Kali Linux is a distribution of Linux operating systems specially designed for cybersecurity tasks such as penetration testing, ethical hacking, digital forensics, etc. It is a powerful and versatile operating system that provides a wide range of tools and resources for security professionals, as well as individuals interested in cybersecurity and ethical hacking.
There are various ways to install Kali Linux:
- Install Kali Linux on VMware.
- Dual-boot installation of Kali Linux.
- Replace the current OS with Kali Linux.
I will show you the 3rd method of how to install Kali Linux on your computer in this comprehensive guide.
Requirements to Install Kali Linux
- A laptop or PC with at least 20GB of storage space.
- A USB flash drive of 8 GB or above.
- RAM 2GB.
- A PC with a 64-bit/32-bit/ARM64 processor of minimum 1GHz clock speed.
What is Kali Linux?
Kali Linux is an open-source distribution of Linux designed for cybersecurity purposes. It’s a Debian-based Linux distribution that provides a wide range of tools and resources for ethical hackers, and security professionals. Kali Linux comes equipped with an extensive arsenal of security testing tools.
Moreover, Kali Linux undergoes development within a highly secure environment, where a limited number of trusted individuals have the privilege to contribute, and each package is authenticated through the developer’s signature. In particular, Kali features a specialized kernel modified to support injection.
Install Kali Linux on Windows/MacOS
The process of installing Kali Linux on Windows or any other OS comprises three essential steps. This includes downloading Kali Linux’s ISO file, making a bootable device with the ISO file, and finally, proceeding to install Kali Linux. Follow the below detailed steps to successfully install Kali Linux on your computer:
1. Back-up Your Data
While replacing your current OS with Kali Linux, make sure you have a backup of your important files to prevent data loss before proceeding to the installation steps.
2. Download the ISO File
After backing up data, the next step of installing Kali Linux is to download Kali Linux’s iso file from its official website. Choose the processor bit according to your PC hardware. I’m downloading a 64-bit installer of Kali Linux 2023.23 Changelog.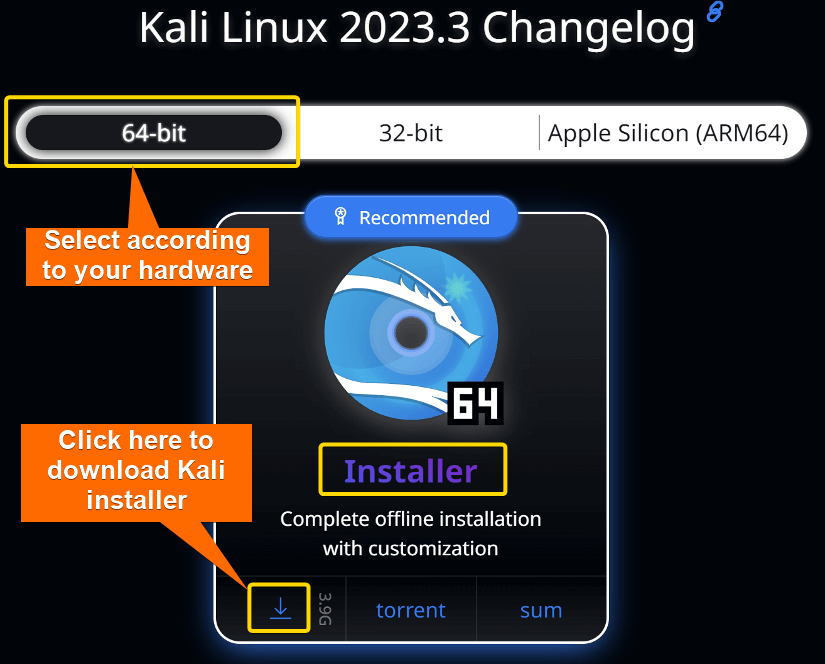
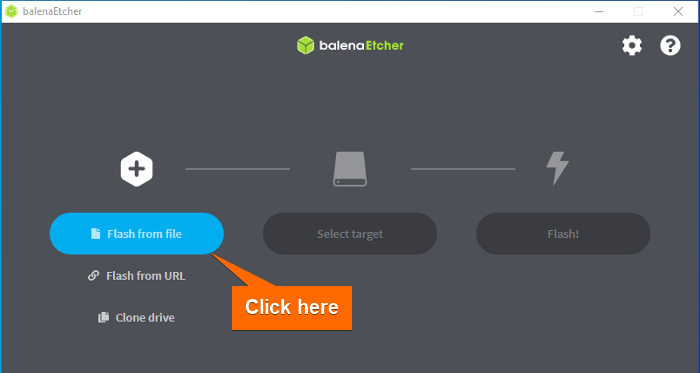
3. Create a Bootable Drive
To create a bootable USB flash drive with the ISO file, I’ll use Etcher which is a free and open-source application. First, Install Etcher on Windows or MacOS. Then, follow these steps to learn how to use Etcher to create a bootable drive for installing Kali Linux:
- Open Etcher and select “Flash from File”.

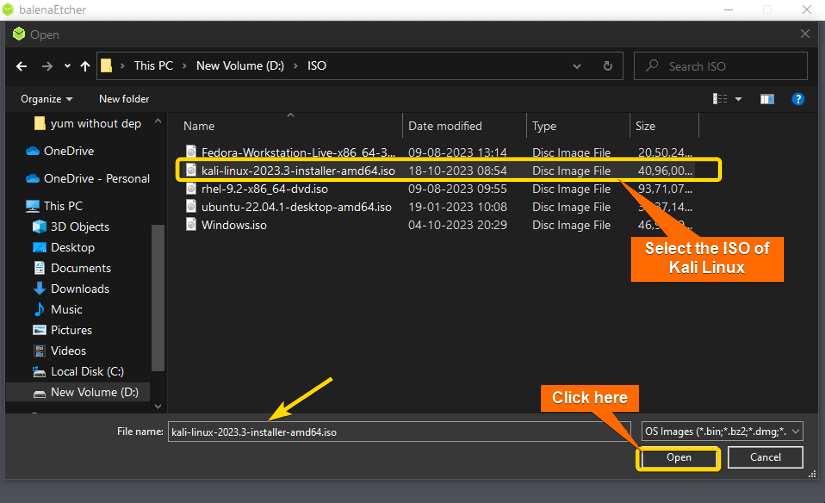
- Select the ISO file from the location you’ve downloaded.

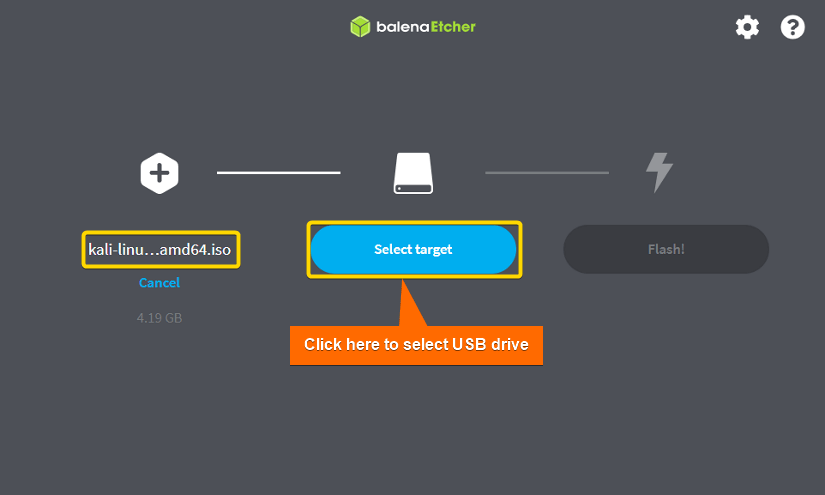
- Plug in your USB pen drive to the PC.
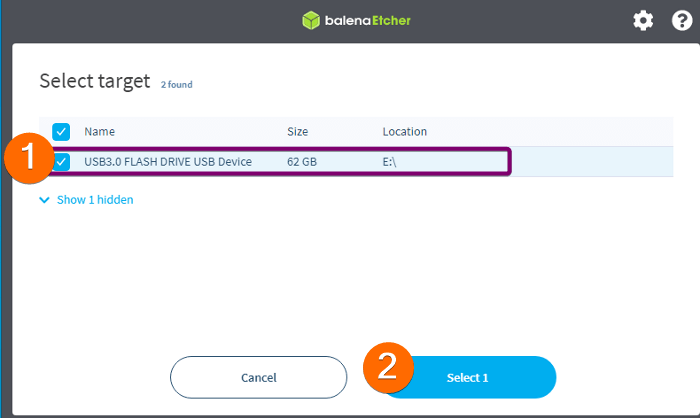
- Click on Select target.

- Select your USB drive.

- Click on Flash to start flashing the ISO file into the USB drive. After that, Etcher will flash the ISO file into your USB drive and make it bootable.

4. Boot Kali Linux From USB Drive
To boot Kali Linux from the USB drive, at first plug the bootable USB drive into the PC where you want to install Debian. Then, turn on/Restart the PC. It will automatically launch the boot window like this.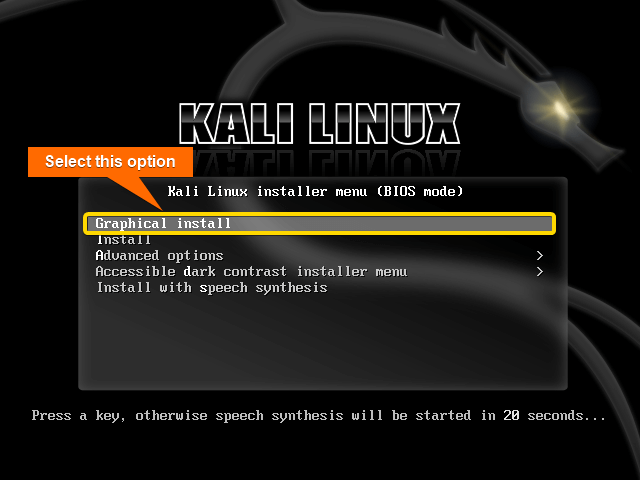 Select “Graphical install” and press ENTER.
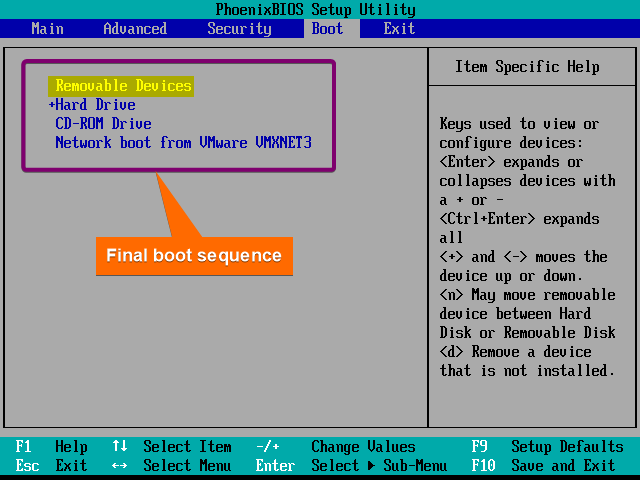 After configuring the boot serial as above, press F10 to save and exit.
5. Select Language
Select a language according to your preference and click on Continue. I’m selecting English.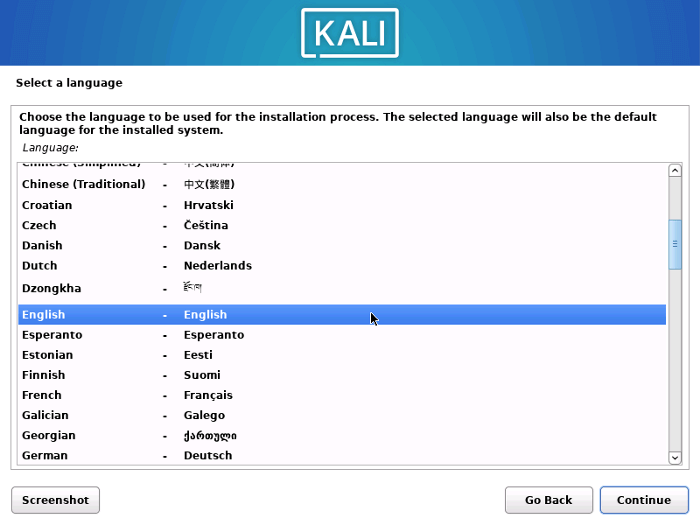
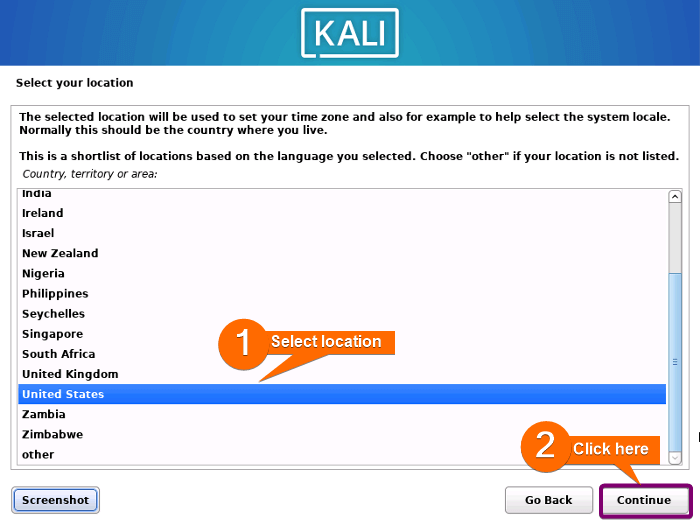
6. Set Location
Select your location.
7. Select Keyboard Layout
From the Configure Keyboard window, select the keyboard layout according to your preference. I’m selecting American English. Then click on Continue.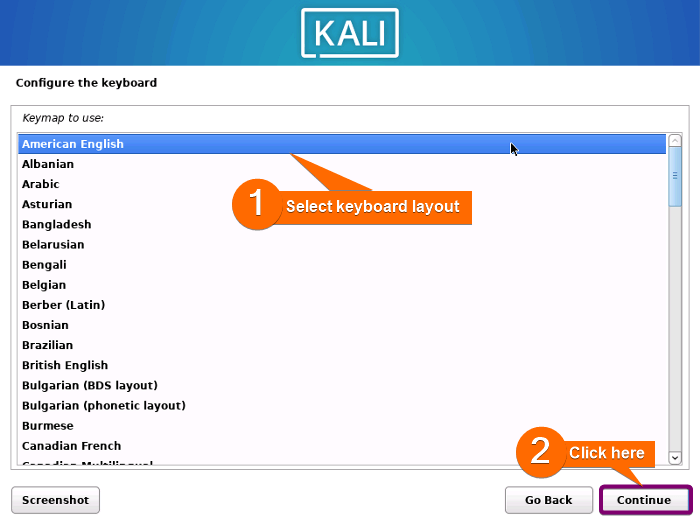
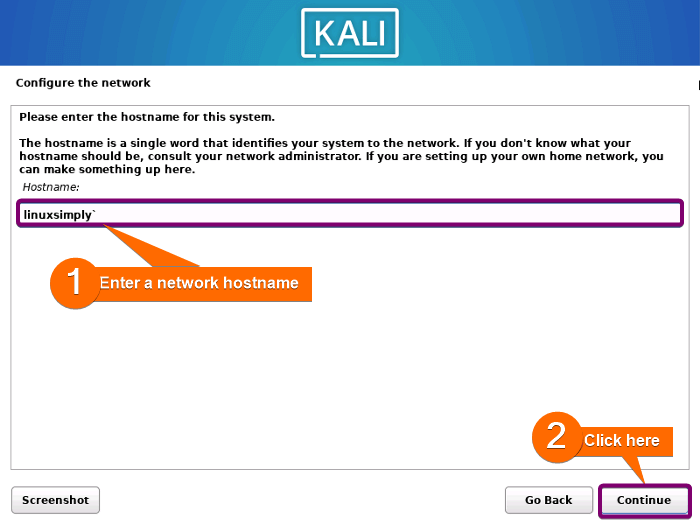
8. Configure the Network
Type a hostname for your Kali Linux system and click on Continue.
 Now, type a domain name for the network. It is the part of your internet address that appears at the right of your hostname. Click on Continue to move to the next step.
9. Create User Credentials
At this stage, you have to create a user account. First, enter your full name and click on Continue.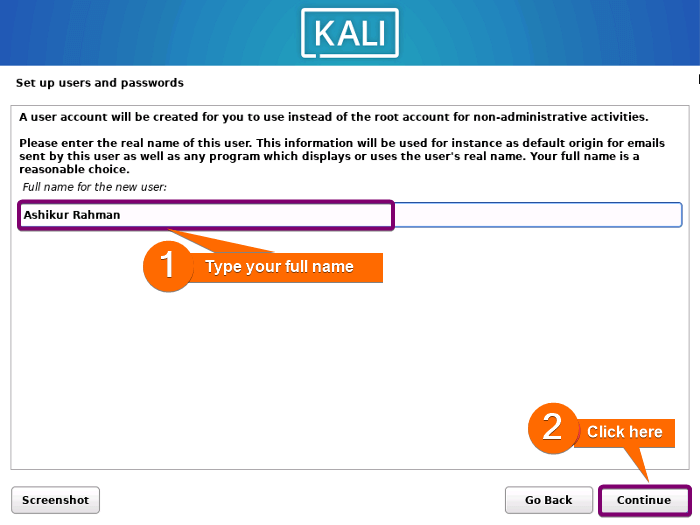 Then, type a short username for your system. By default, it will take the first name from your full name. However, you can keep that or edit it. After that, click on Continue.
 Now, you have to create a password. This password will be required every time you turn on the PC. So, use a strong and mnemonic password. Finally, click on Continue to move to the next step.
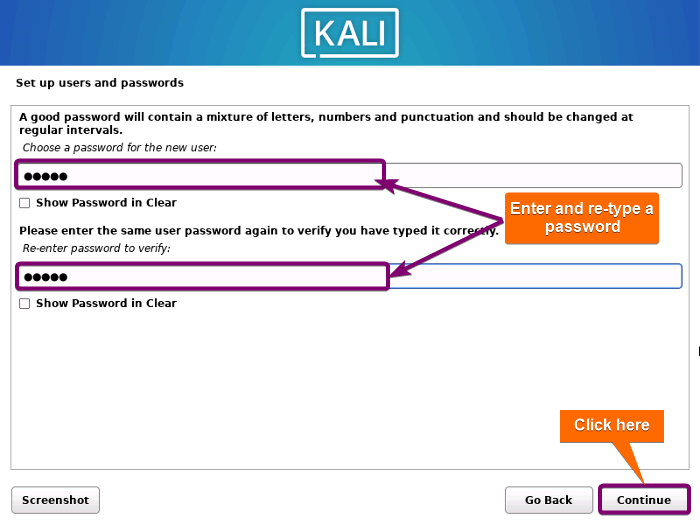
10. Select Time Zone
Select your time zone and click on Continue.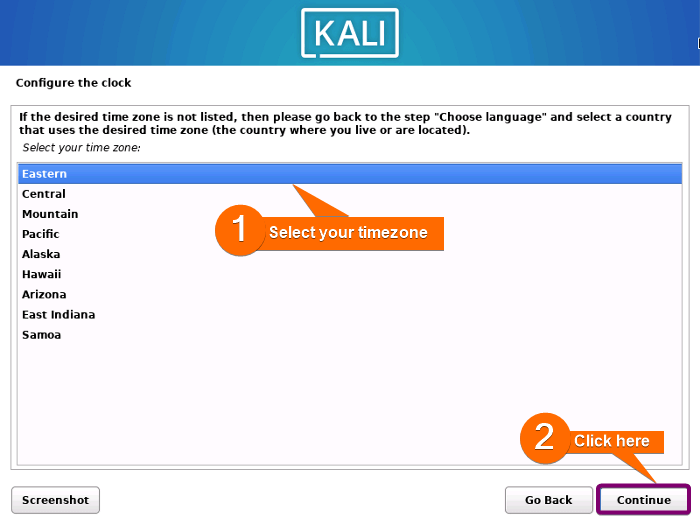
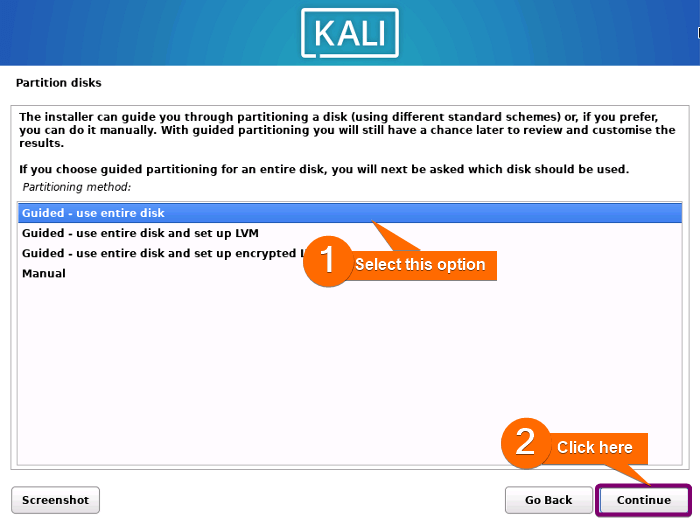
11. Set up the Disk Partition
When installing Kali Linux, it’s important to create appropriate disk partitions to ensure the operating system functions smoothly. Follow the steps below to partition the disk most easily:
- To partition the disk, select “Guided partitioning” as shown below.

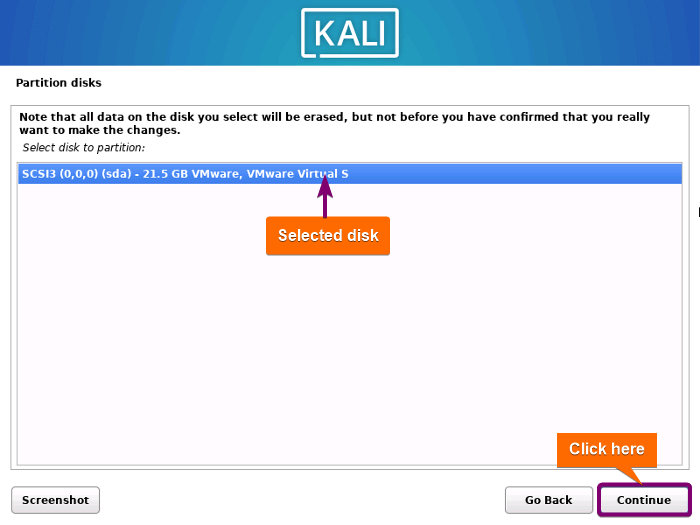
- Select the disk that appears for partitioning and click on Continue.
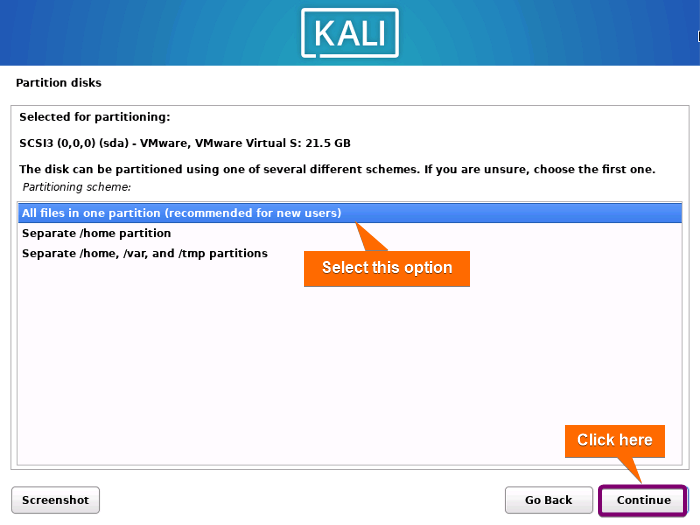
Warning: It will erase the disk of your current system and install Kali in your system. Make sure you have a backup of your important files before proceeding to the next step. - Now, choose “All files in one partition” as a partitioning scheme.
- Here, a prompt shows the summary of the configured partition. Click on Continue.
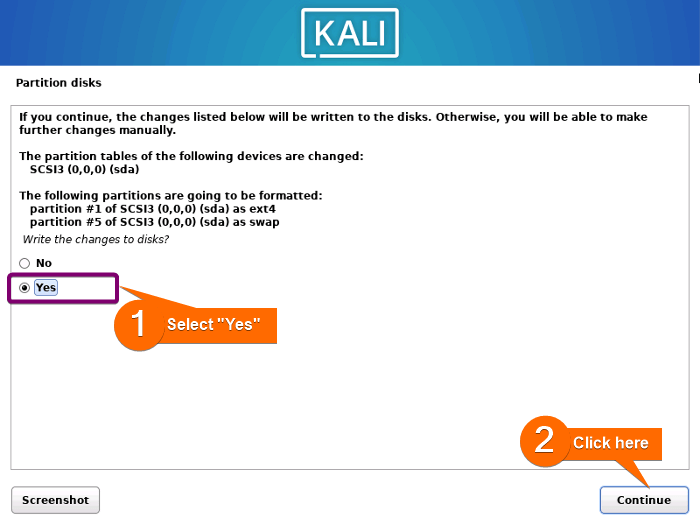
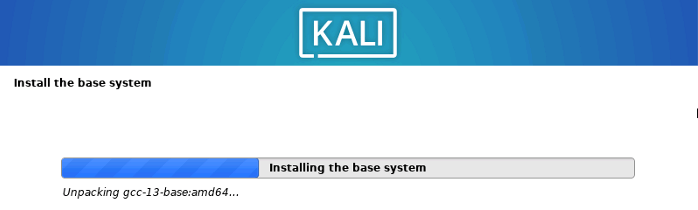
- Check the “Yes” option and click on Continue to confirm writing the changes to the disks mentioned in the prompt. Then installation of the base system starts and the screen appears like the image below. It will take some time. So wait for a while.


12. Software Selection for Installation
At this point, select the software you want to install while installing Kali Linux. I’ve selected the software for installation as the below image shows. After a little time, all the checked software will be installed in your Kali Linux system.
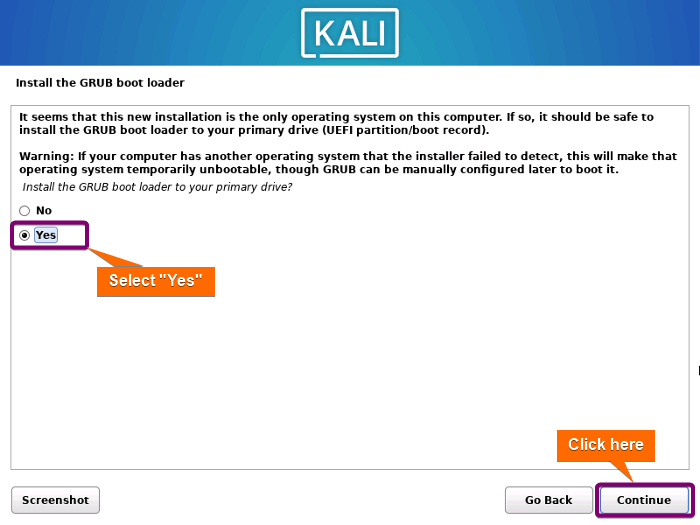
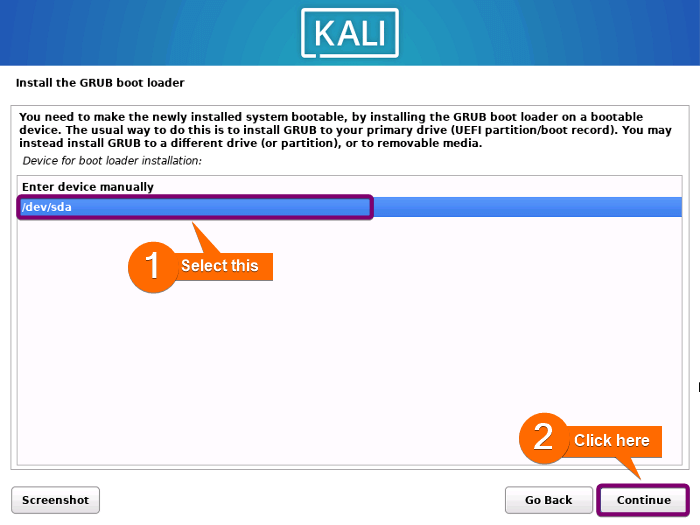
13. Install the GRUB Bootloader
Now, follow the below steps to install the GRUB bootloader:
- Check the “Yes” option and click on Continue.
- Select ‘/dev/sda’ as the boot loader device to install GRUB and click on Continue. After that, it installs GRUB and starts to finish the OS installation.

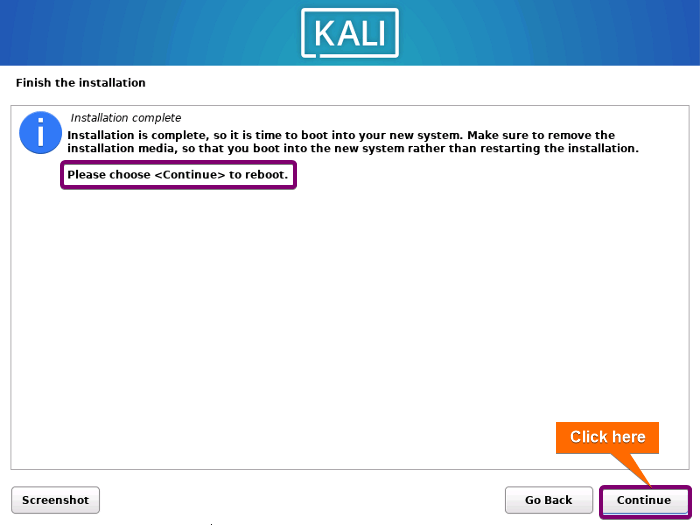
- Click on continue after finishing the installation to reboot your computer.
 After that, it installs GRUB and starts to finish the OS installation.
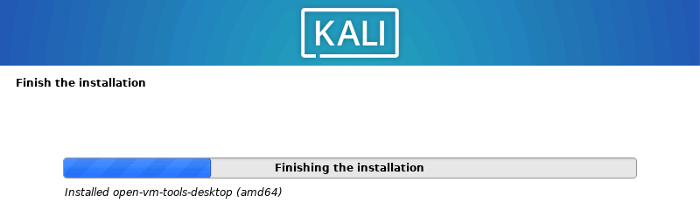
14. Start Using Kali
Finally, a login prompt appears. Type your username and password and click on Log In.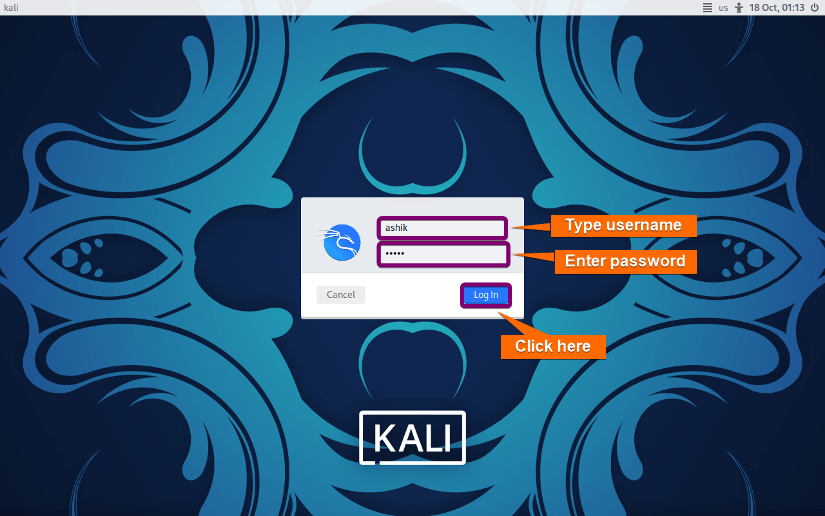 After logging in, the Kali Linux desktop appears on your screen.
 Congratulations! You have successfully installed Kali Linux on your computer.
Advantages of Installing Kali Linux
Some advantages of installing Kali Linux are:
- Tools: Kali Linux comes with a vast array of security assessment tools pre-installed. These include port scanning (Namp), testing wireless LANs (Aircrack-ng), web application security scanners (Burp Suite), and many other vulnerability assessment, password cracking, and forensic analysis
- Customization: Kali Linux is highly customizable and allows users to tailor the installation to their specific needs. This means you can install only the necessary tools, reducing the system’s footprint.
- Security and Privacy: Kali Linux is designed with security in mind, with features like full-disk encryption, strong password policies, and secure development It also supports anonymity through tools like “Tor” and “VPNs”.
- Updates: Kali Linux maintains and receives regular updates to ensure the latest security tools and improvements.
- Virtualization and Container Support: Kali Linux is suitable for running within virtual machines and containers, making it a versatile choice for various environments.
- Community and Support: Kali Linux has a large and active community of users and developers. Users can seek help, share knowledge, and find solutions through forums, mailing lists, and other community resources.
These benefits, combined with the active community have contributed to Kali’s widespread popularity and adoption across various use cases.
Conclusion
Kali Linux is a specialized distribution intended for ethical hacking and penetration testing. By following this guide, you can set up Kali Linux on your PC quickly and easily. Use it responsibly and within the bounds of the law, adhering to ethical hacking and responsible disclosure practices.
People Also Ask
How to setup Kali Linux?
Setting up Kali Linux involves several steps, from downloading the ISO file to configuring the system after installation. Follow the below steps to setup Kali Linux:
- Download the ISO File.
- Create a Bootable Drive.
- Boot Kali From USB DriveStart Installation.
- Start Installation and Set Following Installation Options:
- Select Language.
- Set Location.
- Select Keyboard Layout.
- Configure the Network.
- Create User Credentials.
- Select Time Zone.
- Set up the Disk Partition.
- Software Selection for Installation.
- Install the GRUB Bootloader.
- Complete Installation and Reboot.
What are the applications of Kali Linux?
Kali Linux stands out as a top choice for conducting cybersecurity and information security tasks. Users choose Kali Linux due to its powerful security assurance. If you have an interest in ethical hacking or desire to learn the art, you’ve undoubtedly come across Kali Linux. This operating system,
- Includes 600+ essential penetration testing tools for ethical hacking, vulnerability assessment, and security testing tasks.
- Is highly customizable for diverse cybersecurity tasks; users can modify tools, configurations, and scripts to suit their needs.
- Is multilingual, offering global accessibility for users from diverse regions.
- Supports various wireless devices, which is ideal for Wi-Fi security assessments like penetration testing and monitoring.
- Prioritizes security and reliability, developed in a secure environment, and features packages signed by trusted developers for authenticity.
- Supports vital wireless security tests with easy packet injection.
Can I run Kali Linux from a USB pen drive?
Yes, you can run Kali Linux from USB by pressing the live boot option key (F12) and selecting the USB drive from the list. But it is easier to infect your system with malware if you use an untrusted USB drive for running Kali Linux.
Can I download Kali Linux for free?
Yes, Kali Linux is an open-source and free-to-use distribution of Linux operating systems. It is totally free to download, use and modify. However, only verified authors can directly contribute to the Kali Linux system.
Is Kali Linux safe?
Yes, Kali Linux is very safe if you use it with official verified software. It is recommended to follow the official documentation. Overall, it is safe and useful if you use it responsibly and within the bounds of the law, adhering to ethical hacking and responsible disclosure practices.
What is Kali Linux used for?
Kali Linux is used for cybersecurity and digital forensic purposes generally. It comes equipped with an extensive arsenal of more than a thousand testing tools for vulnerabilities and penetration testing. Also, Kali Linux is used for web servers, desktop OS, and development purposes.
Related Articles
- How to Install Debian 12 (Bookworm) [A Complete Guide]
- How to Install Ubuntu [Step by Step]
- How to Install Ubuntu Server?
- How to Install Kubuntu [A Step-by-Step Guide]
- How to Install Lubuntu [Step-by-Step]
- How to Download & Install Xubuntu [Easiest Guide]
- How to Install Linux Mint 21.2 Victoria [Easy Guide]
- How to Install Zorin OS 16 [Easiest Guide]
- How to Install Red Hat Enterprise Linux [Simple Guide]
- How to Install Fedora [A Step-by-Step Tutorial]
- How to Install CentOS 9 [Easiest Guide]
<< Go Back to Linux OS Single Installation | Linux OS Installation Guide | Learn Linux Basics
FUNDAMENTALS A Complete Guide for Beginners


