Xubuntu, a popular Linux distribution, is renowned for its lightweight design efficiency, and user-friendly interface. Built on the Ubuntu base, it features the XCFE desktop environment, balancing performance and aesthetics perfectly.
If you’re intrigued by the idea of embracing Xubuntu’s speed and user-friendly interface, this step-by-step guide will walk you through the seamless process of installing Xubuntu on your system.
Requirements to Install Xubuntu
- Intel or AMD 64-bit processor.
- Minimum 1 GB of memory (2 GB recommended).
- 6 GB of free hard disk space ( 20 GB recommended).
- 16 GB USB drive.
Steps to Install Xubuntu
Before Xubuntu installation, make sure to create a backup of your data as the installation of a new operating system has the potential to compromise your crucial information.
To install Xubuntu, adhere to the following steps:
Step 1: Download the ISO File
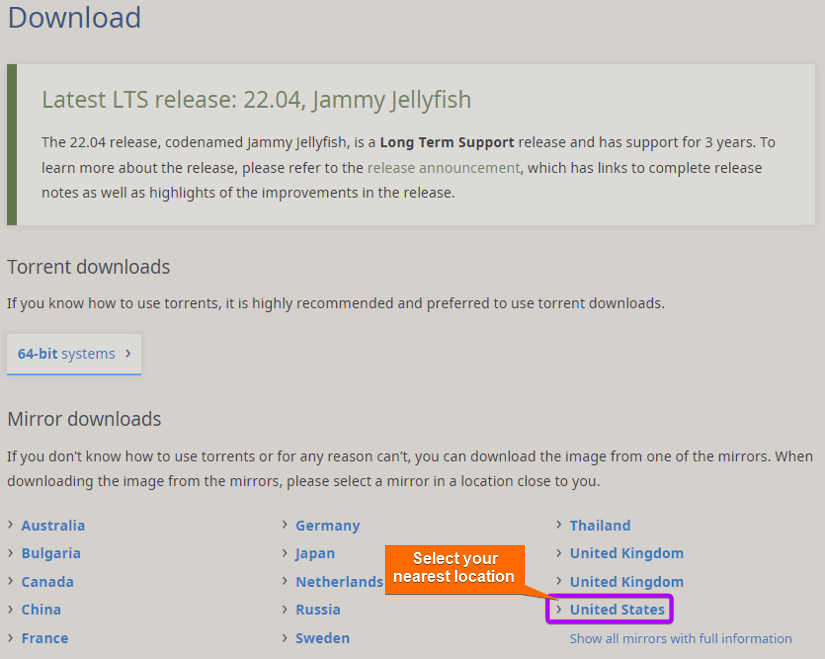
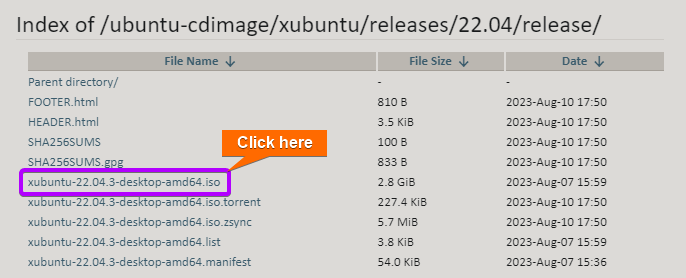
- Visit the official Xubuntu website and select the location closest to yours.

- Now, click on the ISO file to start downloading.

Step 2: Create a Bootable Media
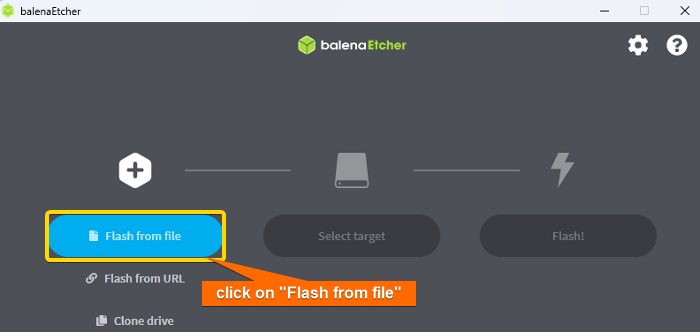
You can use Etcher, an open-source application, to generate a bootable USB drive from the ISO file.
- Start by installing Etcher on either Windows or MacOS. Once installed, open the application and select the “Flash from File” option.

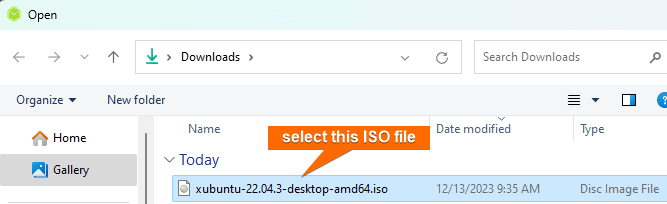
- Select the downloaded ISO file of Xubuntu.

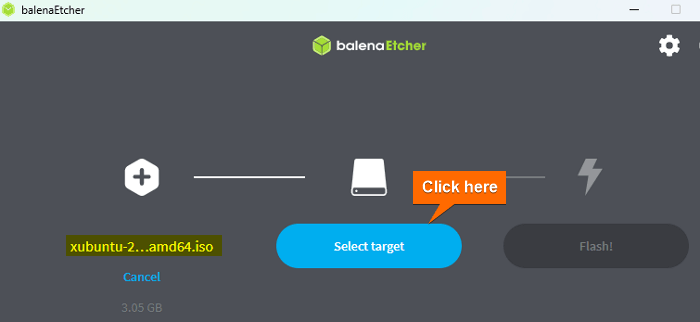
- After that, connect your USB pen drive to the computer and click on “Select target”.

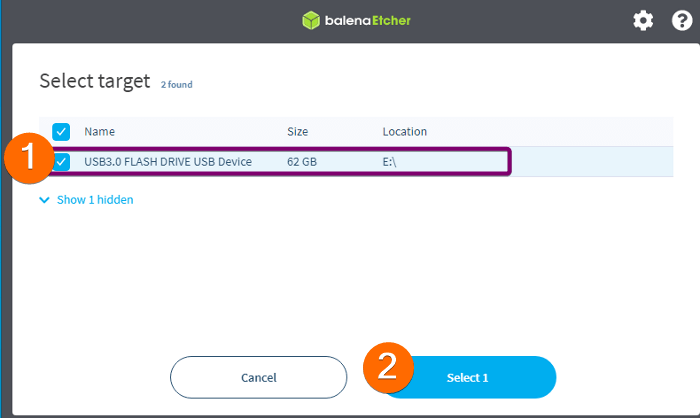
- Select your USB drive from the list.

- Finally, click on Flash to start the ISO file on the USB drive.

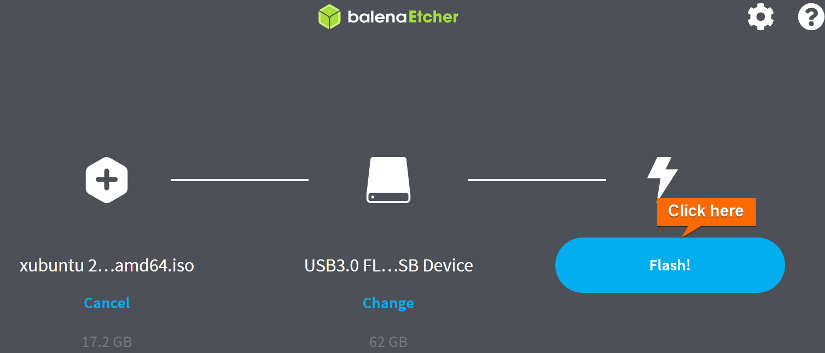
After that, Etcher will proceed to transfer the contents of the ISO file to your USB drive, effectively making it bootable.
Step 3: Boot Xubuntu From USB
To initiate Xubuntu from a USB drive, follow the steps outlined below:
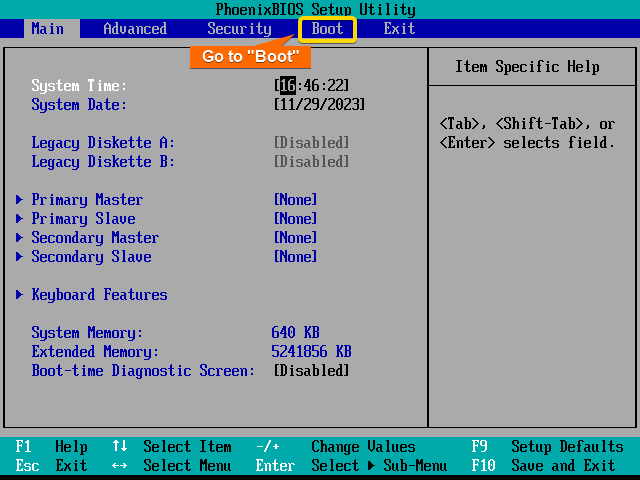
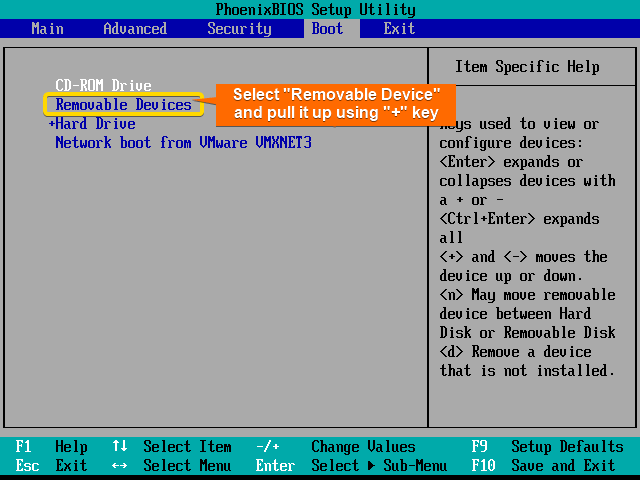
- Start by inserting the USB drive containing the bootable setup into the computer. Subsequently, power on or restart the computer, and the boot window will appear automatically. Utilize the RIGHT ARROW key to navigate to the Boot options.

- Keep the cursor on “Removable Devices” using the DOWN ARROW key. Now, use the + key to move the “Removable Devices” option to the top.
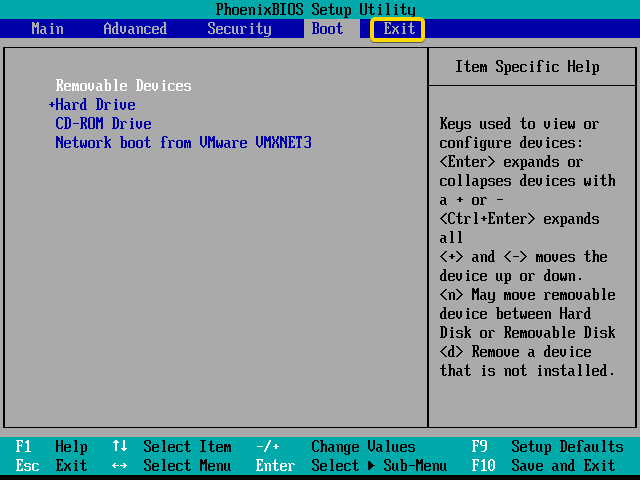
- Navigate to “Exit” using the RIGHT ARROW (or you can press ESC).
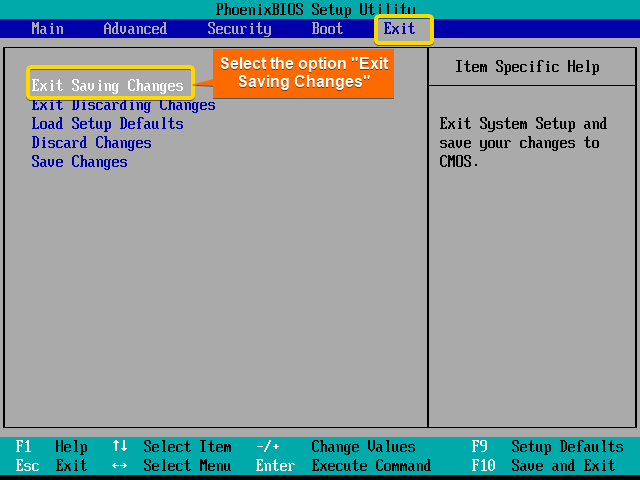
- Keep the cursor on the Exit Saving Changes option. Then, press ENTER.
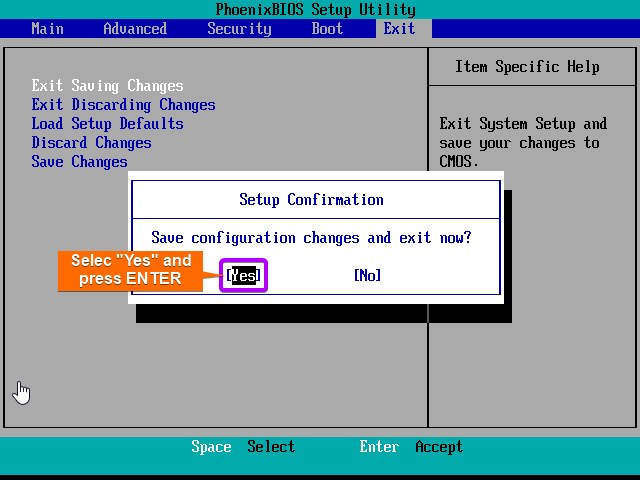
- Select Yes and press ENTER.
- Once booted, the install window will appear on the screen. Here, select “Try or Install Xubuntu”.


Step 4: Choose a Language
Select your preferred language and click on Install Xubuntu. 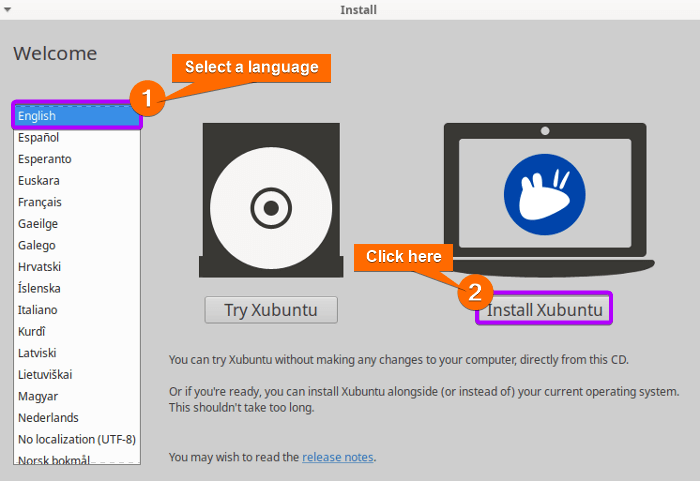
Step 5: Select Keyboard Layout
Choose your keyboard layout and then click on Continue.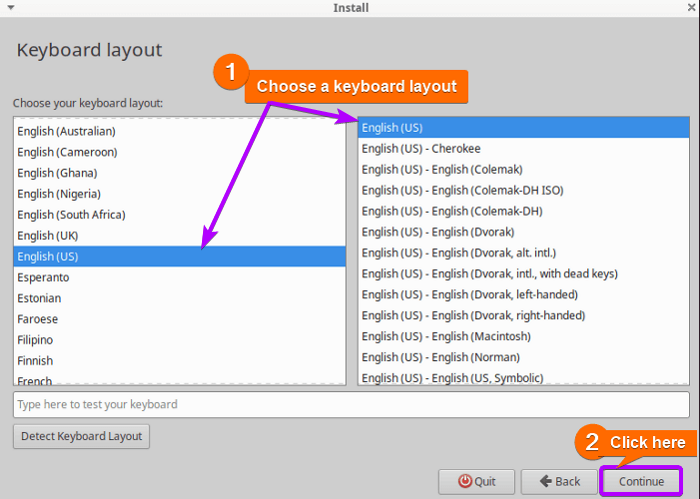
Step 6: Updates and Other Software
Select “Normal installation” and check the option “Download updates while installing Xubuntu”. Then click on Continue. 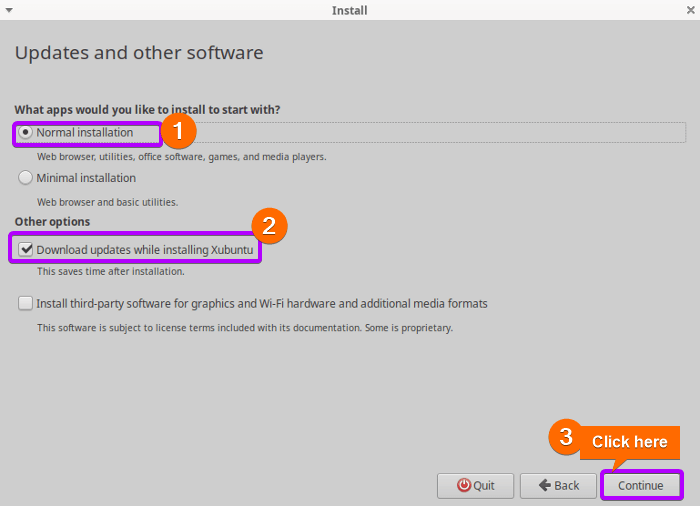
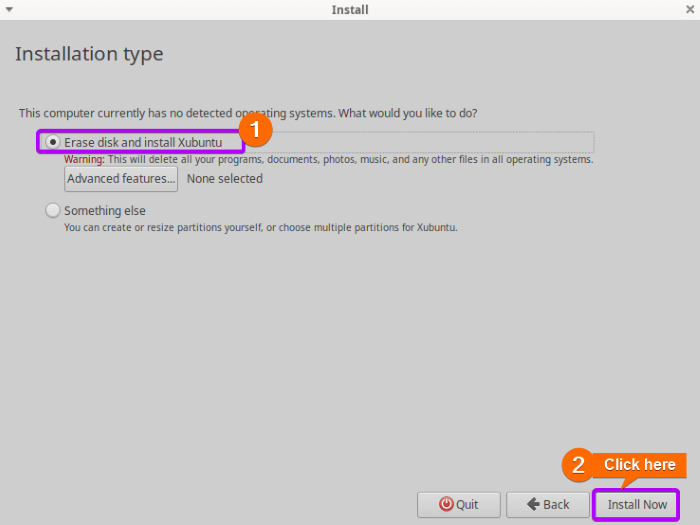
Step 7: Installation Type
- Choose “Erase disk and install Xubuntu” and click on Install Now.

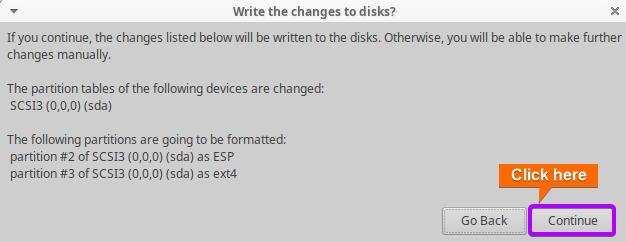
Note: If you want to create or resize partitions yourself or choose multiple partitions for Xubuntu, select Something else option.
- To write the changes to disks, click on Continue.

Step 8: Specify Your Location
Select your location and click on Continue. 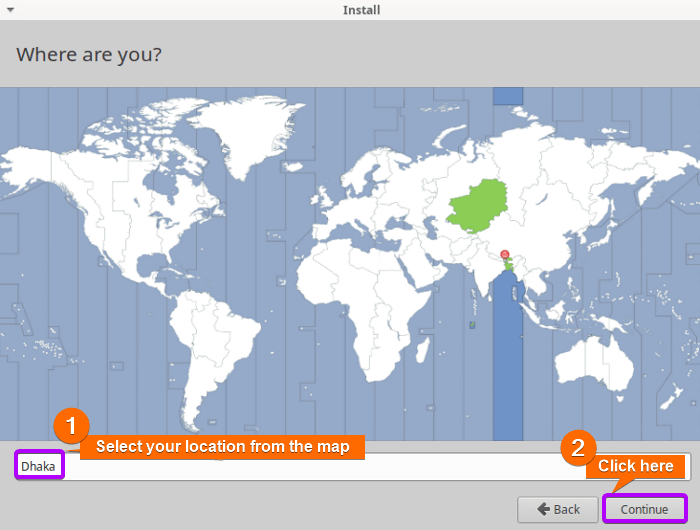
Step 9: Setup User Credentials
To establish your identity, start by entering your name, selecting a username, choosing a password, and setting your computer’s name. Following that, check the “Require my password to log in” option and click on Next. 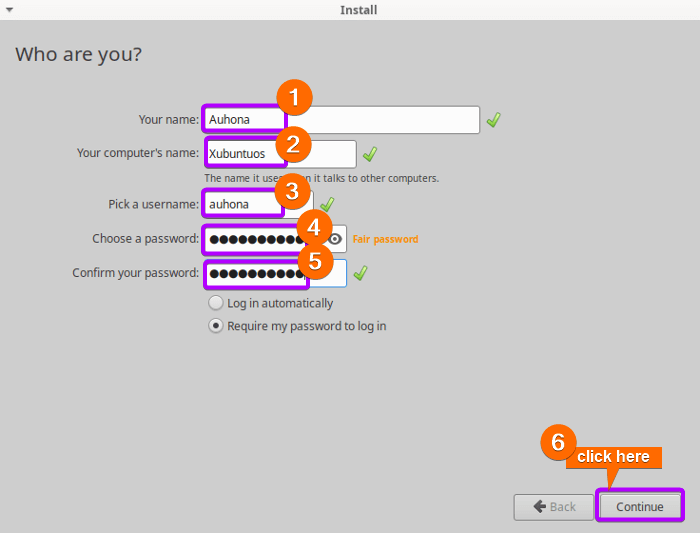
Step 10: Restart the OS
After finishing the installation, click on Restart Now to save the configuration you’ve made. 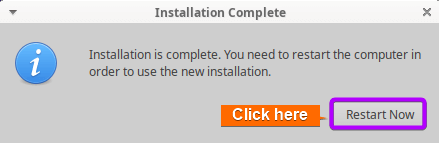
Step 11: Login to the OS
Upon restarting the operating system, input the password you previously created for the user account and press ENTER. 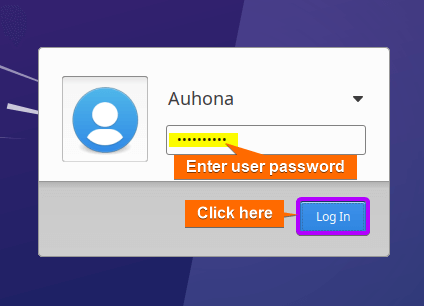 Once you’ve successfully logged into the user account, the Xubuntu desktop environment will become visible.
 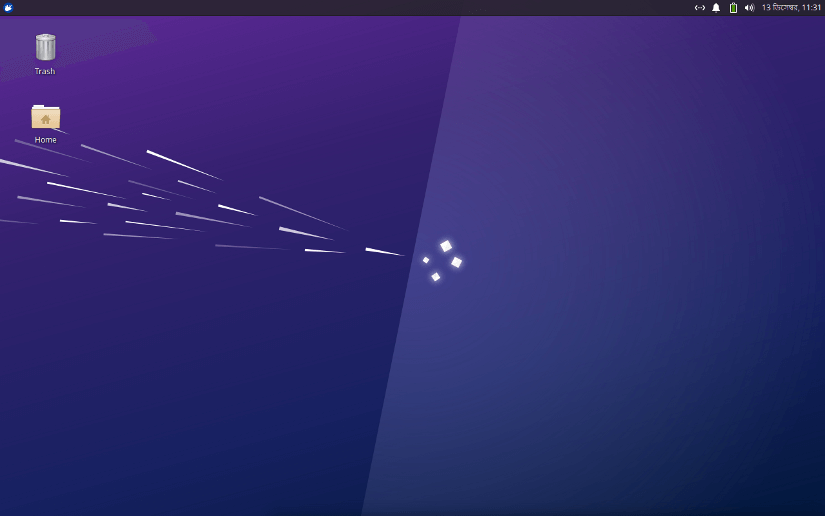 Congratulations! You have successfully installed Xubuntu. Feel free to explore the new operating system and make the most of its delightful features.
Conclusion
In summary, Xubuntu is an excellent choice for users seeking a fast, reliable, and customizable Linux distribution, especially on computers with limited hardware resources. Its focus on simplicity and performance makes it suitable for a wide range of user cases. Whether you’ve opted for Xubuntu due to its excellent performance, you’re now poised to leverage the advantages of this lightweight Linux distribution.
People Also Ask
Is it possible to upgrade from an older version of Xubuntu to the latest release?
Yes, you can upgrade Xubuntu from one release to another. The Update Manager provides an option to upgrade to the latest version when it becomes available. To upgrade from an older version of Xubuntu to the latest release, follow these steps:
- Update the existing system using the following commands:
sudo apt update sudo apt upgrade sudo apt dist-upgrade - Install the update manager using the command:
sudo apt install update-manager-core - Check for new releases using
sudo do-release-upgrade -ccommand. - If a new release is detected, initiate the upgrade process by running:
sudo do-release-upgrade - The upgrade process will prompt you to review the changes and confirm your decision. Press ‘y’ to proceed with the upgrade.
- Restart your system with the command
sudo reboot.
What are the features of Xubuntu?
Here are the features of Xubuntu:
- Xfce Desktop Environment: Xubuntu employs the nimble Xfce desktop environment for a quick and efficient user interface.
- Resource Efficiency: Created to run smoothly on a wide range of hardware, making it perfect for aging or less potent computer systems.
- Customization: Offers a high degree of customization, allowing users to personalize themes, icons, panel layouts, and window manager settings.
- Ubuntu Base: Established on Ubuntu’s stable and secure foundation, offering access to an extensive software repository.
- Application Selection: Includes carefully chosen pre-installed applications, achieving a balance of functionality without overwhelming the system.
- User-Friendly Installer: Includes a user-friendly installer for easy setup, catering to both beginners and experienced users.
Which is better Ubuntu or Xubuntu?
Choosing between Ubuntu and Xubuntu depends on your preferences and hardware. Ubuntu, featuring the GNOME desktop, is modern and visually polished, while Xubuntu, with the Xfce desktop, is lighter and better suited for older or less powerful hardware. Opt for Xubuntu if performance is a priority with aging hardware. But if you value a feature-rich and visually appealing experience, Ubuntu is the preferred choice.
Is Xfce faster than KDE?
Yes, generally, Xfce is considered to be faster than KDE. Xfce, recognized for its lightweight design and efficient resource utilization, is a favored option for users desiring a quicker and more responsive desktop experience, especially on older or less powerful hardware.
What is the difference between the “Try Xubuntu” and “Install Xubuntu” options?
“Try Xubuntu” enables you to run the operating system from the USB drive without installation, while “Install Xubuntu” initiates the installation process allowing you to permanently set up Xubuntu on your computer.
Related Articles
- How to Install Debian 12 (Bookworm) [A Complete Guide]
- How to Install Kali Linux [Step by Step]
- How to Install Ubuntu [Step by Step]
- How to Install Ubuntu Server?
- How to Install Kubuntu [A Step-by-Step Guide]
- How to Install Lubuntu [Step-by-Step]
- How to Install Linux Mint 21.2 Victoria [Easy Guide]
- How to Install Zorin OS 16 [Easiest Guide]
- How to Install Red Hat Enterprise Linux [Simple Guide]
- How to Install Fedora [A Step-by-Step Tutorial]
- How to Install CentOS 9 [Easiest Guide]
<< Go Back to Linux OS Single Installation | Linux OS Installation Guide | Learn Linux Basics
FUNDAMENTALS A Complete Guide for Beginners


These instructions really saved me. I had installed a program on my Xubuntu multi hard drive system from iDrive that trashed the boot. I tried a lot of things and ended up with an even bigger mess. Now i able to boot from the thumb drive and move data files that might be trashed when install xubuntu again. Thank you so much for this clear article!!!
Hey Bonnie, I’m thrilled to hear that the instructions came to the rescue and helped you navigate through the chaos. If you ever find yourself in such a mess again, don’t hesitate to reach out. Hope your Xubuntu experience be a seamless and trouble free adventures! You are most welcome!