Kubuntu is a user-friendly Linux distribution that features the KDE Plasma desktop environment. It provides a sleek and visually appealing interface along with a robust set of applications. As an official Ubuntu flavor, Kubuntu inherits the underlying stability and extensive software support while offering a distinct user interface powered by KDE. Renowned for its refined and user-friendly interface, Kubuntu delivers a smooth and pleasant computing journey.
If you want to know how to install Kubuntu on your system, this comprehensive guide will help you through the step-by-step process.
Requirements to Install Kubuntu
- Minimum 4 GB RAM.
- Minimum 25 GB of hard drive.
- USB drive.
Steps to Install Kubuntu
Before installing Kubuntu, don’t forget to back up your data. Because installing a new OS may harm your important data.
To install Kubuntu follow the steps below:
Step 1: Download the ISO File
Go to the official website of Kubuntu to download the ISO file. 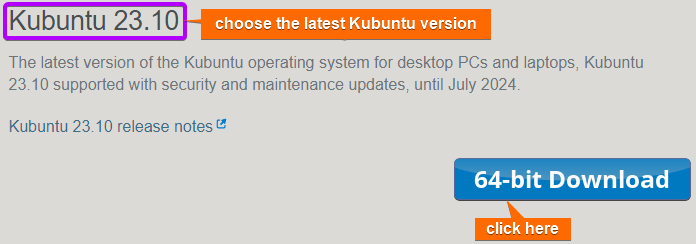
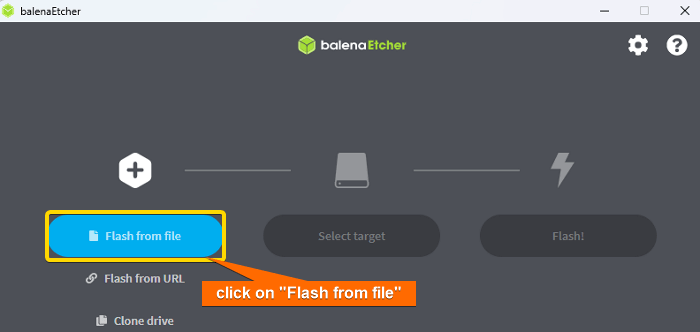
Step 2: Create a Bootable Media
You can use Etcher, an open-source application to create a bootable USB drive from the ISO file.
- First, install Etcher on either Windows or MacOS. After installation, launch the application and choose the “Flash from File” option.

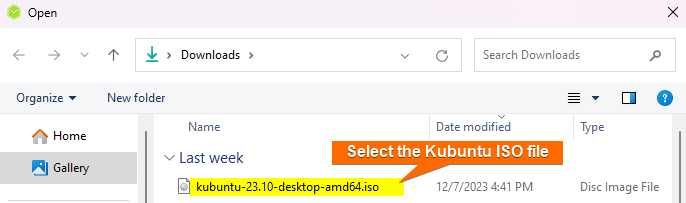
- Now, pick up the ISO file from the downloaded location.

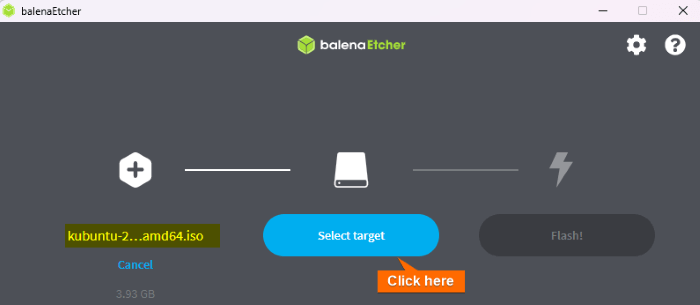
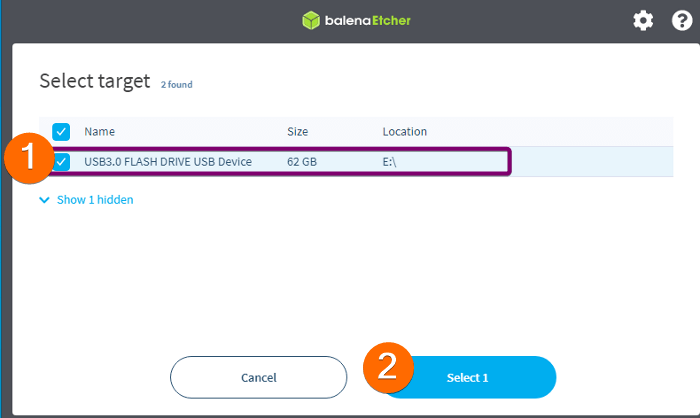
- Then, connect the USB pen drive to your computer and click on “Select target” on Etcher.

- Select the USB drive and click on “Select 1”.

- Lastly, click on Flash! to start the ISO file on the USB drive.

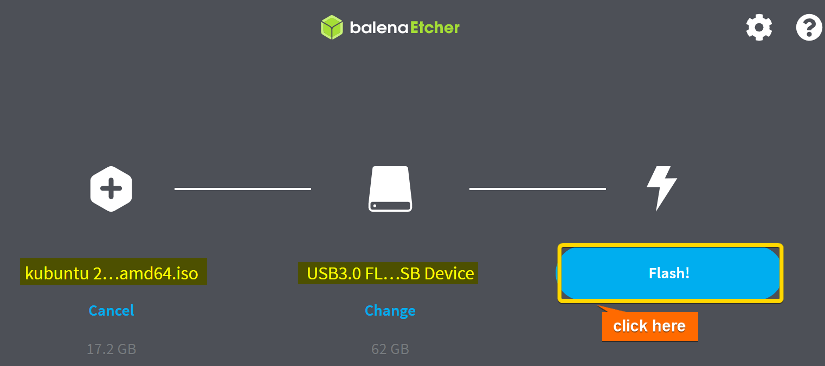
Subsequently, Ethcer will proceed to transfer the data from the ISO file to your USB drive, successfully converting it into a bootable device.
Step 3: Boot Kubuntu from the USB
To boot Kubuntu from USB, follow the steps below:
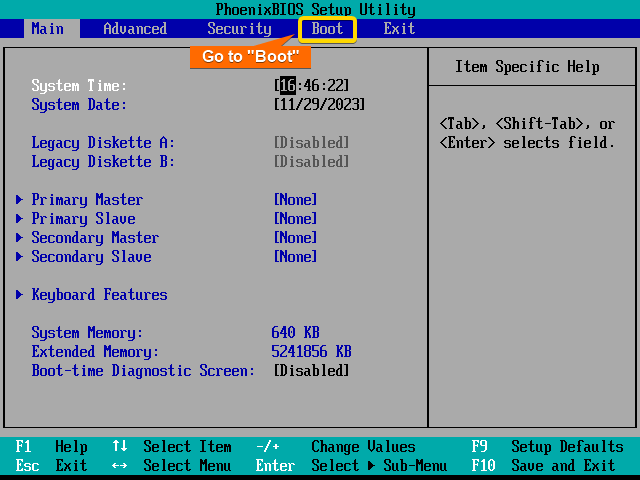
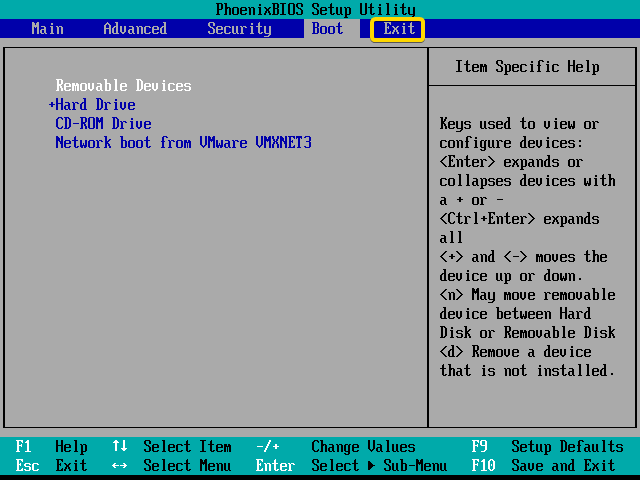
- To begin, insert the USB drive with the bootable setup into the computer. Afterward, power on or restart the computer, and the boot window will appear automatically. Use the RIGHT ARROW key to navigate to the boot options.

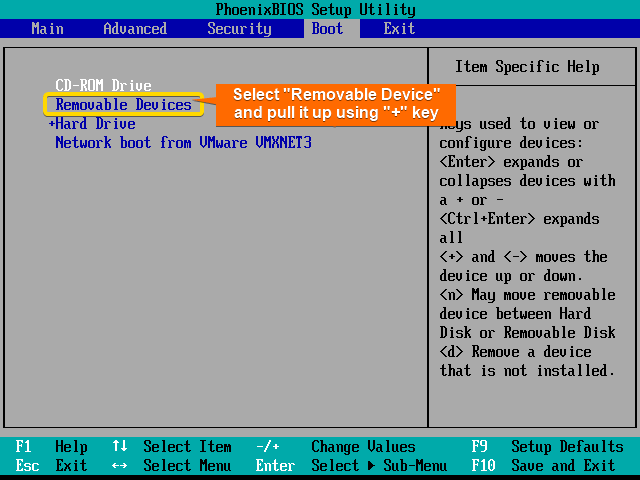
- Keep the cursor on Removable devices using the DOWN ARROW key. Now, use the + key to move the “Removable Devices” option to the top.
- Navigate to Exit by using the RIGHT ARROW (or you can press ESC).
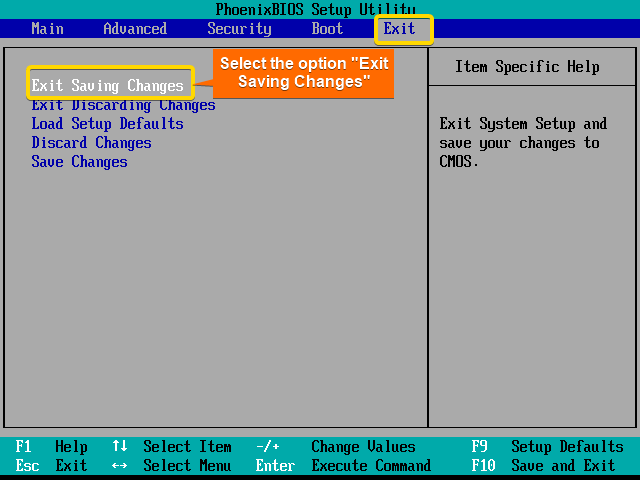
- Keep the cursor on the Exit Saving Changes option. Then, press ENTER.
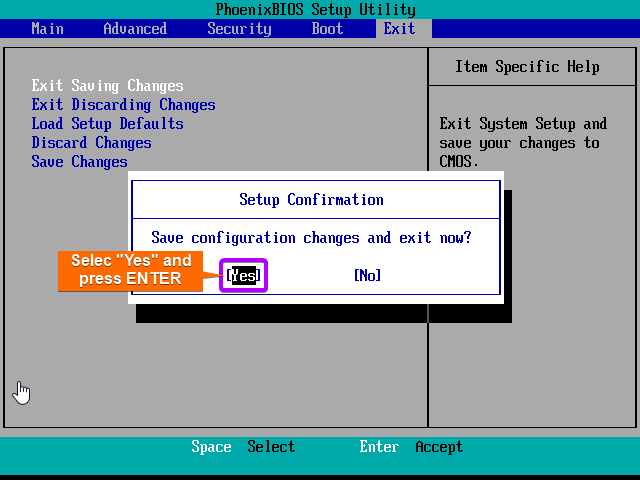
- Select Yes and press ENTER.
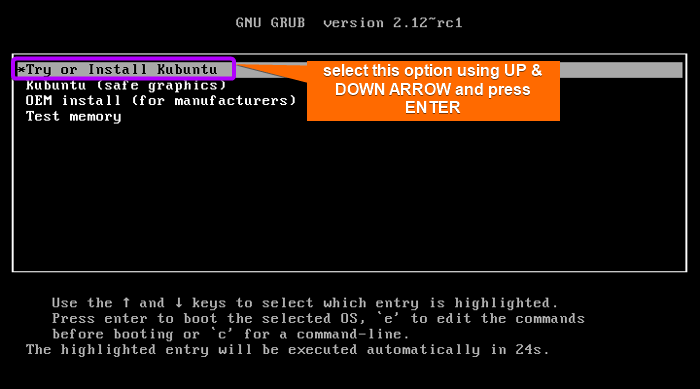
- After booting, the install window will appear on the screen. Here, select “Try or Install Kubuntu”.

Step 4: Choose a Language
Select your preferred language and click on “Install Kubuntu”. 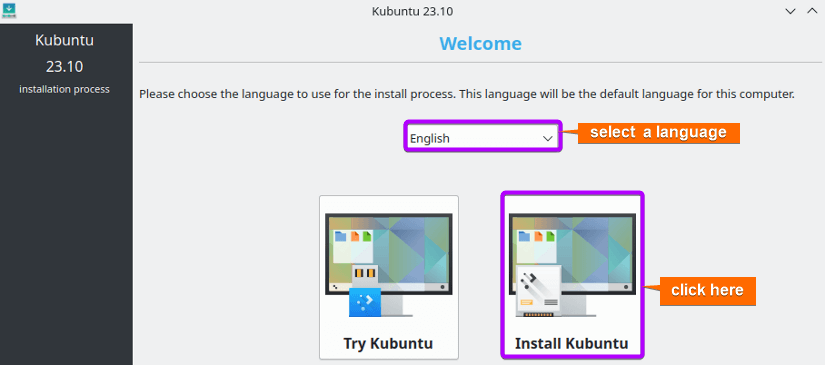
Step 5: Select Keyboard Layout
Choose your keyboard Layout and Variant. Then, click on Continue. 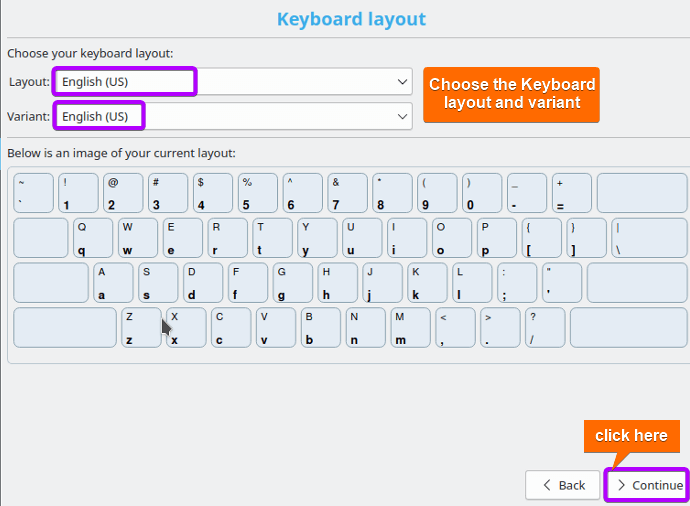
Step 6: Update and Other Software
Choose the “Normal installation” option to install Kubuntu without additional packages after installing the OS. You can check the “Download updated while installing Kubuntu” to install the updates. Lastly, click on Continue. 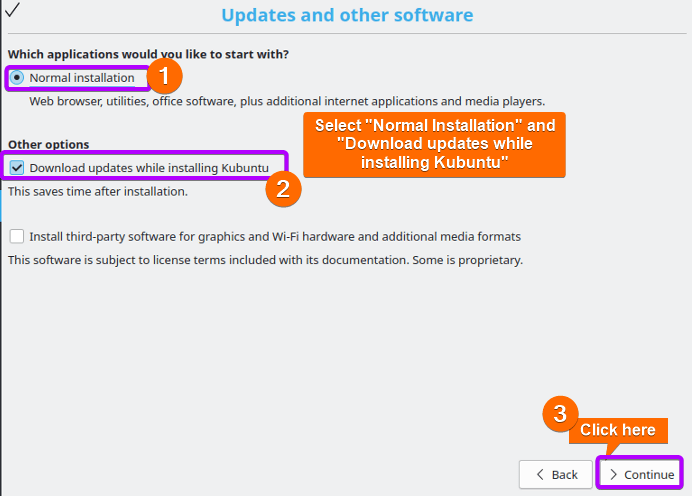
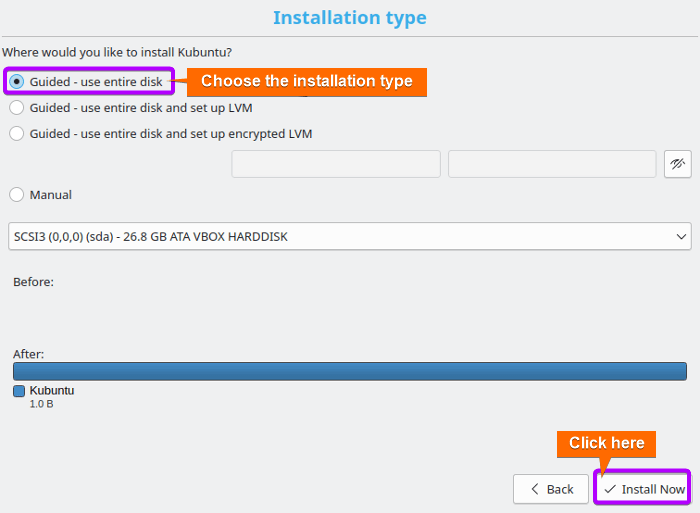
Step 7: Choose Installation Type
- Select the option “Guided use entire disk” to use the whole hard disk to install Kubuntu. Then click on Install Now.

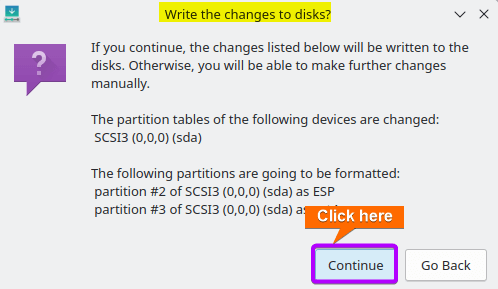
Note: Choose “Guide uses entire disk and set up LVM” to install Kubuntu with LVM, or opt for “Guide uses entire disk and set up encrypted LVM” to encrypt the installation hard disk. Alternatively, select the “Manual” option to manually create partitions.
- To write the changes to disks, click on Continue.

Step 8: Specify Your Location
To specify your location, choose your Region and Timezone. Then, click on continue. 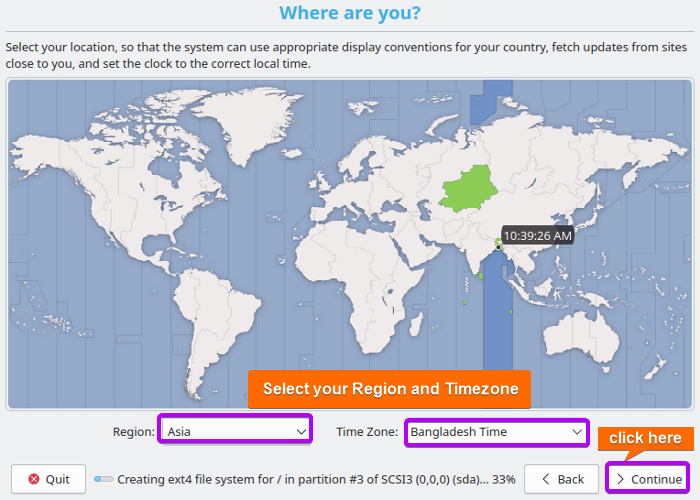
Step 9: Setup User Credentials
To provide your identity, first write your name, pick a username, choose a password, and set your computer’s name. Afterward, check the “Require my password to log in” option and click on Continue. 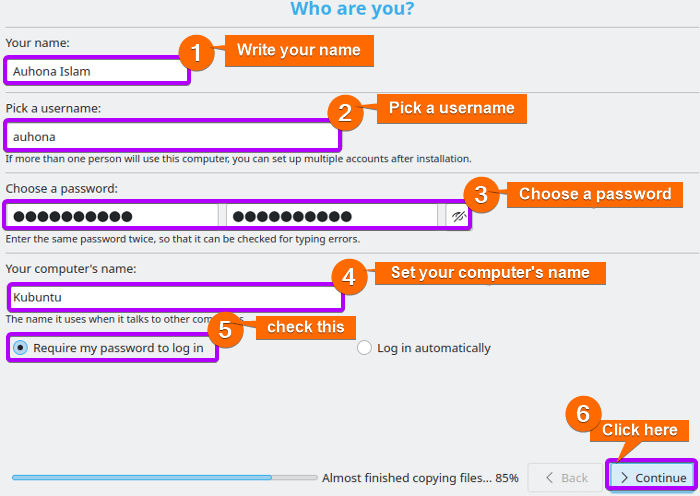
Step 10: Restart the OS
After finishing the installation, click on Restart Now to save the configuration you’ve made. 
Step 11: Login to the OS
After restarting the OS, enter the password previously created for the user account and press ENTER. 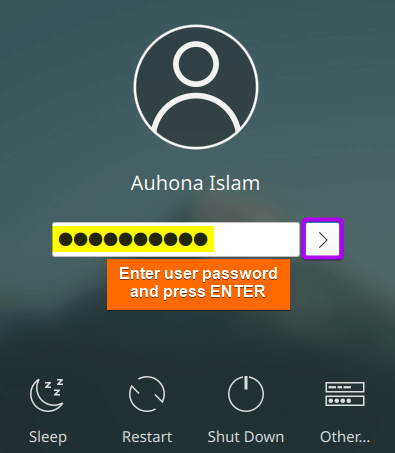 Upon logging into your user account, you’ll be greeted by Kubuntu OS.
  Congratulation! You have completed the installation of Kubuntu successfully Feel free to explore the new system and take advantage of its delightful features.
Conclusion
In conclusion, installing Kubuntu involves a straightforward process that begins with preparing your system and creating a bootable USB drive. The flexibility of choosing different installation options, such as LVM or encrypted LVM, adds a layer of customization to suit individual preferences. Whether you are a Linux enthusiast or a newcomer, Kubuntu stands out as an excellent choice, offering a user-friendly interface with the power of the Ubuntu base.
People Also Ask
What is the difference between Kubuntu and Ubuntu?
Kubuntu, a counterpart to Ubuntu, diverges in its desktop environment. Unlike Ubuntu’s GNOME, Kubuntu adopts the KDE desktop environment, featuring a layout reminiscent of Windows. This distinction allows users to experience a unique interface while benefiting from the underlying Ubuntu system.
How to install a program in Kubuntu?
To install a program in Kubuntu, use the command sudo apt-get install program_name. Replace “program_name” with the actual name of the program you want to install. Enter your password when prompted, and the package manager will handle the installation process.
Is it possible to customize the KDE Plasma desktop environment after installation?
Yes, you can extensively customize the KDE Plasma desktop, including themes, widgets, and desktop layouts, to suit your preferences.
Can I upgrade to a newer version of Kubuntu after installation?
Yes, you can upgrade to a newer release of Kubuntu using the built-in package management tools. To do that, run the command sudo do-release-upgrade command. This command fetches the latest release and guides you through the upgrade process, ensuring your system is updated to the newest version of Kubuntu.
How to switch from Ubuntu to Kubuntu?
To switch from Ubuntu to Kubuntu, follow the steps below:
- Open the Ubuntu terminal and run the command sudo apt-get update.
- Then, install the KDE Plasma desktop environment by running
sudo apt install kubuntu-desktopcommand. - During the installation, you’ll be prompted to choose between the default display manager (usually ‘sddm’) and the one currently in use. Select SDDM and press ENTER.
- After the installation is complete, you can configure the default application. For that, navigate to System Settings > Applications > Default Applications.
- Log out of your current session and restart your system.
- On the login screen, click the gear icon or similar option to select your desktop environment. Choose Plasma or KDE Plasma from the list.
- Log in and you’ll be using the KDE Plasma desktop environment.
Related Articles
- How to Install Debian 12 (Bookworm) [A Complete Guide]
- How to Install Kali Linux [Step by Step]
- How to Install Ubuntu [Step by Step]
- How to Install Ubuntu Server?
- How to Install Lubuntu [Step-by-Step]
- How to Download & Install Xubuntu [Easiest Guide]
- How to Install Linux Mint 21.2 Victoria [Easy Guide]
- How to Install Zorin OS 16 [Easiest Guide]
- How to Install Red Hat Enterprise Linux [Simple Guide]
- How to Install Fedora [A Step-by-Step Tutorial]
- How to Install CentOS 9 [Easiest Guide]
<< Go Back to Linux OS Single Installation | Linux OS Installation Guide | Learn Linux Basics
FUNDAMENTALS A Complete Guide for Beginners


You content has really helped me to install kubuntu.
Thanks.
Hi Kevin,
I’m glad that the guide assisted you to install Kubuntu. You are welcome. If you need any help, don’t hesitate to ask.