NFS or Network File System is a distributed file system protocol that enables a client to handle files and folders over a network as if they were mounted locally. Developed in 1980 by Sun Microsystems, this versatile protocol provides benefits such as centralized storage, local access to remote files, and file backup.
Moreover, its fast operation speed and allowing multiple clients to access resources simultaneously make it a preferred choice for managing small to mid-sized files. I will walk you through a step-by-step process on how to configure NFS Server in Linux, helping you to share files easily across LAN.
Key Takeaways
- Gaining a clear concept of NFS (Network File System).
- Knowing how to install and configure NFS server.
- Learning how to access shared files through NFS client.
Requirements
- The user must have sudo/root privilege.
- The user must have a text editor.
Process Flow Chart
[Distro Used Throughout the Tutorial: Ubuntu 22.04.02 LTS]
Watch 5 Steps to Configure NFS Server in Linux
Step-by-Step Process to Configure NFS Server in Linux
Based on a server-client model, the NFS server is mainly responsible for exporting directories for remote NFS clients to access them and treat them like local resources. NFS server offers essential features such as handling client requests, managing file access and controlling data transfer.
Setting up an NFS server includes installing the package, configuring exported directories and managing access control permissions.
Step 1: Install NFS Server in Linux
Go through the instructions below to know how to install NFS server on a Linux machine.
Steps to Follow >
➊ Open your Ubuntu terminal.
➋ Install NFS server by executing the following command in your terminal.
sudo apt install nfs-kernel-server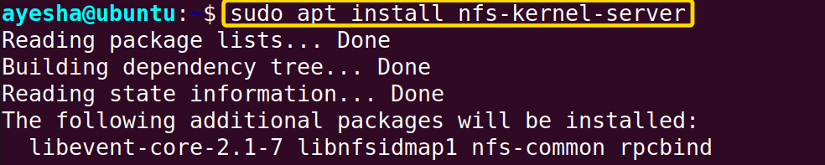 ➌ Afterwards, it is crucial to enable NFS service.
sudo systemctl enable --now nfs-server- systemctl: Manages system services, along with starting, stopping, and checking the status of services.
- enable: Automatically activates a service during system boot.
- –now: Enables and starts a service immediately.
- nfs-server: Name of NFS server service.
 I was prompted to enter my password. With this command, especially with ‘now’ option you don’t need to separately start the service again.
➍ Finally make sure that NFS server is active in Linux.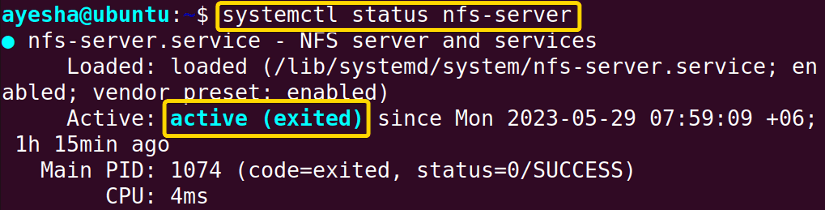 The image above indicates that this service is active or excited as intended. You can now utilize NFS server to share files with remote clients.
Step 2: Creating a Shared NFS Directory in Linux
You have to now create a directory or use any preexisting directory that will be shared with NFS clients.
Steps to Follow >
➊ I have created a fresh directory called NFSserver that will be shared with the clients. Enter your Linux user password if necessary.
sudo mkdir /home/ayesha/Desktop/NFSserver- mkdir: Creates a new directory or folder
- /home/ayesha/Desktop/NFSserver: Absolute path of NFS directory on Desktop.
The host’s root user becomes the folder owner because of ‘sudo’ used at the beginning of the command.
➋ With the command below you need to change the ownership of the directory NFSserver.
sudo chown -R nobody:nogroup /home/ayesha/Desktop/NFSserver- chown: Changes ownership of files and directories.
- -R: Tells chown command to change ownership recursively.
- nobody:nogroup: Sets owner to ‘nobody’ and group to ‘nogroup’ of a directory.
- /home/ayesha/Desktop/NFSserver: Absolute path of NFS directory on Desktop.
Even though this command ensures that all clients have access to the shared directory, NFSserver, it also restricts clients from performing actions with elevated privileges on NFS.
➌ Now provide read, write, and execute permission to the directory, NFSserver so that NFS clients can easily access it.
sudo chmod 777 /home/ayesha/Desktop/NFSserver- chmod: Changes mode or permissions of files and directories.
- 777: Each digit represents granting read, write and execute permissions for owner, group and other users.
- /home/ayesha/Desktop/NFSserver: Absolute path of NFS directory on Desktop.
➍ Subsequently, I created a file namely file.txt in the NFSserver directory. 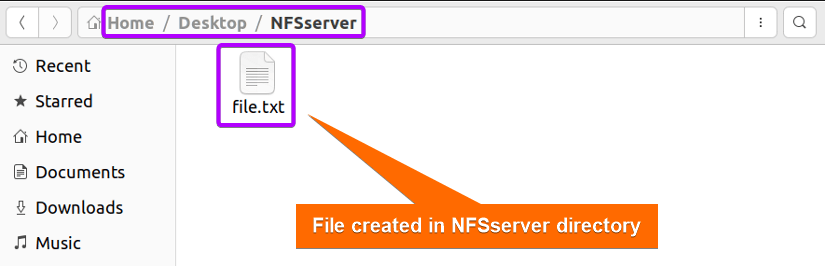 The preceding photo depicts that there is now a file present in the NFSserver folder.
Step 3: Configure NFS Exports File in Linux
Configuring NFS exports file is a fundamental step in order to specify permission for each exported directory, making it accessible to clients.
Steps to Follow >
➊ Run the command below to open the NFS configuration file.
sudo nano /etc/exports- nano: Text editor.
- /etc/exports: NFS server configuration file to define the directories that will be shared with NFS clients.
➋ Go to the end of the configuration file and add the entry specifying the directory to be exported and the client IP address.
/home/ayesha/Desktop/NFSserver 192.168.153.129 (rw, sync, no_subtree_check)- /home/ayesha/Desktop/NFSserver: Absolute path of NFS directory in Desktop.
- 192.168.153.129: IP address of remote NFS client in Linux.
- rw: Stands for ‘read-write’. Specifies that the NFS client has read and write access to the directory.
- sync: Indicates synchronous NFS operations.
- no_subtree_check: Disables subtree checking for the exported directory.
➌ Press CTRL + O to save the changes and CTRL + X to exit the editor file.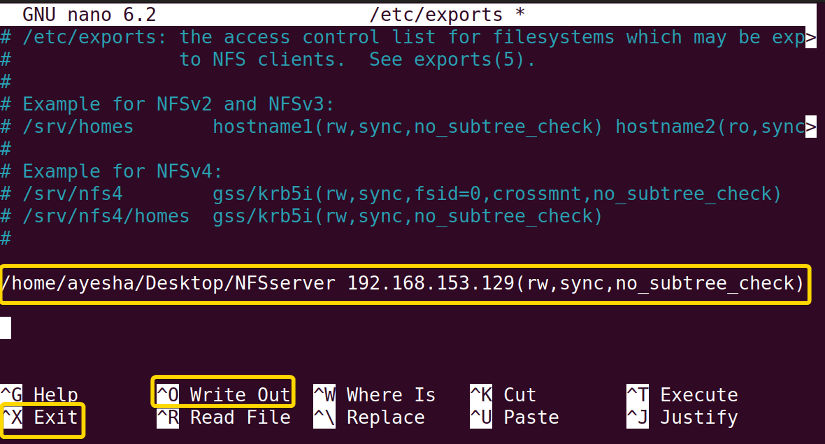 In the preceding image, you can see that the NFSserver directory is shared with the client with 192.168.153.129 IP and has read and write access to it.
Step 4: Export Shared NFS Directory
The steps below will demonstrate how to save the configuration changes to the exported directory, NFSserver. This involves exporting the directory at first and then restarting the server.
Steps to Follow >
➊ Execute the following command in your terminal in order to apply the changes you made in the /etc/exports file.
sudo exportfs -a- exportfs: Makes local directories available for NFS clients to mount.
- -a: Tells exportfs command to export entries for all directories.
➋ Now restart the NFS server service to save the configuration changes.
sudo systemctl restart nfs-kernel-server- systemctl: Manages system services, along with starting, stopping, and checking the status of services.
- restart: Stop running the service and start again.
- nfs-kernel-server: Name of NFS server service.
- How to Share Files between Linux and Windows
- How to Access Shared Folder in Ubuntu [2 Methods]
- How to Install and Configure Samba Server in Ubuntu? [4 Steps]
- How to Install, Configure and Connect Samba Client on Ubuntu
Step 5: Enable Firewall in Linux
Additionally, enabling firewall settings is crucial to protect shared resources and ensure secure data transfers.
Steps to Follow >
➊ To enable the firewall, run the command as follows:
sudo ufw enable- ufw: Stand for Uncomplicated Firewall. Manages firewall settings.
- enable: Instructs UFW to activate the firewall.
 The image above indicates that the firewall service is enabled on my Linux machine.
➋ Afterwards, to open the firewall and allow a particular client to connect with the NFS server, run the following command.
sudo ufw allow from 192.168.153.129 to any port nfs- ufw: Stand for Uncomplicated Firewall. Manages firewall settings.
- allow: Instructs ufw to permit incoming network traffic.
- from 192.168.153.129: Specifies the NFS client IP address from which incoming traffic is allowed.
- to any ports: Refers to any port associated with NFS in my Linux system.
 The image above shows that the UFW firewall has permitted network traffic from the client with IP 192.168.153.129 to establish connections to the NFS server.
➌ Check the ports that are connected to the NFS server.
sudo ufw status- ufw: Stand for Uncomplicated Firewall. Manages firewall settings.
- status: Displays the current status of the firewall.
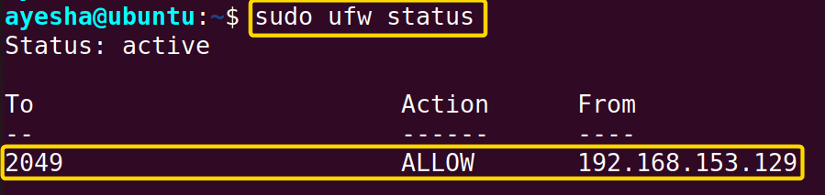 It is evident from the image provided above that the default port for NFS, 2049 allows network connectivity from the client with IP 192.168.153.129.
Complementary Information
You have finally installed and set up the NFS server on your Linux machine. But to utilize it properly, an NFS client is required to access the shared files from a remote location. Follow the additional information below to learn how to install and configure NFS client.
How to Install & Configure NFS Client in Linux
Sharing through NFS relies on the seamless connectivity of NFS clients and the ability to access shared resources. Therefore, NFS client configuration is an important step in order to access the shared directory, NFSServer.
To configure the NFS server, I logged in as user ‘ayesha’ in Linux. However, when setting up the NFS client I switched to a different user called ‘linuxsimply’. This will permit linuxsimply to access shared files of user ayesha through NFS.
Step 1: Install NFS Client in Linux
Begin the configuration process by installing the NFS client package on Linux.
Steps to Follow >
➊ Switch to a new user with root access. I logged in to a new user called linuxsimply with the intention of using it as the NFS client and then opened the Ubuntu terminal.
➋ Run the following command to install NFS client package.
sudo apt install nfs-common- sudo: Permits a user with administrative privileges to execute commands.
- apt install: Specifies that the install task needs to be performed.
- nfs-common: Refers to NFS client package.
 The above image depicts that I have successfully installed the NFS client package.
Step 2: Mount Shared NFS Directory
This step will guide you to access the NFSserver folder that you originally created in the server from the client side.
Steps to Follow >
➊ Let’s create a new directory, NFSclient in the /mnt folder to mount NFSserver.
mkdir /mnt/NFSclient- mkdir: Creates a new directory or folder
- /mnt/NFSclient: Absolute path of NFSclient directory.
➋ Finally, execute the following command to mount the shared NFS folder.
sudo mount 192.168.153.129:/home/ayesha/Desktop/NFSserver /mnt/NFSclient- mount: Attaches a filesystem to a specified directory.
- 192.168.153.129: IP address of the NFS server.
- :/home/ayesha/Desktop/NFSserver: Absolute path of the directory on NFS server that will be mounted.
- /mnt/NFSclient: Mount point or directory on NFS client where shared directory will be mounted.
➌ To verify whether the NFS shared folder was mounted, go to Files > Computer > mnt > NFSclient.
➍ You will be able to access file.txt, created initially in the NFSserver folder from the client.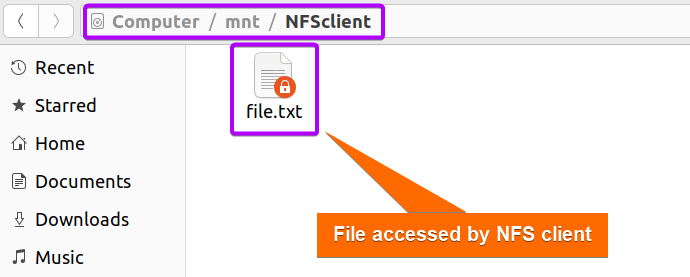 You can see in the picture above that file.txt is now accessible to the client through the mount point, NFSclient.
Conclusion
To sum up, NFS is a reliable and efficient solution for networked file sharing due to its simplified collaboration process with multiple users, centralized storage, and reduced traffic network. This article illustrated the configuration process of NFS server and client so that you can establish an efficient file sharing infrastructure. However, make sure to carefully configure access controls, firewall and permissions since shared files can be vulnerable to unauthorized access.
People Also Ask
Related Articles
- Install, Configure and Connect Samba on Ubuntu Using GUI
- How to Copy File from Windows to Linux Using SSH [2 Methods]
- How to Access Samba Share from Windows [2 Methods]
- How to Share Files between Linux and Windows Dual Boot [3 Methods]
FUNDAMENTALS A Complete Guide for Beginners


