If you are searching for compatible and open-source software for accessing and sharing files, folders, and other data, then come across the Samba share. It provides a cross-platform adaptable environment between Windows and other systems. As a requirement to access Samba Share on Windows, users must have Samba already installed and configured properly.
In this tutorial, I have outlined every ins and outs of how to access Samba Share from Windows. So, go over it, try accessing Samba Share from your Windows, and leverage the benefits of this interoperable service.
Process flow chart to access Samba share on Windows: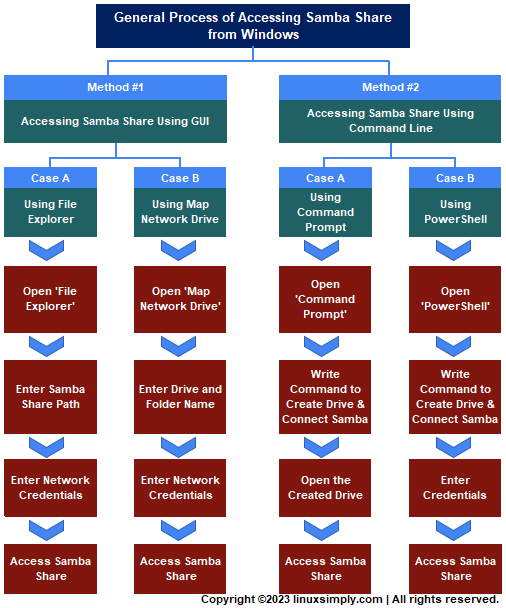
[Windows Used Throughout the Tutorial: Windows 10]
2 Methods on How to Access Samba Share From Windows
You can easily access Samba Share from Windows only employing some compact and effortless steps. Here, I am going to introduce two types of methods that will help you to access the Samba share.
You can read the Comparative Analysis of Methods to know more related terms regarding samba shares.
Method 01: Accessing Samba Share From Windows Using GUI
In the following section, I will show two cases of GUI (Graphical User Interface) for accessing Samba Share from Windows.
A. Accessing Samba Share Using File Explorer
To access Samba Share using File Explorer follow the manual procedure shown below:
- Press WIN+E or you can click on the Folder icon like the image below to open File Explorer:

- Enter the path of the Samba share in the address bar like the format below and click ENTER:
\\192.168.231.128\sambashareEXPLANATION- 192.168.231.128: Represents Samba server IP address.
- sambashare: Indicates the shared folder.
Here, ‘192.168.231.128’ is my system’s IP address, and ‘sambashare’ is the folder I want to share.
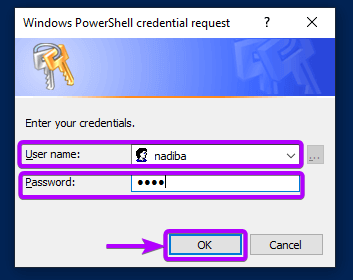
- Now, enter your network credentials when prompted to you and click OK.

- Once done with the connection, you can access all the shared files and folders inside the shared one.
 Following the above steps, I can access the new_samba folder inside the Samba share.

 Following the above steps, I can access the new_samba folder inside the Samba share.
B. Accessing Samba Share Using Map Network Drive on Windows 10
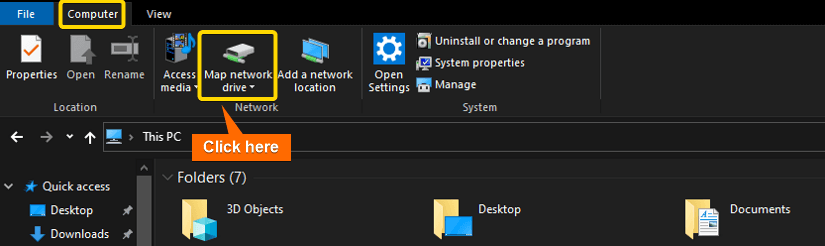
Map Network Drive is another way of accessing Samba Share. Follow the below steps to exercise it:
- Go to File Explorer and click on Map network drive under the Computer tab like the following image:

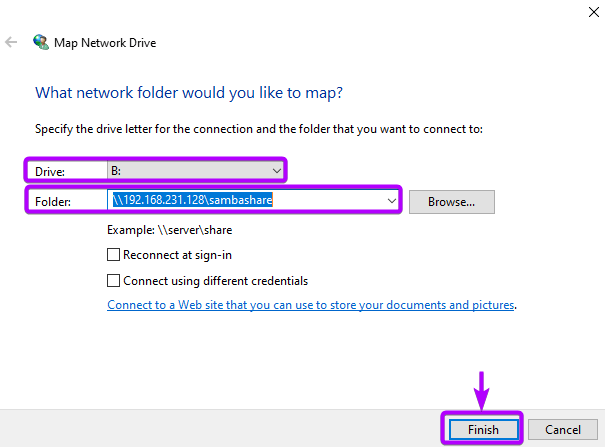
- Now, choose a Drive, enter the path for the Samba share and click Finish.
 From the image, you can see that I have chosen drive B: for my desired Samba share.
 - If there prompts the credential requirements, then provide your username and Samba password. After this, you can see that the Samba shared folder has been mapped to the selected drive.

- Now, double-click on the new drive and you can access the files and folders inside the Samba share. From the snapshot above, you can see that I can access my new_samba folder inside sambashare.
 From the image, you can see that I have chosen drive B: for my desired Samba share.
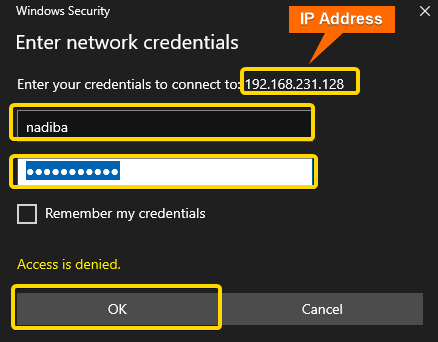 After this, you can see that the Samba shared folder has been mapped to the selected drive.
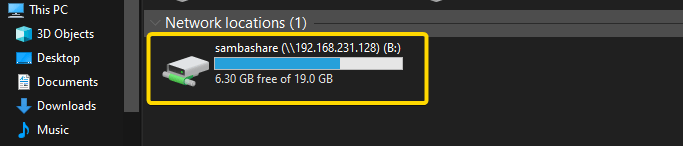
 From the snapshot above, you can see that I can access my new_samba folder inside sambashare.
Method 02: Accessing Samba Share From Windows Using Command Line Shell
Below two different cases of ‘Command line shell’ for accessing Samba share from Windows will be demonstrated:
A. Accessing Samba Share Using Command Prompt
To access the Samba shares’ contents from the command prompt follow the steps below:
- Press WIN+R, type cmd and hit ENTER. You will prompt to the command line interface.
- Now, write the following command in the command prompt to connect to the Samba share:
net use P: \\192.168.231.128\sambashare /user:nadiba 1234EXPLANATION- net use: Manages network connectivity.
- P: Indicates the assigned drive letter for the Samba share. I have chosen ‘P’ drive.
- \\192.168.231.128\sambashare: Represents Samba server IP address and the shared folder.
- /user:nadiba: Specifies the Samba username. ‘nadiba’ is my Samba username.
- 1234: Represents Samba user password. Here, my system’s Samba user password is ‘1234’.
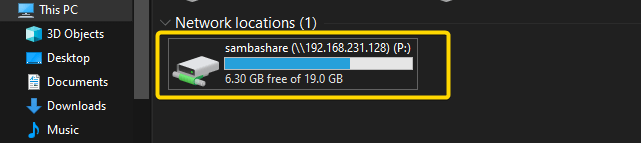
- You will find then that the Samba share has been mapped to the assigned drive letter like the following image:
 Thus, you can access the Samba shares’ contents.
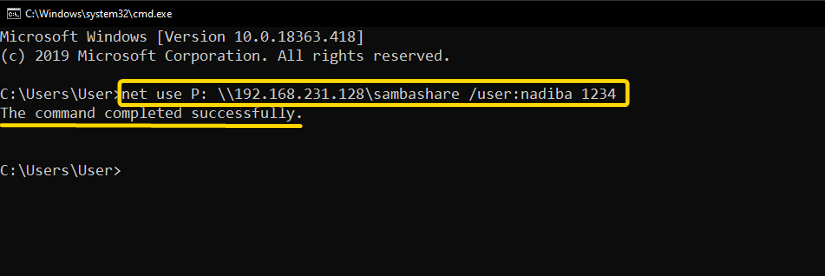 If the given credentials are correct, you will see ‘The command completed successfully.’ like the above image.
 Thus, you can access the Samba shares’ contents.
B. Accessing Samba Share Using PowerShell
You can also access Samba shares from PowerShell by following the given steps:
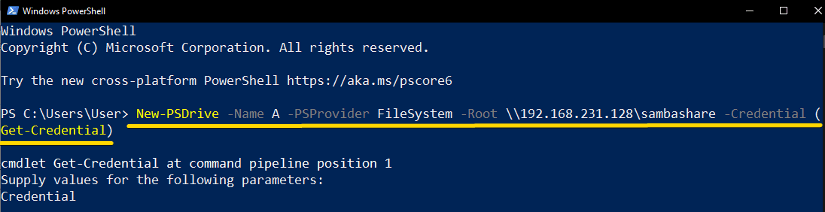
- First, open PowerShell and write the following command to create a new drive:
New-PSDrive -Name A -PSProvider FileSystem -Root \\192.168.231.128\sambashare -Credential (Get-Credential)EXPLANATION- New-PSDrive: Creates a new PowerShell drive.
- -Name A: Represents the letter of the drive you want to assign. I have preferred ‘A’ for my drive.
- -PSProvider FileSystem: Filesystem provider is used for the new drive.
- -Root \\192.168.231.128\sambashare: Specifies the path location of the Samba share.
- -Credential: The requirements to access the Samba share.
- (Get-Credential): Prompts you to provide the username and password to access Samba share.

- Now, you will be prompted to a new window to provide the Samba username and password. Provide the requirements and click OK.
 You can see in the following screenshot that the Samba share has been mapped to the specific drive you chose.
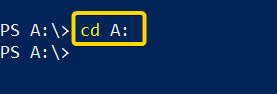
- Now, you can navigate to the drive whenever you want by running the command below:
cd A:EXPLANATION- cd A: Navigates to the drive A.
 After navigating to the new Samba drive you can interact with the contents in the Samba share.
 You can see in the following screenshot that the Samba share has been mapped to the specific drive you chose.
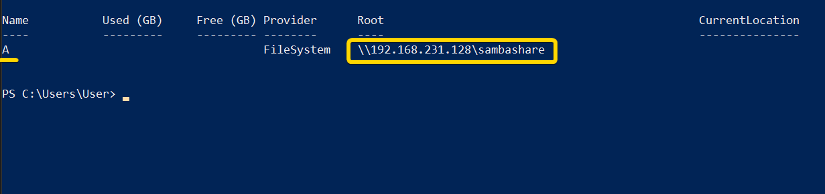
 After navigating to the new Samba drive you can interact with the contents in the Samba share.
Comparative Analysis of Methods of Accessing Samba Share from Windows
While accessing Samba share from Windows, you have two options- using GUI or command line shell. Let’s make a comparative analysis between these two methods:
| Methods | Pros | Cons |
|---|---|---|
| Method 1 |
|
|
| Method 2 |
|
|
Overall, both methods are preferable with their individual specifications. Which method to choose totally depends on the user’s preference, experience level, and individual perspective.
How to Open PowerShell
There are several ways to open PowerShell in Windows. I have mentioned three easy processes below:
- Open PowerShell Using File Explorer: Press WIN+E and type powershell in the address bar and tap ENTER.
- Open PowerShell Using Run Dialog: Press WIN+R, write powershell, and click OK.
- Open PowerShell Using Start Menu: Click on the Start menu at the bottom-left of the screen, scroll and expand the Windows PowerShell folder, and then click on the ‘Windows PowerShell’ option.
 All of these three processes will open the PowerShell application in your Windows like the above image.
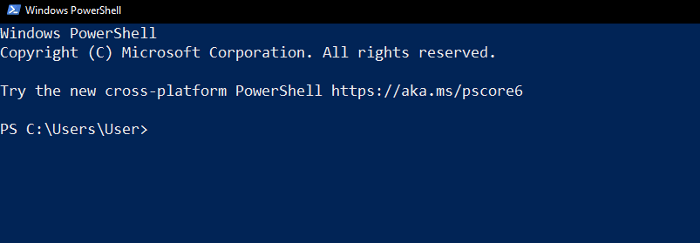 All of these three processes will open the PowerShell application in your Windows like the above image.
How to Perform Several Tasks on Samba Drive Using PowerShell
Using PowerShell you can view the listed contents, add new items, or remove the whole Samba drive. Follow the detailed execution mentioned below:
1. List Contents
After navigating to the assigned Samba drive, you can list all the contents inside the Samba share using the command below:
Get-ChildItem- Get-ChildItem: Returns collection of contents within the shared path.
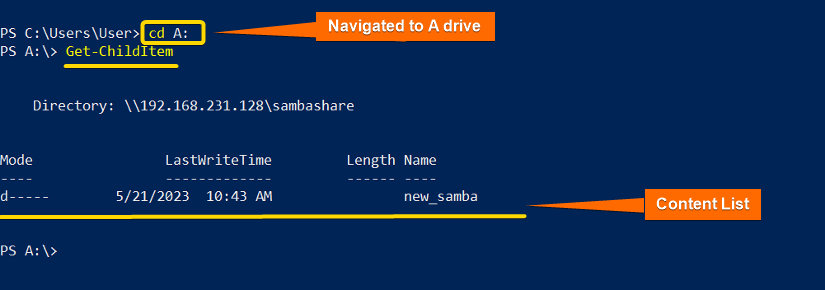 You can see from the image that I have navigated to drive A and can see the new_samba folder inside sambashare folder.
2. Create New Items
To create new files in a mounted Samba drive use the command below:
New-Item -ItemType File -Path A:\new_samba\samba.txt- New-Item: Creates new item.
- -ItemType File: Specifies the item’s type as file.
- -Path A:\new_samba\samba.txt: Indicates the location of the new file. I have created ‘samba.txt’ as a new file inside ‘A’ drive.
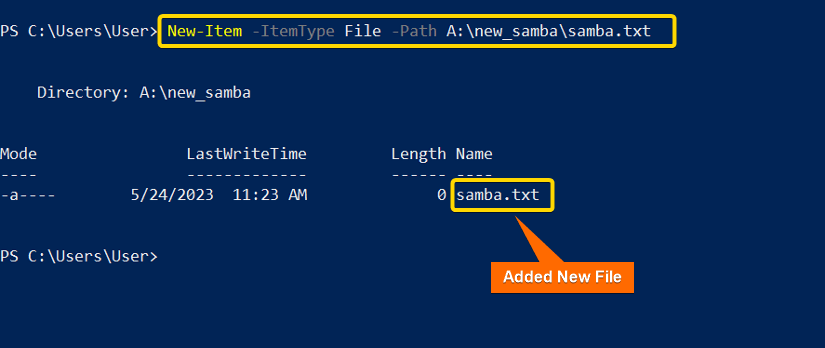 You can see a new file ‘samba.txt’ has been added to the new_samba folder inside Samba drive.
3. Remove Drive Mapping
Once done accessing Samba share, you can remove the mapped Samba drive using the following command:
Remove-PSDrive -Name A- Remove-PSDrive: Removes the assigned drive.
- -Name A: Represents the letter of the drive you want to assign. I have preferred ‘A’ for my drive.
Also, you can check if the drive has successfully been removed or not by running the syntax below:
Get-PSDrive -Name A- Get-PSDrive: Displays information about the given drive.
- -Name A: Represents the letter of the drive you want to assign.
 From the above image, it is clear that the drive ‘A’ is removed successfully.
Conclusion
Samba share integrates collaboration in mixed operating systems. So, to confirm seamless access to Samba share from Windows you must configure the Samba server and set permissions properly. Also, ensure that Windows and Linux machines are on the same network.
People Also Ask
Can I install Samba on Windows?
Yes, you can install Samba on Windows because it’s free and open-source software.
How to see SMB shares in CMD?
To view SMB shares click on the search box, then type cmd and press ENTER. At the prompt, write net share and hit ENTER.
How to find out my SMB IP Address?
Open the command prompt and type ipconfig and hit ENTER.
Do all Windows share use SMB file sharing protocol?
Yes, all Windows shares use SMB.
Can I block SMB traffic using a Windows firewall?
You can block all inbound SMB traffic using Windows firewall configuration.
What is the security risk of SMB in Windows 10?
The SMB vulnerability lets an unauthenticated attacker execute any code as an application.
Related Articles
- How to Share Files between Linux and Windows
- How to Configure NFS Server in Linux? [5 Steps]
- How to Access Shared Folder in Ubuntu [2 Methods]
- How to Install and Configure Samba Server in Ubuntu? [4 Steps]
- How to Copy File from Windows to Linux Using SSH [2 Methods]
- How to Share Files between Linux and Windows Dual Boot [3 Methods]
FUNDAMENTALS A Complete Guide for Beginners


