Sharing files between Linux and Windows dual boot setup is a basic requisite if you are using both operating systems installed on your PC. Generally, Windows employs a FAT32 or NTFS file system whereas Linux utilizes Ext4. As both operating systems support different file systems, there are several methods to facilitate the file sharing between these two. In this guide, I am going to provide you some easy and effective approaches to share files between Linux and Windows dual boot.
Key Takeaways
- Learning about dual booting.
- Understanding the fact of sharing files between Linux and Windows dual boot.
Requirements
- You must have a proper Windows setup.
- You must have Ubuntu installed on your PC.
Process Flow Chart
[Distro & Windows Used Throughout the Tutorial: Ubuntu 22.04.2 LTS & Windows 10]
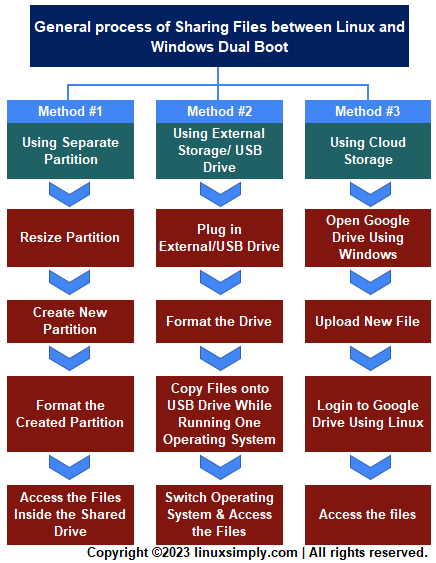
3 Methods to Share Files Between Linux and Windows Dual Boot
To share files between Linux and Windows in a dual boot setup conveniently you can follow up several methods. In the following section, I have described three obvious methods to share files between dual-boot PCs without risking any files.
Method 01: Using Separate Partitions to Share Files Between Linux and Windows Dual Boot
Suppose, you are using your existing Windows partition and for some reason, you want to delete the partition later. Now, you cannot isolate the important files inside the partition which you want to keep. It seems risky, right? Actually, in this case, it’s better to create a new shared partition. Before starting make sure to backup your critical files. The step-by-step procedure to share files between Linux and Windows dual boot using separate partition is given below:
A. Resizing Partition
There are several tools for partitioning drives on Windows. But the easiest way is to use the Windows Disk Management tool. Using this tool you can resize the partitions which support only FAT32 or NTFS file systems in Windows. So, if you are running out of space and want to resize your partition, then follow the steps below:
Steps to Follow >
❶ Press WIN+X, and click on Disk Management from the left panel.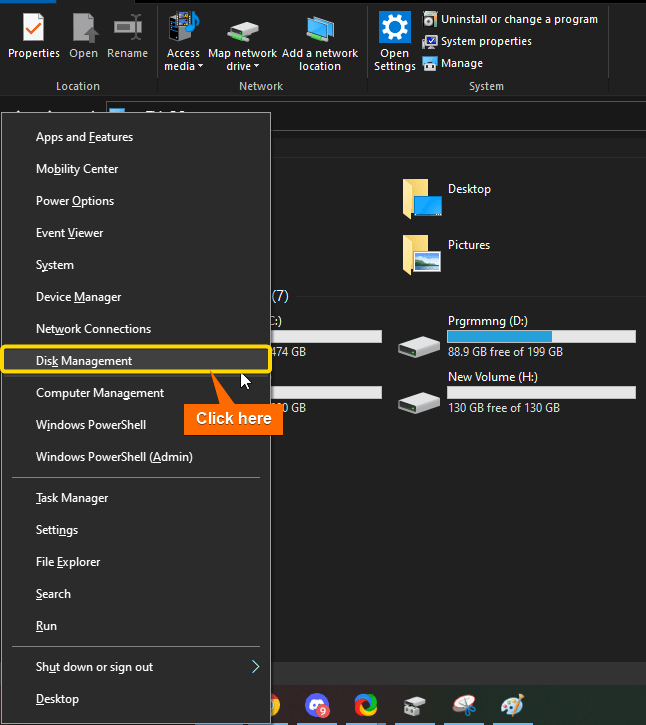 ❷ Now, you will see a list of partitions. The upper half section in the image below indicates the partitions/volumes and the lower half section indicates the partitions of each drive in a detailed format.
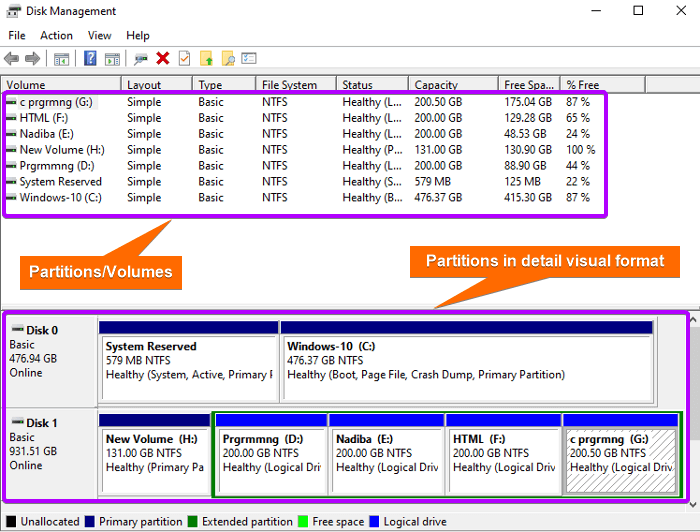 ❸ Select a large partition from all drives and right click on it and click ‘Shrink Volume’. Generally in Windows, the large partition is on Windows C: drive.
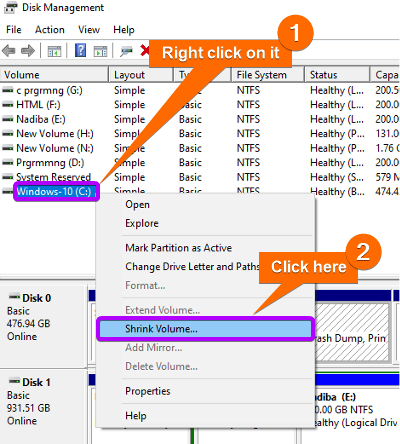 ❹ There prompts a window after a while asking to enter the amount of storage you want to clear like the following image.
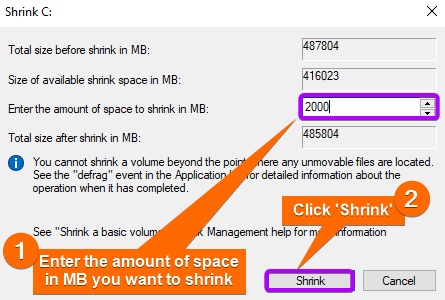 Enter an amount according to your needs in megabytes and click ‘Shrink’. Here, I have inserted 2000 MB.
B. Creating A New Partition
Once you have created the necessary space on your hard drive, you can move on to creating a new partition. To create a new shared drive partition go through the steps below:
Steps to Follow >
❶ Look for ‘Unallocated’ which specifies the available space. Right-click on it and select ‘New Simple Volume’.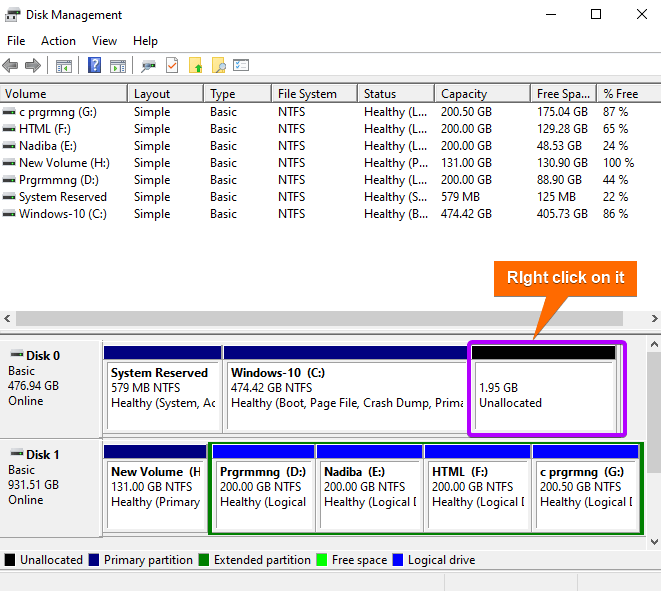
 Click ‘Next’ when the new window prompts like the following image.
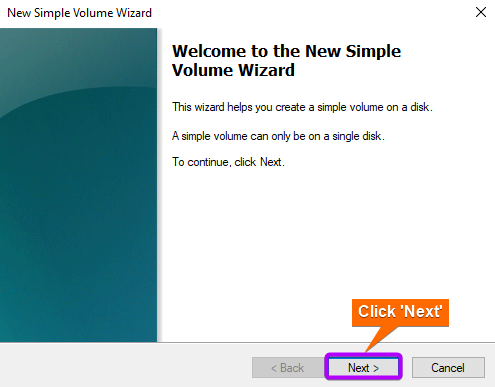 ❷ Specify the new drive’s size in megabytes and click ‘Next’. The volume size used for my new drive is 1800 MB.
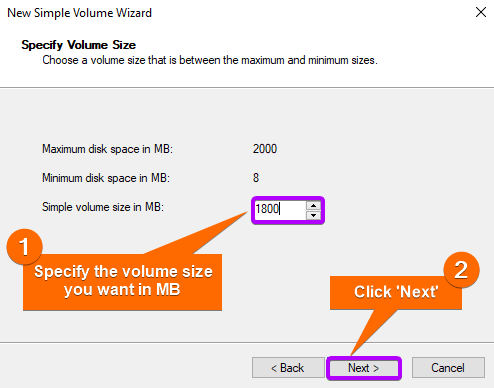 ❸ Assign a drive letter for your new drive.
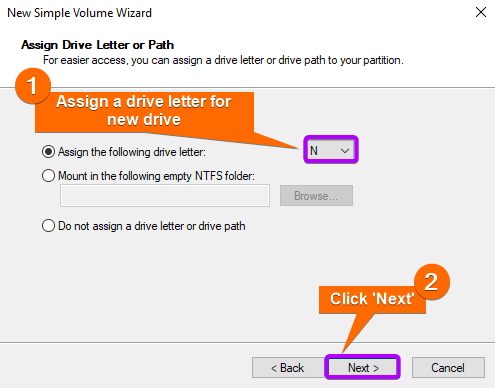 In the snapshot above, I have assigned my new partition to drive N.
❹ Now, make sure to select NTFS as the file system. Also, name the new partition as you want in the ‘Volume label’ option and click ‘Next’.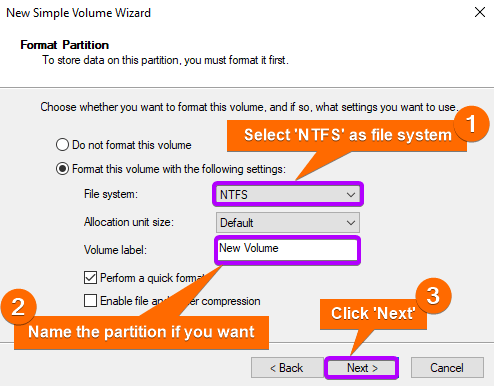 ❺ Finally, click ‘Finish’ to end the process.
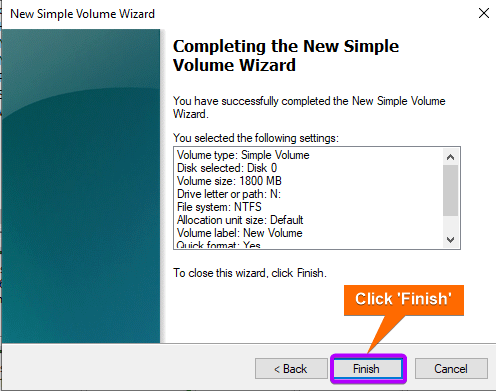 Then, the new drive partition will be created and listed in the Disk Management window.
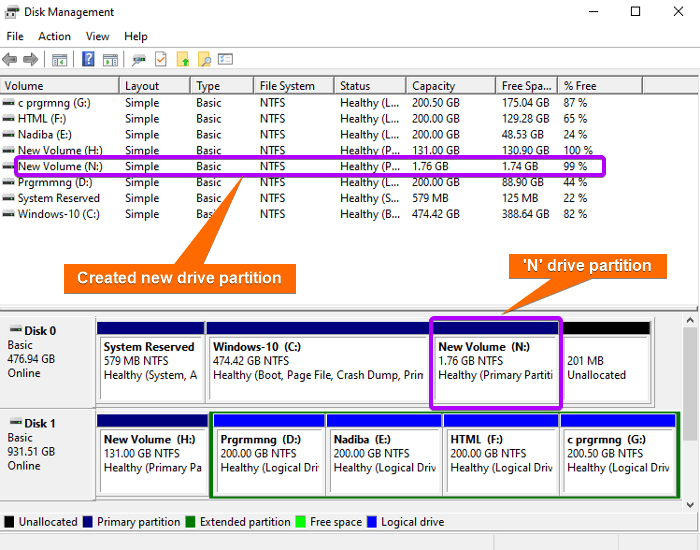 From the above image, you can see that my new N drive partition has been added to the list.
C. Formatting New Partition
Follow the steps below to format the new partition:
Steps to Follow >
❶ Right click on New Volume (N:) and click Format. ❷ Now, name the volume label of your choice, select NTFS as the file system, and click OK.
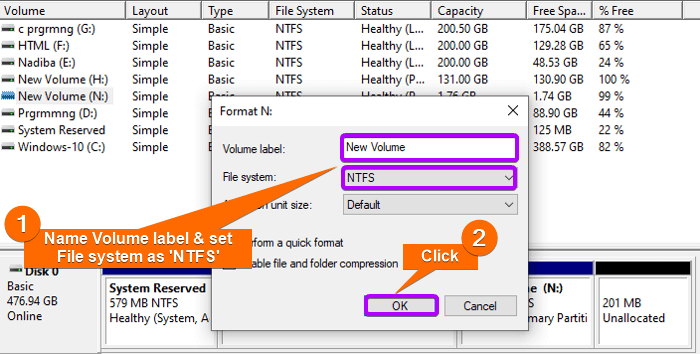 Here, I have named my volume label as ‘shared disk’.
❸ To continue click OK.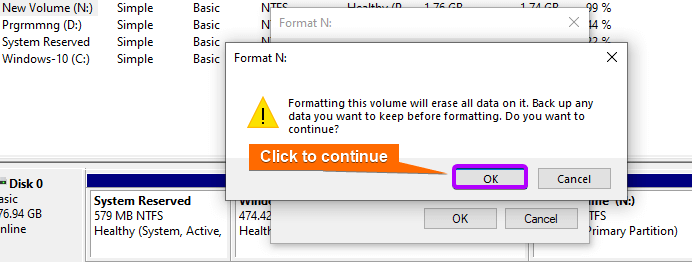 Your volume is now formatted & all data is erased now.
D. Accessing Shared Drive
Once created and formatted the new partition, you can access the contents of it from Windows file explorer like the image below.
Also, you can access it from the Linux system. Recent Ubuntu versions can easily read partitions with the NTFS file system. To access the partition from Linux follow the steps below:
Steps to Follow >
❶ Go to Files > Other Locations and you will find the desired partition created before.
❷ Click on the partition to access it.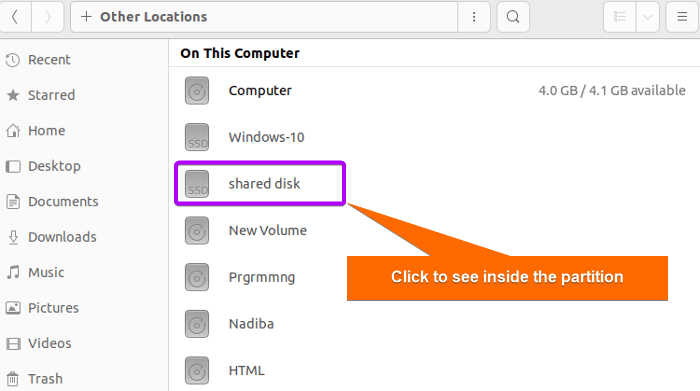 Now, you can see all the files and folders inside the partition like the image below.
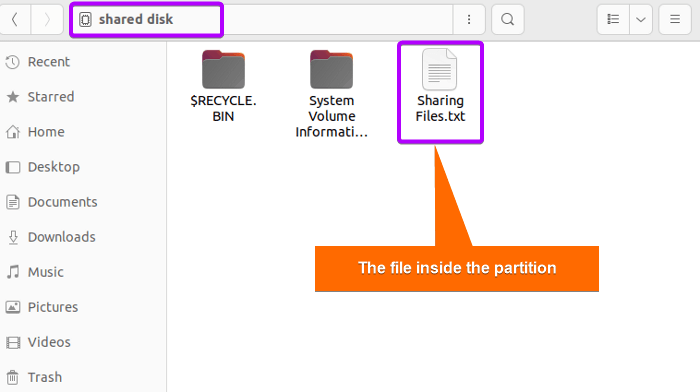 Thus, shared partitions can be used to share files between Linux and Windows dual boot safely.
Method 02: Using External Storage to Share Files Between Linux and Windows Dual Boot
Another way to share files between Linux and Windows is to use an external drive or USB drive. Here’s how to use it:
Steps to Follow >
❶ Plug in your external storage or USB drive.
❷ Format the drive if it is not formatted yet.
❸ While running one operating system, copy the desired files onto the USB drive.
❹ Switch to another operating system and access the contents from the drive.
Read More: How to Share Files between Linux and Windows
Method 03: Using Cloud Storage to Share Files Between Linux and Windows Dual Boot
Accessing files from both Linux and Windows operating systems using cloud storage is a very convenient solution. You can share and access files seamlessly using cloud services like Google drive, One drive, Dropbox etc. Here, I will show you how to share files using google drive.
Steps to Follow >
❶ First, in Windows, open any browser and log in to your google drive account. You can see the existing files in google drive like the image below.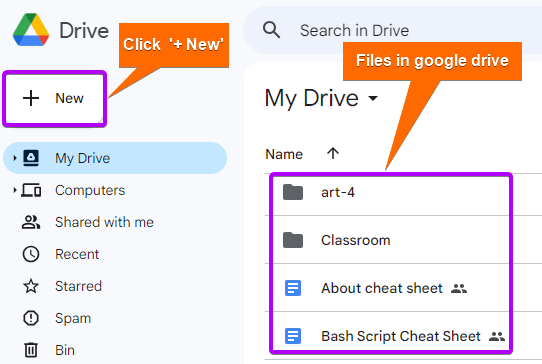 Click on ‘+ New’ to upload a desired file on google drive.
 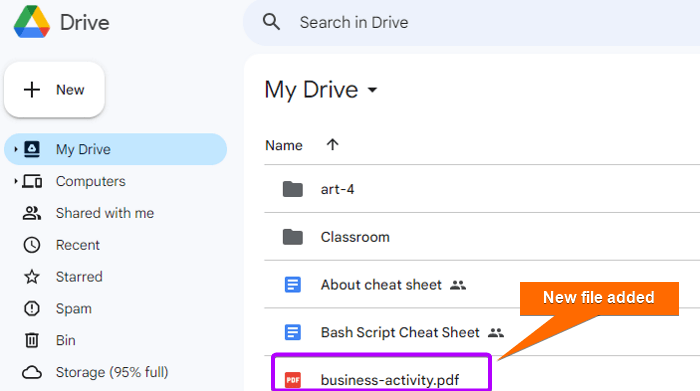 You can see that the new file has been shared like the above image.
❷ Now, go to your Linux system, open any browser on Ubuntu, and log in to your google drive. You will find the desired file which you wanted to share.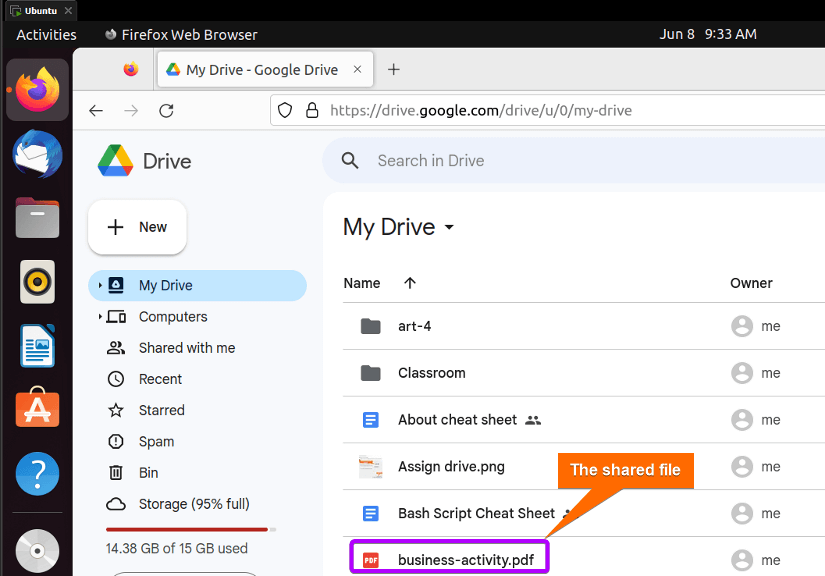 Thus, you can share files using cloud storage between Linux and Windows dual boot.
Comparative Analysis of Methods
Let’s explore the comparative analysis among the discussed three methods of sharing files between Linux and Windows dual boot:
Methods
Pros
Cons
Method 1
Method 2
Method 3
Select any of these methods that satisfy all your preferences while sharing files between Linux and Windows dual boot environments.
Conclusion
Sharing files between Linux and Windows in a dual boot environment improvises interoperability and data management. This guide, with some convenient methods, will be helpful for you while sharing files between Linux and Windows dual boot setups. Just make sure to back up important things before dual booting.
People Also Ask
- How to Configure NFS Server in Linux? [5 Steps]
- How to Access Shared Folder in Ubuntu [2 Methods]
- How to Install and Configure Samba Server in Ubuntu? [4 Steps]
- How to Install, Configure and Connect Samba Client on Ubuntu
- Install, Configure and Connect Samba on Ubuntu Using GUI
- How to Copy File from Windows to Linux Using SSH [2 Methods]
- How to Access Samba Share from Windows [2 Methods]
FUNDAMENTALS A Complete Guide for Beginners


