A common way to communicate between operating systems such as Windows and Linux is to share files. You can accomplish this through various processes such as Samba, SFTP or FTP, SSH, cloud storage, or a portable device. Although this may sound pretty tedious but with the appropriate technique, you can master it in no time. In this article, I will demonstrate how to share files effortlessly between Linux and Windows in two simple methods.
Process Flow Chart
Distro Used Throughout the Tutorial: Ubuntu 22.04.02 LTS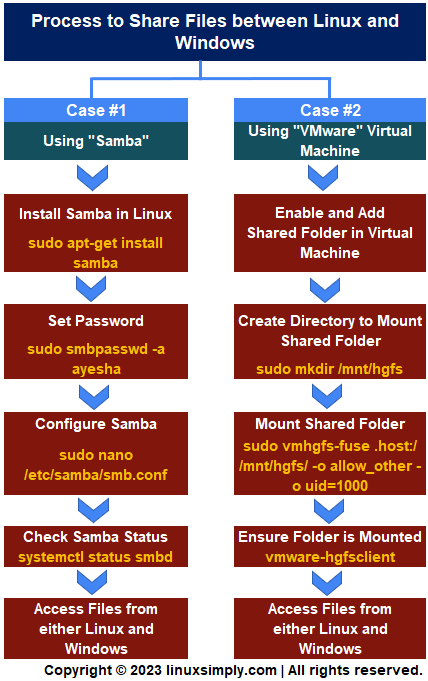
Watch 2 Cases to Share Files Between Linux and Windows
2 Cases to Share Files Between Linux and Windows
Let me introduce you to two simple and easy scenarios for file sharing between Linux and Windows, even if you are a beginner in Linux. These methods will provide you access from either operating system and you won’t need to worry about file sizes or formats.
Case 01: Share Files Between Linux and Windows Using Samba
Samba is a free and open-source software suite that allows users to share files, folders, and printers between different operating systems running on a single network. It is a widely popular method due to its simplicity, stability, and compatibility with both Linux and Windows. Moreover, it offers seamless sharing of files with the added benefit of being able to configure user access and permissions.
Step 1: Installing Samba on Ubuntu
First, you need to install Samba on the Linux operating system. Here, I am using Ubuntu as my Linux distribution where I will be installing this software. Follow the steps below to install Samba on Ubuntu:
-
Open your Ubuntu terminal.
-
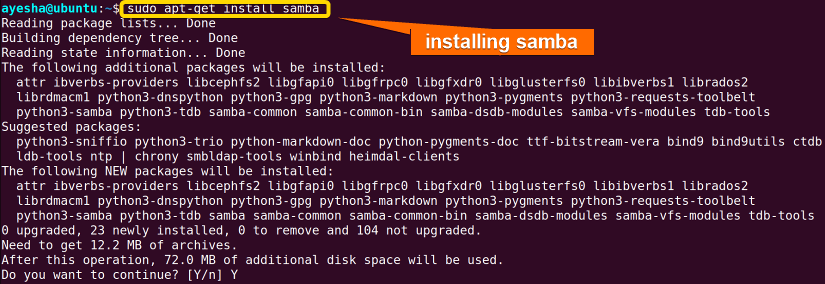
Type the following command to install Samba and press ENTER.
sudo apt-get install sambaEXPLANATION- sudo: Permits a user with administrative privileges to execute commands.
- apt-get install: Specifies that the install task needs to be performed.
- samba: Name of an open-source and free software package.

- Confirm that the installation was complete and check its location in the system with
whereis sambaEXPLANATION- whereis: Look for the location of the installed package.
- samba: Name of the package.

- Type the following command to assign a password for the Samba service.
sudo smbpasswd -a ayeshaEXPLANATION- sudo: Permits a user with administrative privileges to execute commands.
- smbpasswd: Sets password for Samba users.
- -a: Allows the command to add a new Samba user.
- ayesha: User name.


In the image above, the command asked for my password in order to add user ayesha.
Step 2: Configure Samba on Ubuntu
After installing Samba, it is important to configure it so that it is functional for both operating systems. This step involves creating a directory as the shared folder and then making changes to the Samba configuration file.
To configure Samba on Ubuntu, follow the steps below:
-
Open Ubuntu terminal.
-
Create a folder with the mkdir command. Here, I have created the folder, Shared_Folder in Desktop for easy access.
mkdir /home/ayesha/Desktop/Shared_FolderEXPLANATION- mkdir: Creates a new directory or folder
- /home/ayesha/Desktop/Shared_Folder: Absolute path of the location of the folder.
-
Next, you have to configure the Samba service and make it suitable to share files with Windows. For that, run the given command in the terminal.
sudo nano /etc/samba/smb.confEXPLANATION- sudo: Permits a user with administrative privileges to execute commands.
- nano: Text editor
- /etc/samba/smb.conf: Configuration file of Samba to customize settings such as user authentication, shares, and security.
- conf: Configuration file. smb stands for Sever Message Block Configuration.
-
Provide the password of the currently logged-in user.
 After providing the password it will open up the text editor where you can alter the configuration settings of the shared folder.
 -
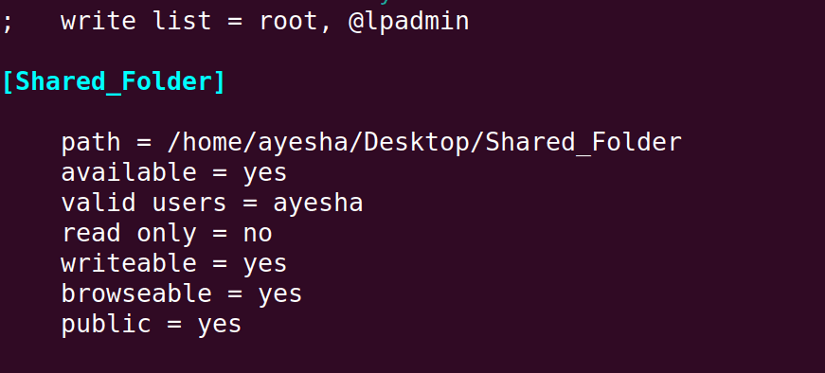
Once the text editor opens, write these lines at the end of the file.
[Shared_Folder] path = /home/ayesha/Desktop/Shared_Folder available = yes valid users = ayesha read only = no writeable=yes browseable=yes public = yesEXPLANATION- Shared_Folder: Name of the folder whose contents you want to share.
- path: Absolute path of the folder you want to share.
- available: Specifies whether the file is available for sharing or not.
- valid users: User name.
- read-only: Specifies whether the file is available for reading or not.
- writeable: Specifies whether the folder can be written to or not.
- browseable: Specifies whether the shared file is visible while browsing the network or not.
- public: Specifies whether the shared file is accessible to all users or not.
-
Finally, press CTRL+O and CTRL+X to save the changes and exit the editor respectively.

Remember to write the folder name, its path, and user name carefully. I chose Shared_Folder as my folder name and its absolute path in the system is included in the mentioned code. Besides, ayesha is the user name in my Linux system.
Read More: How to Configure NFS Server in Linux? [5 Steps]
Step 3: Check Samba Status on Ubuntu
You have to make sure that Samba is active otherwise the shared folder will not be accessible. You can ensure this by checking its status.
To check the status of Samba, follow the steps below:
-
Open your Ubuntu terminal again.
-
Run the following command to restart Samba in Linux.
sudo service smbd restartEXPLANATION- sudo: Permits a user with administrative privileges to execute commands.
- service: Controls services in the Linux system.
- smbd: Samba daemon which provides file-sharing services to Windows clients.
- restart: Stop running the service and start again.
-
Enter the password of the currently logged-in user.

- Now make sure that the smbd daemon is activated and operational.
systemctl status smbdEXPLANATION- systemctl: Manages system services, along with starting, stopping, and checking the status of services.
- status: Displays the current status of a service.
- smbd: Samba daemon which provides file-sharing services to Windows clients.


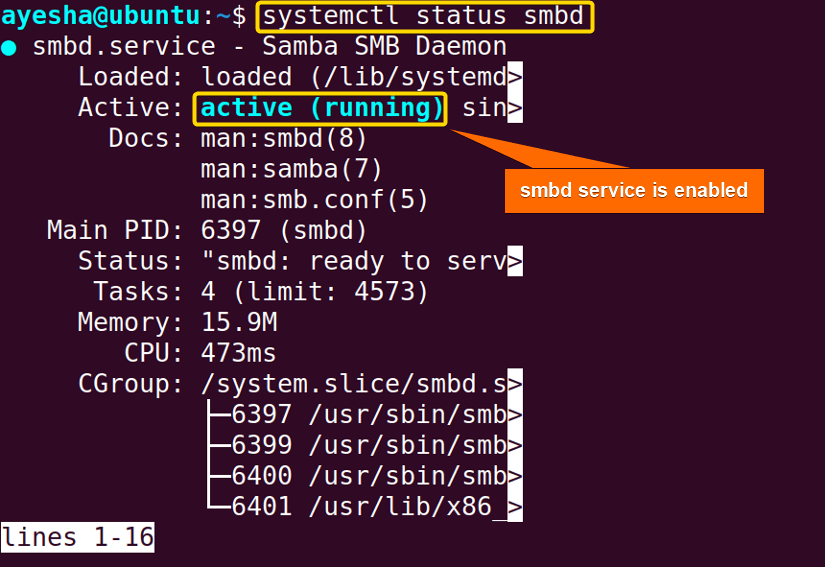
The image above indicates that Samba is active or running. You can access shared folders from the other operating system only after Samba is activated.
Step 4: Create a File in Linux and Access It From Windows
To confirm if files are accessible, create a file in the Shared_Folder and attempt to control it from Windows. Follow the steps below to create a file in Linux and access it from Windows:
-
Open your Ubuntu terminal.
-
Type the following command in the Ubuntu terminal to get your Linux IP address.
hostname -IEXPLANATION- hostname -I: Displays the IP address associated with the hostname.
 The terminal shows that the IP address of my Linux system is 192.168.153.128. This will come in handy in the next step.
 -
Now go to Windows and open “This PC”.
-
Click on the address bar and type the IP address and name of the folder which you created in Linux.
\\192.168.153.128\Shared_FolderEXPLANATION- 168.153.128: IP address of my Linux system.
- Shared_Folder: Name of the folder you have created in Linux to share files.

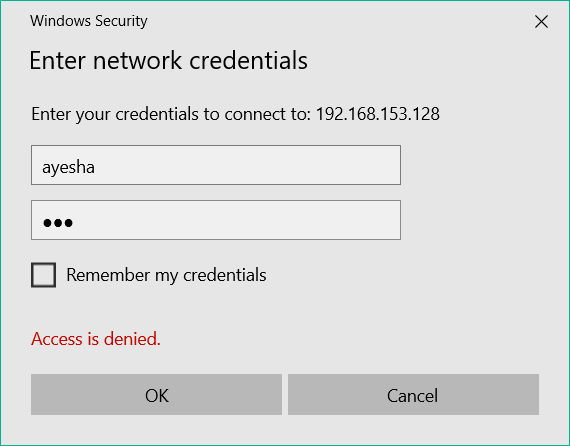
- After this, a dialogue box will appear on the screen asking for your Linux username and password. Make sure to enter them carefully and press OK.
 You can see in the above image that the username and password are entered here. But don’t worry if “Access is denied.” shows up. It will appear until you put in your network credentials.
 -
Shared_Folder will open instantaneously when you hit OK. The folder will open as an empty folder in both Linux and Windows.
 The above image depicts that Shared_Folder in Windows is accessible.
 The above image depicts that Shared_Folder in the Linux system is also accessible.
 -
To understand that Windows can access the files in the folder, I have saved an image in Shared_Folder in the Linux system.

- Now check Shared_Folder in Windows.

 The terminal shows that the IP address of my Linux system is 192.168.153.128. This will come in handy in the next step.
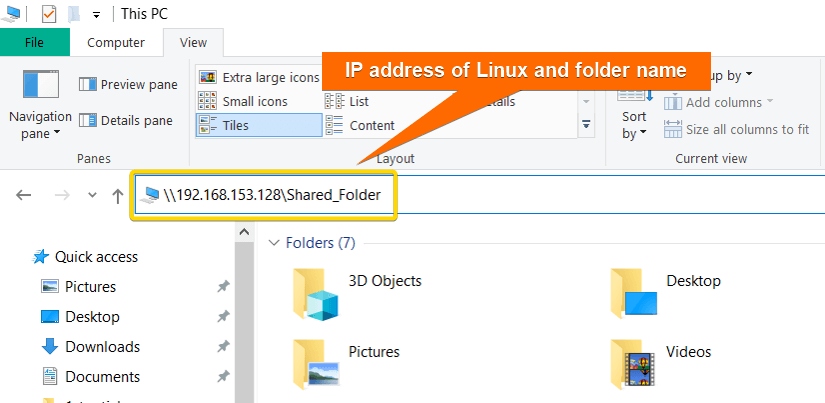
 You can see in the above image that the username and password are entered here. But don’t worry if “Access is denied.” shows up. It will appear until you put in your network credentials.
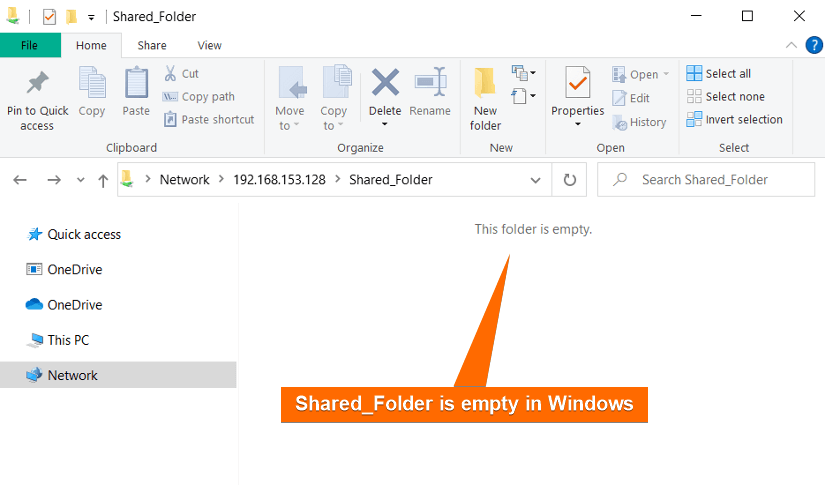 The above image depicts that Shared_Folder in Windows is accessible.
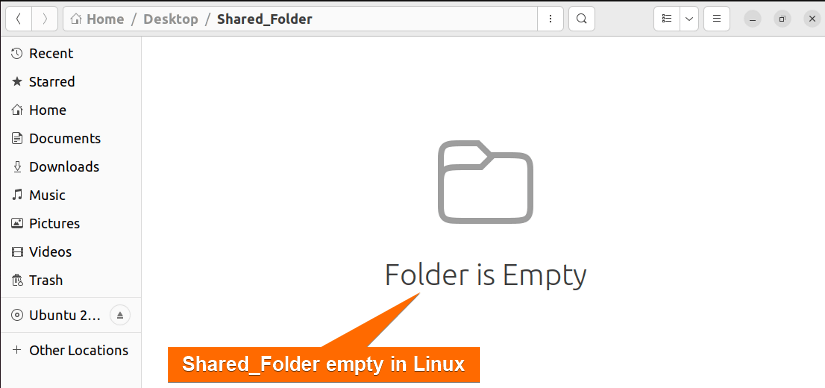 The above image depicts that Shared_Folder in the Linux system is also accessible.
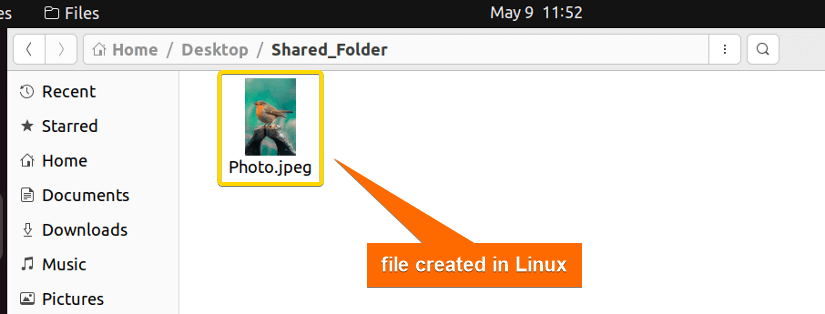
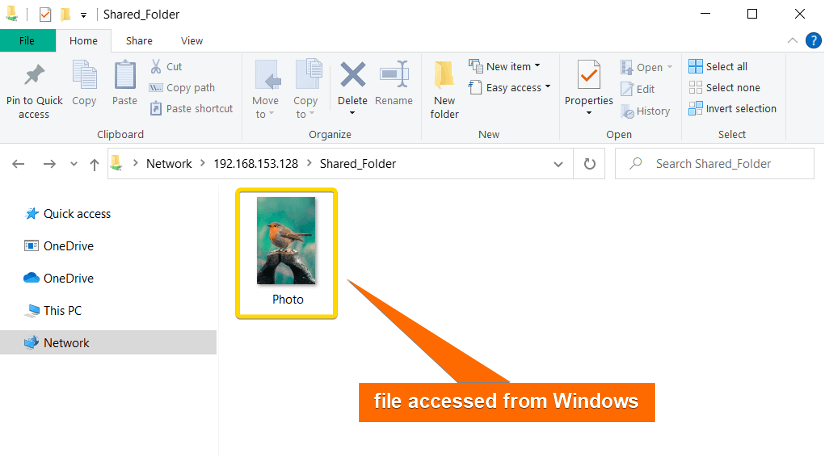
You can now view the photo from Windows and have full control over it.
Step 5: Create a File in Windows and Access It From Linux
The file was accessible from Windows. But can you manage files created in Windows from Linux?
To check if a file created in Windows is accessible from Linux environment, follow the steps below:
-
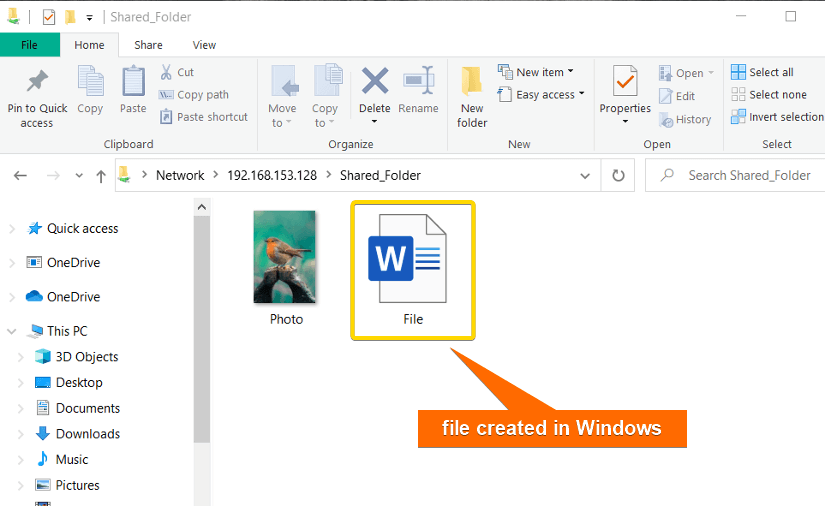
First, create a Word file in Shared_Folder from Windows.

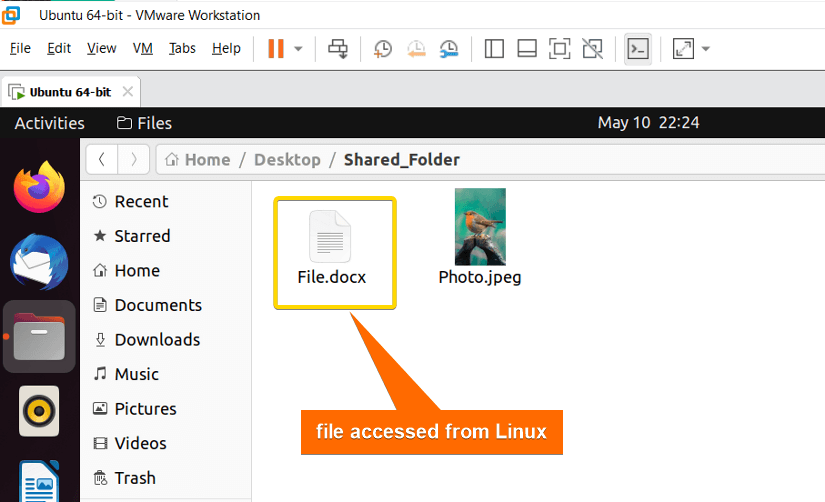
- Go to Linux and open Shared_Folder there.
 You can see in the above image that the file is visible and you can similarly have full control over it from Linux.
 You can see in the above image that the file is visible and you can similarly have full control over it from Linux.
Read More: How to Share Files between Linux and Windows Dual Boot [3 Methods]
Case 02: Share Files With a Virtual Machine Between Windows and Linux
Multiple operating systems can run on a single physical computer with the help of VMware Workstation which is a virtualization software. This method is deemed advantageous if you wish to save time and effort in contrast to the laborious and time-consuming approach of file transfer through a network share.
To share your files with VMware, follow the steps given below:
Step 1: Enable Shared Folder in Virtual Machine (VMware)
It is mandatory to enable the shared folder option in VM settings. This will ultimately grant anyone permission to have full access to files from either operating system. To enable the shared folder option in the VM setting, do this:
- First, power on your VMware Virtual Machine.
-
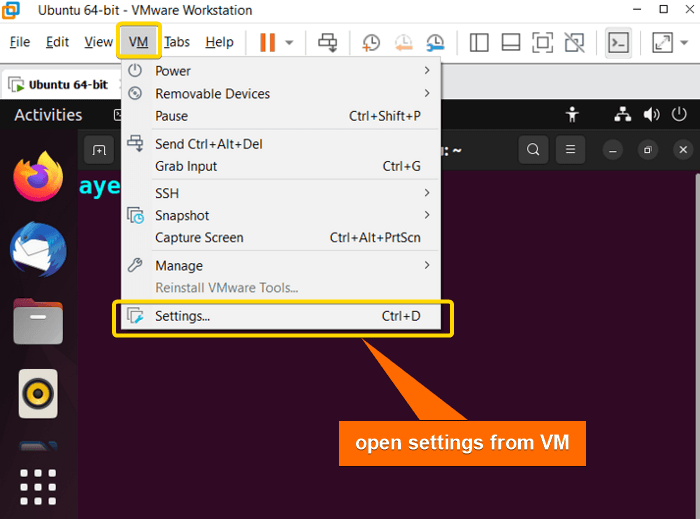
Go to VM > Settings.

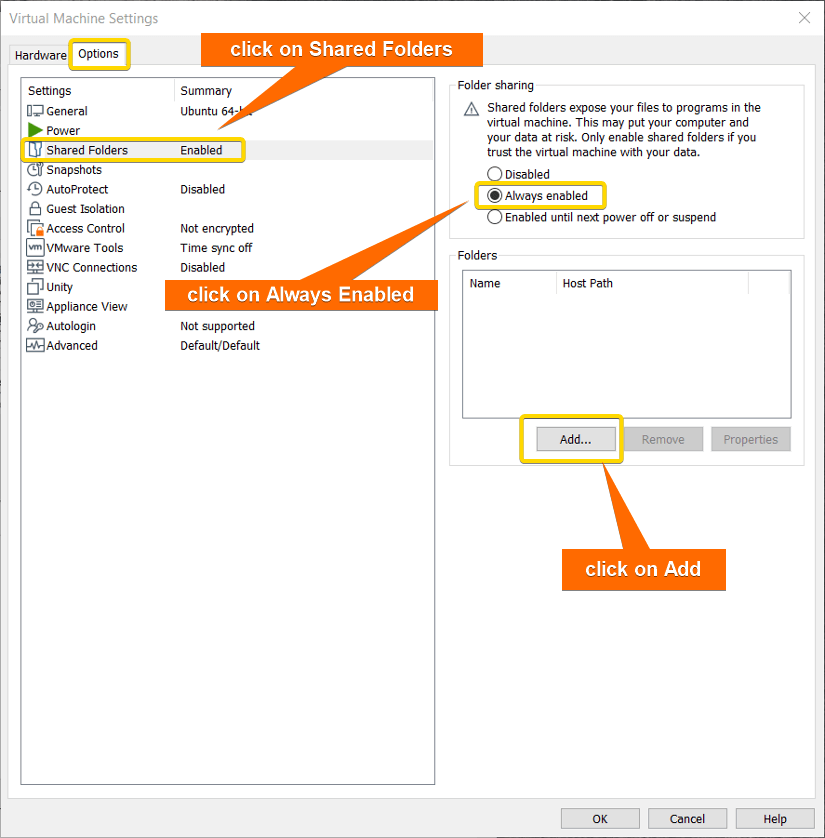
- Next go to Options > Shared Folder. Click on Always enabled. Then hit on Add.

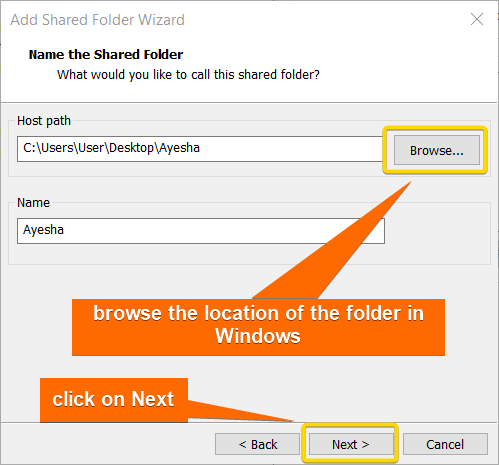
- Then browse the folder you want to share. I have chosen the folder Ayesha in this regard and its location and name of the folder appeared on the Host path and Name dialogue boxes. Afterward, click on Next.

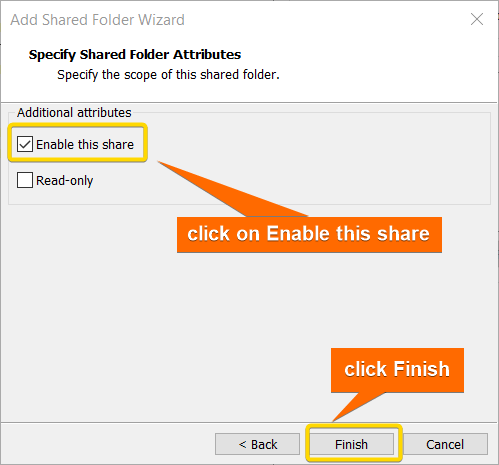
- Now click on Enable this share and then press Finish.
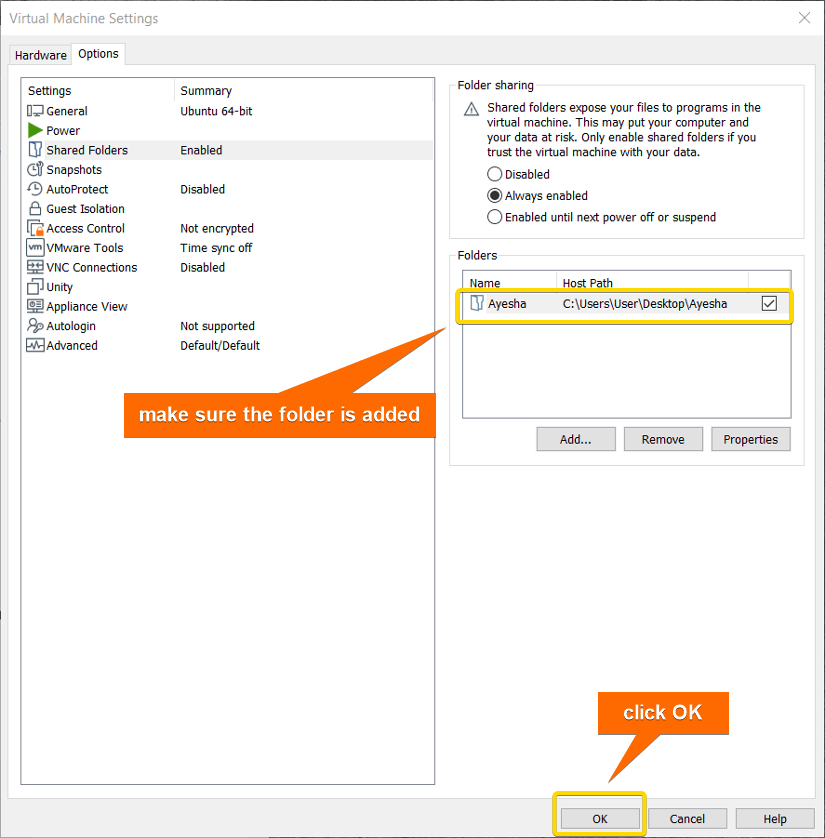
- Make sure that your desired folder is added in the Folders option. Click on OK when you have completed the steps above.
You can see in the image shown above that folder Ayesha along with its location on my PC has been added to Folders box. It is now available for sharing files.
 You can see in the image shown above that folder Ayesha along with its location on my PC has been added to Folders box. It is now available for sharing files.
Step 2: Create a Directory to Mount Shared Folder
Now mount the shared folder, Ayesha in the existing /mnt/ directory as it is the standard folder for temporarily mounting files or devices. Moreover, /mnt/ does not interfere with any existing directory in the system. The mounted folder is now easily recognizable in the Linux system.
- Open your Ubuntu terminal.
- Type the following command to make a folder named hgfs using mkdir command in the mnt directory.
sudo mkdir /mnt/hgfsEXPLANATION- sudo: Permits a user with administrative privileges to execute commands.
- mkdir: Creates a new directory or folder in the system.
- /mnt: Directory in Linux system that is used as a mount point for temporary files.
- /mnt/hgfs: Absolute path of the location of the newly created directory, hgfs.
- Now execute the following command to finally mount the shared folder, Ayesha.
sudo vmhgfs-fuse .host:/ /mnt/hgfs/ -o allow_other -o uid=1000EXPLANATION- sudo: Permits a user with administrative privileges to execute commands.
- vmhgfs-fuse: Command that mounts VMware shared folders in the Linux file system.
- .host:/: This specifies the name of the VMware shared folder that you want to mount. The dot (.) at the beginning specifies the default mount point.
- /mnt/hgfs: Absolute path of the location of the newly created directory, hgfs. This indicates where you want to mount your shared folder.
- -o: Specifies the options to use when mounting a folder.
- allow_other: The first option allows other users on the system to access the mounted shared folder.
- uid=1000: This option sets the user ID (UID) of the mounted shared folder to 1000. 1000 is the default UID. UID indicates which user owns the files of the mounted directory.
- Afterwards, type the following command to ensure that the shared folder is available in the terminal.
vmware-hgfsclientEXPLANATION- vmware-hgfsclient: Displays list of available shared folders.
 As you can see, this command views the shared folder Ayesha on the terminal.
 - Now implement the commands below one by one to navigate to the folder Ayesha using cd command and list its contents with ls command.
cd /mnt/hgfs/Ayesha lsEXPLANATION- cd: Changes the current working directory helping you to navigate through the file system by specifying the path of the directory you want to change to.
- /mnt/hgfs/Ayesha: Absolute path of the folder Ayesha in mnt directory.
- ls: Lists the contents of a directory.
 The image shows that at first, folder Ayesha is stored in hgfs sub-directory within mnt directory. When listing this folder, it shows nothing since it is empty at the moment.
 As you can see, this command views the shared folder Ayesha on the terminal.
 The image shows that at first, folder Ayesha is stored in hgfs sub-directory within mnt directory. When listing this folder, it shows nothing since it is empty at the moment.
Step 3: Locating the Shared Folder on Linux
You need to understand the accessibility of this folder. To do so you need to find its location at first:
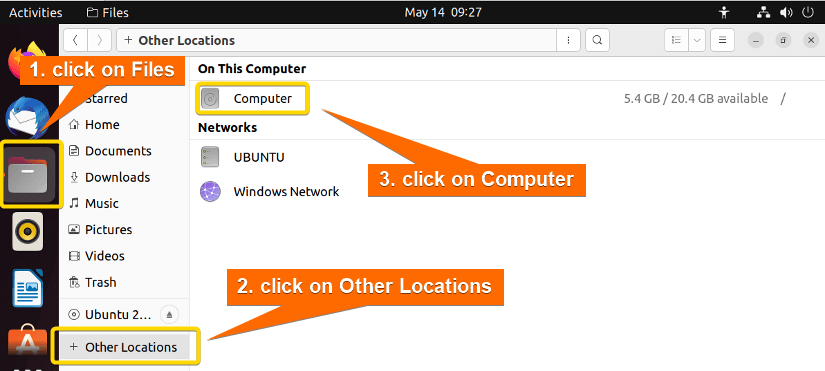
- Now in the Files in Ubuntu, go to Files > Other Locations > Computer.

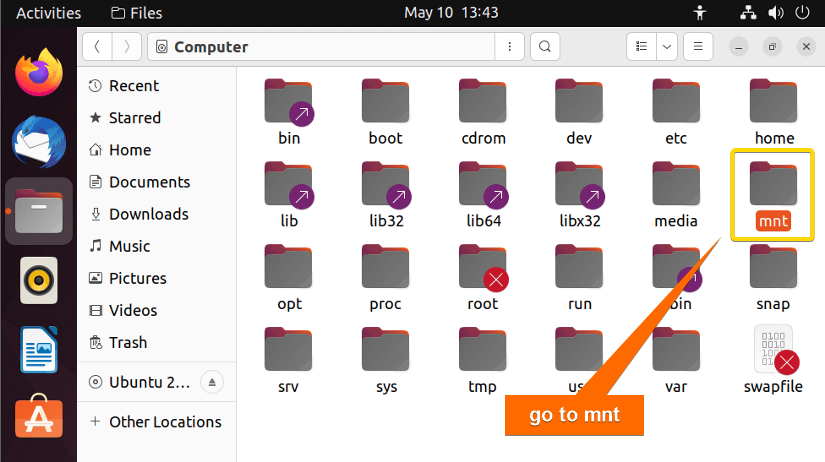
- Then click on the folder named “mnt”.

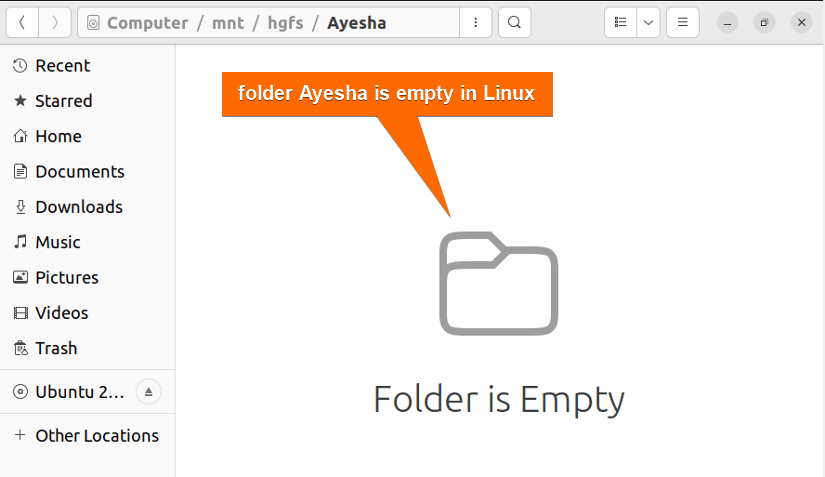
- Then browse through hgfs > Ayesha.
 In the above image, you can see that the folder Ayesha is empty at this point.
 In the above image, you can see that the folder Ayesha is empty at this point.
Step 4: Create a File in Linux and Access It From Windows
Let’s create a file in the folder Ayesha and access it from Windows. To create a file in Linux and access it from Windows, see this:
- Navigate to the shared folder in my case which is Ayesha and type the following commands to create a text file.
touch file.txt lsEXPLANATION- touch file.txt: Creates an empty file named file.txt
- ls: Lists the contents of a directory.

- Now when you open the folder Ayesha from Files in Linux, you will see the text file named file.txt.

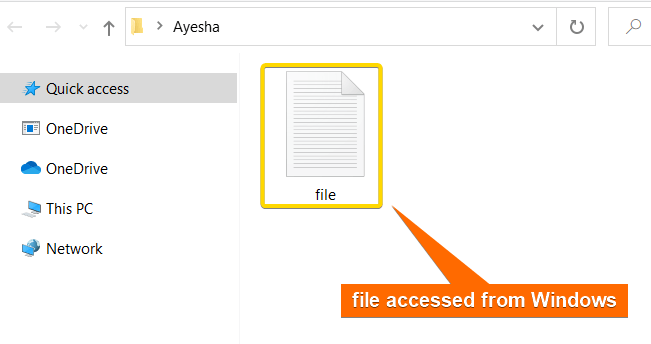
- Open the folder in Windows.
 Finally, you can see in the above image that I have successfully accessed the shared file from Windows.


 Finally, you can see in the above image that I have successfully accessed the shared file from Windows.
Step 5: Create a File in Windows and Access It From Linux
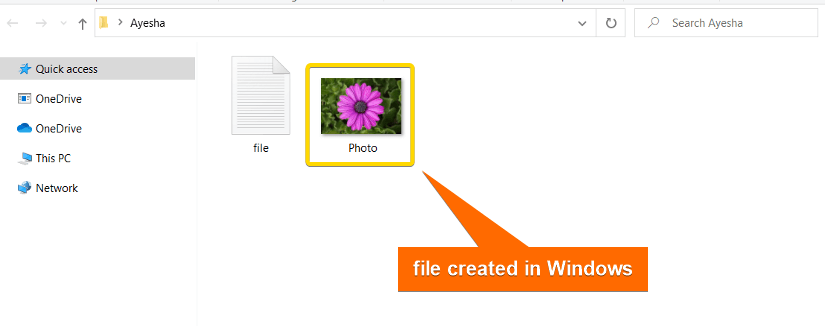
Now I will save an image in the folder Ayesha in Windows and try to access it from Linux. To create a file in Windows and access it from Linux, follow the steps below:
- First, save a file in the specific shared folder in Windows. In my case, I will save a file named “Photo.jpeg” on my shared folder named “Ayesha” in Windows.

- After that type the following command in the Ubuntu terminal after navigating to the shared folder.
lsEXPLANATION- ls: Lists the contents of a directory.
 The above image displays the contents, file.txt, and Photo.jpeg in the folder Ayesha.
 - To check it from the graphical user interface, navigate to your shared folder in Linux which is in my case Files>Other Locations>Computer>mnt>hgfs>Ayesha.
 In the above image, you can see that I can successfully access the shared image on my Linux Virtual Machine.
 The above image displays the contents, file.txt, and Photo.jpeg in the folder Ayesha.
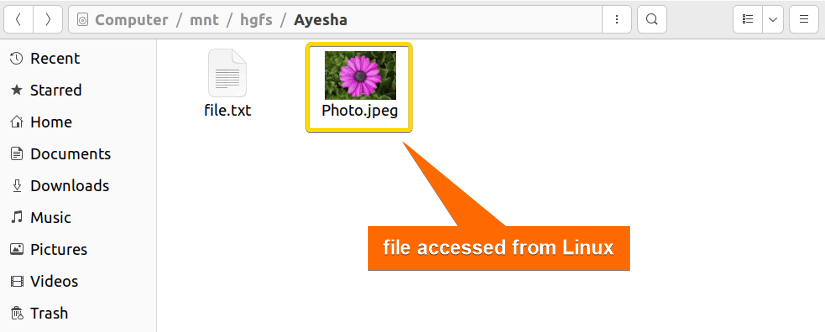 In the above image, you can see that I can successfully access the shared image on my Linux Virtual Machine.
Comparative Analysis of Cases
After going through the above-mentioned cases you may be confused in choosing the suitable process. I have shown a comparison of both scenarios to demonstrate the advantages and disadvantages. Hopefully, this will help to understand the criteria for deciding the best method:
| Cases | Pros | Cons |
|---|---|---|
| Case 1 |
|
|
| Case 2 |
|
|
To simplify, Case 1 is preferable when different operating systems are used and file sharing is a common requirement. On the other hand, sharing through Case 2 is feasible when you’re working with virtualized environments.
Conclusion
If you are confused about file sharing or find this process complicated, try the methods mentioned in this article. The file-sharing process has been simplified here so that anyone, regardless of their expertise in Linux, can undergo this experience smoothly and with no hassle. However, your need to share over a network or a virtual machine decides the scenario you are in and therefore you can transfer files based on your preference. Moreover, keep in mind that file sharing can pose security risks. Therefore, I recommend you to have a regular backup for your files and folders.
People Also Ask
What is the fastest way to share files between Linux and Windows?
To share files fast between Linux and Windows, you can rely on FTP. However, SFTP or SCP can provide fast and secure data sharing.
What is the difference between SMB and NFS?
SMB (Server Message Block), a protocol developed by Microsoft, is designed for Windows to share files and printers over a network. It is supported by non-Window operating systems, such as Linux and macOS. On the contrary, NFS (Network File Systems), developed by Sun Microsystems, is used mainly by Linux and allows faster file sharing on remote or local systems.
Which one is better SMB or FTP?
SMB is considered better than FTP since it is faster and more efficient in file sharing. On the other hand, FTP is platform-independent and supported by most web browsers. However, FTP poses security threats as FTP transfers are not protected by encryption.
What security concerns should I consider when sharing files between Linux and Windows?
Some key security concerns that you should keep in mind are authentication to restrict unauthorized access, encryption to protect the confidentiality of files, configuring firewalls, file types, and the latest security updates to alleviate potential security vulnerabilities.
How do I troubleshoot common issues when sharing files between Linux and Windows?
Some common troubleshooting issues in file sharing involve network connectivity, file permission, configuration, firewall, name resolution, and protocol settings. Addressing these issues and resolving them can ensure seamless file sharing.
What are some alternative ways to share files between Linux and Windows besides Samba?
Some alternative ways besides Samba include SSH, FTP or SFTP, NFS, web-based services such as Google Drive, Dropbox, or OneDrive and portable devices.
What is the best way to share files between Linux and Windows?
The process of file sharing depends on user requirements and preferences. Hence it is difficult to name one best way. However, Samba is considered the popular and reliable option as it offers seamless and more protected file transfer. Using cloud storage devices such as Google Drive, OneDrive or Dropbox can ensure file sharing across different operating systems.
Related Articles
- How to Access Shared Folder in Ubuntu [2 Methods]
- How to Install and Configure Samba Server in Ubuntu? [4 Steps]
- How to Install, Configure and Connect Samba Client on Ubuntu
- Install, Configure and Connect Samba on Ubuntu Using GUI
- How to Copy File from Windows to Linux Using SSH [2 Methods]
- How to Access Samba Share from Windows [2 Methods]
FUNDAMENTALS A Complete Guide for Beginners


Beautifully explained!
Thank you for sharing your thought. I hope this article makes file sharing between Linux and Windows easy for you.
Thank you very much for the tutorial, I completed it successfully on my Win 11 – Linux Mint machines.
Can I ask… I have a NAS enclosure (4 discs) connected to the Win 11 machine, is it possible and if so how can I share these NAS drives with the Linux machine without copying the complete contents of the drives to the ‘shared_folder’?
If this is possible, can it be done by modifying or adding to the instructions you have given in the tutorial or would I need to delete what Ive done so far and start again?
Thank you.
host ubuntu 22
guest win 10 on virtmanager
did not work