Samba is an open-source software suite providing file and print-sharing services between Windows and Linux-based systems. Its increasing popularity is for being interoperable and a versatile solution for integrating Linux and Windows. This tutorial will provide you with a step-by-step walkthrough on how to install and configure the Samba server in Ubuntu. Besides file sharing, Samba supports features such as authentication and access control, integrating with cloud storage services and streaming media files. Samba relies on smb or Server Message Block protocol, which is the core network sharing protocol for interprocess communication.
Free Downloads to Install and Configure Samba Server in Ubuntu:
Process Flow Chart to Install and Configure Samba Server: Distro Used Throughout the Tutorial: Ubuntu 22.04.02 LTS
Step-by-Step Process to Install and Configure Samba Server
Follow the steps below to install and configure samba server:
Step 1: Install Samba Server on Ubuntu
First, you need to install Samba on your Linux distribution. For the article, I am using Ubuntu 22.04. Following this step ensures updates of all existing packages and verifies Samba installation:
- Open your Ubuntu terminal.
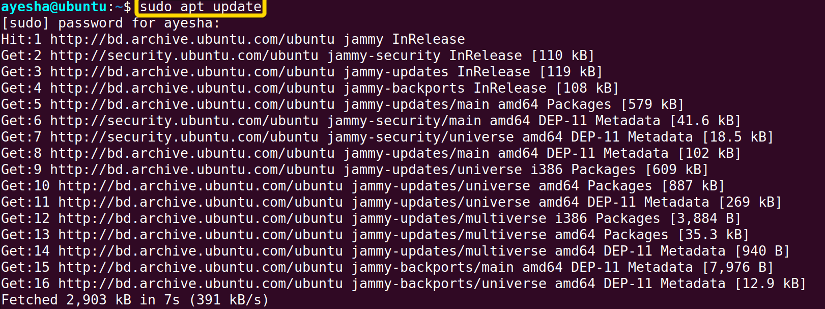
- Type the following command to update all packages in your Linux system.
sudo apt updateEXPLANATION- sudo: Permits a user with administrative privileges to execute commands.
- apt update: Updates all outdated packages and dependencies on your system.

- Install Samba with the following command.
sudo apt-get install samba -yEXPLANATION- sudo: Permits a user with administrative privileges to execute commands.
- apt install: Specifies that the install task needs to be performed.
- samba: Name of an open-source software package, Samba for file sharing.
- -y: Automatically answers ‘yes’ to any confirmation message during installation.

- An easy way to verify the installation of Samba is to locate it within the Linux system. The command to do this is:
whereis sambaEXPLANATION- whereis: Looks for the location of the installed package.
 The folder that contains the installed Samba is shown in the above image.
-
Next type the following command to instruct UFW firewall to open necessary ports or allow network traffic for the Samba service.
sudo ufw allow sambaEXPLANATION- ufw: Uncomplicated Firewall (ufw) is a command line tool for managing firewall configurations on Ubuntu.
- allow: Command option that allows incoming network traffic for Samba service.
- samba: Name of an open-source software package, Samba for file sharing.
 The command has now granted access to the Samba service through the firewall.

 The folder that contains the installed Samba is shown in the above image.
 The command has now granted access to the Samba service through the firewall.
Step 2: Create a Directory for Sharing Files
Now you have to create a shared directory in the Linux system that can be easily accessible from both Linux and Windows. To do so, follow the steps mentioned below:
-
Type the following command to create a directory for Samba sharing. I will create a folder, Sambashare in Desktop for file sharing.
mkdir /home/ayesha/Desktop/SambashareEXPLANATION- mkdir: Creates a new directory or folder
- /home/ayesha/Desktop/Sambashare: Absolute path of the location of the folder, Sambashare.
Step 3: Add User to Samba Server on Ubuntu
You have to add a user who will have access to the shared folder. Follow the below step:
-
To add a new Samba user and assign a password to that user, run the following command.
sudo smbpasswd -a ayeshaEXPLANATION- smbpasswd: Sets password for Samba users.
- -a: Allows the command to add a new Samba user.
- ayesha: User name.
 The image shows I had to enter a password to add user ayesha.
 The image shows I had to enter a password to add user ayesha.
Step 4: Configure Samba Settings for Shared Folder
This step involves customizing settings and permissions of the shared folder, Sambashare in the Samba configuration file. Refer to the following steps to configure Samba settings for shared folder:
-
Now run the command below to open and edit the configuration file.
sudo nano /etc/samba/smb.confEXPLANATION- nano: Text editor
- /etc/samba/smb.conf: Configuration file of Samba to customize settings such as user authentication, shares, and security.
- conf: Configuration file. smb stands for Sever Message Block Configuration.

Provide your password and this command will open an editor file for modifying configuration settings.
-
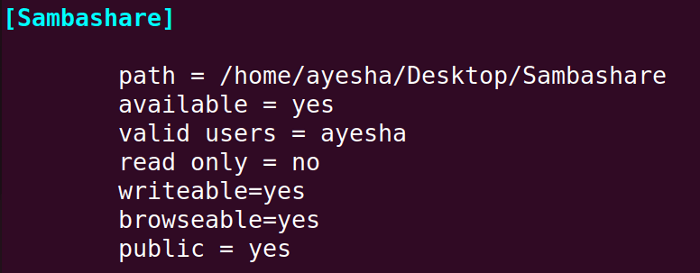
Insert these lines at the end of the configuration file. Remember to write the name of your shared folder inside the braces. I wrote Sambashare in this regard.
[Sambashare] path = /home/ayesha/Desktop/Sambashare available = yes valid users = ayesha read only = no writeable=yes browseable=yes public = yesEXPLANATION- sambashare: Name of the folder whose contents you want to share.
- path: Absolute path of the folder you want to share.
- available: Specifies whether the file is available for sharing or not.
- valid user: User name.
- read-only: Specifies whether the file is available for reading or not.
- writeable: Specifies whether the folder can be written to or not.
- browseable: Specifies whether the shared file is visible while browsing the network or not.
- public: Specifies whether the shared file is accessible to all users or not.
-
Press CTRL+O and CTRL+X to save the changes and exit the editor respectively.

- Restart Samba and enter the password of your currently logged-in user.
sudo service smbd restartEXPLANATION- service: Controls services in the Linux system.
- smbd: Samba daemon which provides file-sharing services to Windows clients.
- restart: Stop running the service and start again.

- Now to finally use the Samba service for file sharing it is important to check its status. The following command will tell you if the service is running, stopped, or facing any issues.
systemctl status smbdEXPLANATION- systemctl: Manages system services, along with starting, stopping, and checking the status of services.
- status: Displays the current status of a service.
- smbd: Samba daemon which provides file-sharing services to Windows clients.
 The image above shows that the Samba service is active and running as expected.


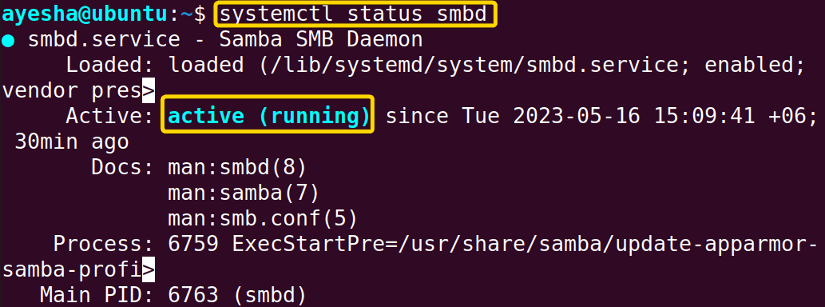 The image above shows that the Samba service is active and running as expected.
Read More: How to Configure NFS Server in Linux? [5 Steps]
Sharing Files Using Samba Server on Ubuntu
To finally serve the purpose of Samba i.e. to facilitate file sharing, you need to have the flexibility to create files in either Linux or Windows and access them seamlessly from both systems.
Step 1: Establish a Connection Between Linux and Windows
To help Linux and Windows to communicate with each other, you need to install the required file-sharing packages and protocols. You can follow these steps:
-
Run the command below to install client and utils package on Samba.
sudo apt install cifs-utils samba client -yEXPLANATION- cifs-utils: Package that supports mounting CIFS/SMB file system. CIFS is the core file-sharing protocol used by Samba.
- samba client: Package containing necessary client tools for Samba shares and other Samba-related operations.
- -y: Automatically answers ‘yes’ to any confirmation message during installation.

- To access files in Windows, you need to obtain the IP address of your Linux system. Run the command below to find it.
hostname -IEXPLANATION- hostname -I: Obtain the IP address of the current Linux system.
 You can see from the image above, that the IP address of my Linux system is 192.168.153.128.

 You can see from the image above, that the IP address of my Linux system is 192.168.153.128.
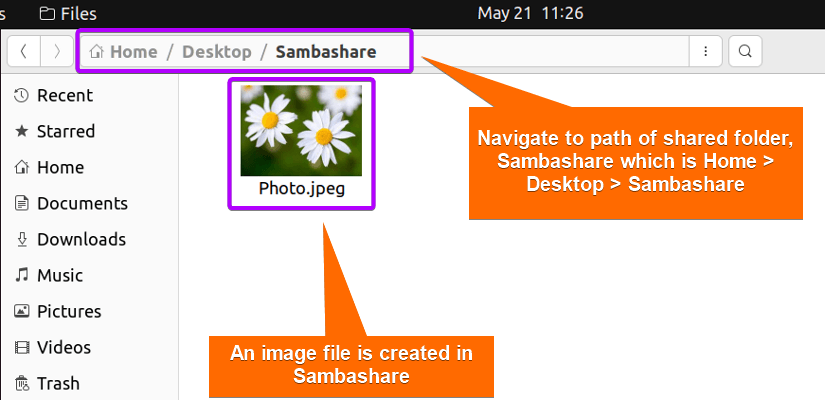
Step 2: Create Files in Ubuntu and Access Them from Windows
In this step, I will save an image called Photo.jpeg in Linux and attempt to access it from Windows:
-
In Linux, navigate to the shared folder, Sambashare by following the path Files>Home>Desktop>Sambashare and save the image file there.

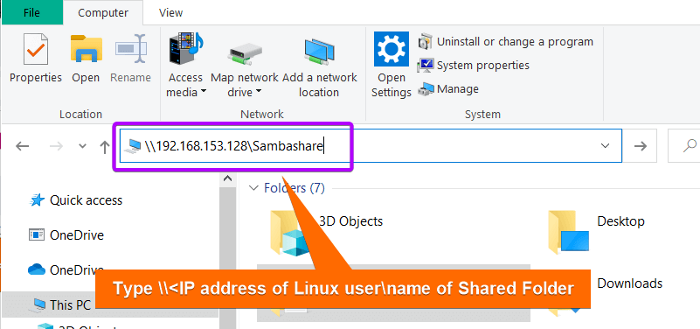
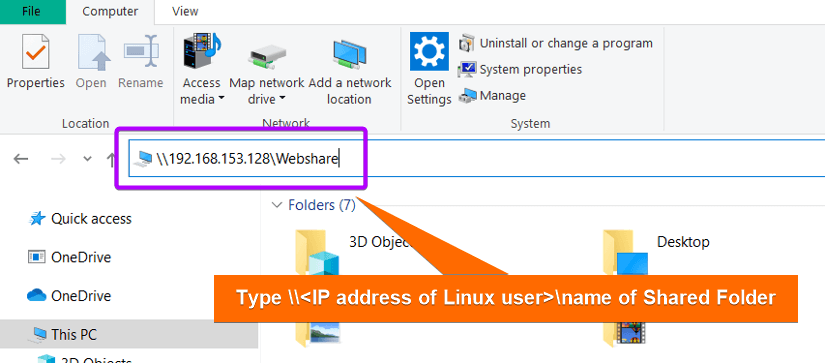
- Then go to Windows and type the IP address of Linux system and the name of shared folder, Sambashare in the address bar.
\\192.168.153.128\SambashareEXPLANATION- 192.168.153.128: IP address of my Linux system.
- Webshare: Name of the folder used for sharing files.

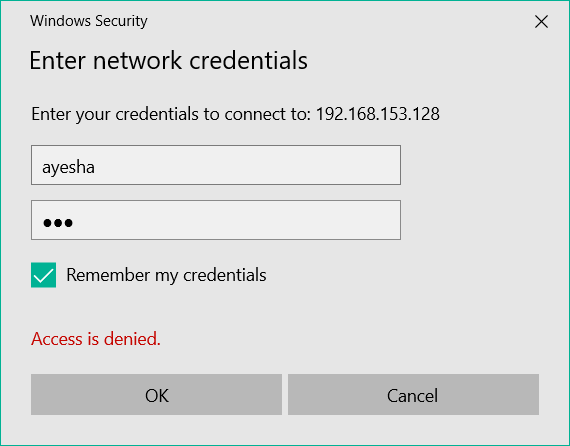
- A dialogue box like the image below will appear. Put in your currently logged-in Ubuntu user information.
 Don’t worry if “Access is denied” shows up. It will appear until you have entered your user information correctly.
 -
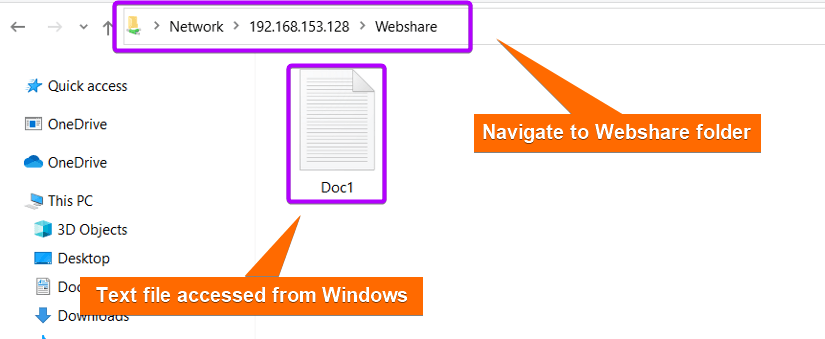
You have now successfully accessed Sambashare folder from Windows and can view its contents.
 You can see that the image file is now accessible from the Windows system.
 Don’t worry if “Access is denied” shows up. It will appear until you have entered your user information correctly.
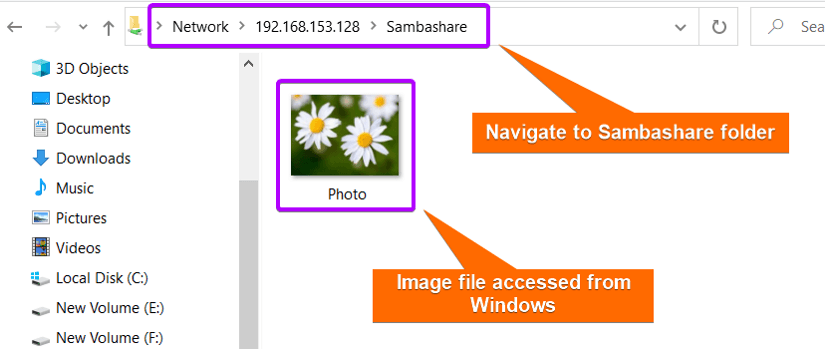 You can see that the image file is now accessible from the Windows system.
Step 3: Create Files in Windows and Access Them From Ubuntu
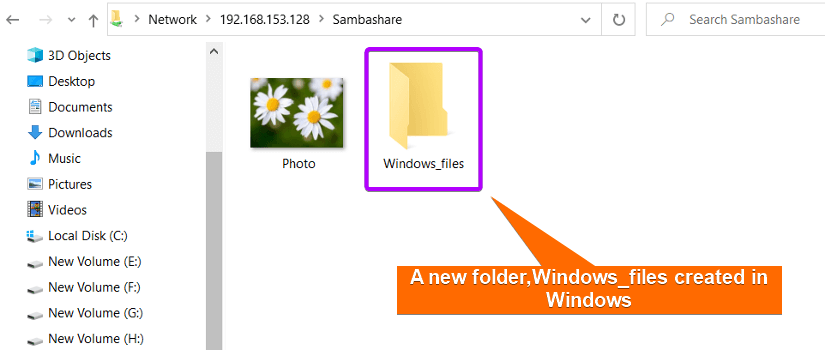
I will demonstrate to you whether I can share any file from Windows. In this case, I will create a folder, Windows_files in Sambashare in Windows and try to access it from Linux. You can do the same following the steps below:
-
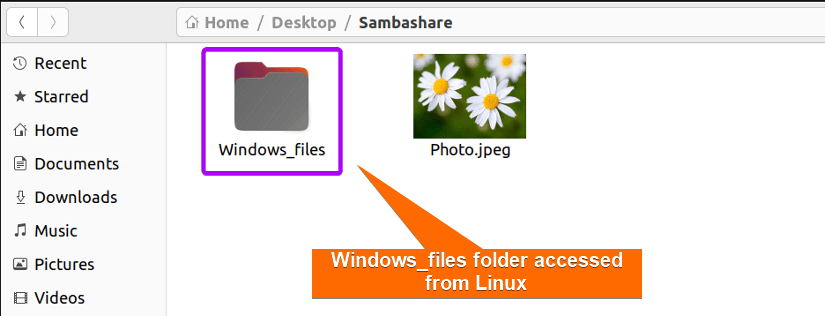
Go to Windows and create a folder, Windows_files.

- Then open Sambashare folder in Linux.
 The image above shows that the Windows_files folder is now accessible from Linux.
 The image above shows that the Windows_files folder is now accessible from Linux.
Read More: How to Share Files between Linux and Windows
Web-based Samba Server Configuration on Ubuntu
You can opt for a web-based Samba configuration if you prefer a graphical user interface(GUI) or want to manage Samba remotely from any device using a web browser. Webmin is a powerful web-based configuration tool for managing all aspects of the Linux system. You can easily configure Samba settings with Webmin instead of a command-line interface (CLI).
Step 1: Install Webmin on Ubuntu
The steps below will guide you on how to set up the required environment for installing Webmin in Ubuntu:
-
Open your Ubuntu terminal.
-
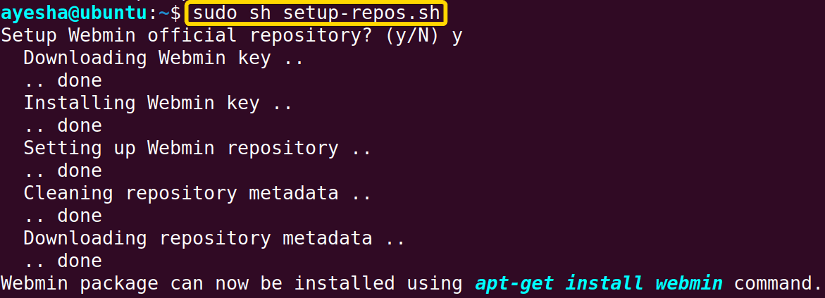
Type the following command to set up the necessary repositories for installing Webmin on a Linux system by downloading setup-repos.sh script from the Webmin repository on GitHub.
sudo curl -o setup-repos.sh https://raw.githubusercontent.com/webmin/webmin/master/setup-repos.shEXPLANATION- curl: Retrieves data from or sends data to web or application server by specifying URL.
- -o setup-repos.sh: Option -o determines that output of the URL should be saved to a file named ‘setup-repos.sh’.
- https://raw.githubusercontent.com/webmin/webmin/master/setup-repos.sh: URL of ‘setup-repos.sh’ in webmin/webmin repository of Gthub from where data will be fetched.
 The command has automatically set up the repository and GPG keys to facilitate Webmin installation.
-
Afterwards, run the following command.
sudo sh setup-repos.shEXPLANATION- sh: Command for ‘shell’ and executes shell scripts.
- setup-repos.sh: Name of the shell script you want to execute.
 The image depicts that the Linux system is now ready to install Webmin package.
-
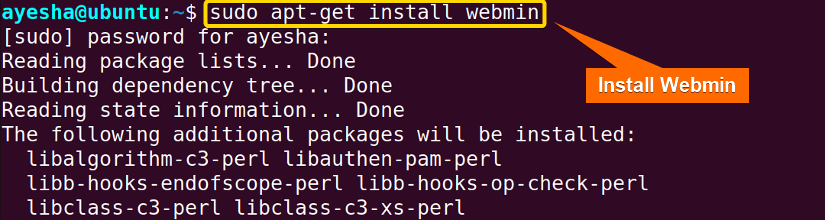
Finally your Linux system is ready to install Webmin with the following command.
sudo apt-get install webminEXPLANATION- sudo: Permits a user with administrative privileges to execute commands.
- apt-get install: Specifies that the install task needs to be performed.
- webmin: Name of Webmin package.
 From the above image, you can see that Webmin is finally installed.
 The command has automatically set up the repository and GPG keys to facilitate Webmin installation.
 The image depicts that the Linux system is now ready to install Webmin package.
 From the above image, you can see that Webmin is finally installed.
Step 2: Log Into Webmin
Now you have to enter your Samba user credentials i.e. username and password to log into Webmin and make necessary changes:
-
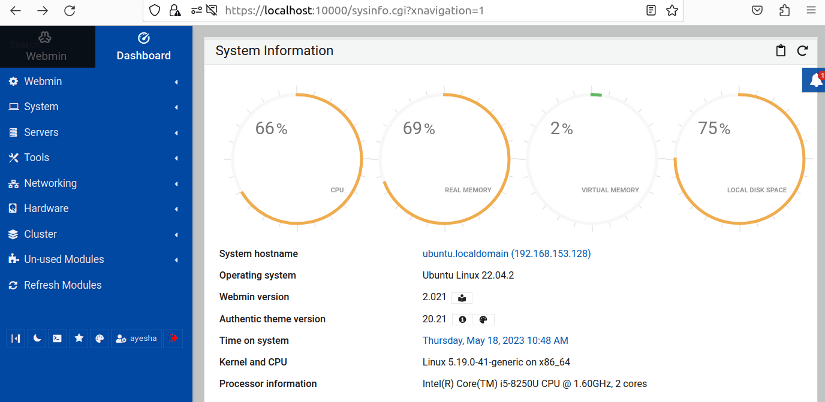
Open your internet browser and type the URL of the Webmin into the browser address field. Enter your username and password or your currently logged-in user.
https://localhost:10000EXPLANATION- https: Stands for Hypertext Transfer Protocol and encrypt data for secure communication.
- localhost: Hostname referring to the current machine where the web browser is running.
- 10000: Port number associated with Webmin.
-
Click on Remember me if you want your user credentials saved.
- Hit on Sign in.

- Webmin interface will look like the image below.

- Then browse through Webmin > Servers > Samba Windows File Sharing.
 The preceding image displays the location of Samba Windows File Sharing.

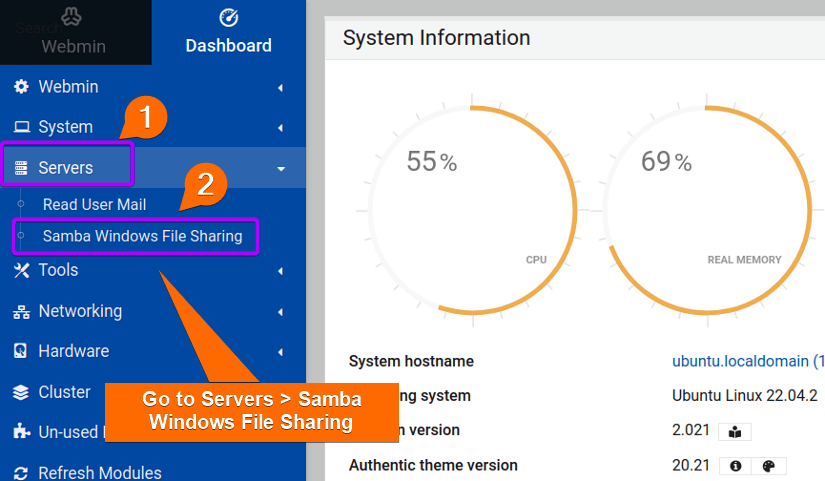 The preceding image displays the location of Samba Windows File Sharing.
Step 3: Create a New Shared Folder
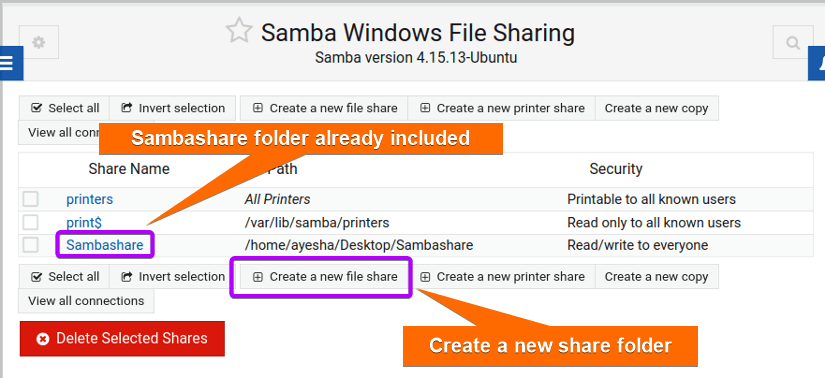
You will see that my previously created folder, Sambashare is already enlisted in the sharing folders. What if I want to create a completely new folder and configure it? Let’s see how to do that:
- Open your Ubuntu terminal.
-
I created a folder called Webshare on Desktop of my Linux system using the command below.
mkdir /home/ayesha/Desktop/WebshareEXPLANATION- mkdir: Creates a new folder or directory.
- /home/ayesha/Desktop/Webshare: Absolute path of the newly created Webshare folder.
-
Go back to Webmin and click on Create a new file share.

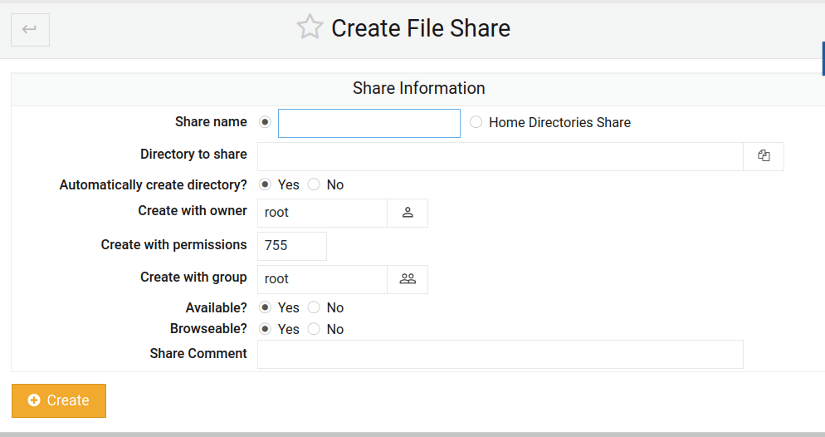
- The browser will direct you to the page, Create File Share. You can now enter the necessary details for a new folder.

- Now click on the Directory to share icon.
-
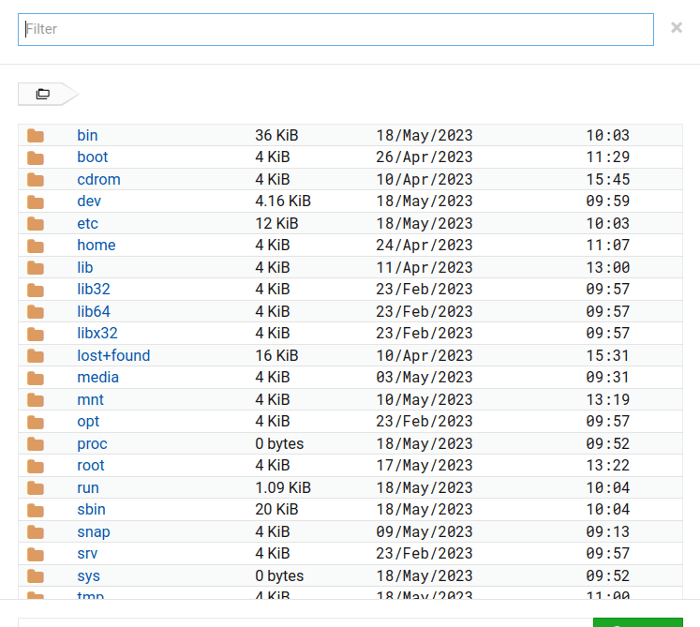
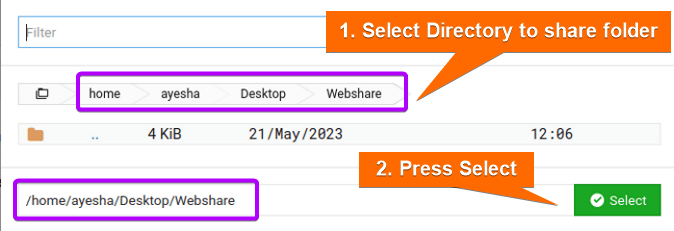
A list of available directories will appear on the screen.

- Navigate to the previously created Webshare folder in Desktop and press Select.
 The image displays the entire path of the folder, Webshare.
 -
You will be directed back to Create File Share page. Type the shared directory name.
-
Then click on Create button.
 You can see in the picture above that the shared directory is enlisted here.
 The image displays the entire path of the folder, Webshare.
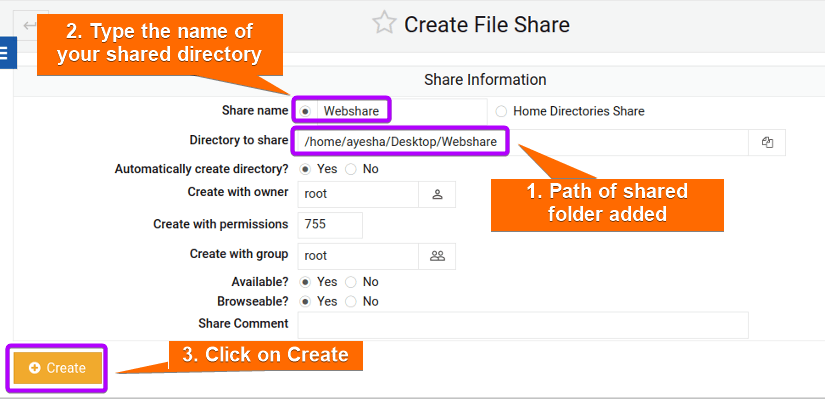 You can see in the picture above that the shared directory is enlisted here.
Step 4: Giving Security and Access Control
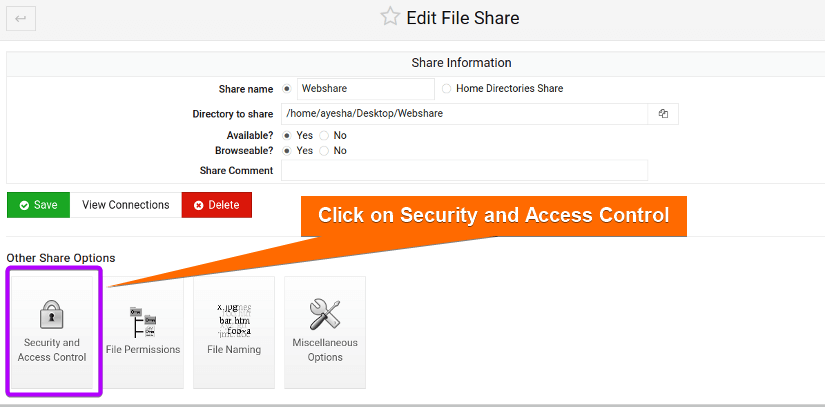
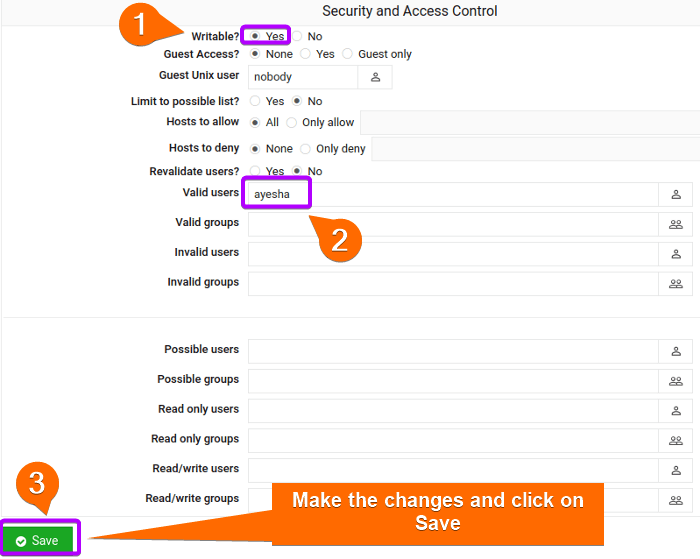
Now you have to decide if your folder will be accessible or not or who can have control over files. To do that you need to bring modifications in Security and Access Control like the following:
-
Go to the main interface of Samba Windows File Sharing and click on the newly added folder, Webshare.

- Then click on Security and Access Control.

- Select Yes to Writeable and add your user name who will have access. Press on Save afterward.


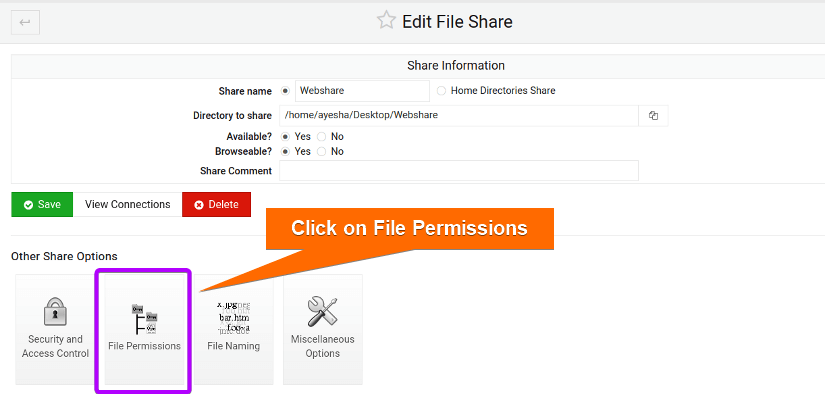
Step 5: Giving File Permissions
Whether the contents of a shared folder will be readable, writable, or executable depends on the permission granted to users. You can perform this in the File Permissions section:
-
Go back to Edit File Share page and click on File Permissions.

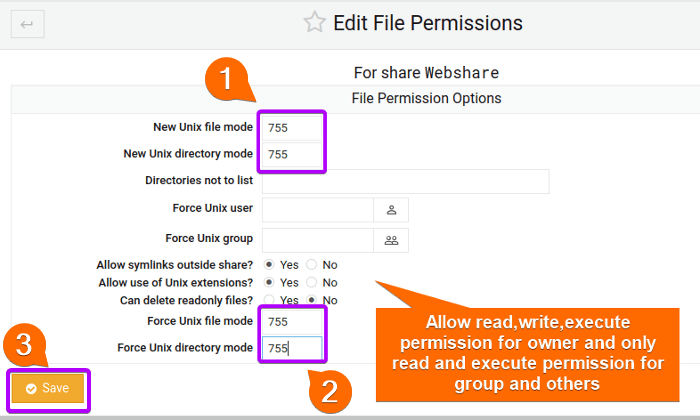
- Set the Unix file mode to 755 as in the image below and save the changes.
 The image shows that the file permission is 755. Here, 7 indicates read-write-execute permission for the owner and 5 denotes read-and-execute permission for both groups and others.
 The image shows that the file permission is 755. Here, 7 indicates read-write-execute permission for the owner and 5 denotes read-and-execute permission for both groups and others.
Step 6: Accessing Files
Now to create files and access them from either Windows or Ubuntu operating system, carry out the instructions below:
-
Run the command below to install all cifs and utils protocols which are mandatory parts of the file-sharing process.
sudo apt install cifs-utils samba client -yEXPLANATION- cifs-utils: Package that supports mounting CIFS/SMB file system. CIFS is the core file sharing protocol used by Samba.
- samba client: Package containing necessary client tools for Samba shares and other Samba-related operations.
- -y: Automatically answers ‘yes’ to any confirmation message during installation.
- Then type in the following command to find out the IP address of the host associated with your Linux system.
hostname -IEXPLANATION- hostname -I: Display IP address of the current Ubuntu system.
The command shows that the IP address of my Ubuntu system is 192.168.153.128.
-
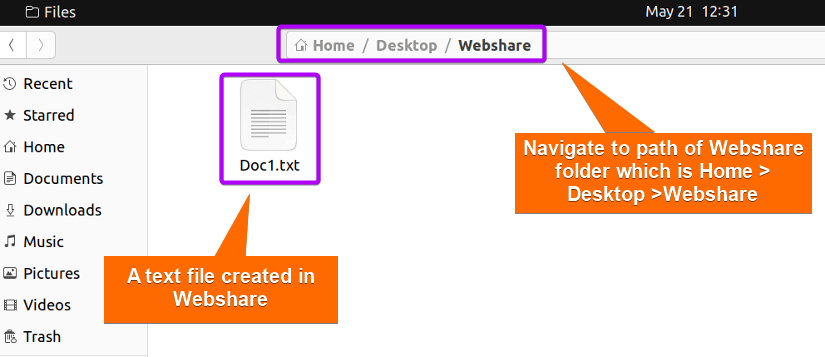
Then navigate to Files >Home> Desktop>Webshare. I have already created a text file in Webshare folder.

- Afterwards go to the Windows system. Go to This PC and type the IP address you obtained and the folder name, Webshare in your address bar.
\\192.168.153.128\WebshareEXPLANATION- 192.168.153.128: IP address of my Ubuntu system.
- Webshare: Name of the folder used for sharing files.

- Now open Webshare folder from Windows and find the text file which you had created previously in your Windows system.
 You can see that the file is now accessible from Windows.

 The command shows that the IP address of my Ubuntu system is 192.168.153.128.
 You can see that the file is now accessible from Windows.
Read More: How to Access Shared Folder in Ubuntu [2 Methods]
Scheduled Backup of Samba Files on Ubuntu
It is crucial to have a backup of your Samba shared files since easy and flexible access can often pose potential security risks. Having an automated backup ensures recovery of data in case of accidental deletion or data loss incidents and you can continue your sharing operations without any interruption. In this section, I will create a scheduled backup system for my Samba files that will back up my Samba files on Ubuntu every 2 minutes. To do so follow the instructions given below:
-
First create a backup directory where you will save your shared folder. I have chosen to create a directory called Backup in Desktop and viewed its contents with the following commands. You can choose your directory location according to your preference.
mkdir /home/ayesha/Desktop/Backupls Desktop/BackupEXPLANATION- mkdir: Creates a folder or directory.
- /home/ayesha/Desktop/Backup: Absolute path of the Backup Directory.
- ls Desktop/Backup: Lists the contents of the Backup directory located in Desktop.

- Regular backup will involve copying the Samba shared files to the Backup folder at specified intervals. Edit the cron table with the command below and you can define your desired schedule for backing up process.
crontab -eEXPLANATION- crontab -e: Edits cron table or crontab. Crontab contains commands or scripts that are executed at specified time intervals.
- Now type the command below in the crontab editor.
*/2 * * * rsync -avz /home/ayesha/Desktop/Sambashare /home/ayesha/Desktop/BackupEXPLANATION- */2 * * *: Specifies that the cron job will run every two minutes. This means the copying of files will be executed every two minutes.
- rsync: Copies and synchronizes files with different locations.
- -a: Stands for ‘archive’ and preserves file permissions, ownership, timestamps, and symbolic links. Copied files will retain their original attributes.
- -v: Stands for ‘verbose’ and displays information about files being transferred.
- -z: Compresses data during file transfer.
- /home/ayesha/Desktop/Sambashare: Source directory of the files that you want to backup.
- /home/ayesha/Desktop/Backup: Destination directory where files will be sent for backup.
-
Press CTRL+O and CTRL+X to save the editor file and exit respectively.

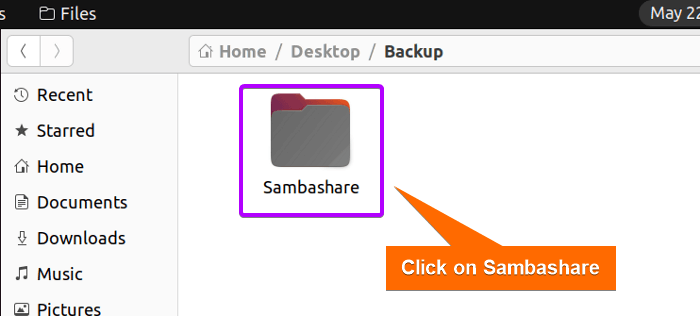
- Now go to Files > Home > Desktop and click on the Backup folder within Desktop.
- You will find the entire Sambashare folder copied to the Backup folder.

- Proceed to Sambashare by clicking on it.
 The image shows that the contents of Sambashare are automatically copied and synchronized to the Backup folder.


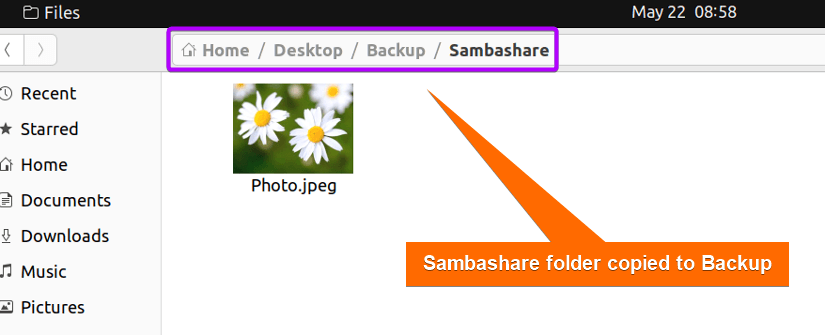 The image shows that the contents of Sambashare are automatically copied and synchronized to the Backup folder.
How to Remove Samba Server From Ubuntu
If you no longer require Samba or want to simplify system configuration, the removal of Samba would be a wise decision. But before Samba deletion, make sure that it will not adversely affect any other application or service in the Linux system. Remember to have a backup of important files before proceeding with the removal. Now follow the steps below:
-
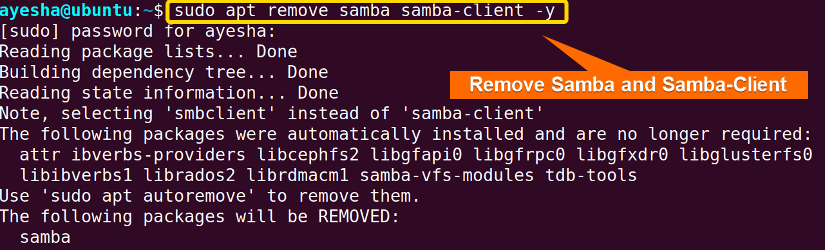
At first, you need to uninstall the Samba and Samba-client package from your system with the command below.
sudo apt remove samba samba-client -yEXPLANATION- remove: Removes or uninstalls specified packages from the system.
- samba: Name of open-source software package, Samba for file sharing services.
- samba-client: Package containing tools and utilities for interacting with Samba servers.
 The image above shows all packages required for connecting to Samba shares and accessing files are removed.
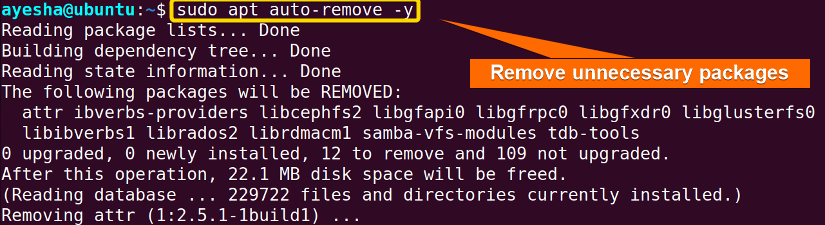
- Run the command below to remove any unnecessary or unused packages that are no longer needed.
sudo apt auto-remove -yEXPLANATION- auto-remove: Automatically removes any unused packages that were initially installed but are no longer needed.
 As depicted in the image above, the removal of unnecessary packages freed up disk space.
 The image above shows all packages required for connecting to Samba shares and accessing files are removed.
 As depicted in the image above, the removal of unnecessary packages freed up disk space.
Conclusion
Samba is a powerful tool to facilitate smooth file sharing between Linux and Windows systems. In this article, I have demonstrated a step-by-step guide on how to install and configure Samba using both a command line interface and a web-based tool. Additionally, the removal of Samba and backup of Samba files enhance data integrity and easy data restoration when needed. Furthermore, this guide will provide you optimal file-sharing experience. Comment below and let us know if you have found this article helpful.
People Also Ask
How do I install the Samba server on Ubuntu?
To, install the Samba server on Ubuntu, run the command sudo apt-get install samba -y. Using the -y flag automatically answers any confirmation question during the installation process.
What is a Samba server?
Samba server is a software suite that enables files and print-sharing between Unix/Linux and Windows systems. It’s used on Ubuntu to facilitate a seamless share of files and resources across a network.
How to verify the installation of the Samba server?
To verify whether the samba server is installed on the Ubuntu system, run the command whereis samba prints the directory containing samba. Or, you can use the command samba -V to check the current Samba server version to verify its installation.
You have found a patch for the Samba server on your system. The patch is a .rpm package. Which is the most correct procedure to install the patch?
Here are the most careful steps to install a Samba server patch of .rpm package:
- Backup the existing Samba configuration files.
- Download .rpm package for the patch from from trusted source.
- Install the patch using the appropriate package manager in the terminal.
- Restart the Samba service to reflect patch changes.
- Test the functionality to verify the patch installation and ensure that everything works as expected.
What is the size limit of Samba share?
There is a limitation for files mounted using smbmount which is it does not support files larger than 2 GB.
Does Samba have GUI?
Yes, Samba has Graphical User Interface or GUI. It offers a user-friendly way or visual interface to configure Samba, manage user access, and create shares. Some popular GUI for Samba are Webmin, SWAT, KDE control module, and Gnome Samba configuration tool.
How do I access Webmin remotely?
To remotely access Webmin, open your web browser and type https://your-server-ip-address:10000 in the address bar. <your-server-ip-address> is the IP of your Linux system.
How do I stop Samba?
To stop Samba service run the command: sudo service smbd stop or the command: sudo /etc/init.d/smbd stop.
How do I disable Samba on Linux?
To disable Samba service from starting automatically, execute the command: sudo systemctl disable smbd. Moreover, you can disable Samba client service with the command sudo systemctl disable nmbd.
Related Articles
- How to Install, Configure and Connect Samba Client on Ubuntu
- Install, Configure and Connect Samba on Ubuntu Using GUI
- How to Copy File from Windows to Linux Using SSH [2 Methods]
- How to Access Samba Share from Windows [2 Methods]
- How to Share Files between Linux and Windows Dual Boot [3 Methods]
FUNDAMENTALS A Complete Guide for Beginners


Great guide! I followed your steps to set up Samba on my Ubuntu system, and it worked perfectly. The screenshots were really helpful, especially for someone new to Linux like me. Thanks for making it so straightforward!