Samba, a free, open-source utility of SMB networking protocol, enables file sharing between Linux machines and other operating systems. And Server Message Block(SMB) allows Samba clients to connect and access the files and directories remotely. In this article, I have outlined step-by-step procedures of installing, configuring and connecting a Samba client on Ubuntu. Let’s go over it & grasp the basics.
Process Flow Chart to Install, Configure & Connect Samba Client
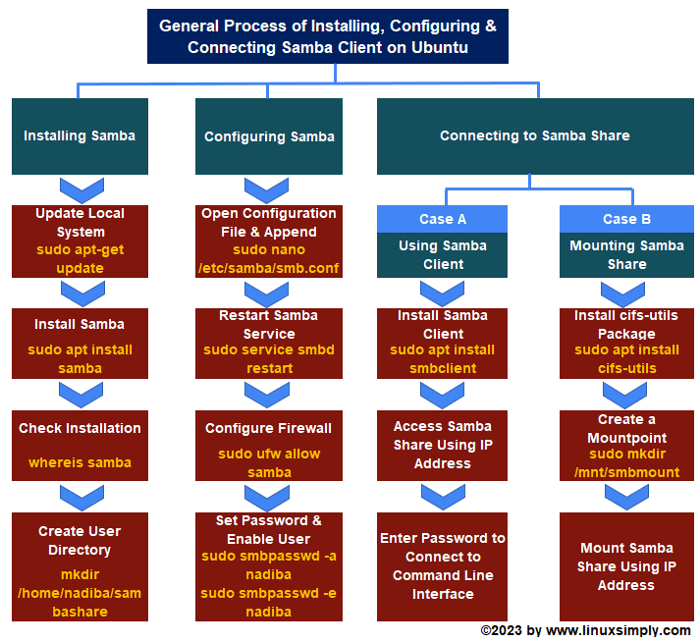
[Distro Used Throughout the Tutorial: Ubuntu 22.04.2 LTS]
Installing Samba on Ubuntu
The Samba package is available on Ubuntu’s official repositories. Here I will show you how to install Samba on Ubuntu:
- First, open the Ubuntu terminal & install the apt packages by executing the following command
sudo apt-get updateEXPLANATION
- Then, install Samba packages using the following command:
sudo apt install samba
- Now, you can check if you have installed Samba successfully or not with the command below:
whereis sambaEXPLANATION- whereis: Returns the source, binary and manual page files of given commands.
- samba: Free packages.

- Finally, to make a Samba user directory write the following command and hit the ENTER button:
mkdir /home/nadiba/sambashareEXPLANATION- mkdir: Creates one or more directories.
- /home/nadiba/sambashare: Indicates ‘sambashare’ directory inside the home directory of user “nadiba”.
 After this samba installation and creation of a user directory will be completed.


 After this samba installation and creation of a user directory will be completed.
Read More: How to Install and Configure Samba Server in Ubuntu? [4 Steps]
Configuring Samba on Ubuntu
After the installation process, you need to configure Samba on Ubuntu by following the steps below:
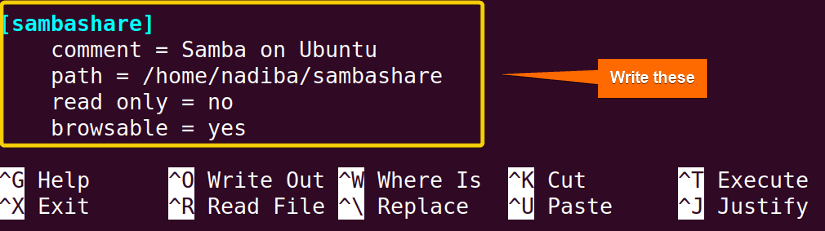
- Type according to the following command to open the configuration file for Samba:
sudo nano /etc/samba/smb.confEXPLANATION- sudo: Super User DO.
- nano: It’s a text editor.
- /etc/samba/smb.conf: Enters into the Samba configuration file under the “etc” directory.

- Now, append the following options inside the file:
comment = Samba on Ubuntu

path = /home/nadiba/sambashare

read only = no

browsable = yes
OUTPUT ANALYSIS
- path: It’s the path to the Samba share of the user.
- read only: Users are able to write in this share by setting it to “no”.
- browsable: Other users will be able to browse the share by setting it to “yes”.
-
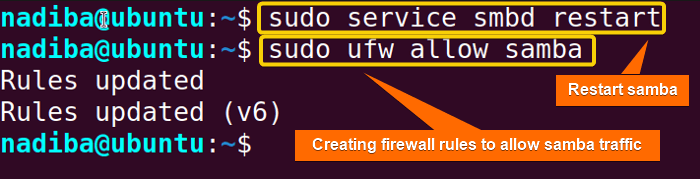
Then, save it by pressing “CTRL+O” and “ENTER”. Then, type “CTRL+X” to exit. Once done restart the Samba services using the command below:
sudo service smbd restartEXPLANATION- sudo: Super User DO.
- service: The services sudo provides.
- smbd restart: Restart Samba service.
 Now, if you are using UFW for your firewall configuration, then you will need to allow the ‘samba’ profile by using the following command like the above snapshot:
sudo ufw allow sambaEXPLANATION- sudo: Super User DO.
- ufw: Uncomplicated Firewall.
- allow samba: Allows ‘samba’ profile.
-
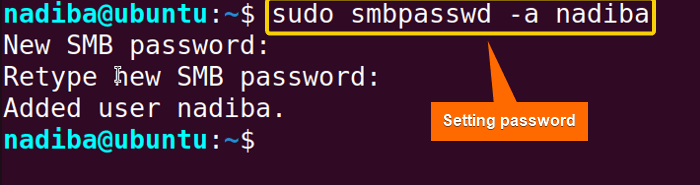
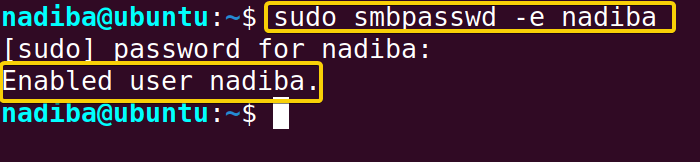
Add a user to Samba database by setting & re-confirming new user password for Samba like the following. Here, I have added the user “nadiba”, you can add any of your likings.
sudo smbpasswd -a nadibaEXPLANATION- sudo: Super User DO.
- smbpasswd: Samba encrypted password file.
- -a nadiba: Indicates the user.

- Finally, to enable the user Samba account run the command below. Here, I have added the user “nadiba”, you can choose according to your choice.
sudo smbpasswd -e nadibaEXPLANATION- -e nadiba: Enables the user.
 Once you put the password, you will see the line ‘Enabled user nadiba’.

 Now, if you are using UFW for your firewall configuration, then you will need to allow the ‘samba’ profile by using the following command like the above snapshot:
 Once you put the password, you will see the line ‘Enabled user nadiba’.
Read More: How to Configure NFS Server in Linux? [5 Steps]
Connecting to Samba Share on Ubuntu
As a Linux user, you can access the Samba share using the command line & mount the Samba share. Now, to get the IP address of the Samba server type the following command and copy the IP address:
ifconfig- ifconfig: Configures a network interface.
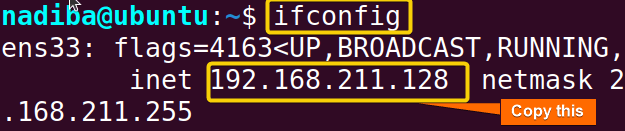
To install ifconfig run the below command:
sudo apt install net-tools- sudo: Super User DO.
- apt: Advanced package utility.
- install net-tools: Install ‘ifconfig’ command under net-tools.
 Here, I will use two options to connect to Samba Share by using Samba client & mounting Samba share.
A. Using Samba Client
First, you need to install the Samba client packages before accessing Samba share. So, follow the given steps:
- Install Samba client by running the following command:
sudo apt install smbclientEXPLANATION- sudo: Super User DO.
- apt: Advanced package utility.
- install smbclient: Install Samba client.

- After installing ‘smbclient’, you can access Samba shared folders with the following command:
smbclient //192.168.211.128/sambashare -U nadibaEXPLANATION- smbclient: Samba client.
- 192.168.211.128: Samba server IP address you copied using ifconfig.
- sambashare Shared folder on Samba server.
- -U nadiba: valid username on Samba server.
 Once you prompt to enter the password, you will be connected to the command line interface of Samba share. Now, you can implement a variety of commands to interact with the Samba share. For example:

 Once you prompt to enter the password, you will be connected to the command line interface of Samba share. Now, you can implement a variety of commands to interact with the Samba share. For example:
B. Mounting Samba Share
By following the steps below you can mount Samba Share as a local file system on your Ubuntu:
- First, install cifs-utils package to mount Samba share.
sudo apt install cifs-utilsEXPLANATION- sudo: Super User DO.
- install cifs-utils: Install the in-kernel CIFS file system which depends on a package of user space tools.

- Create a mountpoint by executing the command below:
sudo mkdir /mnt/smbmountEXPLANATION- sudo: Super User DO.
- mkdir:Creates directory on Samba share.
- /mnt/smbmount: Local directory where you will mount the Samba share.

- Mount the Samba share with the commands below:
sudo mount -t cifs -o username=nadiba //192.168.211.128/sambashare /mnt/smbmountEXPLANATION- sudo: Super User DO.
- mount: Attaches a removable file system or storage device to a directory.
- -t: Indicates file system type.
- cifs: Common Internet File System.
- -o: Specifies additional options.
- username=nadiba: Username[you can choose any of your choice].
- 192.168.211.128: IP address of Samba server.
- sambashare: Shared directory on Samba server.
- /mnt/smbmount: Local directory where you will mount the Samba share.
 Lastly, enter a user password like the image above.

 Lastly, enter a user password like the image above.
Read More: How to Access Samba Share from Windows [2 Methods]
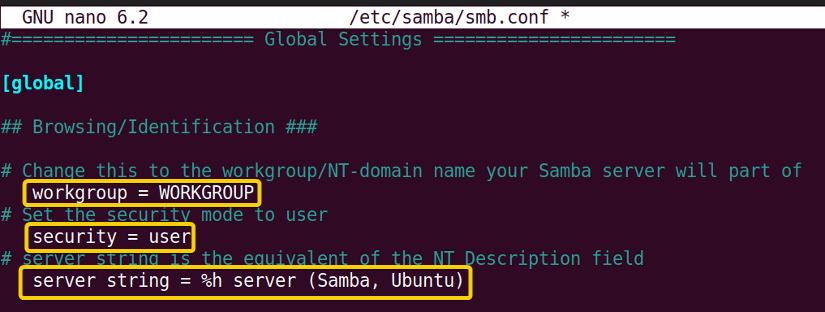
How to Configure the Global Samba Options on Ubuntu
To configure global Samba options follow the steps below:
- Open the Samba configuration file in a text editor running:
sudo nano /etc/samba/smb.confEXPLANATION- sudo: Super User DO.
- nano: It’s a text editor.
- /etc/samba/smb.conf: Enters into the Samba configuration file under the “etc” directory.
- Now, locate the [global] section. Here you can set the global options. I am mentioning some global options which you may configure. To set workgroup, security and server string, type the following options:
workgroup = WORKGROUP security = user server string = %h server (Samba, Ubuntu)EXPLANATION- workgroup: Sets workgroup name for Samba.
- security: Sets security mode for Samba. For most cases, the default mode is ‘user’.
- server string: Sets the string displayed in the Windows browser for Samba server.

Set the ‘server role’ to standalone server like the following:
server role = standalone serverEXPLANATION- server role: The default Samba package file is configured for ‘standalone server’. It means the Samba server is not a member of the Windows domain.

To see the interface name and bind interface type:
interfaces = 192.0.0.0/8 eth0 bind interfaces only = yesEXPLANATION- interfaces: Shows interface name or IP address.
- bind interface: Means only bind to the interfaces given above.
![Adding options: interfaces, bind interfaces only in [global] section](data:image/svg+xml,%3Csvg%20xmlns='http://www.w3.org/2000/svg'%20viewBox='0%200%20825%20282'%3E%3C/svg%3E)
If you want to control the unsuccessful attempts, set ‘map to guest’ as bad user like below:
map to guest = bad userEXPLANATION- map to guest: Controls how unsuccessful authentication attempts are mapped. For most cases, the default mode is set to ‘bad user’.

To set ‘log file’, type the following option:
log file = /var/log/samba/log.%mEXPLANATION- log file: Tells Samba to use a separate log file for each machine. By default, it is set like the image below.

- Once completed, save the file and restart the Samba service by using the command like the snapshot below:
sudo systemctl restart smbdEXPLANATION- sudo: Super User DO.
- systemctl restart smbd: Restarts Samba service.
 Thus, after restarting, you will be able to apply your changes to the configuration file.


![Adding options: interfaces, bind interfaces only in [global] section](https://linuxsimply.com/wp-content/uploads/2023/05/img19-interface-settings.png)


 Thus, after restarting, you will be able to apply your changes to the configuration file.
Read More: Install, Configure and Connect Samba on Ubuntu Using GUI
How to Unmount Samba Share on Ubuntu
If you want to unmount a Samba client on Ubuntu, follow the steps carefully:
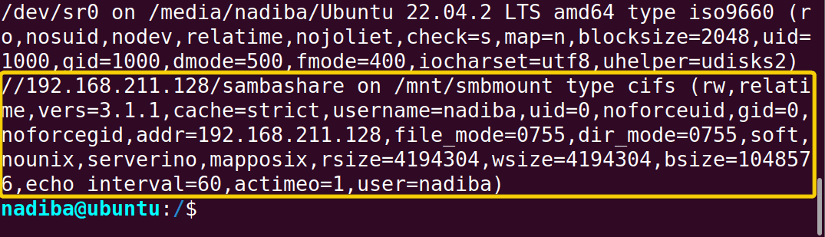
- Use the command ‘mount’ to list all mounted shares:
mountEXPLANATION- mount: Attaches a removable file system or storage device to a directory.
 The output should contain the terms alike the marked one:
- Now, run the following command to unmount the mounted shares:
sudo umount /mnt/smbmountEXPLANATION- sudo: Super User DO.
- umount: Detach all removable file systems or storage devices from directory.
- /mnt/smbmount: Local directory where you will mount the Samba share.

- To verify if the Samba share is unmounted or not run the below command again:
mountNow, you will see there is no line like the output of mounted shares.
 Now, you will see there is no line like the output of mounted shares.
How to Set Max and Min Protocol for Samba Client on Ubuntu
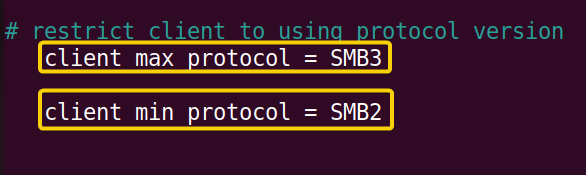
In the Samba configuration file, the client max protocol controls the highest protocol version & the client min protocol controls the lowest protocol version which the client attempts to use. So, to set the client protocol version, follow the steps below:
- Open the Samba configuration file.
sudo nano /etc/samba/smb.confEXPLANATION- sudo: Super User DO.
- nano: It’s a text editor.
- /etc/samba/smb.conf: Enters into the Samba configuration file under the “etc” directory.
- Append the lines in the [global] section.
client max protocol = SMB3 client min protocol = SMB2EXPLANATION- client max protocol: This explains that Samba client will negotiate the maximum SMB protocol version usage.
- SMB3: Samba version 3.
- client min protocol: This explains that Samba client will negotiate the minimum SMB protocol version usage.
- SMB2: Samba version 2.

- Save the file, exit and then, restart the whole Samba service to apply the changes you made.
sudo systemctl restart smbdEXPLANATION- sudo: Super User DO.
- systemctl restart smbd: Restarts Samba service.
By restarting the Samba service you can apply the protocol version settings in the configuration file.

 By restarting the Samba service you can apply the protocol version settings in the configuration file.
Conclusion
By now, you have the proper understanding of how to install, configure and connect a Samba client on Ubuntu. Also, you can mount and unmount Samba shares very easily. Just be conscious of making a backup always before editing any kind of configuration file.
People Also Ask
Is Samba only for Windows?
No. It is not only for Windows but also for Linux, macOS. Using SMB/CIFS(Server Message Block & Common Internet File System) protocol, Samba package provides file sharing services for computers.
How to Install Samba Server on Ubuntu?
To install Samba server on Ubuntu, open the terminal and run the command sudo apt-get install samba. Type “y” and press ENTER when prompted to confirm the installation and successfully install Samba on your Ubuntu system.
Why use Samba for Linux?
To enable the communication between Windows & Linux machines in a network.
Is Samba free?
Yes. Samba is an open source free software certified by GNU general public license.
Which is better- Samba or FTP?
For quick command or small file transfer, Samba server is better and for large file transfer, FTP is better
What is the maximum limit for Samba file size?
The maximum limit for Samba share file size is 2GB.
Does Samba have any GUI?
Yes. There are several GUI(Graphical User Interface) interfaces available in Samba.
Related Articles
- How to Share Files between Linux and Windows
- How to Access Shared Folder in Ubuntu [2 Methods]
- How to Copy File from Windows to Linux Using SSH [2 Methods]
- How to Share Files between Linux and Windows Dual Boot [3 Methods]
FUNDAMENTALS A Complete Guide for Beginners


Hi , thanks for the great and step by step explanation. Much appreciated. My question is how to configure my ubuntu client so that I can automatically connect to my samba shares on start-up? Is there a way to have this visible immediately? Like in Windows on startup?
Thank you
Hello, thank you for sharing your thoughts. To automatically connect to Samba shares on start-up, you can follow the instructions:
First, ensure that the ‘cifs-utils’ package is installed in your machine as it provides support for mounting SMB/CIFS shares. To do that, update your system and install the package using
sudo apt updateandsudo apt install cifs-utils.Then, create a mount point using
sudo mkdir /your_mount_point(You can choose any local directory such as /mnt, /media, /home where your Samba share will be mounted).Next, you can create a credential file which is optional but recommended for security purpose. In the file, enter your actual credentials and make sure you have the correct file permission. Let’s say, you have a hidden file named ‘mycredentials’ in your ‘home’ directory. Inside the file, enter the following:
username=your_user_namepassword=your_passwordThen, set the file permission to restrict read access using
sudo chmod 0600 ~/.mycredentialsNow, open the ‘/etc/fstab’ file using a text editor such as
sudo nano /etc/fstab. Scroll down the file and add the following line at the end of the file://server_address/samba_share_name /your_mount_point cifs x-systemd.automount,rw,credentials=/path/to/.mycredentialsSave the file and exit the text editor. Run
sudo mount -ato check if there are any errors during the mounting process. Then, reboot your machine. After rebooting, your Samba share should automatically be mounted at start-up.