Ubuntu Samba GUI (Graphical User Interface) is an assembly of graphical tools and services that provide a user-friendly interface and let users configure and manage the Samba shares very easily on Ubuntu. Throughout the article, I have mentioned different GUI utilities for Samba share in a simplified process. Let’s explore it.
Process Flow Chart to Install, Configure & Connect Samba Using GUI
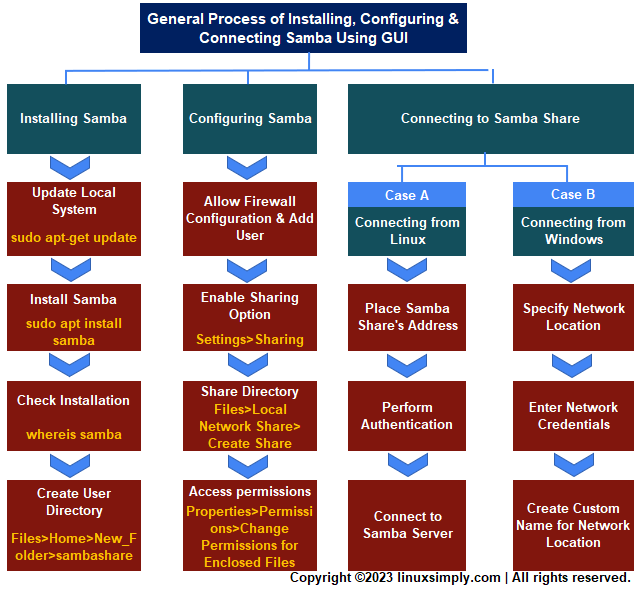 [Distro Used Throughout the Tutorial: Ubuntu 22.04.2 LTS]
Installing Samba on Ubuntu Using GUI
In case of using newer Ubuntu versions, you may face problems during samba installation using GUI. So, I have explained all the steps below of how you can install Samba using the command line interface on your new version of Ubuntu without any hassle:
- First, open the Ubuntu terminal & install the apt packages by using the following command:
sudo apt-get updateEXPLANATION
- Then, install Samba packages running the following command:
sudo apt install samba
- Now, you can check if you have installed Samba successfully or not using the command below:
whereis sambaEXPLANATION- whereis: Returns the source, binary and manual page files of given commands.
- samba: Free packages.

- You can make a Samba user directory using GUI So, go to Files and then click on the Home section.
 After that, click on the 3rd and 4th option accordingly like the above image.
 - Write a folder name according to your choice and click Create:
 Here, I have created a directory named sambashare.


 After that, click on the 3rd and 4th option accordingly like the above image.
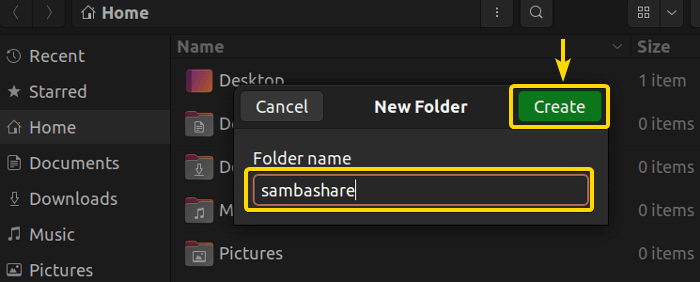 Here, I have created a directory named sambashare.
Read More: How to Install and Configure Samba Server in Ubuntu? [4 Steps]
Configuring Samba on Ubuntu Using GUI
During Samba configuration using GUI, there may arise some problems regarding firewall configuration, Samba password creation and adding user operation to the Samba database. So, to avoid these you need to configure Samba on Ubuntu by following the steps below:
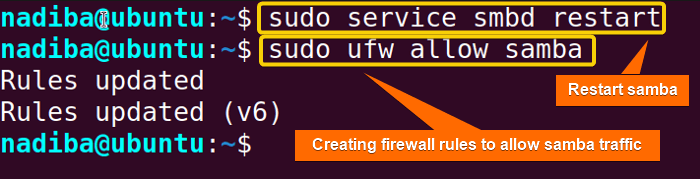
- Open Ubuntu terminal & restart the Samba services using the command below:
sudo service smbd restartEXPLANATION- sudo: Super User DO.
- service: The services sudo provides.
- smbd restart: Restart Samba service.
-
Now, if you are using UFW for your firewall configuration, then you will need to allow the ‘samba’ profile by using the following command:
sudo ufw allow sambaEXPLANATION- sudo: Super User DO.
- ufw: Uncomplicated Firewall.
- allow samba: Allows ‘samba’ profile.
-
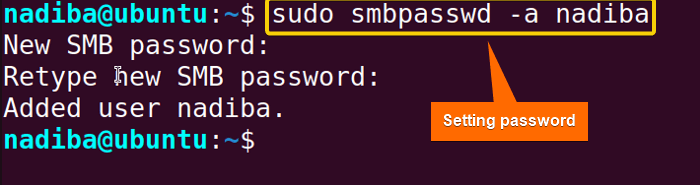
Add a user to Samba database by setting & re-confirming new user password for Samba like the following. Here, I have added the user “nadiba”, you can add any of your likings:
sudo smbpasswd -a nadibaEXPLANATION- sudo: Super User DO.
- smbpasswd: Samba encrypted password file.
- -a nadiba: Indicates the user.

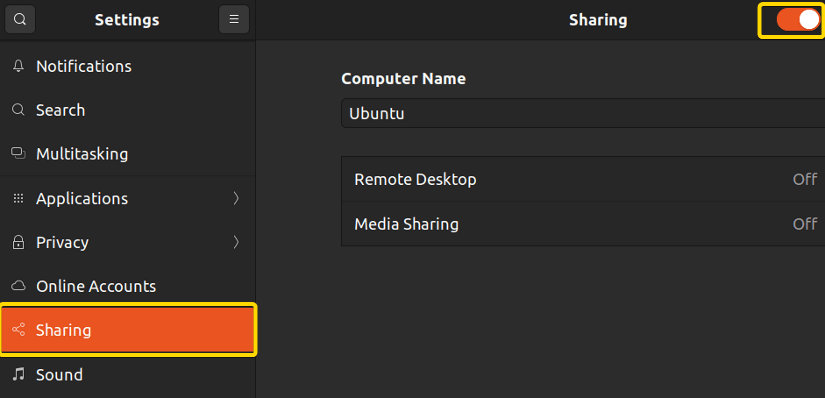
- Now, go to settings>sharing and turn on the sharing button like the image below:

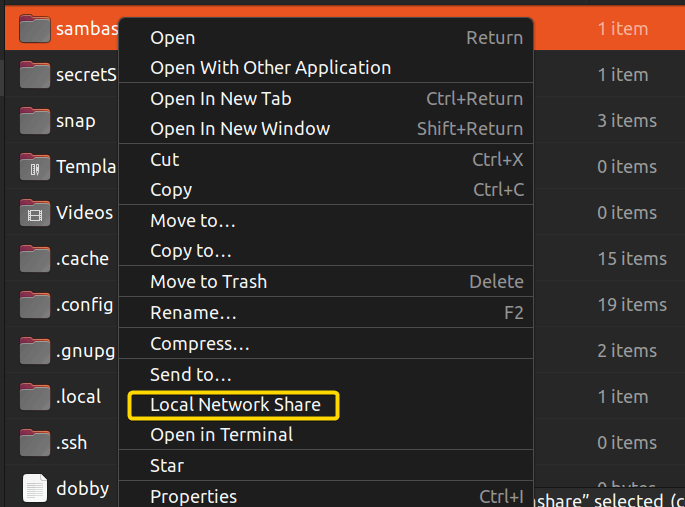
- To share a folder go to Files and find the folder. Then, right-click on it and select the Local Network Share option. Here, I have located at Files>Home>sambashare:
 Now, select ‘Share this folder’ folder option and click ’Create Share’.
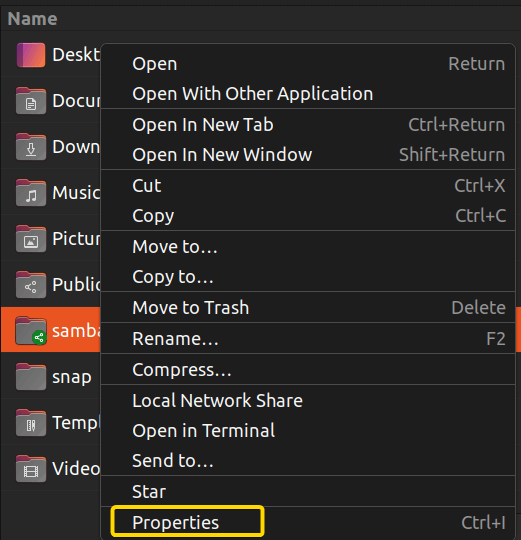
- To set user access right click on the shared folder and select Properties.

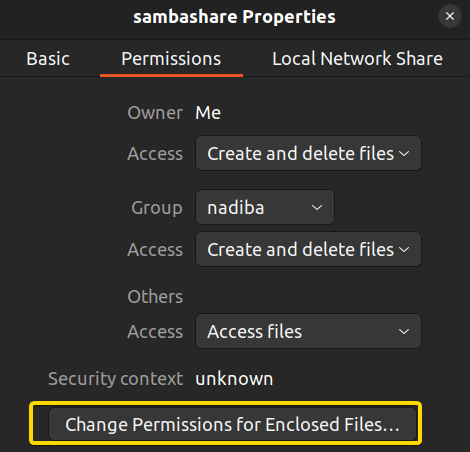
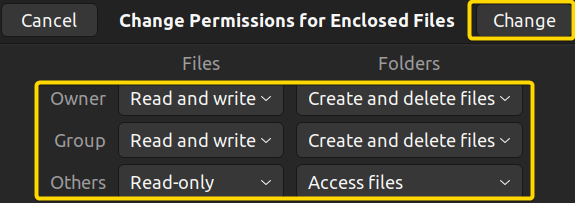
- Then, in the Permissions section click on the ‘Change Permissions for Enclosed Files’ option.

- You can see several permission options. Change according to your need and to save the changes click on the Change button.
 Now, your configuration is done for Samba Share.
 Now, select ‘Share this folder’ folder option and click ’Create Share’.
 Now, your configuration is done for Samba Share.
Read More: How to Configure NFS Server in Linux? [5 Steps]
Connecting Samba Share Using GUI
You can connect and access the Samba share using GUI from a different system. Before that, you need to know the IP address of the Samba server. So, to get it follow the steps below:
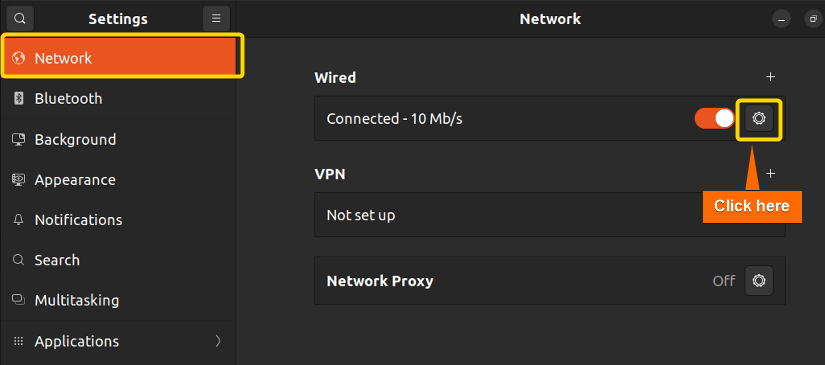
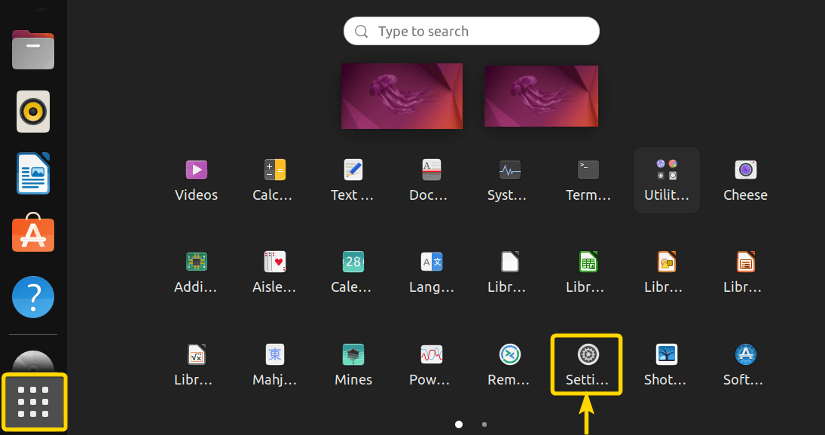
- Open the Ubuntu application and click ‘Settings’.

- In the ‘network’ panel, click on the icon marked on the Wired section like the image below.

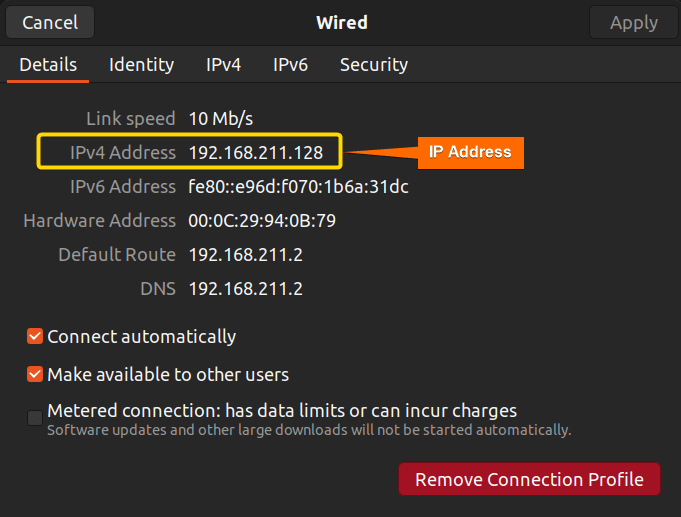
- Now in the ‘Details’ section, you will find the IPv4 address which is the required IP address. For my system, the IP address is 192.168.211.128.
 Copy the IP address of Samba share of your system for further use.

 Copy the IP address of Samba share of your system for further use.
Now, I will show two cases for connecting to Samba share using GUI from Linux and Windows.
A. Connecting or Mounting to Samba Share on Linux
You can access the Samba shares using the default file manager from Linux. Go through the steps below:
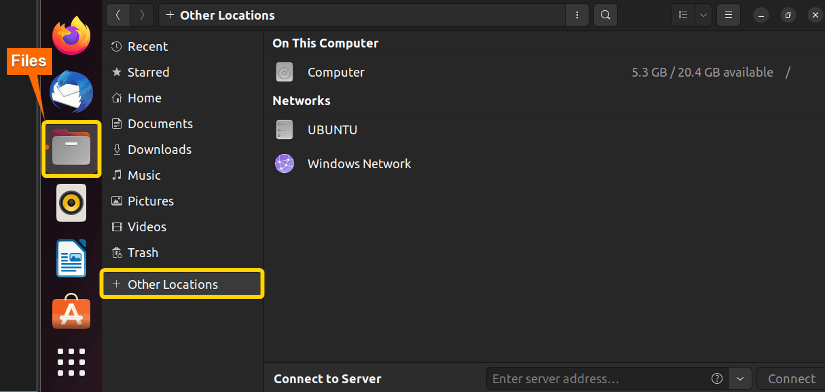
- First, open ‘Files’ & click on ‘Other locations’ at the bottom.

- Place the Samba share’s address in the ‘Connect to Server’ option like the following:
smb://192.168.211.128/sambashareEXPLANATION- 192.168.211.128: Server IP address.
- sambashare: Shared folder name.

Press ‘Connect’ after placing the address of Samba shares. In the above image, I have used the address of my system.
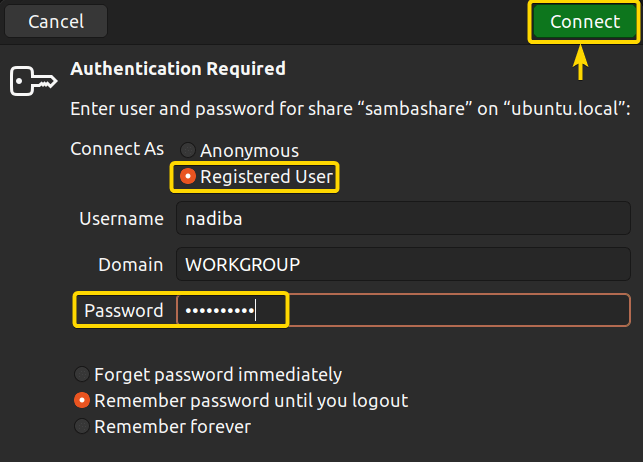
- After prompting to the following screen, click on the ‘Registered User’, enter the Samba username & password. and then click on the ‘Connect’ button:

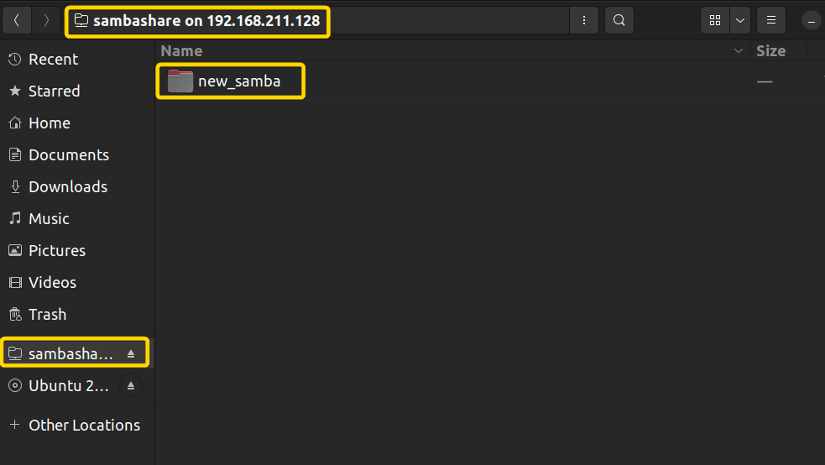
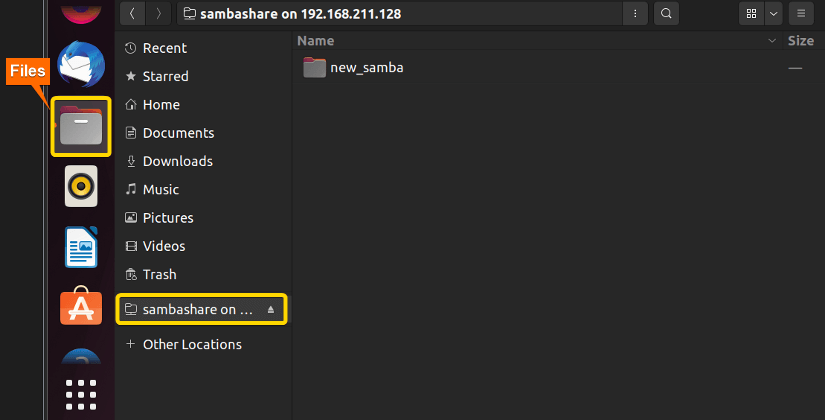
- Doing so, you will find the files & folders on the Samba server.
 In the above snapshot, I have shown the folder ‘new_samba’ inside the Samba shared folder sambashare.

 In the above snapshot, I have shown the folder ‘new_samba’ inside the Samba shared folder sambashare.
B. Connecting to Samba Share on Windows
As a Windows user, you can connect to Samba share using the file explorer in GUI. Follow the steps below to access the Samba shares:
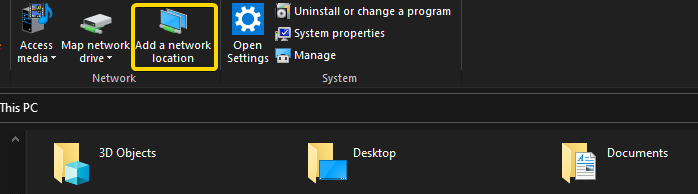
- Open the file explorer and select ‘This PC’ from the sidebar.
 Click on the ‘Add a network location’ option like the above image.
 - Hit ‘Next’ to continue.

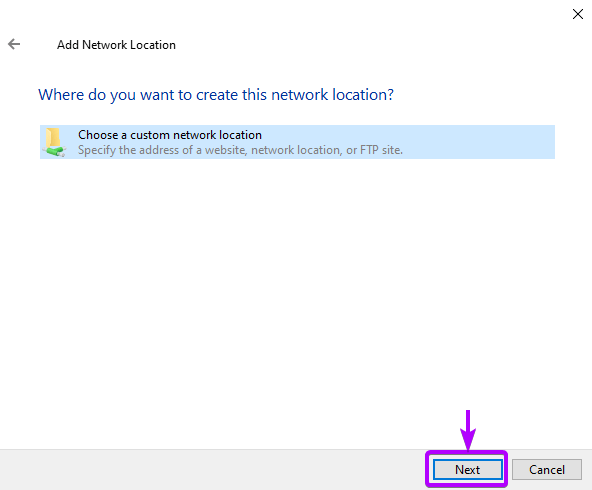
- Then, select the ‘Choose a custom network location’ & press ‘Next’.

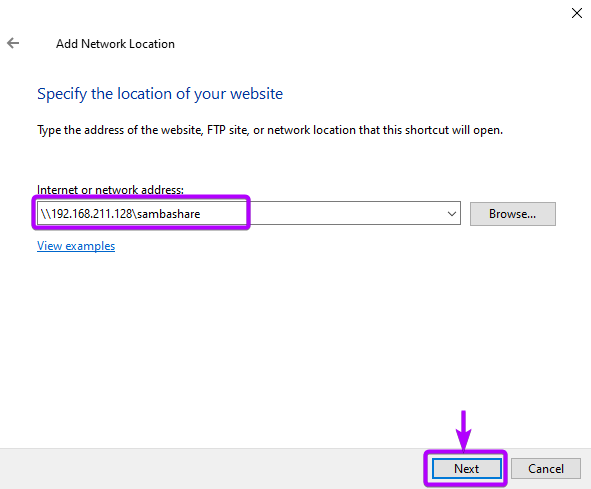
- Now, specify the location in the ‘Internet or network address’ option like the following:
\\192.168.211.128\sambashareEXPLANATION- \\192.168.211.128\sambashare: \\server IP address\sharename.
 Click ‘Next’ as shown above to move forward.
 - Now, enter the network credentials prompted to you & click ‘OK’.

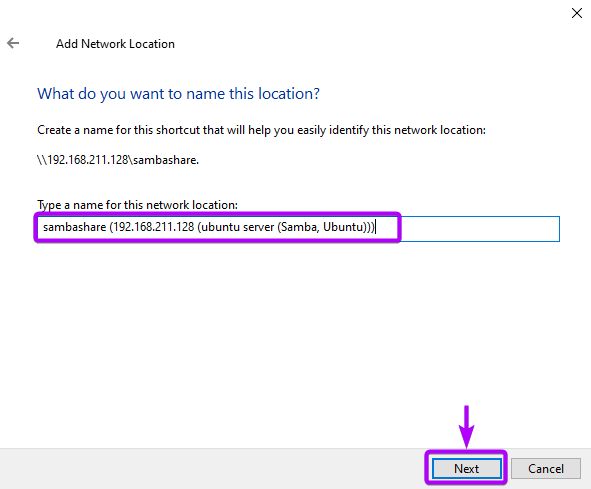
- Type a name for the network location of your choice and click ‘Next’. Otherwise, the Samba server takes up the default name for the location.
- Now, you can see ‘Completing the Add Network Location Wizard’ in the prompted window like the image below:Click ‘Finish’ to end the task.
- Finally, you find the folders on the Samba server.

 Click on the ‘Add a network location’ option like the above image.
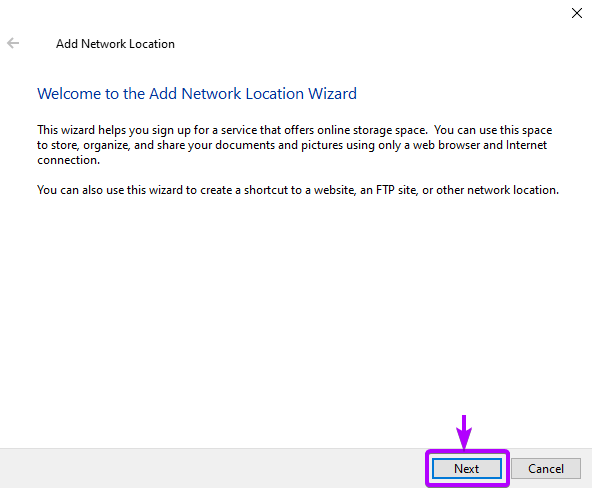
 Click ‘Next’ as shown above to move forward.
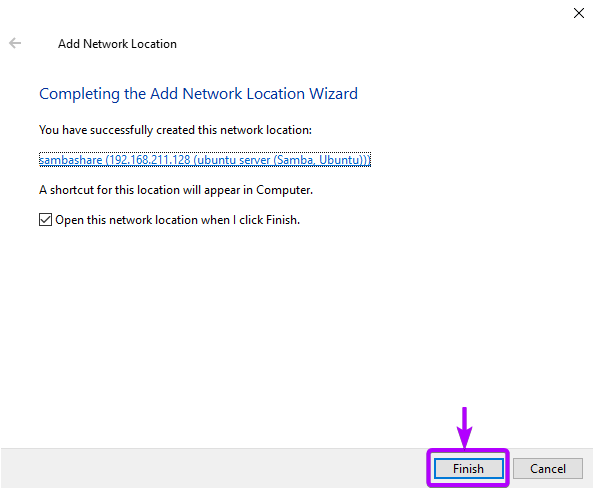 Click ‘Finish’ to end the task.
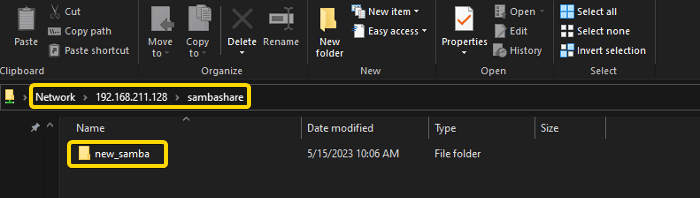
By following the above task step by step, you can connect the Samba shares from Windows very easily.
Read More: How to Access Samba Share from Windows [2 Methods]
How to Check Ubuntu Version
I have mentioned below how you can check your system’s Ubuntu version using both the graphical interface and command line in your terminal.
A. Check Ubuntu Version Using GUI
If you want to know which Ubuntu version your computer is running through the system settings, then follow the steps below:
- First, open the Ubuntu application & select ‘Settings’.
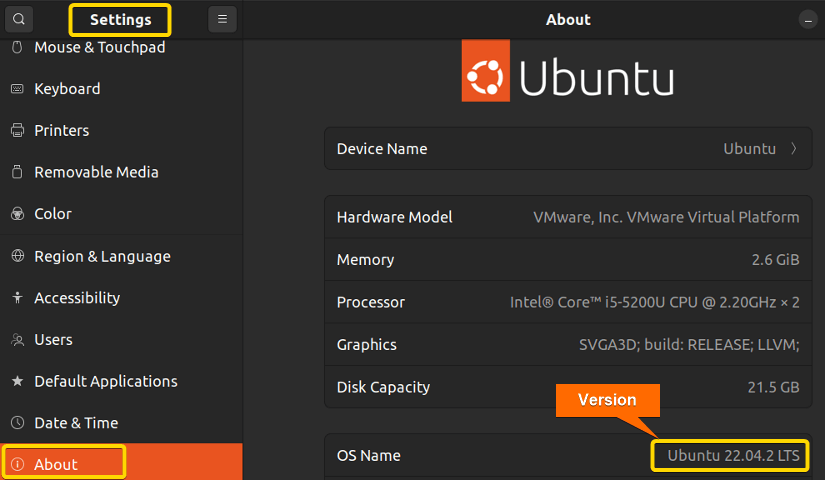
- Scroll down and click on ‘About’ in the left pane.
 Now, you will find the basic details of the system including the Ubuntu version you are running. According to the above snapshot you can see, my system is running Ubuntu 22.04.2 LTS.
 Now, you will find the basic details of the system including the Ubuntu version you are running. According to the above snapshot you can see, my system is running Ubuntu 22.04.2 LTS.
B. Check Ubuntu Version Using Terminal
To get the Ubuntu version fast, go with the terminal check viewing the steps below:
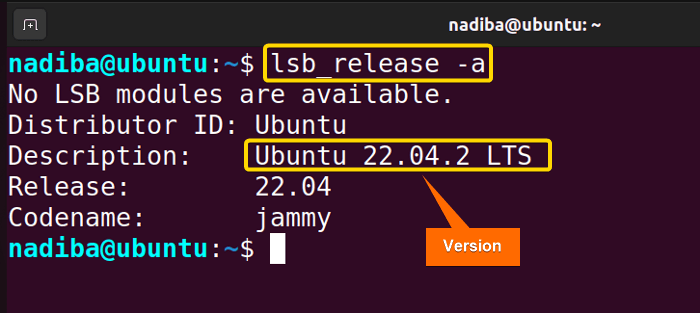
- Open your Ubuntu terminal, write the following line and you will see the output like the image below:
lsb_release -aEXPLANATION- lsb_release: Collects LSB(Linux Standard Base) & distribution information about the Ubuntu operating system.
- -a: All information including LSB, distributor ID, description, release, codename of the system.

- But if you want only a cleaner description, then run the command line below:
lsb_release -dEXPLANATION- -d: Displays only the description.
 You will get the output of the version of your system as like the snapshot above. Here, my system runs Ubuntu 22.04.2 LTS.
 You will get the output of the version of your system as like the snapshot above. Here, my system runs Ubuntu 22.04.2 LTS.
To unmount the mounted Samba shares using GUI, follow the steps given below:
- Open ‘Files’ application. In Ubuntu, ‘Nautilus’ is the default file manager.
 You will find the mounted Samba share at the bottom of the left pane.
 -
Right click on the mounted Samba share and from the context menu select ‘Unmount’ or ‘Eject’– whatever comes to you.
 To verify the unmount operation, go to ‘Other Locations’ option & you will find that the Samba share folder is no longer there.
 You will find the mounted Samba share at the bottom of the left pane.
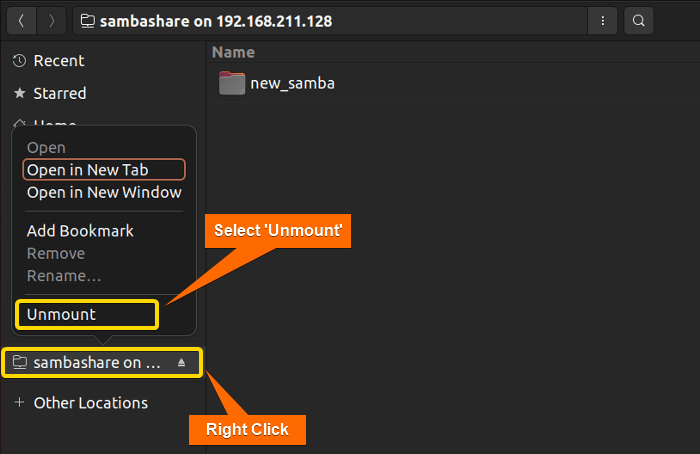 To verify the unmount operation, go to ‘Other Locations’ option & you will find that the Samba share folder is no longer there.
How to Check & Switch Current Target Boot
If you ever feel the need to change the default target manually while booting your system, you may follow the steps below:
- Open the Ubuntu terminal and check the default boot mode by running:
sudo systemctl get-defaultEXPLANATION- sudo: Super User DO.
- systemctl get-default: Retrieves the default target boot(The initial system state).
 The output will likely be either the ‘graphical.target’ or ‘multi-user.target’. From the above image you can see that in my system the initial state, ‘multi-user.target’ is loaded during the target boot process which represents the ‘Command Shell Mode’.
 - Now, to convert the target permanently use the following command:
sudo systemctl set-default graphical.targetEXPLANATION- sudo: Super User DO.
- systemctl set-default: Sets default target for system.
- graphical.target: GUI environment.
 As my initial state was in ‘Command prompt’ mode, I have switched it to GUI mode. You will perform it according to your initial state.
 The output will likely be either the ‘graphical.target’ or ‘multi-user.target’. From the above image you can see that in my system the initial state, ‘multi-user.target’ is loaded during the target boot process which represents the ‘Command Shell Mode’.
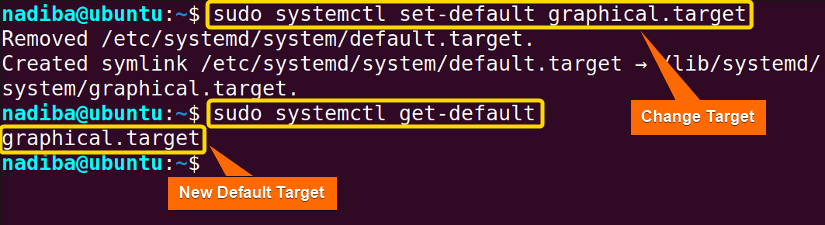 As my initial state was in ‘Command prompt’ mode, I have switched it to GUI mode. You will perform it according to your initial state.
Troubleshooting Connectivity Issues in Linux
There are several steps you can take to troubleshoot the connectivity issues. I have mentioned a detailed guideline for troubleshooting below.
How to Monitor the System Using GUI in Linux
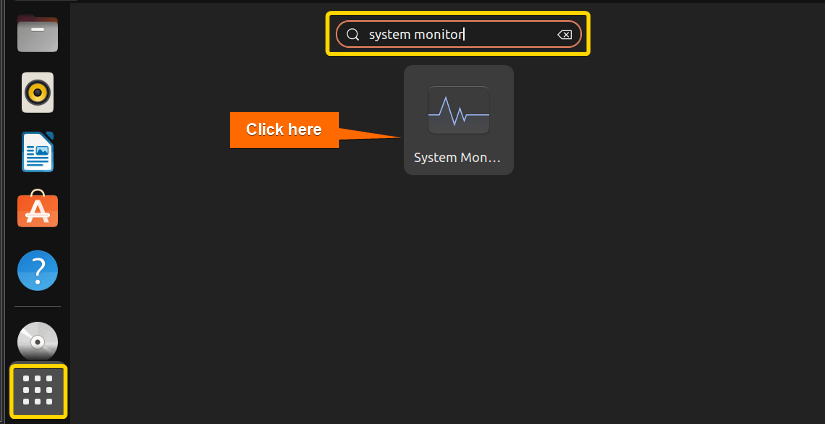
System Monitor offers a user-friendly built-in GUI application to monitor system usage. I have mentioned the steps to access and use it for troubleshooting:
- Open Ubuntu application and type ‘System Monitor’ in the search bar.
 To launch the application click on the System Monitor’s icon.
 - A new window will open where you will find some tabs mentioned below:
- Processes: This tab shows the running processes’ names and their resource usage.
- Resources: This displays detailed information about CPU, memory and disk usage.
- File Systems: It offers information about the mounted file systems.

- Now, monitor the system resources from every aspects, identify and troubleshoot issues.
 To launch the application click on the System Monitor’s icon.
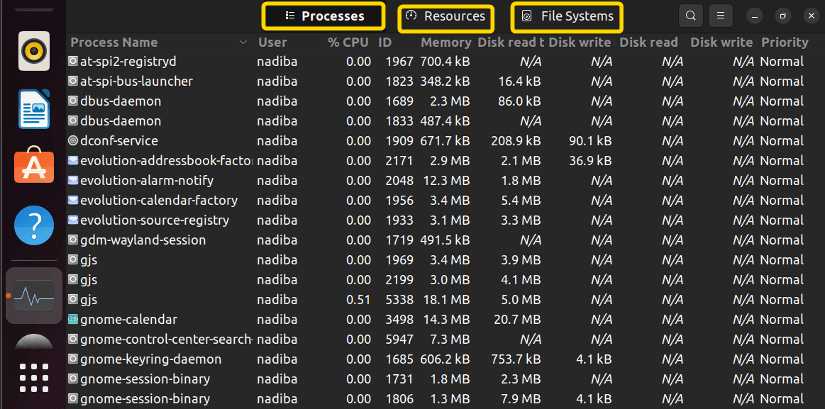
Troubleshooting Connectivity Issues Using “traceroute”
In Linux, traceroute command doesn’t come by default. So, to use you have to install and then run the command following the steps below:
- Open Ubuntu terminal and install traceroute by using the following command:
sudo apt-get install tracerouteEXPLANATION- sudo: Super User DO.
- apt-get install: Install advanced package utility.
- traceroute: Tracks the path a data packet takes.

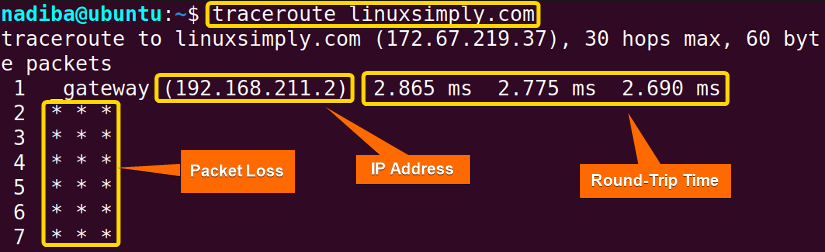
- To list the route to linuxsimply.com run the command below:
traceroute linuxsimply.comEXPLANATION- traceroute: Tracks the path a data packet takes.
- com: Destination.
 OUTPUT ANALYSIS
- Testing Network Path: Test IP addresses to know which path is used to reach destination by the packets and search for problematic hops.
- Checking Round Trip Time (RTT): Check round trip time for each hop (network node). High RTT indicates latency issues, network congestion.
- Identifying Packet Loss: Search for asterisks (*) which indicate packets were dropped along the route. Huge packet loss creates network issues.

Troubleshooting Connectivity Issues Using “ping”
To troubleshoot using ping command, open the terminal and run the following command:
ping -c 3 linuxsimply.com- ping: Packet internet Groper is used to find out the internet connectivity.
- -c 3: Limits the number of packets.
- com: Destination.
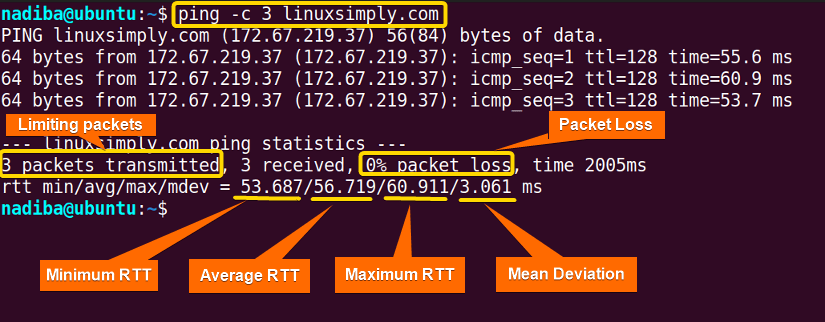
- Limiting packets: You can limit packet number by your choice. Here, I have used the -c 3 option to limit the packet number to 3 and so the command stops after transmitting 3 packets.
- Checking Packet Loss: Check the packet loss statistics. Here, the output shows 0% packet loss.
- Checking Round Trip Time (RTT): Check the round trip time for each packet. At the end, you can see a summary of RTT: minimum RTT, average RTT, maximum RTT, and mean deviation of RTT.
Troubleshooting Connectivity Issues Using “netstat”
The following steps may be of your help if you want to troubleshoot network related problems using netstat command. The steps are:
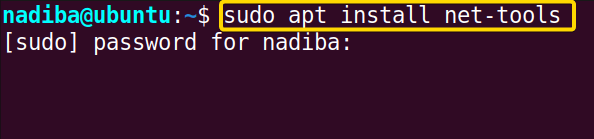
- Start opening your Ubuntu terminal and type the following command:
sudo apt install net-toolsEXPLANATION- sudo: Super User DO.
- apt: Advanced package utility.
- install net-tools: Install netstat command under net-tools.
 Then, enter the password and netstat will be installed.
 - Observe the netstat command running:
netstatEXPLANATION- netstat: Network statistics display network-associated information.
 You can analyze the output by the following facts:
- Local & foreign Address: The local and foreign address indicates the IP and port number of your system & the remote system you are connected to respectively.
- State: It represents the current state of the connection like ‘ESTABLISHED’, ‘LISTEN’ Check if there are any abnormal states.
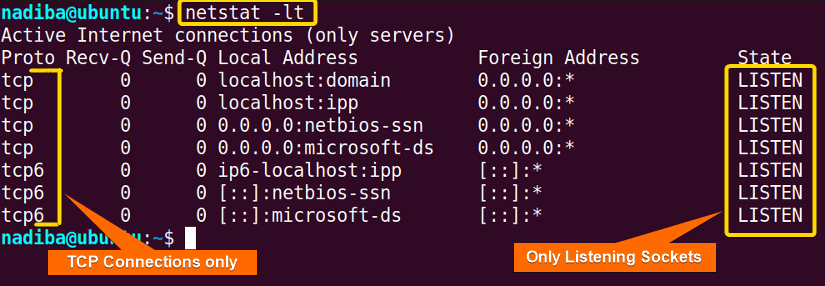
- If you want only the tcp connection and listening sockets, then type the following command:
netstat -ltEXPLANATION- netstat: network Statistics display network associated information.
- -lt: Displays only the tcp (Transmission Control Protocol) connections and listening sockets.
 From the output you can see the sockets’ states are ‘LISTEN’ And all the connections showing are tcp connections.
 Then, enter the password and netstat will be installed.
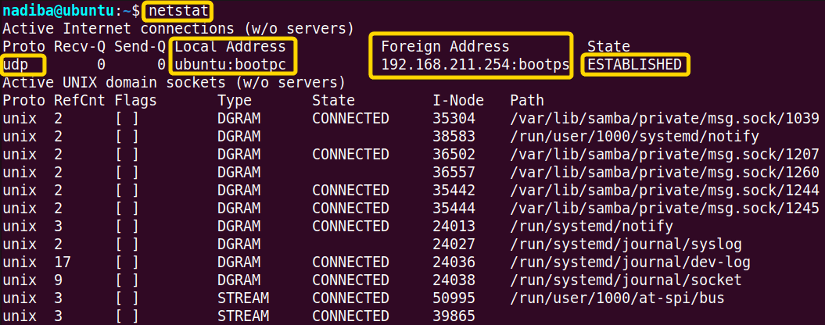 You can analyze the output by the following facts:
 From the output you can see the sockets’ states are ‘LISTEN’ And all the connections showing are tcp connections.
Conclusion
Samba graphical interface on Ubuntu simplifies the setting process and improvises the user experience intrinsically. I have utilized the important GUI applications for Samba share in this article. So, by reading the whole article I think you will gain the actual insights of Ubuntu Samba GUI.
People Also Ask
How to install Samba on Ubuntu?
To install Samba server on Ubuntu, open the terminal and run the command sudo apt-get install samba. Type “y” when prompted to confirm the installation and successfully install Samba on your Ubuntu system.
Does Samba have a GUI?
Yes, the Samba server configuration tool itself is a graphical interface that manages and modifies Samba shares and other settings.
Can I know which Samba version I am using on Ubuntu?
Yes, you can. Open the terminal and type the command samba -V to check the currenct Samba version running on your Ubuntu system.
What are the advantages of using Samba?
There are several advantages of using Samba such as cross-platform compatibility, resource sharing, collaboration. enhanced connectivity, etc.
How to connect to a Samba share in Linux?
To connect to a Samba share in Linux, use the smbclient tool that enables users to gain access to Samba using the command line. For instance, to connect to a share named josh on a Samba server with an IP address 192.168.121.118 as a user josh, use the command smbclient //192.168.121.118/josh -U josh.
Related Articles
- How to Share Files between Linux and Windows
- How to Access Shared Folder in Ubuntu [2 Methods]
- How to Copy File from Windows to Linux Using SSH [2 Methods]
- How to Share Files between Linux and Windows Dual Boot [3 Methods]
- How to Install, Configure and Connect Samba Client on Ubuntu
FUNDAMENTALS A Complete Guide for Beginners


Brilliant.. I had to follow the instructions to the letter as I am a elderly newby.
Thank you
You’re welcome. Glad to hear that you found the article useful. Stay with us!
Thank you.
Lol. this will not work.. you will need to edit conf (samba conf) as well so there permissions to access specified folders. This article is garbage.
Hello! Thank you so much for checking this article. You probably haven’t noticed that the access permission setting is done using GUI just after installing samba and will eventually take care of the samba conf file you are talking about. Yes, it can also be done by manually editing the conf file but it’s better to look carefully before tagging anything as garbage (rather than being it).
Look at this video if you have further confusion.
I like how there are explanation box on how the command works. Thanks!