Installing Kali Linux on a Mac is a strategic move for cybersecurity enthusiasts and penetration testers aiming to harness the powerful tools of Kali on Apple hardware. This guide serves as a comprehensive resource for the step-by-step process to seamlessly installing Kali Linux (2023.4) into your Mac environment.
Requirements to Install Kali Linux on Mac
The recommended requirements for installing Kali Linux as a dual boot on Mac are:
- RAM: 4 GB
- Processor: 64-bit 2 GHz
- Free Storage: 30 GB minimum
- USB Drive: 4 GB
- Internet access is helpful
14 Steps to Dual Boot Installation of Kali Linux on Mac
Follow the below steps one by one to install Kali Linux on your Mac in the easiest way:
1. Download the Kali Linux ISO File
After backing up data, the next step of installing Kali Linux is to download Kali Linux’s iso file from its official website. Choose the processor bit according to your PC hardware. I’m downloading a 64-bit installer of Kali Linux 2023.23 Changelog.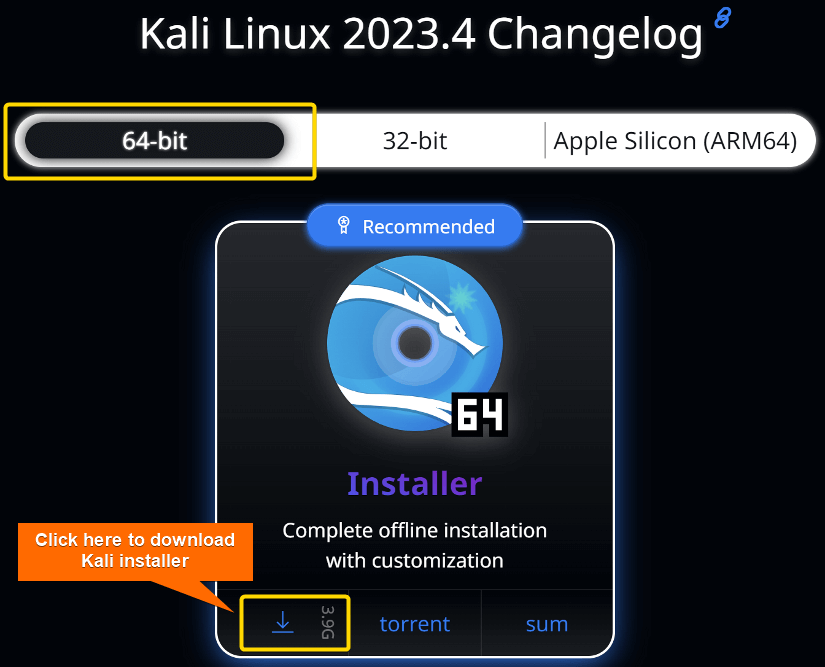
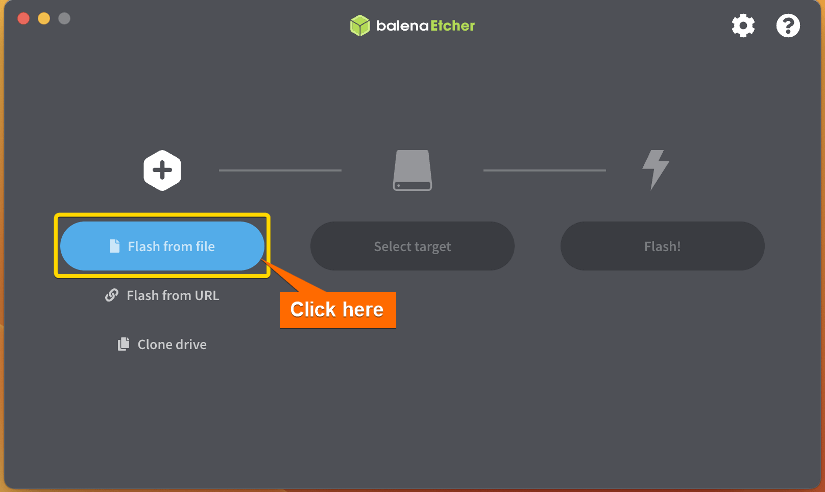
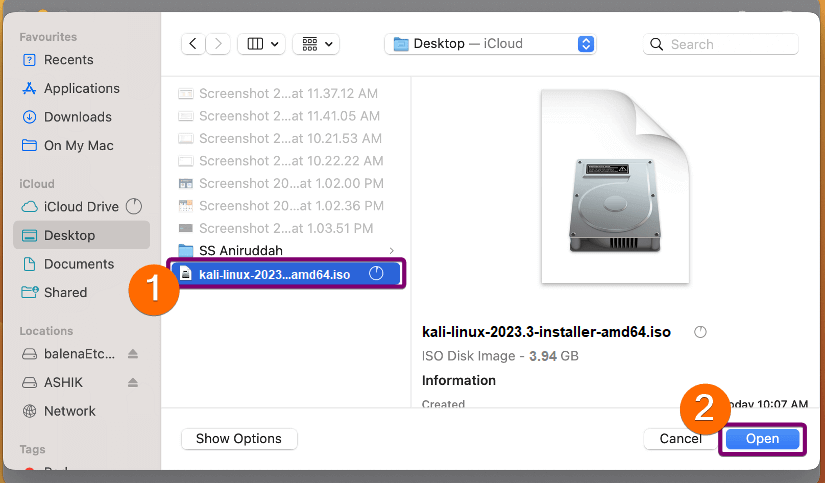
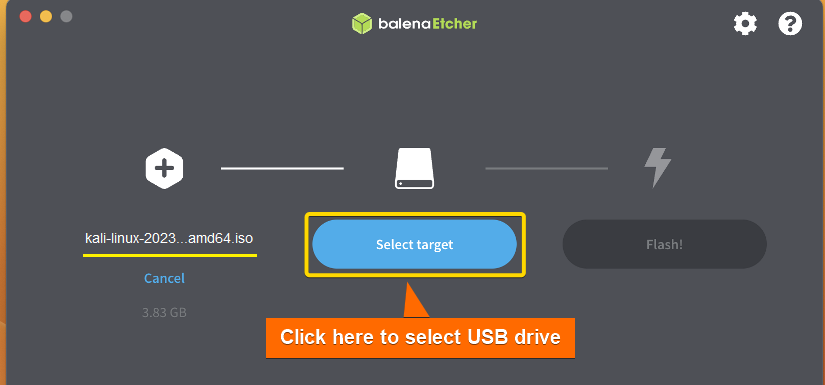
2. Create a Bootable USB Drive
To create a bootable USB drive of the ISO file, use “Etcher”. It is a free and open-source application. First, Install Etcher on Mac. After installing, follow the steps:
- Open Etcher and select “Flash from File”.

- Select the ISO file from the location where you’ve downloaded it.

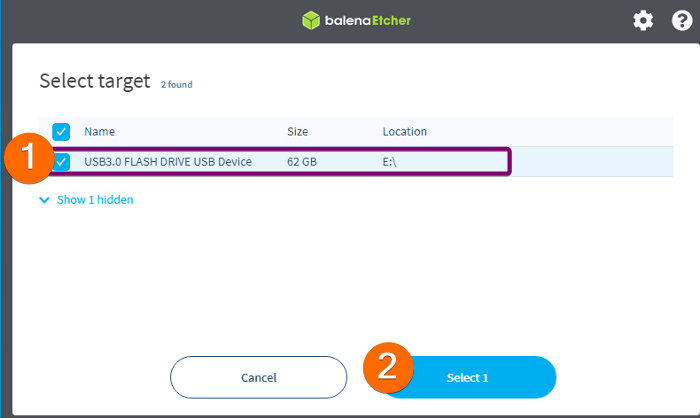
- Plug in a USB pen drive to the PC and click “Select target”.

- Select your USB drive from the list.

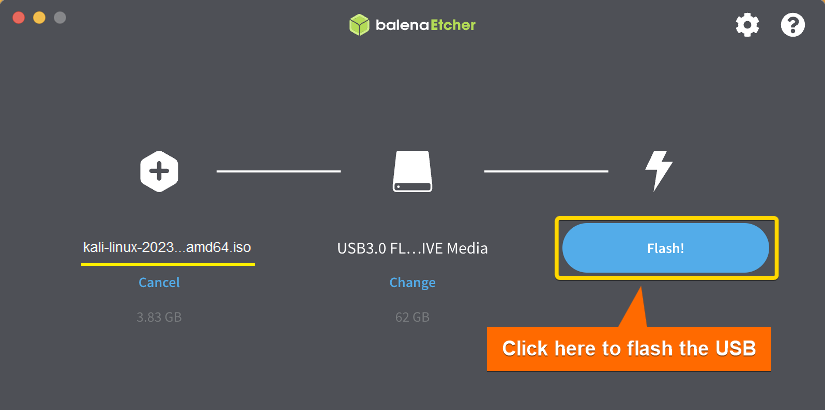
- Finally, click on “Flash” to start flashing the ISO file into the USB drive.
 After that, Etcher will flash the ISO file into your USB drive and make it bootable.
 After that, Etcher will flash the ISO file into your USB drive and make it bootable.
3. Create Disk Partition
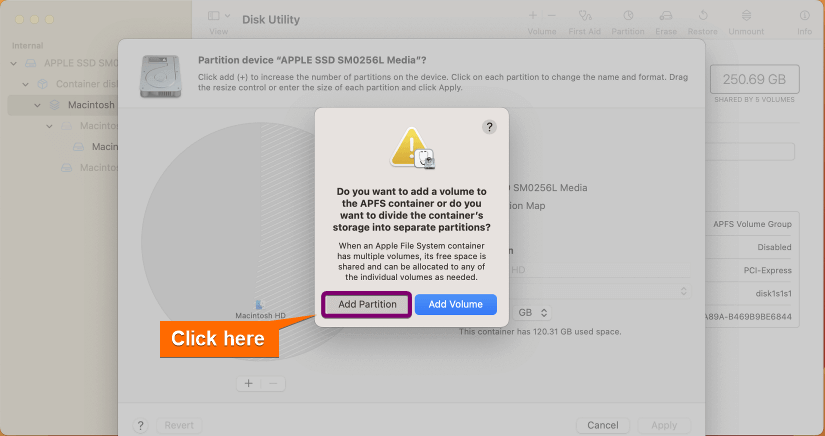
To create a Mac disk partition, follow the steps below:
- Open Spotlight by pressing COMMAND (⌘) + SPACE.
- Search and open Disk Utility.
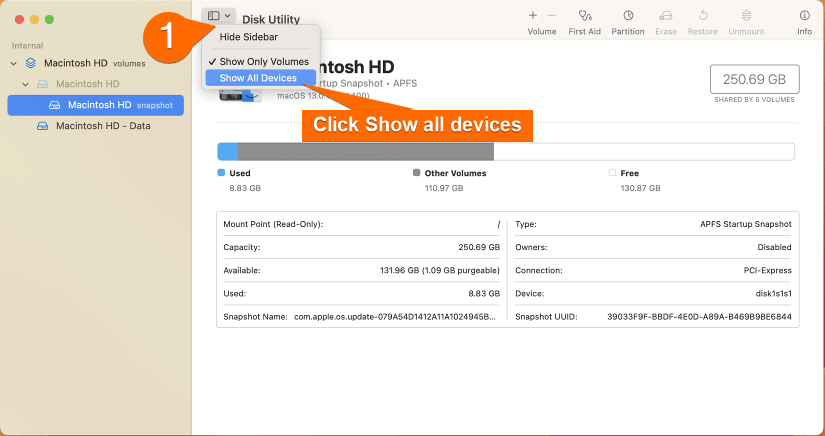
- Click on View and select “Show All Devices”.

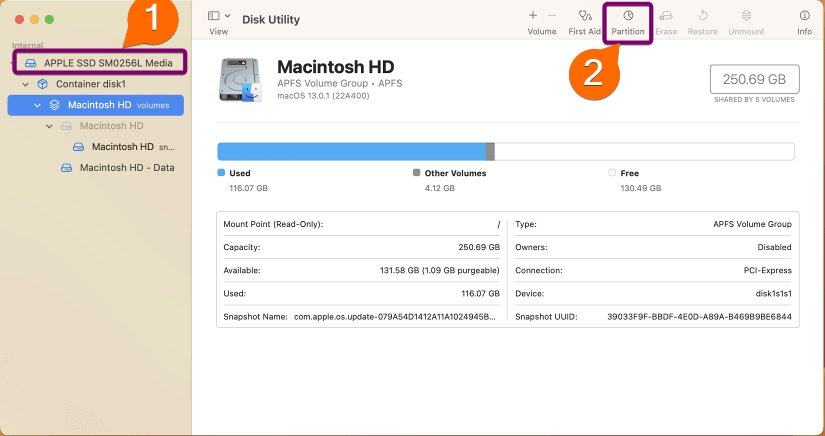
- Select the topmost device and click on “Partition”.
- Click on the + icon.
- Click on Add Partition.
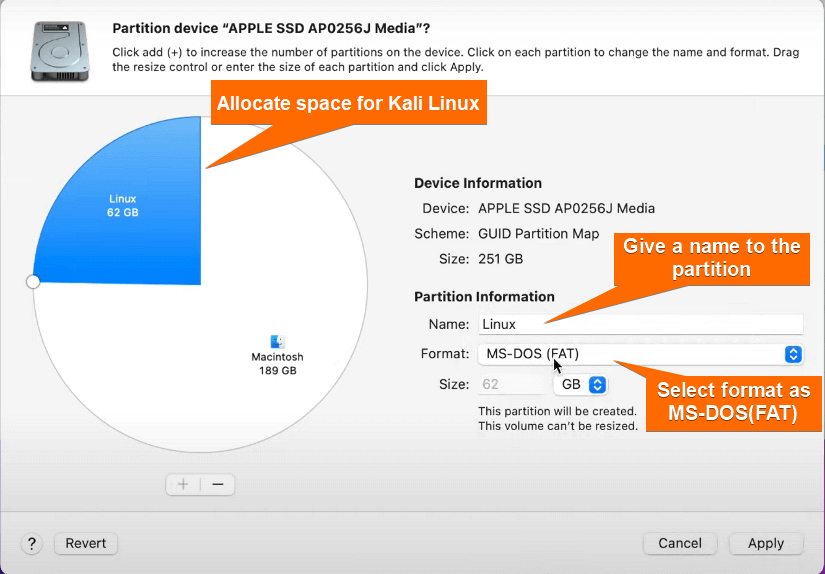
- Allocate space for Kali Linux and set the format as MS-DOS (FAT). Then click on “Apply”.

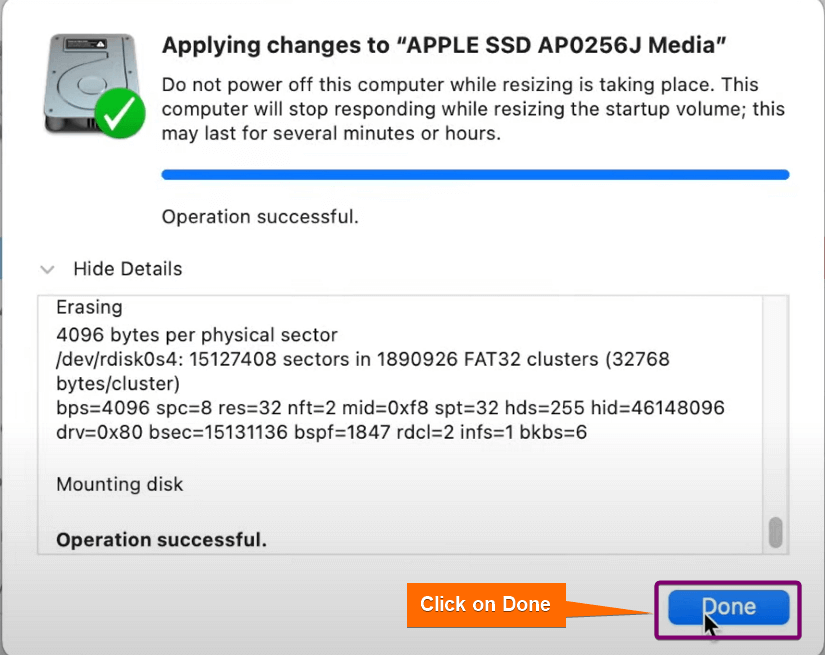
- Click on “Done” when the partition is created successfully.

4. Boot Kali Linux from USB Drive
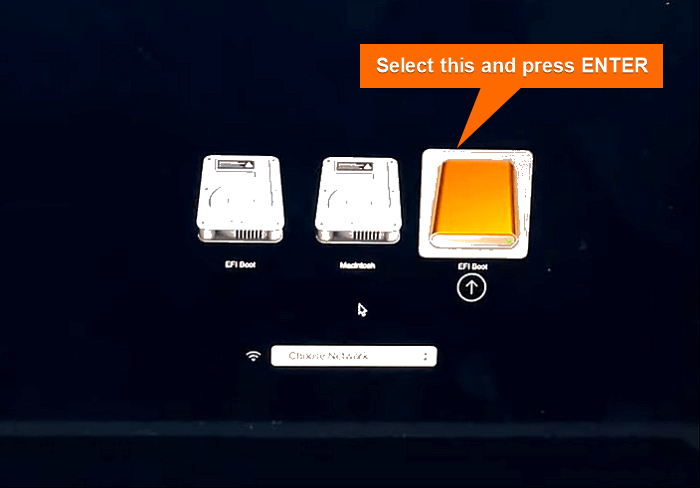
- Plug the bootable USB drive into the PC.
- Restart and hold the OPTION (⌥) key.
-
Select “EFI boot” using the arrow keys and press ENTER.

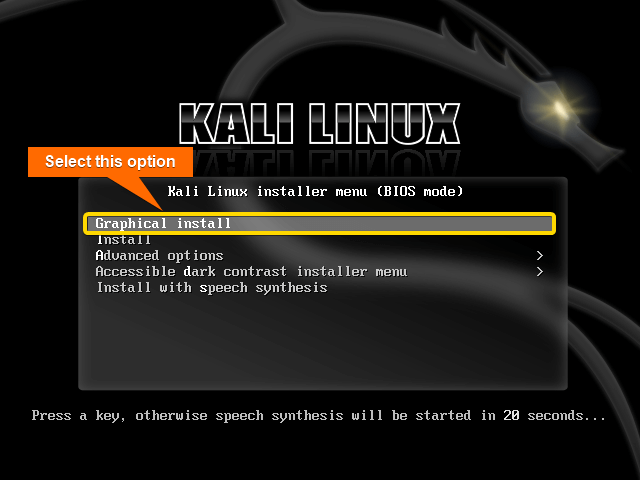
- Now, the BIOS window will appear on the screen. Use the arrow keys to select “Graphical install” and press ENTER.

5. Select Language
Select a language for the system and click on Continue.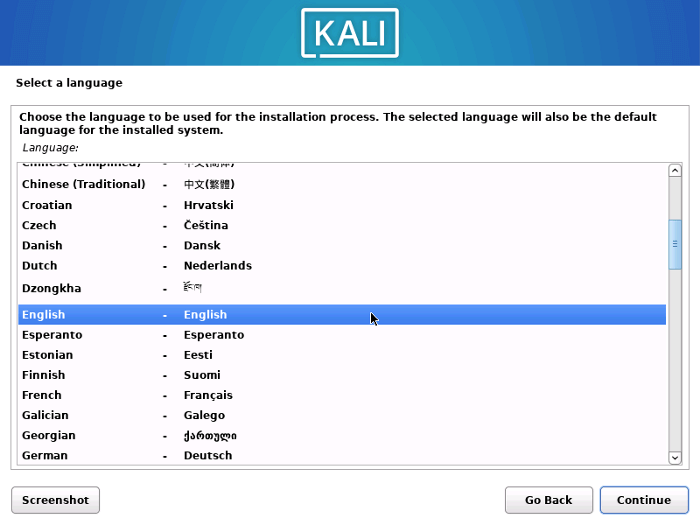
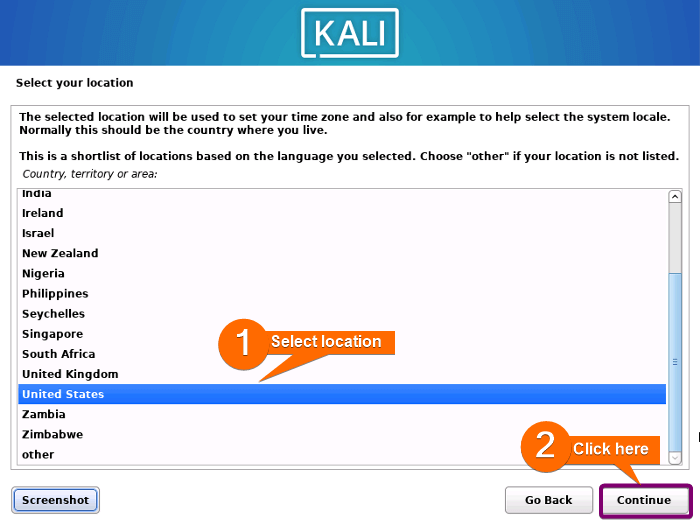
6. Set Location
Select your location.
7. Select Keyboard Layout
From the Configure Keyboard window, select the keyboard layout according to your preference.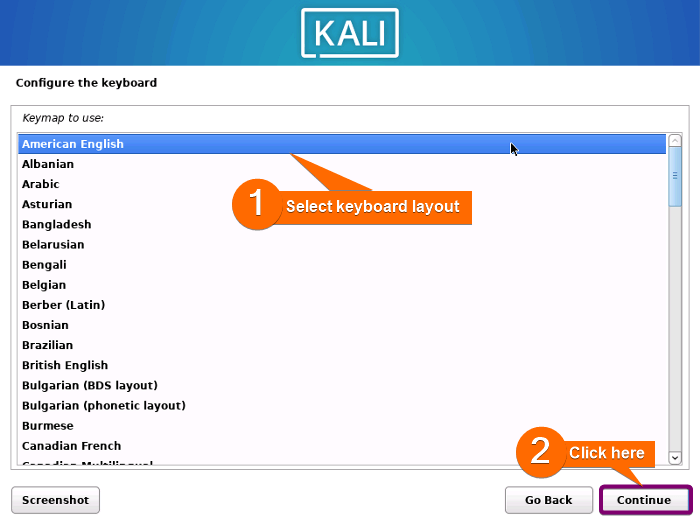
8. Configure the Network
First, type a hostname for your Kali Linux system, and click on Continue.
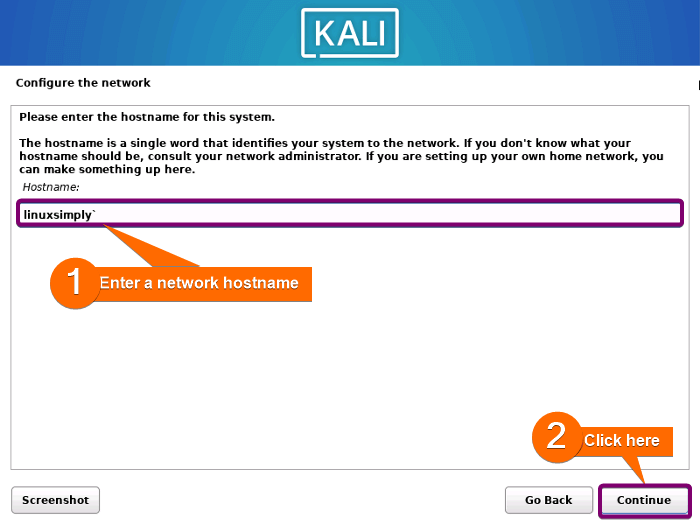 Now, type a domain name for the network.
9. Set up Users and Passwords
To create a user account, first, enter your full name and click on Continue.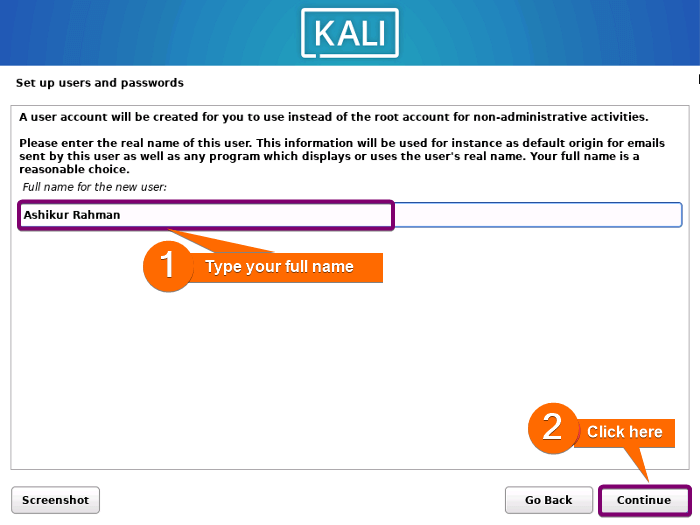 Then, type a short username for your system.
 Create a password. This password will be required every time you turn on the PC.
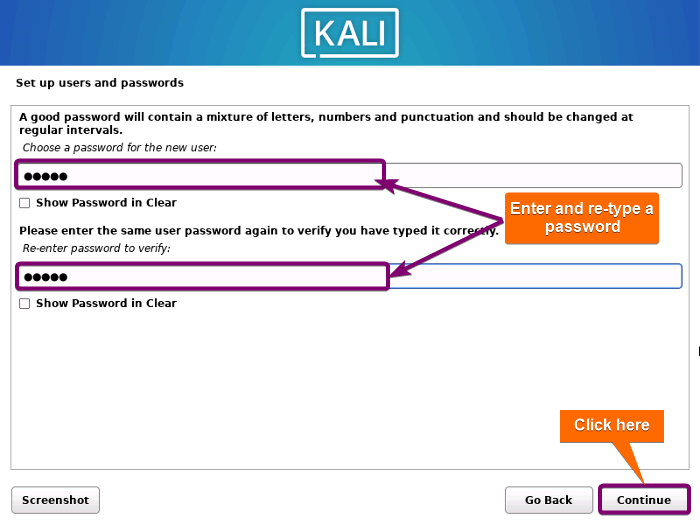 Finally, click on Continue to move to the next step.
10. Set Time Zone
Select your time zone and click on Continue.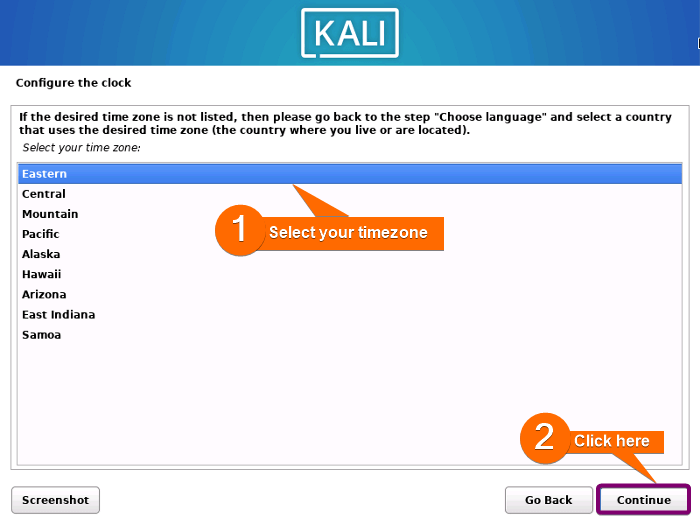
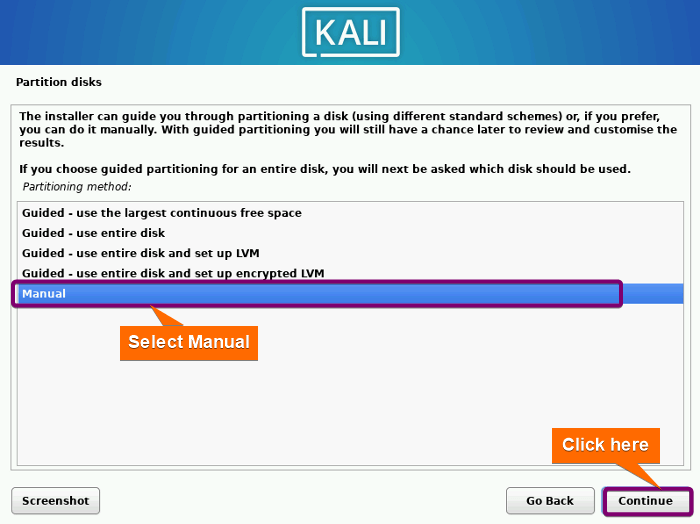
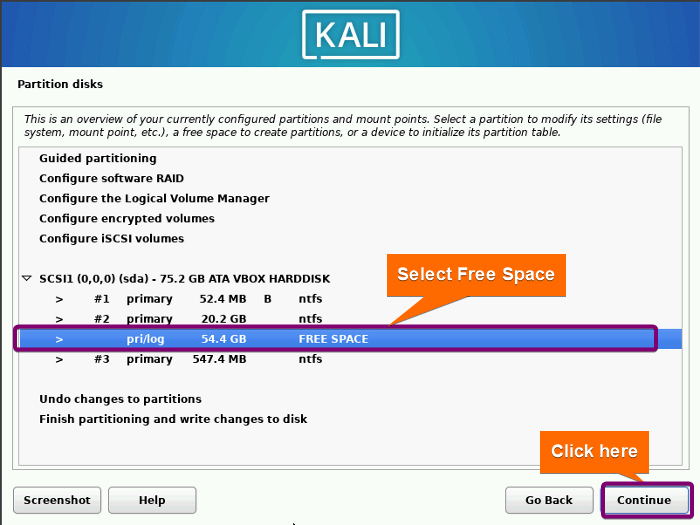
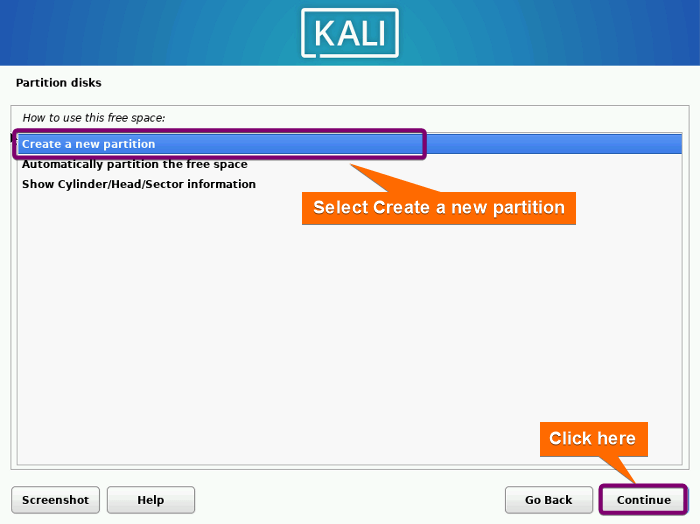
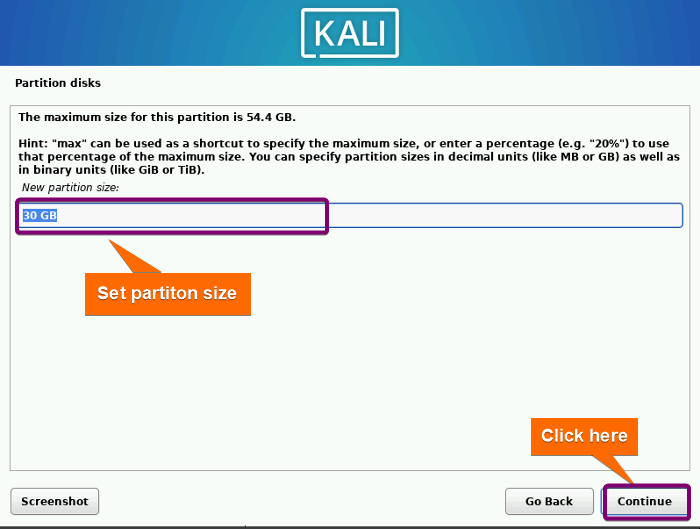
11. Allocate Disk Partition
To allocate the partitioned free disk to Kali, follow the steps below:
- Select “Manual” partitioning and click on Continue.

- Click on the FREE SPACE partition. Then click on Continue.

- Select “Create a new partition”.
- Set the partition size and click on Continue.

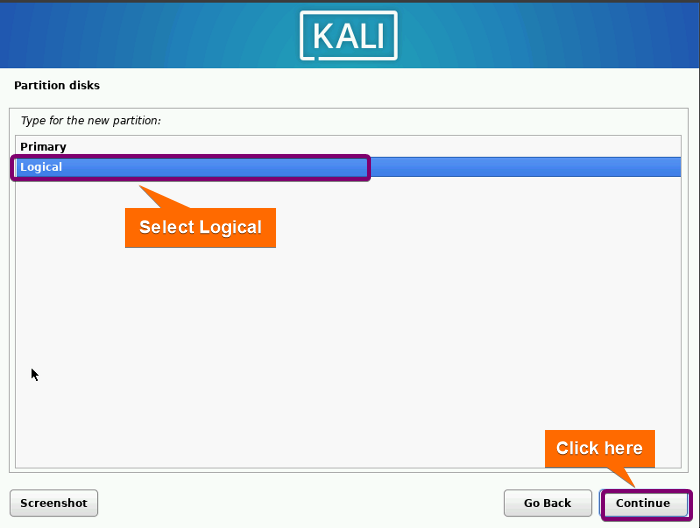
- Choose “Logical”.

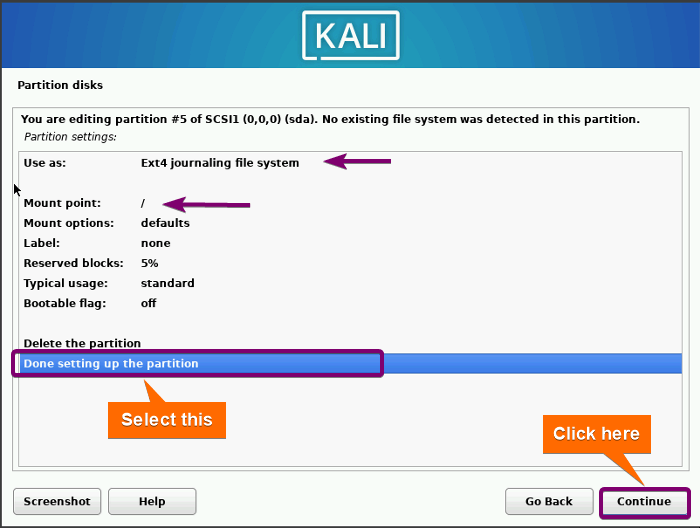
- Set the mount point to root (/). Double-click on “Done setting up partitioning”.

- Select “Finish partitioning” and click on Continue.
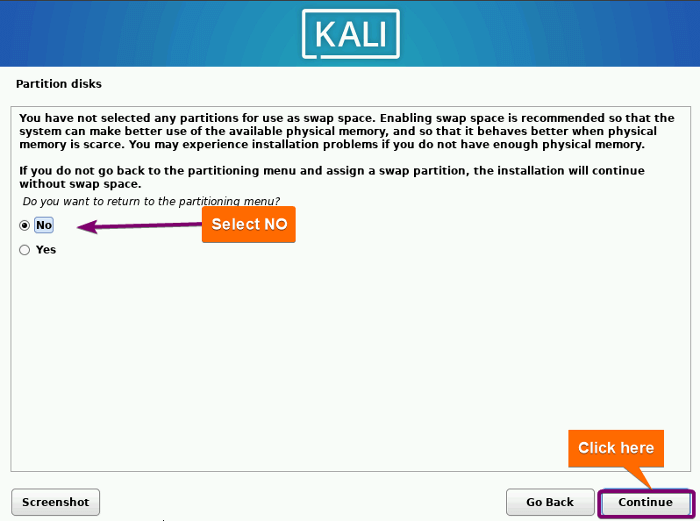
- Select “No” in the swap partition.

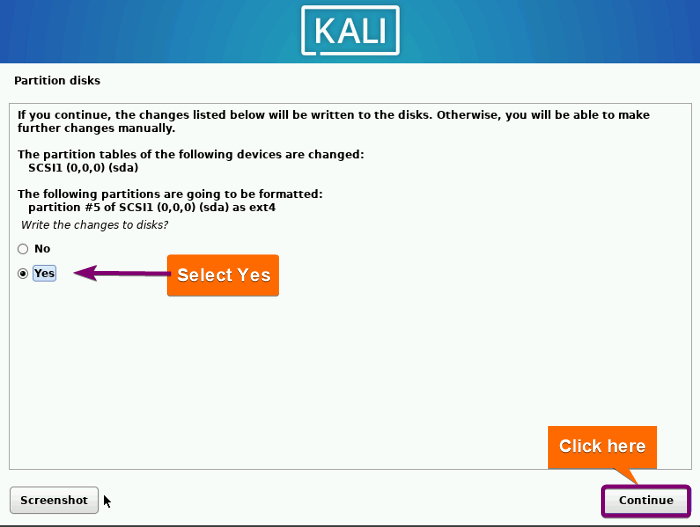
- Select “Yes” to confirm the partitioning.


12. Software Selection
Select the software you want to install while installing Kali Linux.
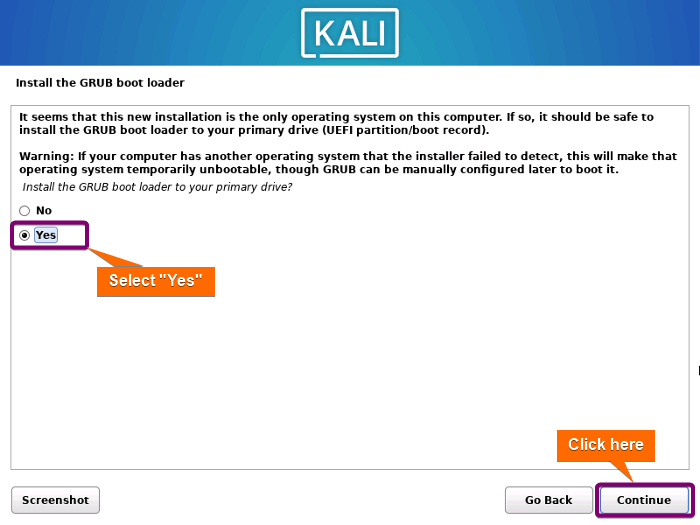
13. Install the GRUB Bootloader
Follow the below steps to install the GRUB bootloader.
-
Check the “Yes” option and click on Continue.
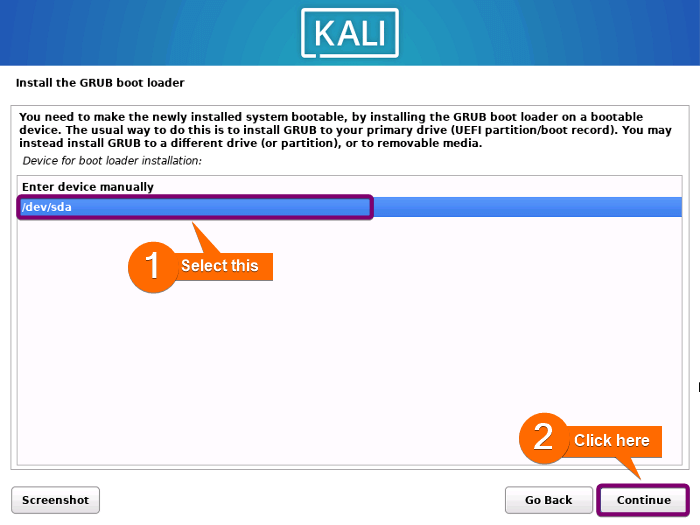
- Select /dev/sda as the boot loader device to install GRUB and click on Continue.After that, it installs GRUB.

- Plug out the USB flash drive (installation media) and click on Continue to reboot your computer.
Note: Press and hold the OPTION (⌥) key during reboot.With this step, the installation is completed successfully.
 After that, it installs GRUB.
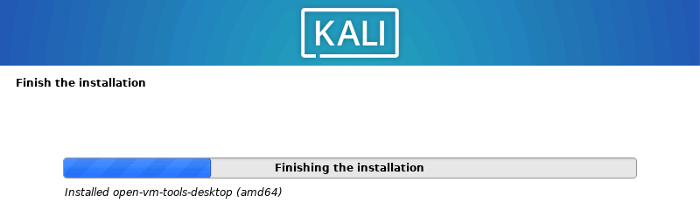
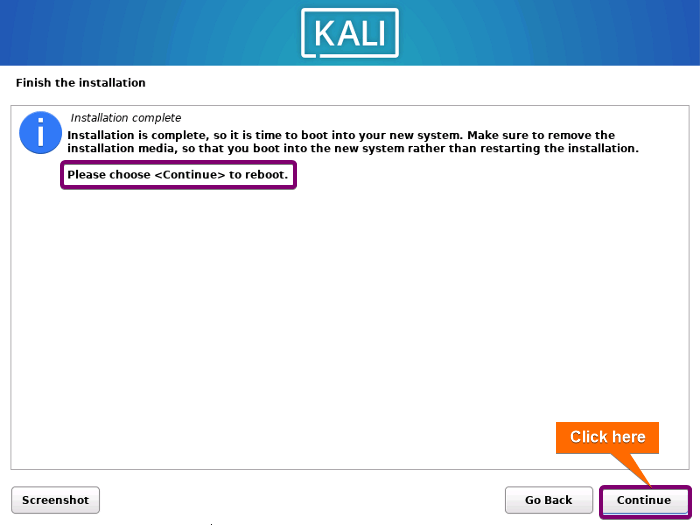 With this step, the installation is completed successfully.
14. Log in to Kali Linux
Choose Kali Linux and Log in using the credentials set during installation.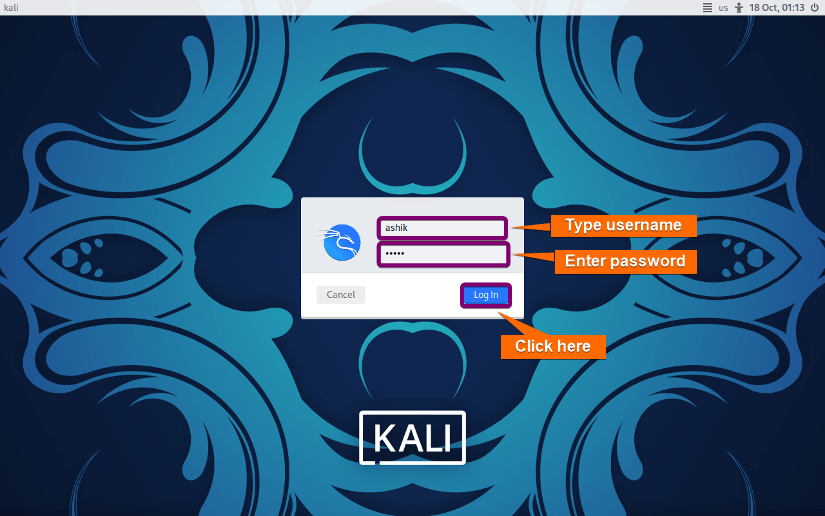
Conclusion
Conclusively, this powerful fusion of Kali’s tools with the sleek functionality of a Mac opens new avenues for ethical hacking and security testing. Embrace this union of robust operating systems and embark on a journey to bolster your digital defenses with the dynamic capabilities of Kali Linux on your Mac.
People Also Ask
Can I install Kali Linux on a Mac?
Yes, you can install Kali Linux on a Mac. Follow the steps below:
- Create a bootable Kali Linux USB using tools like Rufus or Etcher.
- Restart your Mac holding the OPTION (⌥) key to access the boot menu.
- Select the Kali Linux USB from the boot menu.
- Install Kali Linux on a separate partition or external drive during the installation process.
- Complete the installation, ensuring the bootloader is installed on the same partition or external drive.
- Boot into Kali Linux by selecting it from the boot menu or using a tool like rEFInd.
How to make bootable Kali on Mac?
To make a bootable Kali on Mac, download and install Etcher. Then, insert a USB drive (4GB minimum) into your Mac. Now, download Kali Linux ISO. Finally, open Etcher, select Kali Linux ISO, choose USB drive, and click “Flash”. After that, Etcher will flash the ISO file into your USB drive and make it bootable.
Is Kali Linux risky for Mac?
No, generally Kali Linux is not risky for Mac. However, misuse of the Kali tools, lack of expertise, and potential legal implications can pose risks. Ensure responsible use, keep both systems updated and consider using Kali Linux in a controlled environment like a virtual machine or dedicated hardware to mitigate potential issues.
How do I boot into a Kali Live environment?
To boot into a Kali live environment, follow the below steps:
- Create a bootable Kali Linux USB using tools like Rufus or Etcher.
- Insert the USB drive into your computer.
- Restart and access the boot menu (ESC, F2, F10, F12, OPTION).
- Select the USB drive from the boot menu.
- Choose the “Live system” option to boot into the Kali Linux Live environment.
- Explore Kali Linux without installing it on your computer.
Can I install Kali on a USB stick?
Yes, you can install Kali Linux on a USB stick. First, create a bootable Kali Linux USB using tools like Rufus or Etcher. During installation, choose the USB drive as the installation target. Next, complete the installation process, ensuring the bootloader is installed on the USB. Finally, boot from the USB to access your Kali Linux installation on your computer.
Related Articles
- What is Dual Boot? [Why & How]
- How to Dual Boot Ubuntu and Windows 10 [Simple Guide]
- Dual Boot Windows and Ubuntu [On Separate Hard Drives]
- How to Dual Boot Windows 11 and Ubuntu? [Easy Way]
- How to Dual Boot Windows 10 and Linux Mint [Easiest Method]
- How to Dual Boot Windows 10 and Kali Linux [Simplest Method]
- Install Ubuntu on Mac [Dual Boot]
- Install Linux Mint on Mac [Dual Boot]
<< Go Back to Dual Boot Installation | Linux OS Installation Guide | Learn Linux Basics
FUNDAMENTALS A Complete Guide for Beginners


