Dual boot on separate hard drives means installing two operating systems on two available hard drive storage in a computer. This becomes essential when your computer has two storage i.e. an HDD and an SSD. For example, you want to dual boot Windows with Ubuntu and use the SSD as the root partition for both operating systems as it will make booting faster, keeping the other files in the HDD. In this tutorial, I’ll demonstrate how to dual-boot Windows 10 and Ubuntu 22.04 LTS on separate hard drives.
Requirements to Dual Boot Windows and Ubuntu on Separate Drive
The minimum requirements for installing Windows 10 and Ubuntu as a dual boot on separate hard drives are:
- A computer preinstalled with Windows 10
- RAM: 4 GB
- HDD: 80 GB
- SSD: 20 GB
- USB Drive: 4 GB
10 Steps to Dual Boot Windows 10 and Ubuntu in Separate Drive
Follow the below steps one by one to dual-boot Windows 10 and Ubuntu on separate hard drives in the easiest way:
1. Download the Ubuntu ISO File
After backing up data, the first step of installing Ubuntu is to download Ubuntu’s ISO file. I’m downloading a 64-bit installer of Ubuntu 22.04.3 LTS.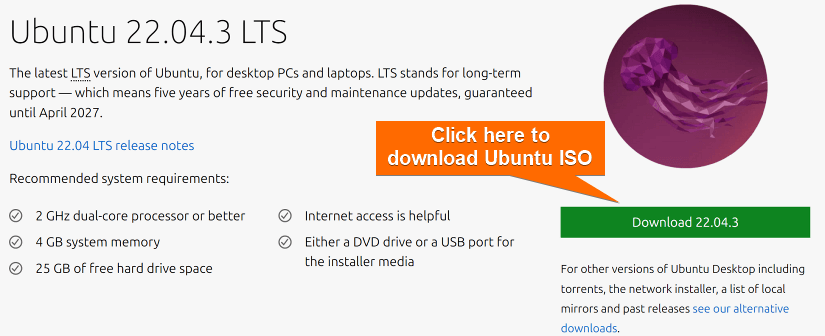
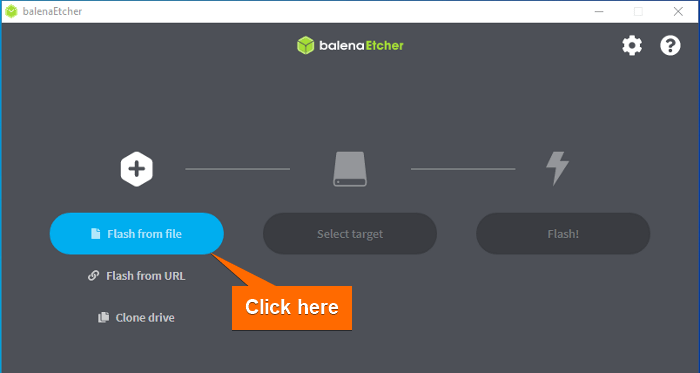
2. Create a Bootable USB Drive
To create a bootable USB drive of the ISO file, use “Etcher”. It is a free and open-source application. First, install Etcher on Windows. After installing, follow the below steps:
- Open Etcher and select “Flash from File”.

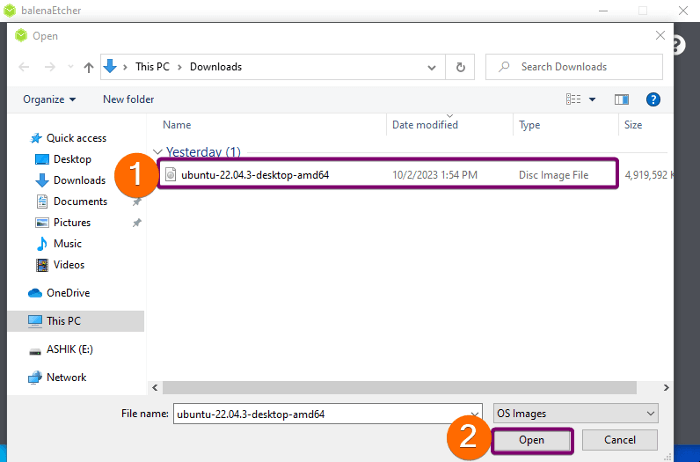
- Select the ISO file from the location where you’ve downloaded it.

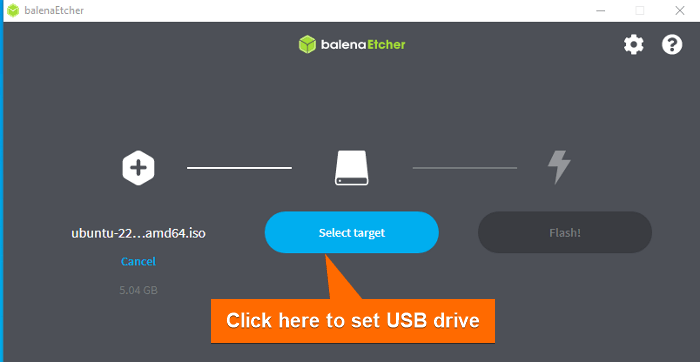
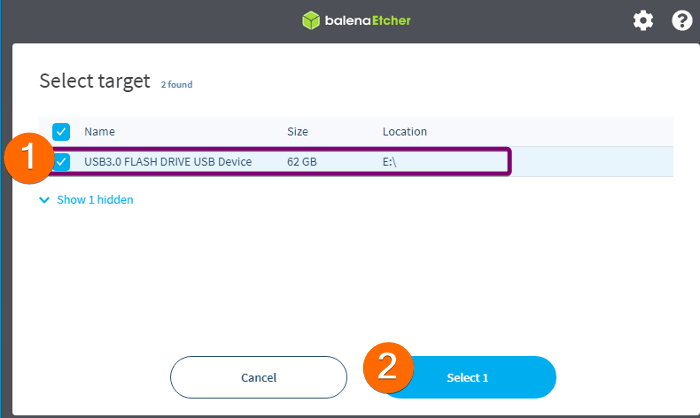
- Plug in a USB pen drive to the PC and click on “Select target”.

- Select your USB drive from the list.

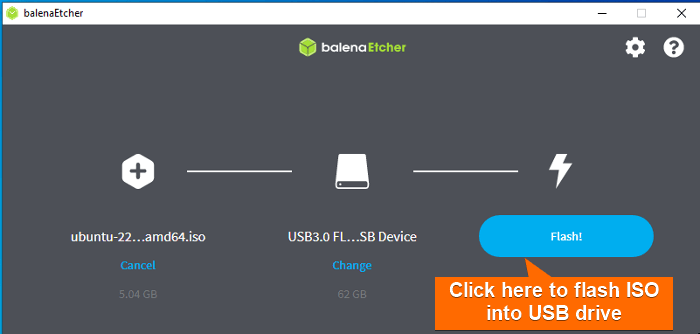
- Finally, click on “Flash” to start flashing the ISO file into the USB drive.
 After that, Etcher will flash the ISO file into your USB drive and make it bootable.
 After that, Etcher will flash the ISO file into your USB drive and make it bootable.
3. Create Disk Partition
To create a disk partition on Windows 11, follow the below steps:
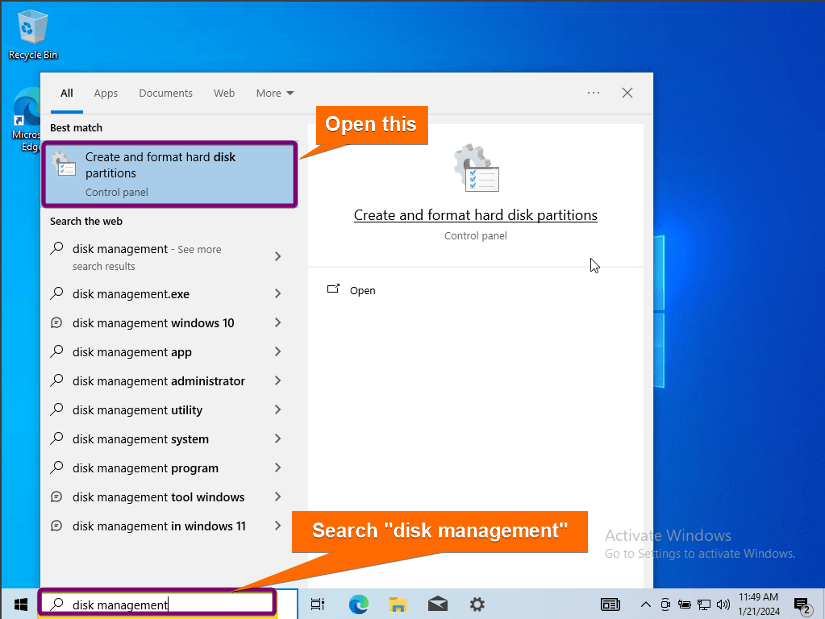
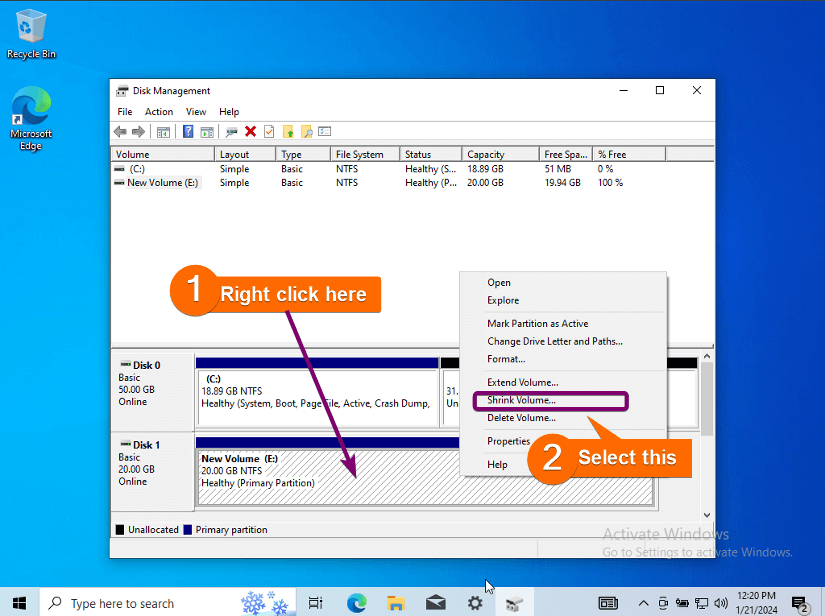
- Open Disk Management.

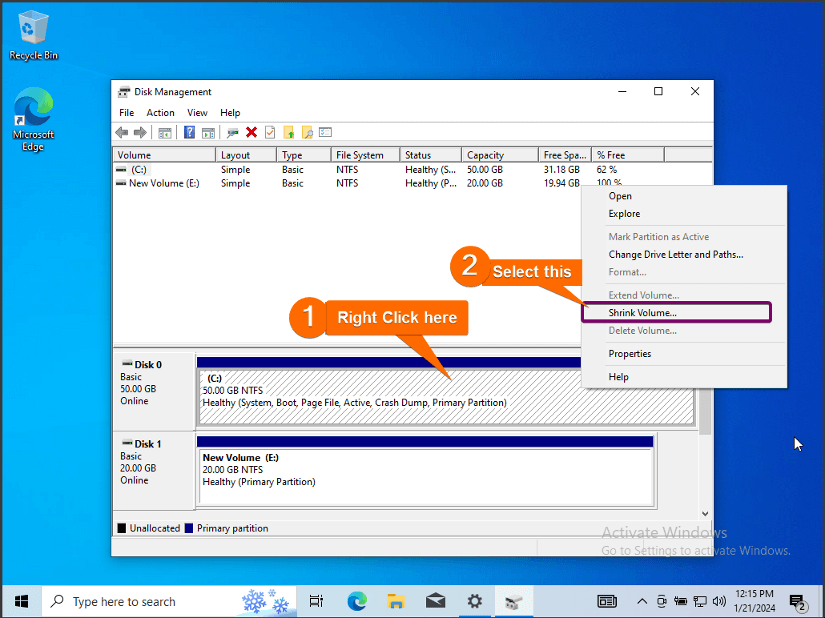
- Right-click on the (C:) drive and select “Shrink Volume”.

- Click on Shrink.

- Similarly, right-click on the other drive (E: in this case) and select “Shrink Volume”.

- Set space and click on Shrink. This will create a new partition from the available free space in (C:) and (E:) drives.
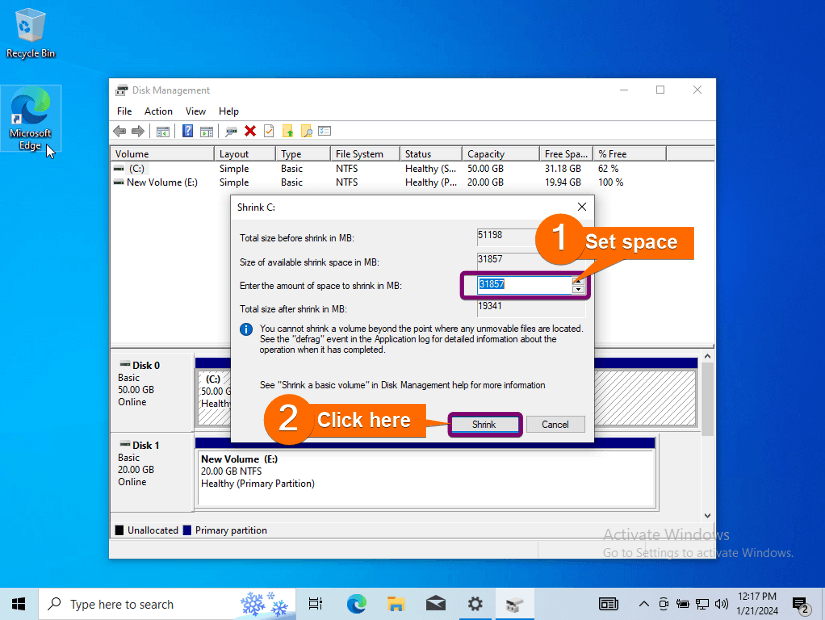
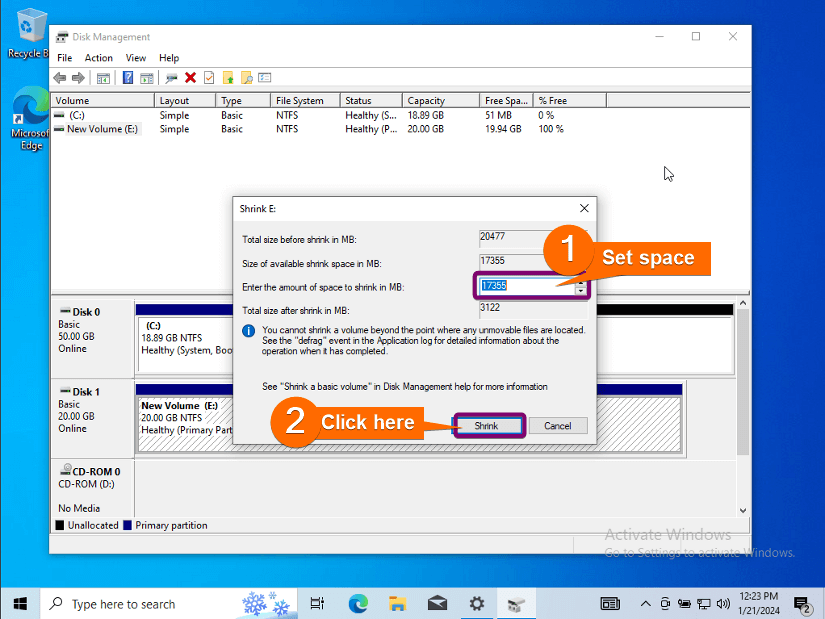 This will create a new partition from the available free space in (C:) and (E:) drives.
4. Boot Ubuntu from USB Drive
To boot Ubuntu from the USB drive, follow these steps:
- Plug the bootable USB drive into the PC where you want to install Ubuntu.
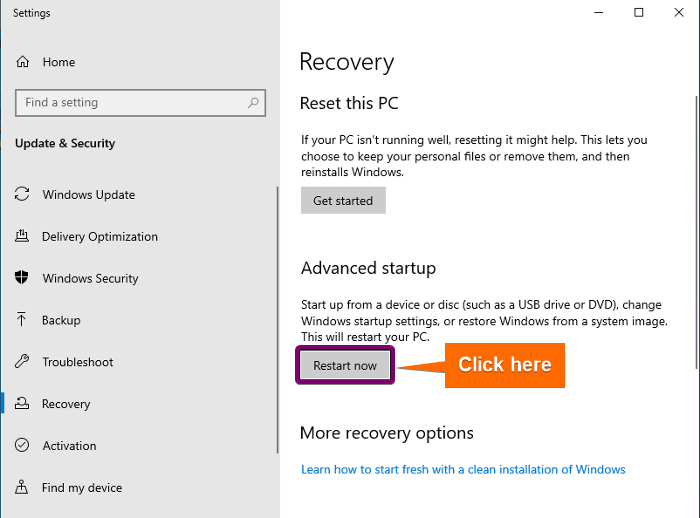
- Search “UEFI” and open Change advanced startup options.

- Click on “Restart now” from Advanced Startup.

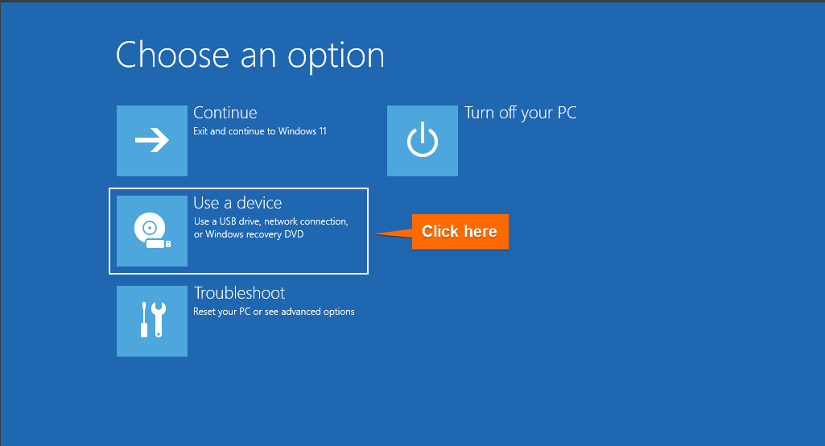
- Select “Use a device” and press ENTER.

- Select your bootable USB drive from the list appears and press ENTER. It will launch the boot window.

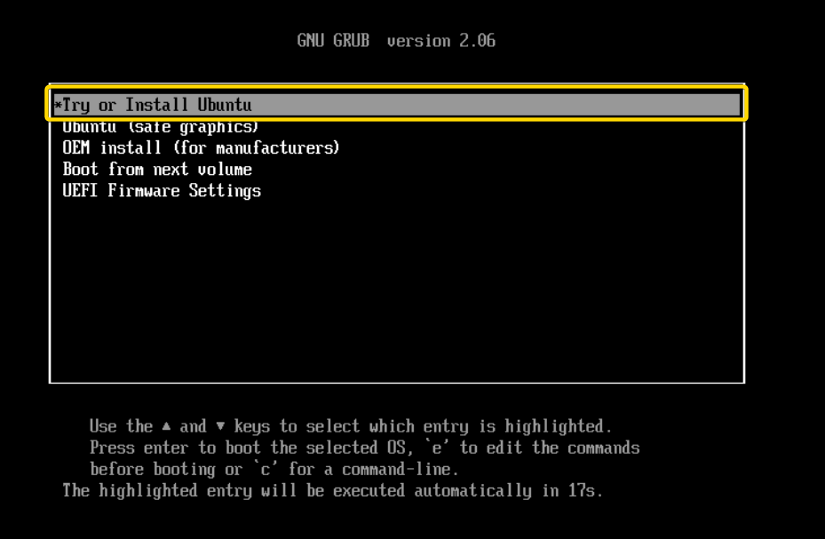
- Use the arrow keys to select the option “Try or Install Ubuntu” and press ENTER.
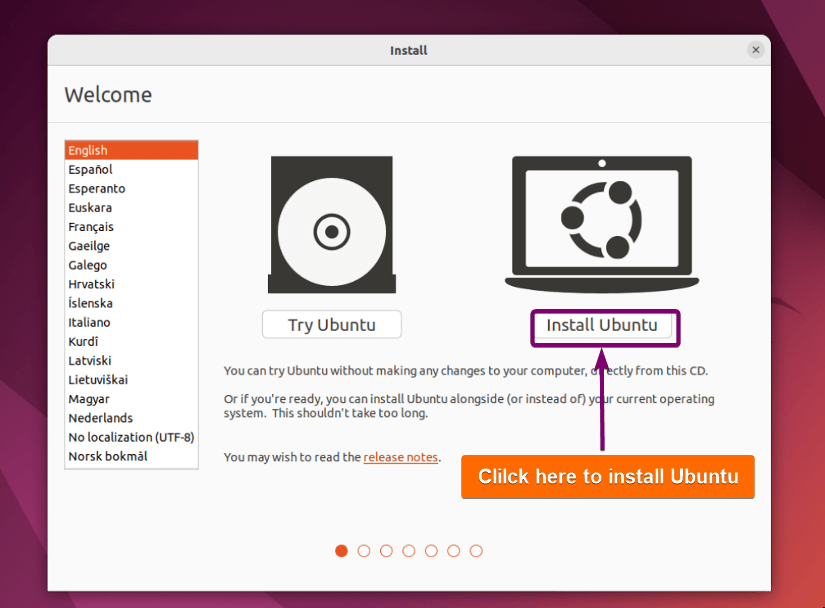
- Click on Install Ubuntu.


5. Select the Keyboard Layout
Select the keyboard layout and click on Continue.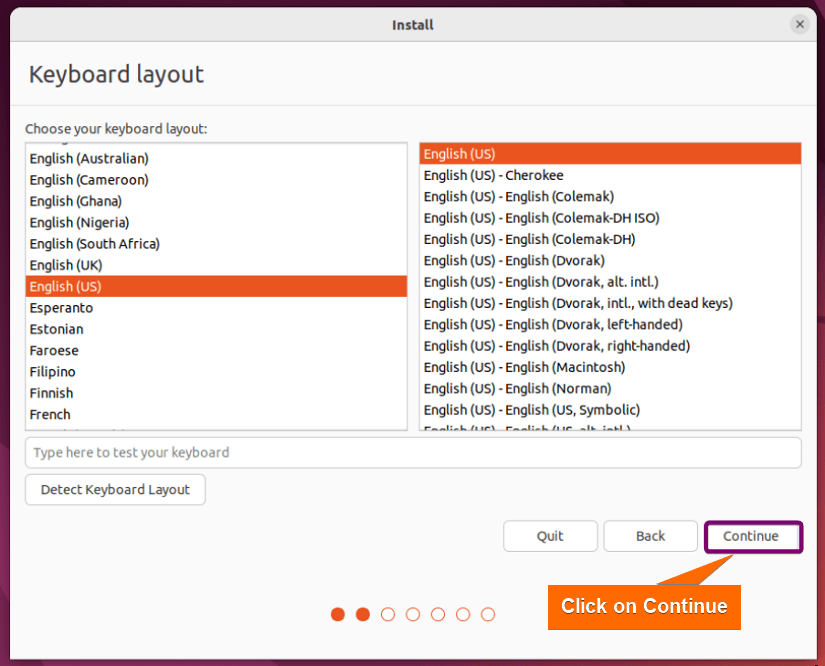
6. Select Installation Setup
Select “Normal installation” and click on Continue. It’ll install web browsers, utility software, games, and media players during the installation.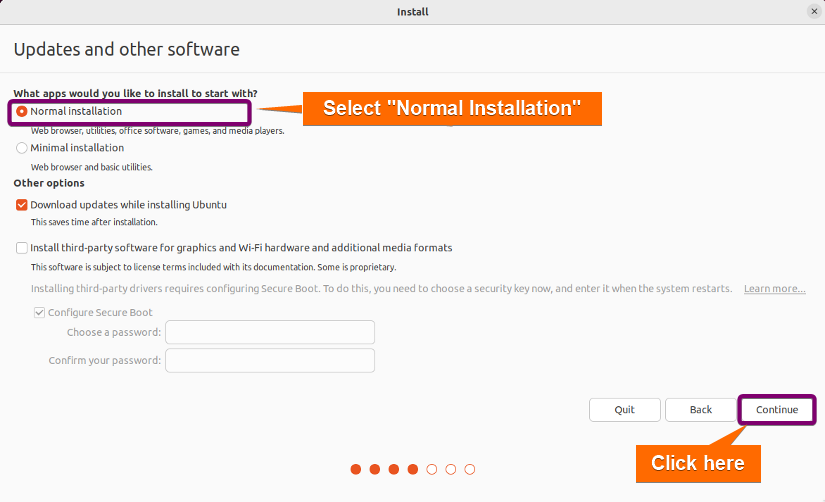
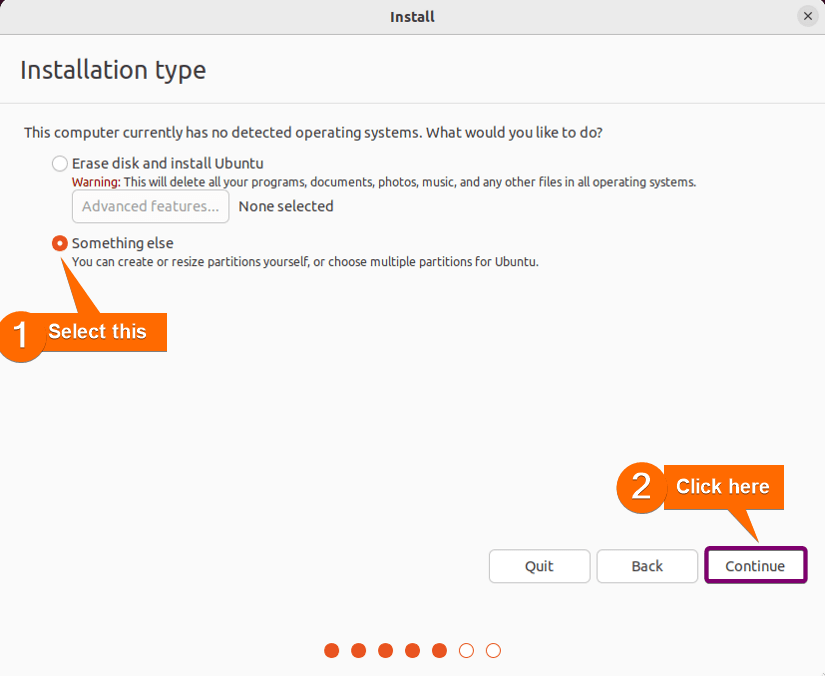
7. Set Installation Type
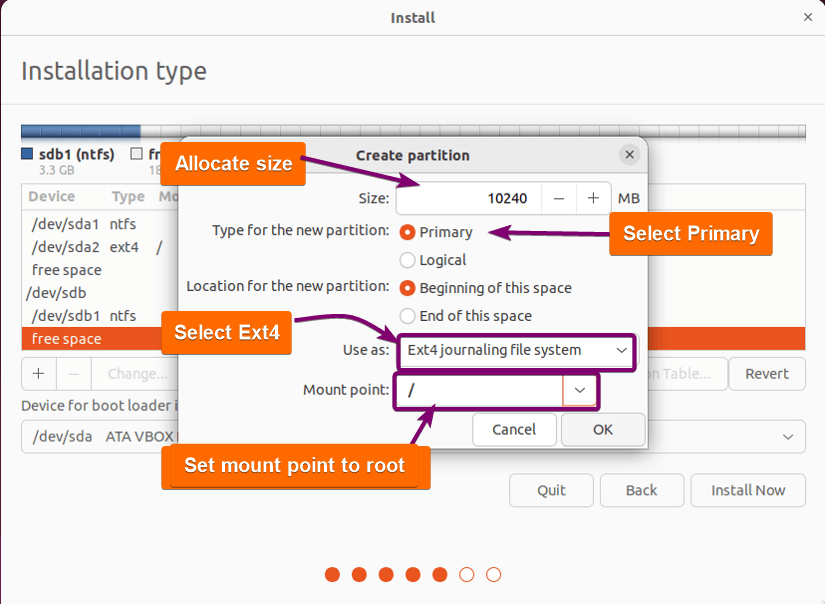
To set the installation type for dual boot in the separate hard drives, follow the steps:
- Select “Something else” for manual partitioning.

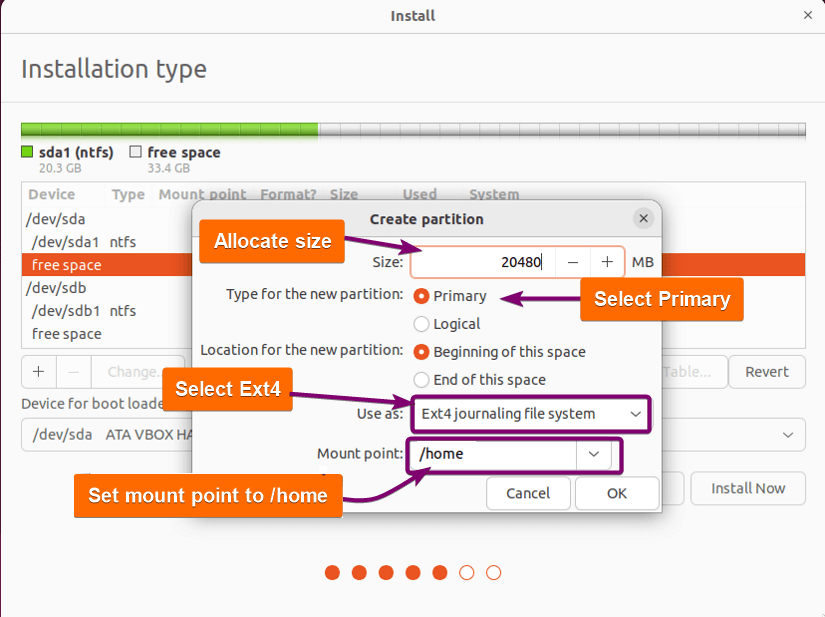
- Select “free space” from HDD and click the + icon.

- Allocate size, set the partition type as “Primary”, select file system as Ext4, and set the mount point to /home.

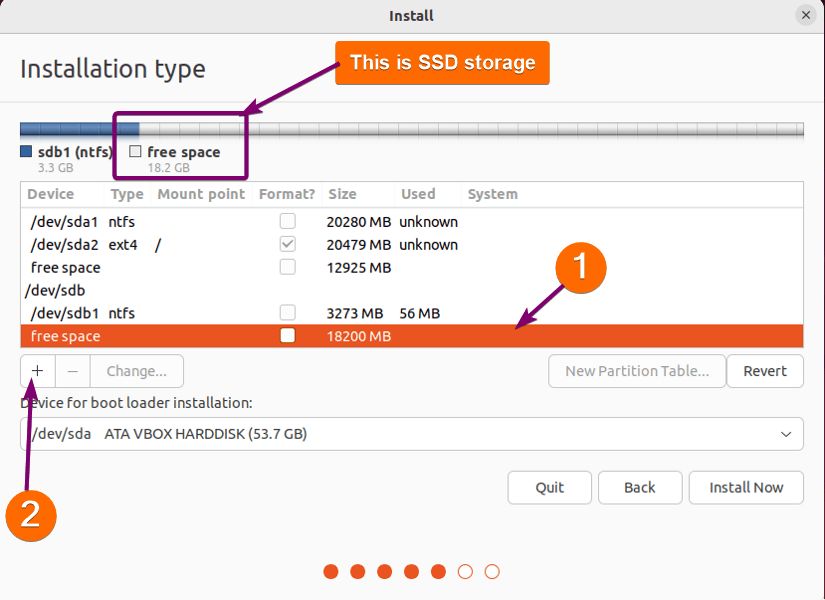
- Similarly, select “free space” from SSD and click on the + icon.

- Allocate size, set the partition type as “Primary”, select the file system as Ext4, and set the mount point to /.

- Click on “Install Now”.


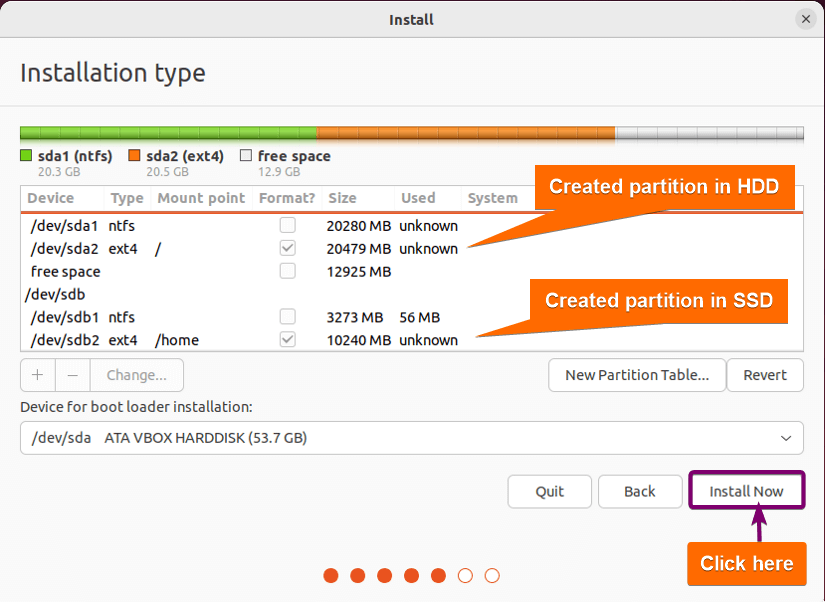
Note: If you have a pre-installed Windows UEFI system, that should have an EFI System Partitioning (ESP) already, and the Ubuntu installer will automatically detect that partitioning. However, an EFI partitioning (35 MB minimum) can be created from the remaining free space as below: 
8. Select Your Location
Select your location from the drop-down menu on the map screen. However, this information will be detected automatically if the computer is connected to the internet. Then, click on Continue.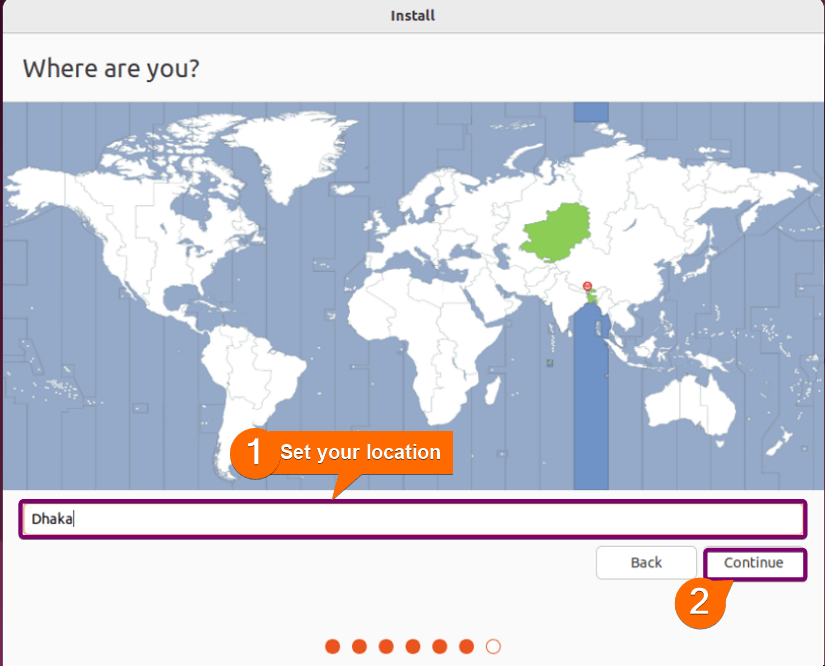
9. Create User Credentials
On this screen, type your name, computer name, and username. Then type and re-type a strong password. Finally, select “Require my password to log in”. Selecting this option will ask for the password every time you power on your PC. Click on Continue.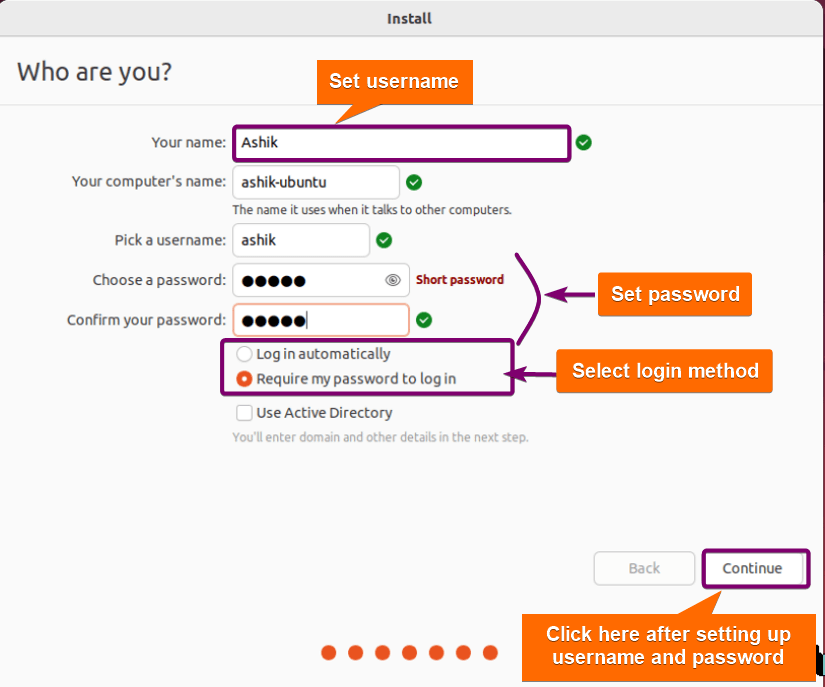 Now, installation will start. It may take a few minutes.
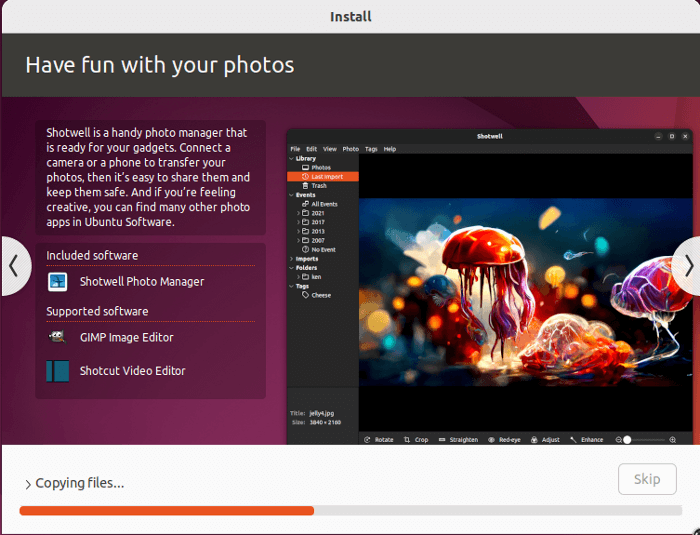
10. Restart the PC
At the end of the installation, an “Installation Complete” prompt appears on the screen. Click on Restart Now in this prompt.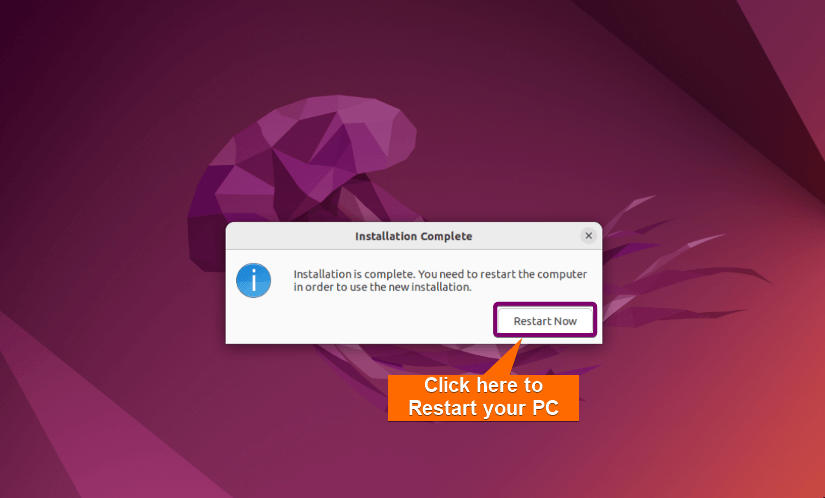
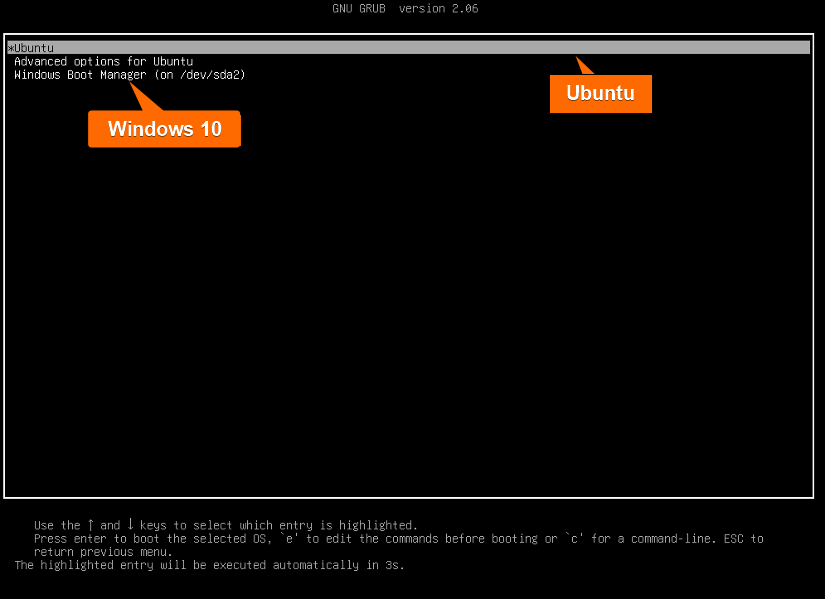 You can see both operating systems during startup and choose one.
Conclusion
This dual boot setup of Windows and Ubuntu on separate hard drives provides users with the best of both worlds, combining the robustness of Windows for certain applications and the flexibility of Ubuntu for development or open-source projects. The distinct storage mediums enhance overall system performance, with the SSD ensuring quick boot times while the HDD accommodates storage needs.
People Also Ask
Is it possible to dual boot on different hard drives?
Yes, it is possible. You can install different operating systems on different drives and when the system boots up, you will be asked to choose which operating system to boot. The exact process of dual booting on separate hard drives varies depending on the manufacturer and implementation of the computer’s BIOS/UEFI utility. However, generally, you can either use the boot menu to select the drive to boot from on each startup or change the BIOS boot priority order to select which devices to boot in what order.
Can I dual boot on the same hard drive?
Yes, you can dual boot on the same hard drive. You can install multiple operating systems on the same hard drive by partitioning the drive into several different partitions and then installing each operating system on a separate partition. When you boot your computer, you will be asked to choose which operating system to boot into. However, it is important to note that dual booting on the same hard drive can be risky, as it can lead to data loss or corruption if not done correctly.
Can I use Windows & Ubuntu on a separate hard drive?
Yes, you can install Windows and Ubuntu on a different hard drive and then choose which one to boot into when you start your computer. Here are the general steps to dual booting Windows and Ubuntu on separate hard drives:
- Insert both hard drives and find which hard drive the system boots into. The OS which gets booted will be managing the bootloader for the system.
- Create a bootable USB drive with Ubuntu on it.
- Boot from the USB drive and install Ubuntu on the second hard drive.
- During the installation process, you will be asked to choose the installation type. Choose the option to install Ubuntu alongside Windows.
- Follow the prompts to complete the installation process.
- Restart your computer, and the next time you will see the boot menu asking for which operating system to boot into.
SSD or HDD what should I choose for root partition?
SSDs are faster and more reliable than HDDs, but they are also more expensive. If you want faster boot times and overall system performance, then an SSD would be a better choice for the root partition. However, if you need more storage capacity and are on a tight budget, then an HDD would be a better choice.
Related Articles
- What is Dual Boot? [Why & How]
- How to Dual Boot Ubuntu and Windows 10 [Simple Guide]
- How to Dual Boot Windows 11 and Ubuntu? [Easy Way]
- How to Dual Boot Windows 10 and Linux Mint [Easiest Method]
- How to Dual Boot Windows 10 and Kali Linux [Simplest Method]
- Install Ubuntu on Mac [Dual Boot]
- Install Linux Mint on Mac [Dual Boot]
- How to Install Kali Linux on Mac [Dual Boot]
<< Go Back to Dual Boot Installation | Linux OS Installation Guide | Learn Linux Basics
FUNDAMENTALS A Complete Guide for Beginners


Hi Ashikur
That was a brillant wallthru how to have two operating systems, on different drives
and how to boot whichever one you want, I will print a hard copy rather than keep
looking at my PC Screen
Thank You