Dual boot Windows 10 and Kali Linux stand as a gateway to harnessing the robust penetration testing and security capabilities of Kali Linux alongside the familiarity and versatility of Windows 10. Setting up this dual boot configuration presents an exciting opportunity for users keen on exploring ethical hacking, cybersecurity, and advanced system testing, all while maintaining the usability of Windows for daily tasks. In this tutorial, I will show how to dual-boot Windows 10 and Kali Linux (2023.4) on your computer step-by-step.
Requirements to Dual Boot Windows 10 and Kali Linux
The minimum requirements for installing Windows 10 and Kali Linux as dual boot are:
- RAM: 4 GB
- Storage: 70 GB
- USB Drive: 4 GB
14 Steps to Dual Boot Kali Linux on Windows 10
Follow the below steps one by one to dual-boot Kali Linux as the second OS on Windows 10 in the easiest way:
1. Download the Kali Linux ISO File
After backing up data, the first step of installing Kali Linux is to download Kali Linux’s iso file. Choose the processor bit according to your PC hardware. I’m downloading a 64-bit installer of Kali Linux 2023.4 Changelog.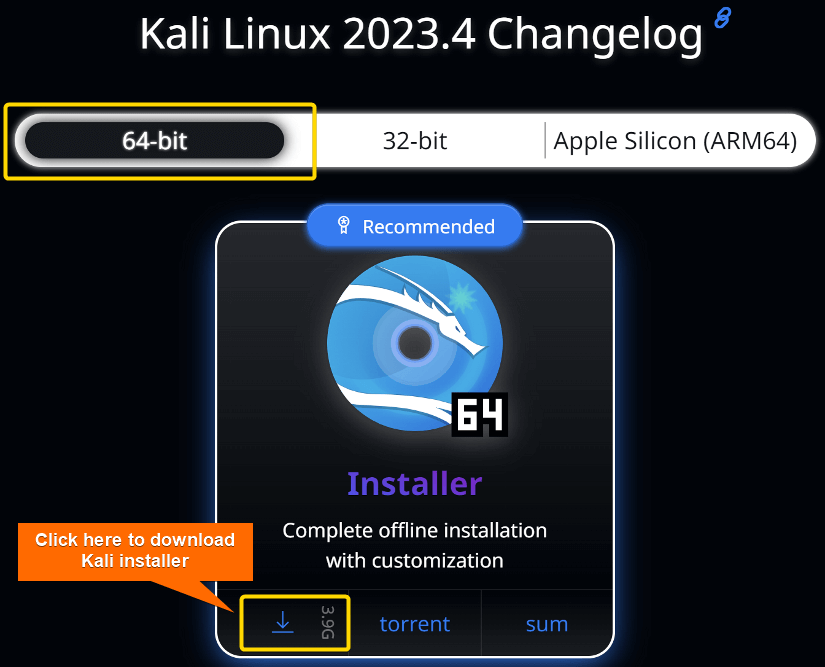
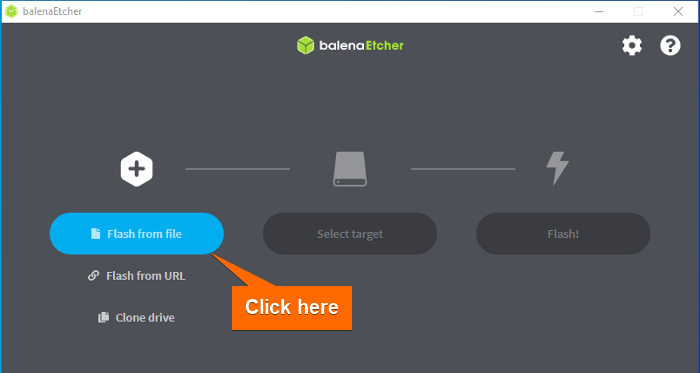
2. Create a Bootable USB Drive
To create a bootable USB drive of the ISO file, use “Etcher”. It is a free and open-source application. First, Install Etcher on Windows. After installing, follow the steps:
- Open Etcher and select “Flash from File”.

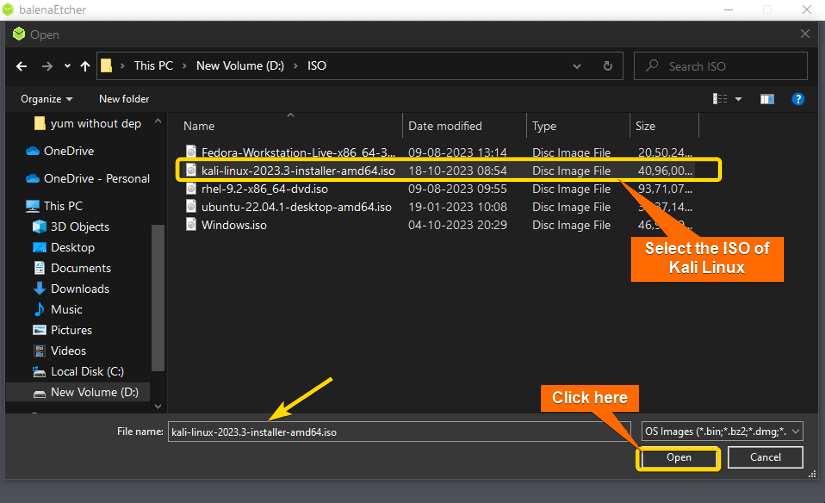
- Select the ISO file from the location you’ve downloaded.

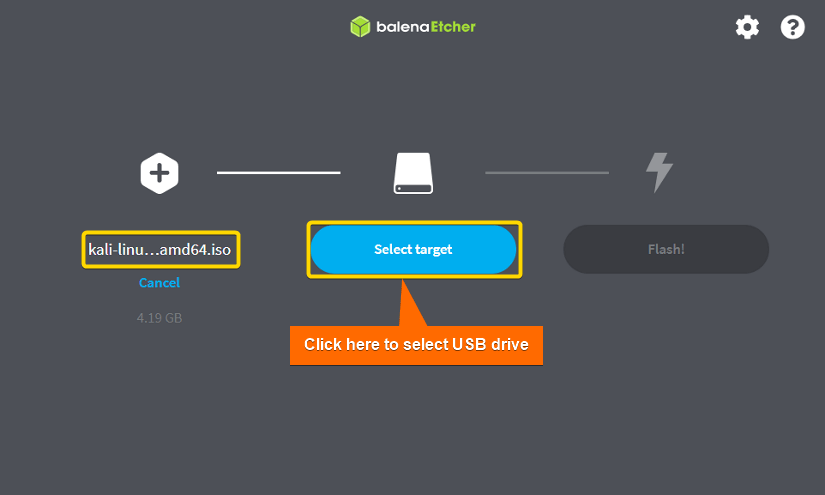
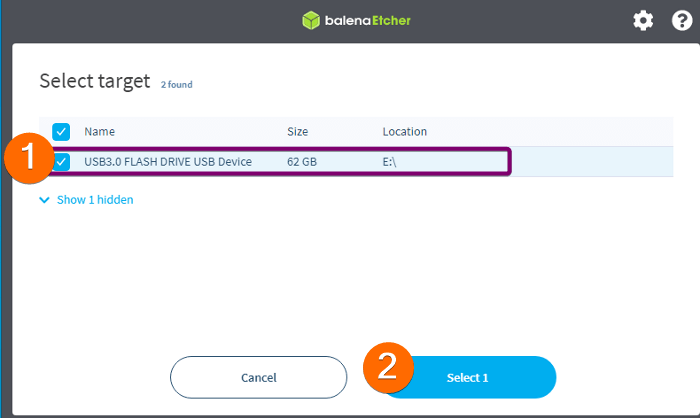
- Plug in a USB pen drive to the PC and click on “Select target”.

- Select your USB drive from the list.

- Finally, click on “Flash” to start flashing the ISO file into the USB drive.After that, Etcher will flash the ISO file into your USB drive and make it bootable.
 After that, Etcher will flash the ISO file into your USB drive and make it bootable.
3. Create Disk Partition
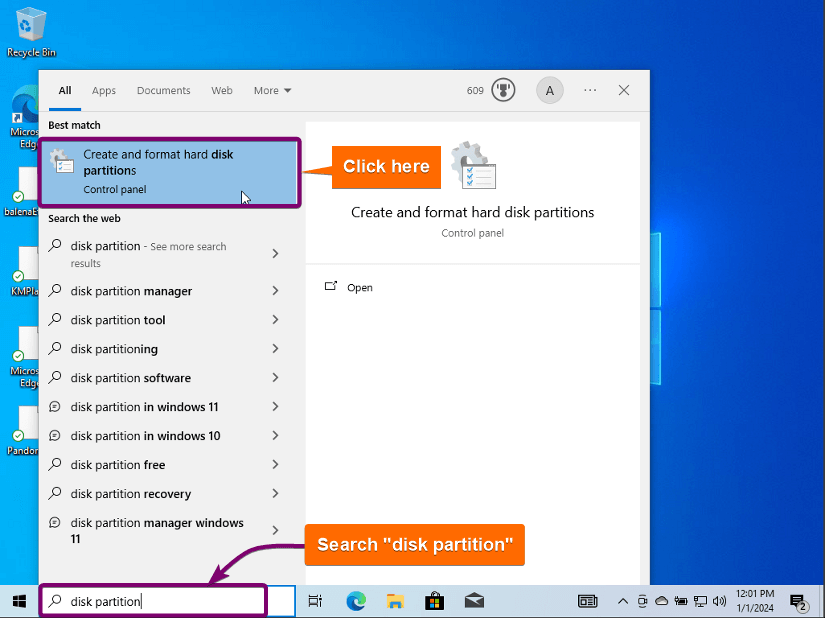
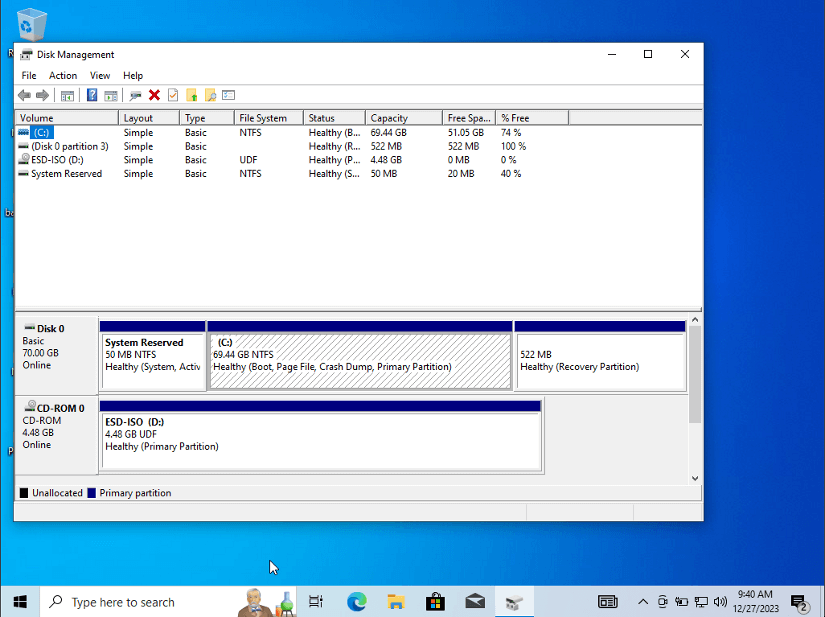
To create a disk partition on Windows 10, follow the below steps:
- Search for “disk partition” on the start menu.

- Open Disk Management.

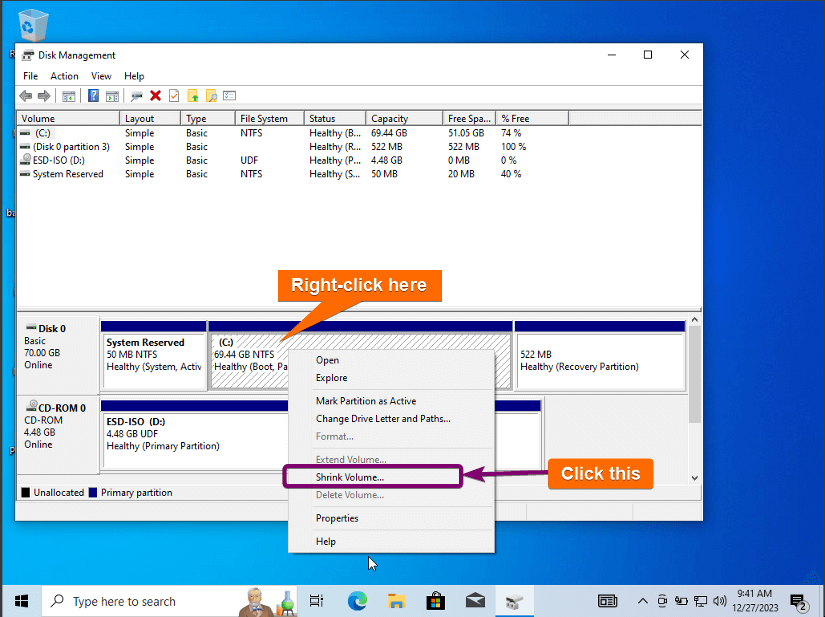
- Right-click on the (C:) drive and select “Shrink Volume”.
- Click on Shrink.
 This will create a new partition from the available free space in C: drive.
 This will create a new partition from the available free space in C: drive.
4. Boot Kali Linux from USB Drive
To boot Kali Linux from the USB drive, first, plug the bootable USB drive into the PC where you want to install it. Then, Restart the PC. It will automatically launch the boot window like this.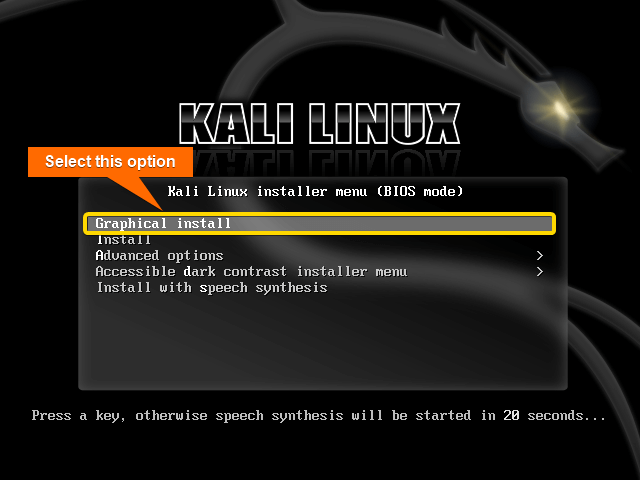 Use the arrow keys to navigate the menu and select the first option “Graphical install” and press ENTER.
To launch the setup window manually, restart your PC and press the BIOS key according to your device. F12 is the most common BIOS key, but ESC, F2, and F10 are alternatives for some devices.
5. Select Language
Select a language for the system and click on Continue.
6. Set Location
Select your location and click on Continue.
7. Select Keyboard Layout
Select the keyboard layout from the Configure Keyboard window according to your preference. Then click on Continue.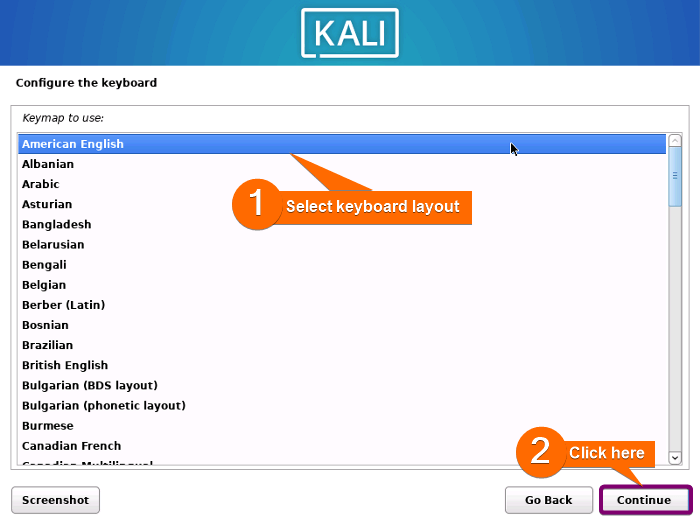
8. Configure the Network
First, type a hostname for your Kali Linux system, and click on Continue.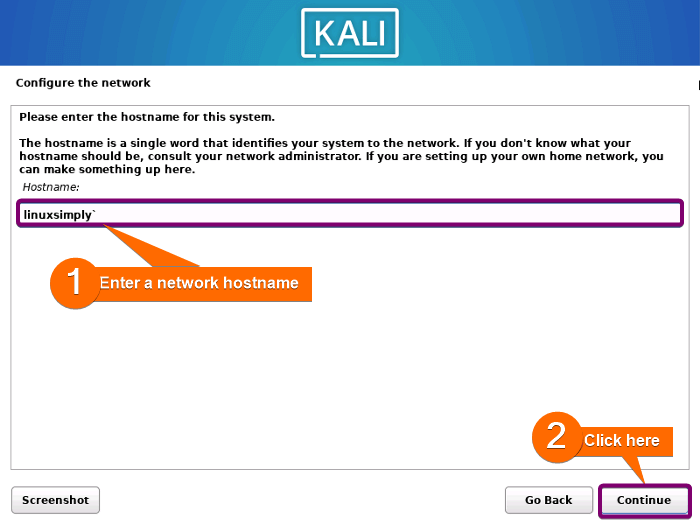 Now, type a domain name for the network.
9. Set up Users and Passwords
To create a user account, first, enter your full name and click on Continue.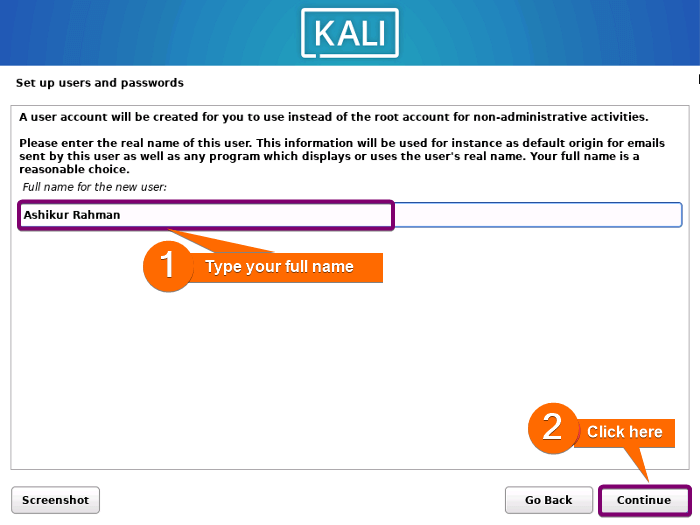 Then, type a short username for your system.
 Create a password. This password will be required every time you turn on the PC.
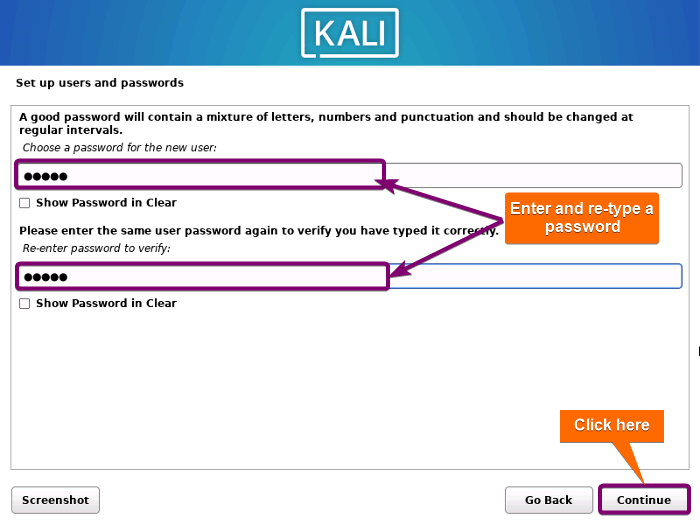
10. Select Time Zone
Select your time zone and click on Continue.
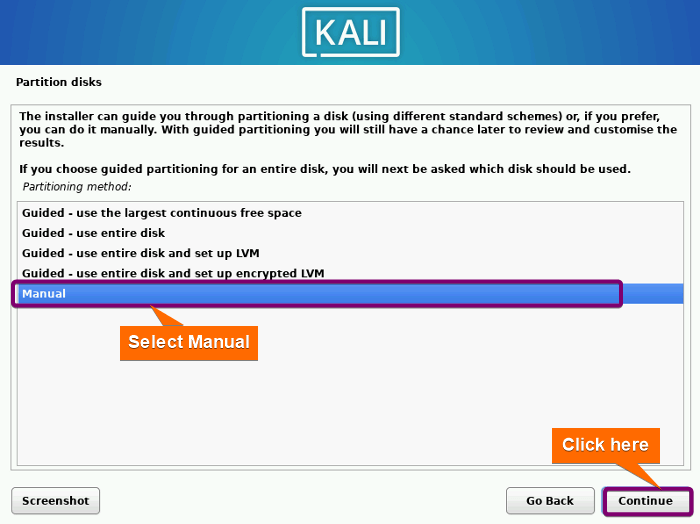
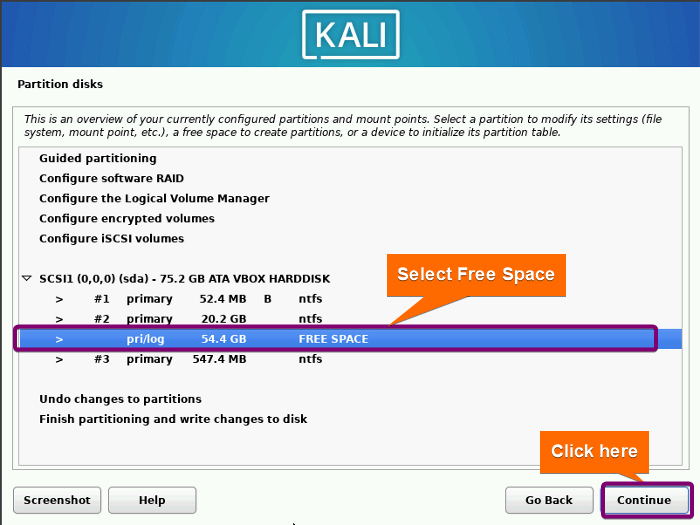
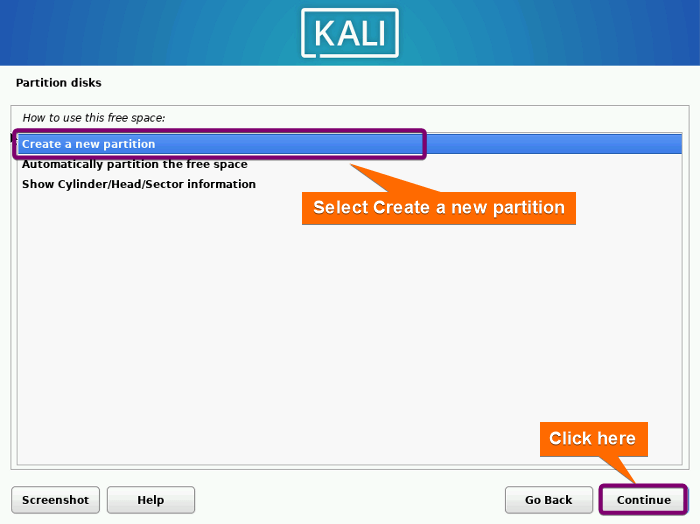
11. Allocate Disk Partition
To allocate the partitioned free disk to Kali, follow the steps below:
- Select “Manual” partitioning and click on Continue.

- Click on the FREE SPACE partition. Then click on Continue.

- Select “Create a new partition”.
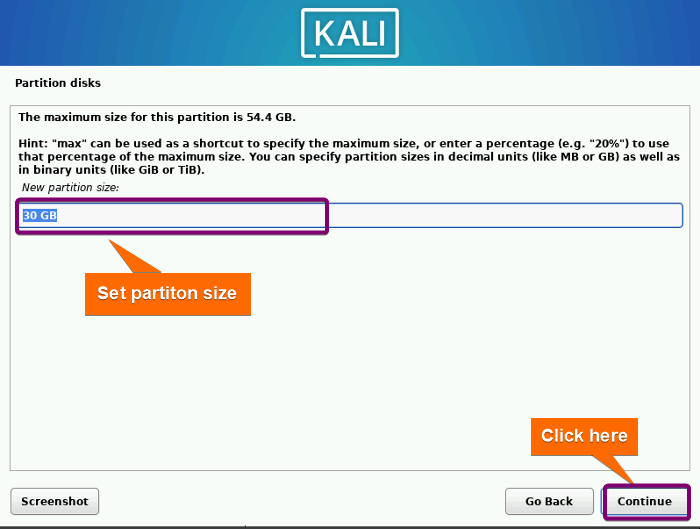
- Set partition size and click on Continue.

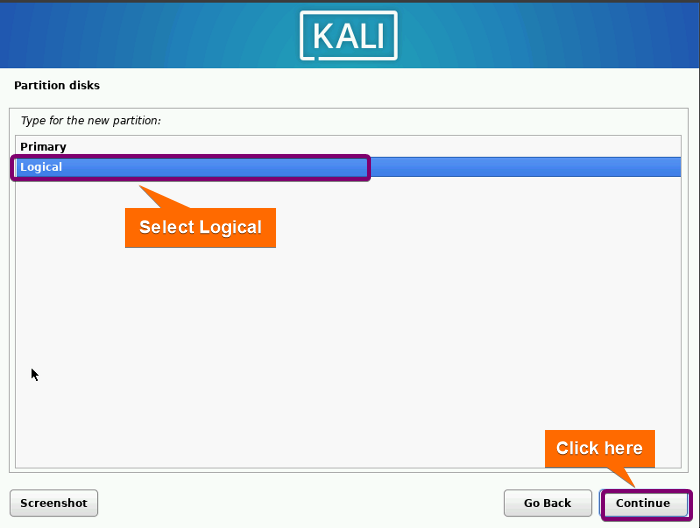
- Choose “Logical”.

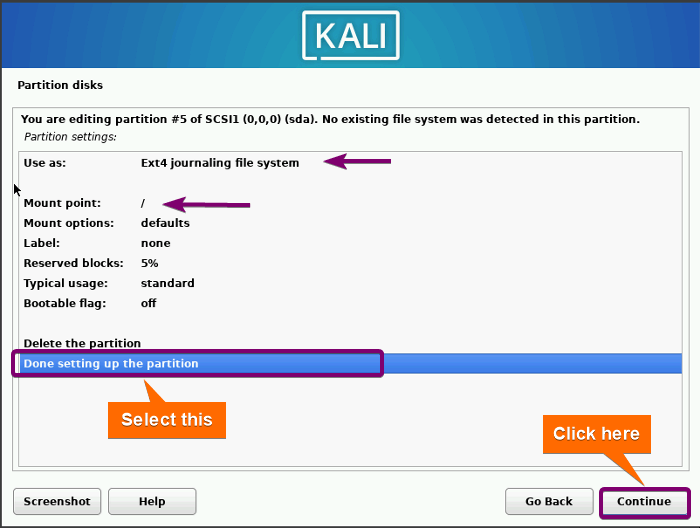
- Set the mount point to root (/). Double-click on “Done setting up partitioning”.

- Select “Finish partitioning” and click on Continue.
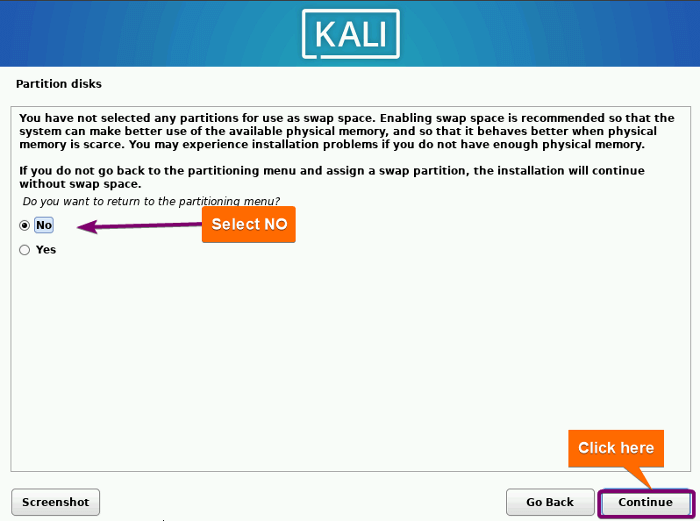
- Select “No” in swap partition.

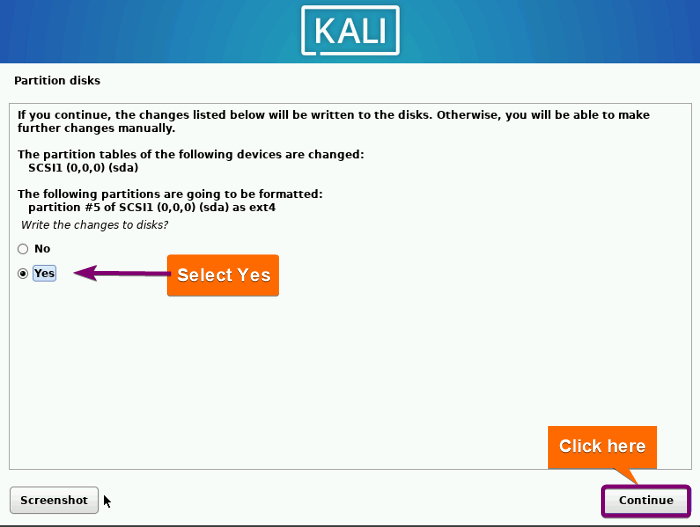
- Select “Yes” to confirm the partitioning.


12. Software Selection
Select the software you want to install while installing Kali Linux.
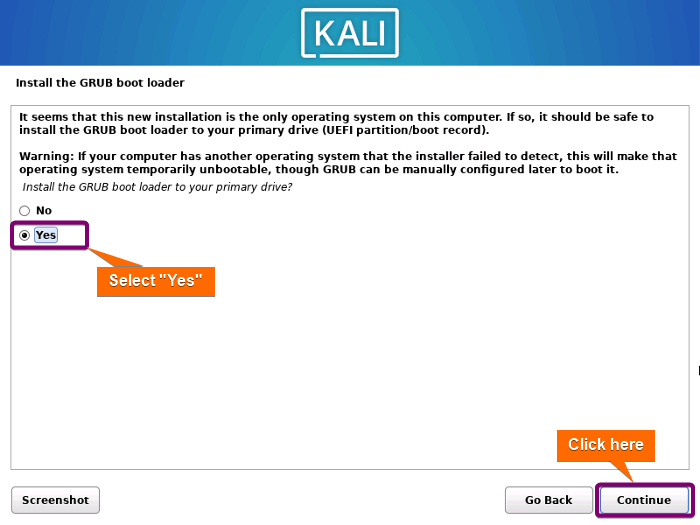
13. Install the GRUB Bootloader
Follow the below steps to install the GRUB bootloader.
- Check the “Yes” option and click on Continue.
- Select “/dev/sda” as the boot loader device to install GRUB and click on Continue.After that, it installs GRUB.

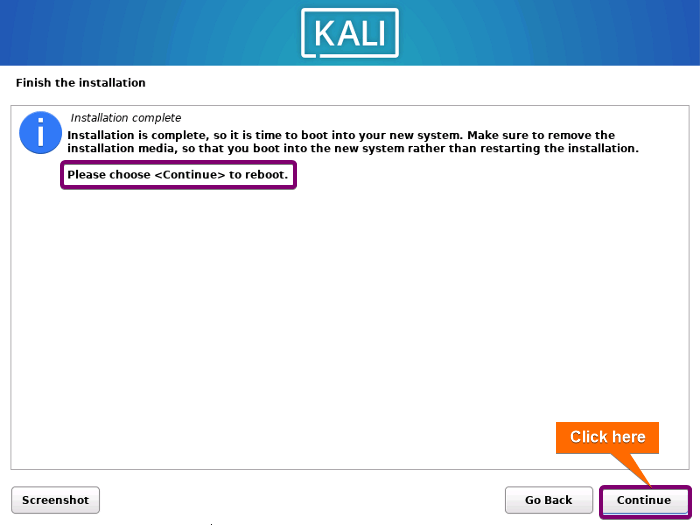
- Click on continue after finishing the installation to reboot your computer.
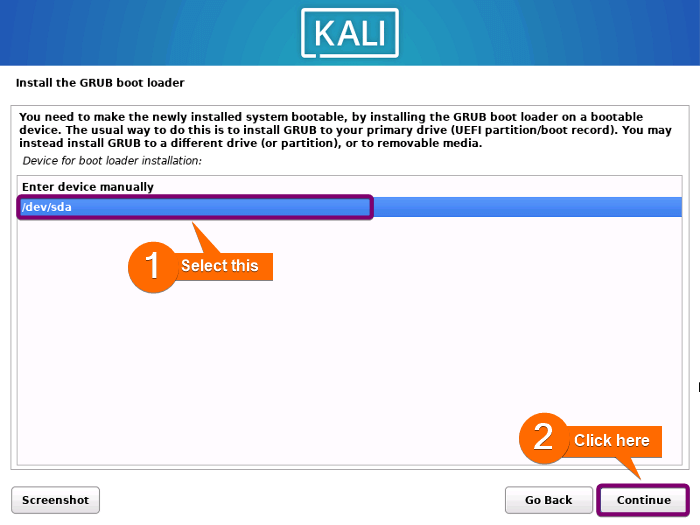 After that, it installs GRUB.
14. Log in to Kali Linux
You can see both operating systems and choose one every time you turn on the PC.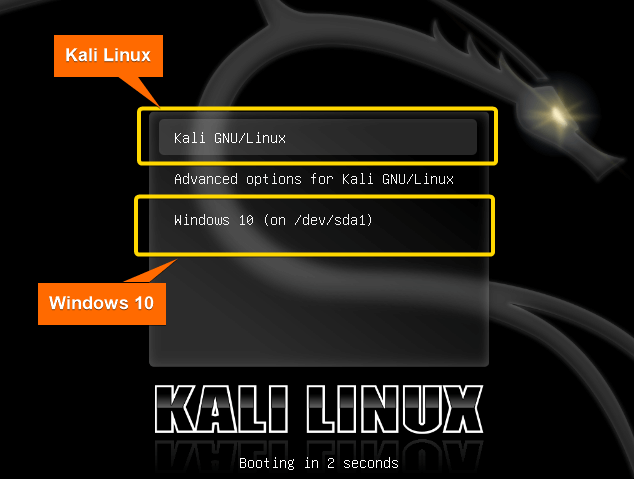 Choose Kali Linux and Log in using the credentials set during installation.
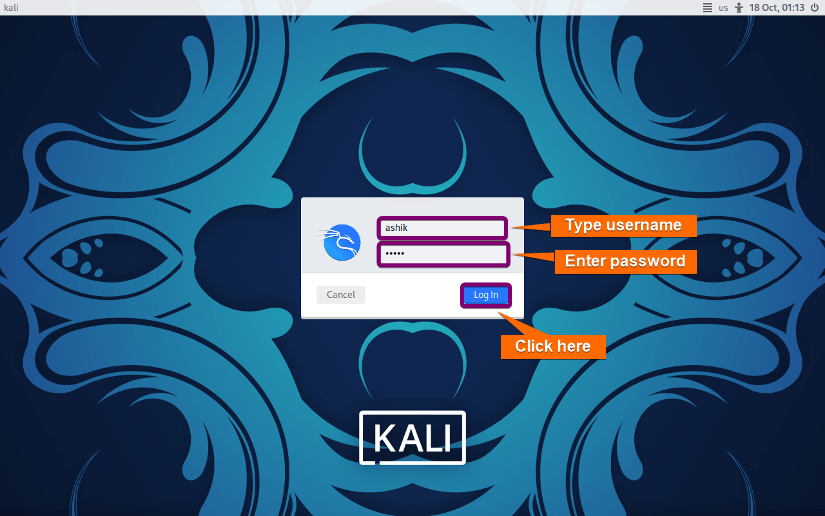
How to Dual Boot Windows as Second OS on Kali Linux?
Installing Windows as your second system with Kali Linux is valid too. You can do it with just a few simple steps:
- Make a partition. You can use GParted software to shrink the Kali Linux partition.
- Download Windows ISO and create a bootable USB.
- Insert the USB into your computer and restart it while continuously pressing the BIOS key.
- Boot from the installation media and use the partitioned unallocated space to install Windows.
You’re done. But after Windows is installed, your computer will likely boot directly into Windows without asking you the option to boot into Kali Linux. So, to restore the GRUB bootloader, boot into the Kali Linux live session and run the command:
sudo update-grubThen remove the USB and restart the computer. That’s it!
Conclusion
The dual boot installation of Kali Linux with Windows 10 marks it as a powerful synchronization between cutting-edge security tools and everyday computing convenience. This setup empowers users to leverage Kali Linux’s robust penetration testing capabilities alongside the familiarity and usability of Windows 10.
People Also Ask
Can I install Kali Linux in a partition?
Yes, you can install Kali Linux in a partition. Here are the basic steps to install Kali Linux in a partition:
- Download the Kali Linux installer image and burn it to a DVD or image Kali Linux Live to a USB drive.
- Boot your computer with the chosen installation medium and choose Graphical Install.
- Choose the partition type. For new users, choose “All files in one partition”.
- Finish partitioning and write changes to disk.
- Wait for the installation to complete.
How to boot into Kali without showing GRUB after dual boot?
To boot into Kali Linux without GRUB, modify the GRUB configuration file. Here are the steps:
- Open the terminal in Kali Linux.
- Type
sudo nano /etc/default/gruband press ENTER. - Locate the line that says
GRUB_TIMEOUT_STYLE=hiddenand comment it out by adding#at the beginning of the line. - Add a new line
GRUB_TIMEOUT=0. - Save the file by pressing Ctrl+O and then Ctrl+X.
- Run sudo update-grub to update the Grub configuration.
After following these steps, Grub will not be displayed when you boot into Kali Linux. Instead, Kali Linux will boot directly into the login screen.
How do I create a bootable USB drive with Kali Linux?
To create a bootable USB drive with Kali Linux, you can use a utility like Etcher. Here are the basic steps to create a bootable USB drive with Kali Linux using Etcher:
- Download the Kali Linux ISO file from the official website.
- Plug your USB drive into an available USB port on your computer and launch Etcher.
- Click “Flash from file”, and locate the Kali Linux ISO file.
- Click “Select target” and choose the USB drive you want to make bootable.
- Click the Flash! button once ready.
Is Kali Linux safe for dual boot?
Yes, Kali Linux is safe for dual booting. It is recommended to follow the installation steps in the official documentation carefully. Overall, it is safe and useful if you use it responsibly and within the bounds of the law, adhering to ethical hacking and responsible disclosure practices.
How to dual boot Ubuntu & Kali Linux?
To dual boot Ubuntu and Kali Linux, first, ensure you have at least 50 GB of free storage space on the HDD or SSD and 4 GB RAM for efficient performance. Then follow the steps:
- Download the ISO file.
- Make a bootable USB with the ISO.
- Partition the disk.
- Boot from the USB drive.
- Install Kali Linux on the partitioned disk.
After installation, the GRUB boot menu will appear during startup, allowing you to choose between Ubuntu and Kali Linux.
Related Articles
- What is Dual Boot? [Why & How]
- How to Dual Boot Ubuntu and Windows 10 [Simple Guide]
- Dual Boot Windows and Ubuntu [On Separate Hard Drives]
- How to Dual Boot Windows 11 and Ubuntu? [Easy Way]
- How to Dual Boot Windows 10 and Linux Mint [Easiest Method]
- Install Ubuntu on Mac [Dual Boot]
- Install Linux Mint on Mac [Dual Boot]
- How to Install Kali Linux on Mac [Dual Boot]
<< Go Back to Dual Boot Installation | Linux OS Installation Guide | Learn Linux Basics
FUNDAMENTALS A Complete Guide for Beginners


