To send email in Bash, first, you need to generate app-specific password and set up an SMTP server on your machine. Then you can use different available commands to send emails directly from the command line. However, there are various commands to send email in Bash. In this article, you’ll explore how to leverage 2 different methods in Bash to send emails efficiently.
Environment Setup for Sending Email in Bash
Before creating a script for sending emails in Bash, you have to generate an app-specific password and set SMTP. Follow the steps below:
Step 1: Generate App-Specific Password
Follow the steps below to generate a password that is specific to an application in Gmail:
- Follow 2FA documentation to enable 2FA on Gmail.
- Once you have 2FA enabled, visit this site to generate an app-specific password.
-
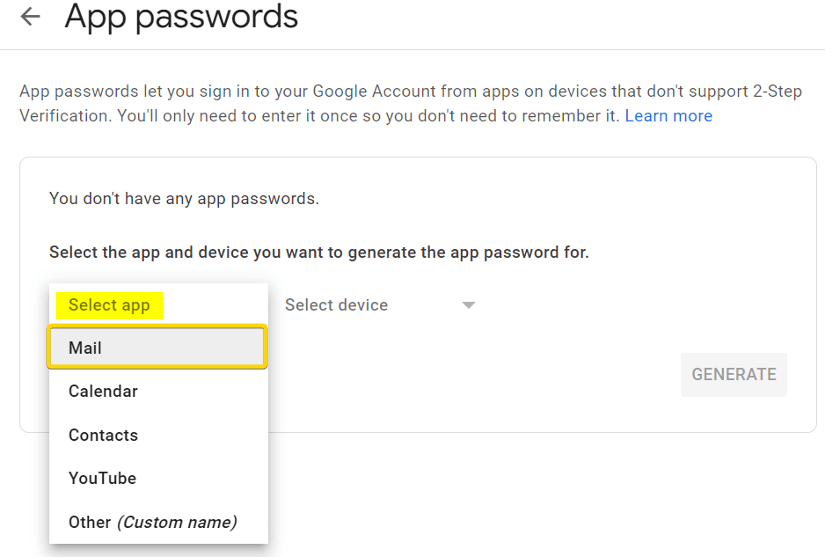
After logging in to your account, you can see the following window. Select Mail from the Select app dropdown list as follows.

-
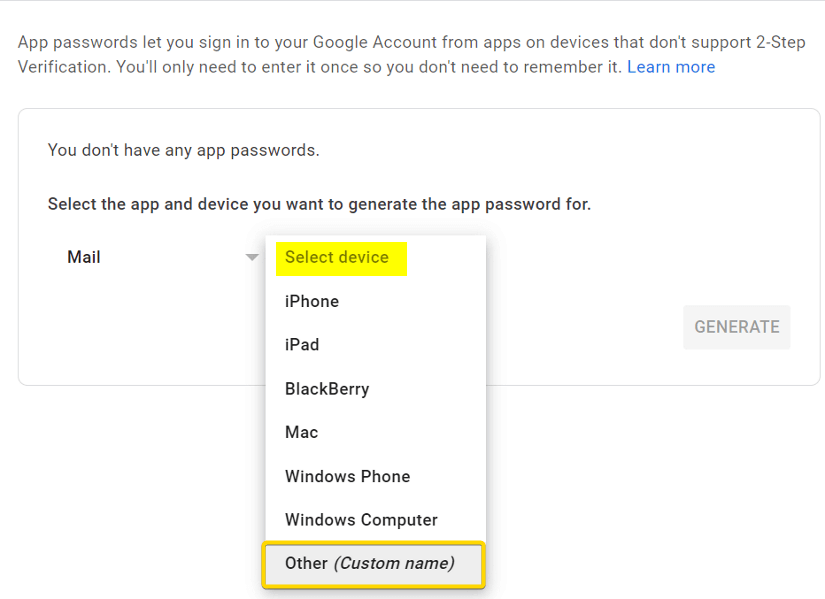
From the Select device dropdown list, select Other (Custom name) option.

-
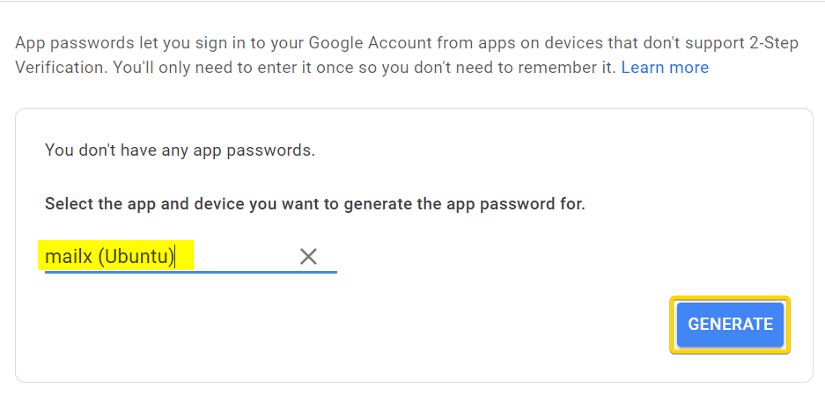
Now give the name of the device. You can give something memorable as I named it mailx (Ubuntu) in this case. Finally, click on Generate to create the app-specific password.

A password of 16-character is given just after the click. The following image shows the generated app-specific password.

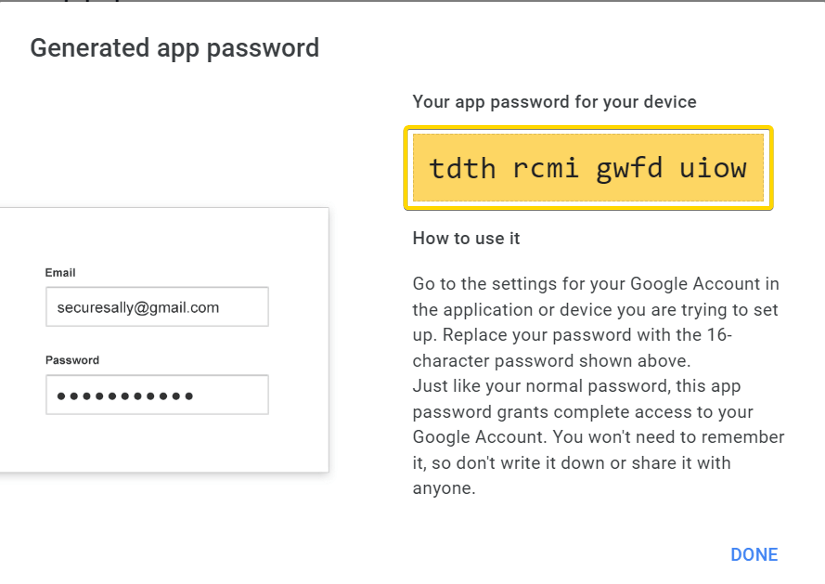
At this point, you have obtained an app-specific password from your E-mail provider. In the subsequent steps, I will show you how to set up an SMTP server and then send mail.
Step 2: SMTP Server Set-up
Follow the steps below to configure a SMTP (Simple Mail Transfer Protocol) server on your Linux:
-
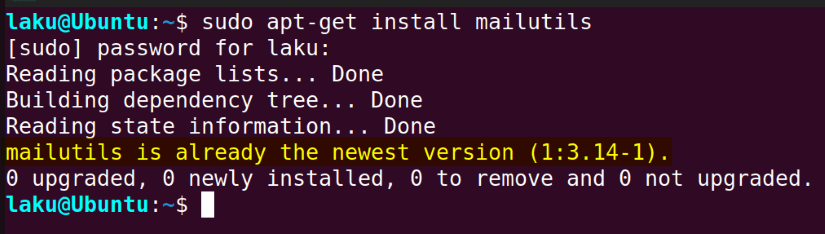
At the beginning, open the system (Ubuntu) terminal and run the command below to successfully install the mailx and necessary packages to set up a SMTP server.
sudo apt-get install mailutils
- Press “Y” to continue the installation.

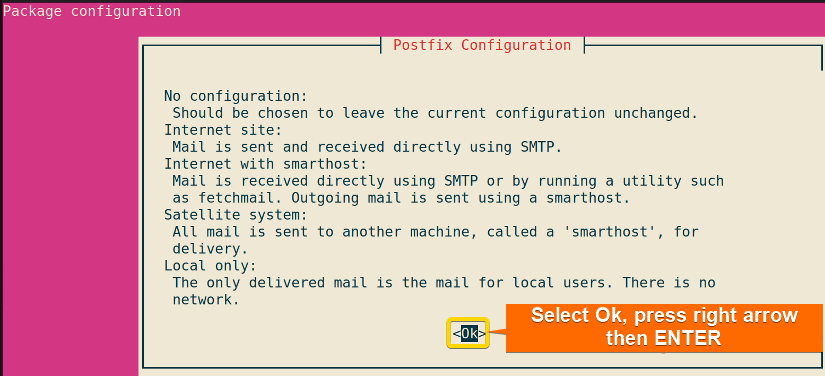
- After installation it automatically opens the Postfix Configuration window. Select Ok, then press the right arrow and press on ENTER to continue configuring the package.

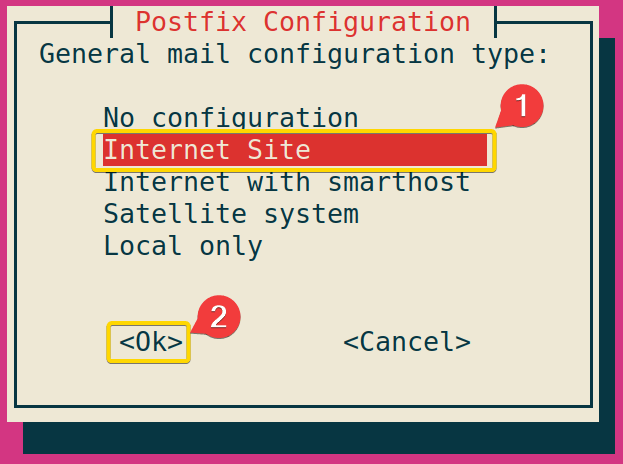
- At this point of configuration select Internet Site and continue with Ok.

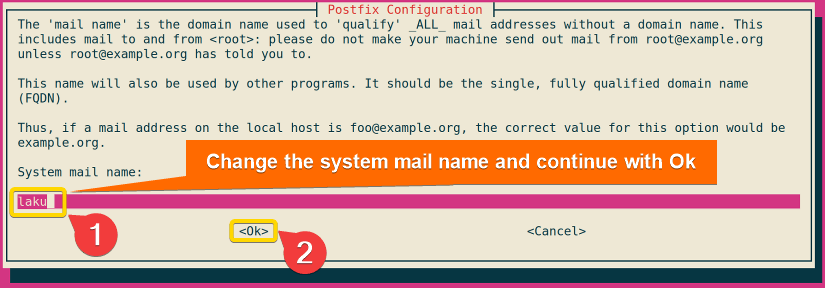
- Change the System mail name as your wish and continue with Ok. This will successfully install the necessary packages.

- If you run the installation command again you will see a message that mailx is already installed in the system. Now, it’s time to configure the /etc/ssmtp/ssmtp.conf file.

- To open the SMTP configuration file run the command below:
sudo nano /etc/ssmtp/ssmtp.confNote: The above command can’t open the configuration file if smtp is not installed in the system. Run the command below to install smtp at this stage:sudo apt-get install ssmtp - Now change the configuration file as follows.

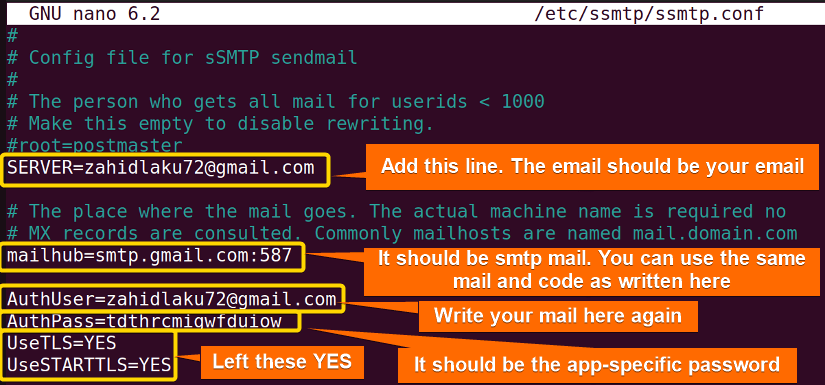
 Let us understand the meaning of each field I changed in the configuration file.EXPLANATION
- SERVER: This field indicates from sender email ID.
- mailhub: This field indicates where the mail goes. If you are using Google’s e-mail services, we assume that this goes to Google’s e-mail server. In that case, this should be gmail.com. If your e-mail service provider is not Google, you should go through the documentation of your e-mail provider.
- AuthUser: This is the field where you enter your e-mail address. If, for example, my e-mail address is [email protected], I would enter this address in the AuthUser
- AuthPass: You have to place the 16-character long alphanumeric app specific password in this field. The password I generated is tdthrcmigwfduiow (there are no spaces).
- UseTLS: This uses the TLS protocol to wrap the SMTP contents that enable you to send encrypted e-mail. The recommended value of this field is “YES“.
- UseSTARTTLS: This specifies if the STARTTLS should be used or not. I would recommend you use STARTTLS and fill the field with “YES“.
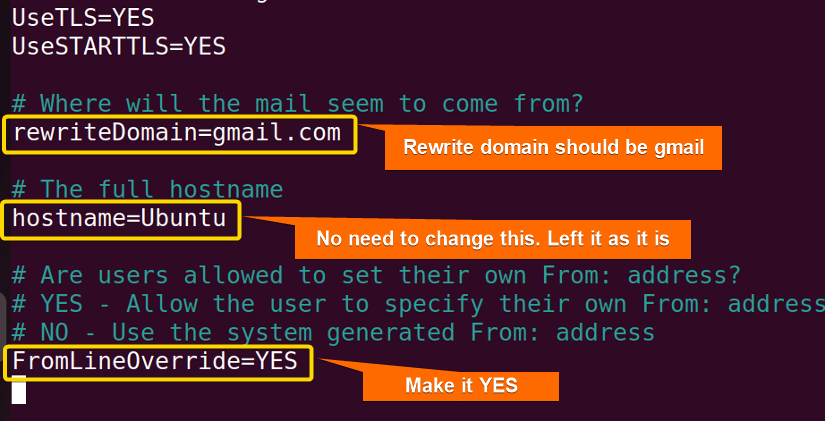
- rewriteDomain: It should be the domain that can rewrite your mail. Gmail is the rewrite domain in my case.
- Hostname: You can leave the field as it is or change it to your mail ID.
- FromLineOverride: This field specifies whether you are allowed to override the ‘From header‘ of an e-mail or not. I fill the field with “YES”.


 Let us understand the meaning of each field I changed in the configuration file.
2 Methods to Send Email from Bash Terminal
Sending emails from a Bash terminal is an efficient way to automate notifications, reports, or alerts. Here are the two popular methods for accomplishing this task using the mailx and curl commands:
1. Using “malix” Command
The mailx is a versatile command-line utility for sending and receiving emails. It’s commonly available on Unix-based systems and offers a simple syntax for sending emails directly from the terminal. Here’s how to use this command to send emails form Bash terminal:
- Firstly, write the following command to open a mailx.sh file in the build-in nano editor:
nano mailx.sh -
Copy the following script and paste it into nano. Press CTRL+O and ENTER to save the file; CTRL+X to exit. Alternatively, copy the following script. Paste the script in a text editor and save it as .sh file.
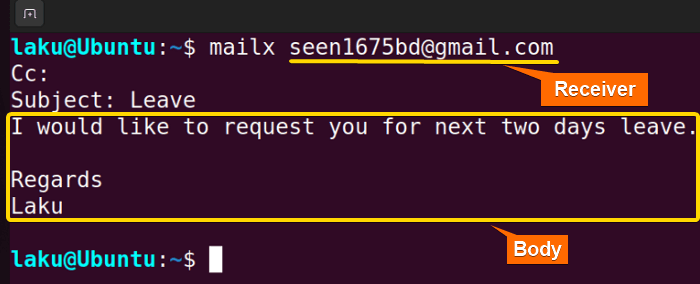
#!/bin/bash recipient="[email protected]" subject="Leave" body="I would like to request you for next two days leave.\\n \\ n Regards Laku" echo -E "$body" | mailx -s "$subject" "$recipient"EXPLANATIONThe provided Bash script demonstrates a simple example of sending an email using the
mailxcommand. The script sets the recipient’s email address, subject and body of the email. Then, it pipes the body content to the mailx command with the specified subject and recipient address. - Now, Use the following command to make the file executable:
chmod u+x mailx.sh - Finally, Run the script by the following command:
./mailx.sh
When executed, this script will send an email to the recipient ([email protected]) with the subject “Leave” and the given body text.
malix <recipient> structure:
2. Using CURL Command
The curl is a powerful command-line tool for transferring data with URLs. When paired with SMTP servers, it can be used to send emails programmatically from the terminal. Here’s the script:
#!usr/bin/env bash

# User input
read -p "Enter your email : " sender
read -p "Enter recipient email : " receiver
read -p "Enter your Google App password : " gapp
read -p "Enter the subject of mail : " sub

echo "Enter the body of mail : "
read -r body # using read command for multiline input

# curl command for accessing the smtp server
curl -s --url 'smtps://smtp.gmail.com:465' --ssl-reqd \
--mail-from "$sender" \
--mail-rcpt "$receiver" \
--user "$sender:$gapp" \
--mail-rcpt "$receiver" \
-T <(echo -e "From: ${sender}\nTo: ${receiver}\nSubject: ${sub}\n\n${body}")
This script captures user input for sender email, recipient email, Google App password, and email subject. It then prompts the user to input the email body. The script utilizes the curl command to send the email via SMTP to the recipient using Gmail’s SMTP server.
How to Attach a File with Email from Bash Terminal?
Attaching a file to an email from the Bash terminal can be achieved using the curl command with SMTP. Here’s a step-by-step guide on how to do it:
#!/usr/bin/env bash

# User input
read -p "Enter your email: " sender
read -p "Enter recipient email: " receiver
read -p "Enter your Google App password: " gapp
read -p "Enter the subject of mail: " sub
read -p "Enter path to the file to attach: " attachment

# MIME type for the attachment
MIMEType=$(file --mime-type -b "$attachment")

# curl command to send email with attachment
curl -s --url 'smtps://smtp.gmail.com:465' --ssl-reqd \
--mail-from "$sender" \
--mail-rcpt "$receiver" \
--user "$sender:$gapp" \
-F "=(;type=multipart/mixed" \
-F "=$body;type=text/plain" \
-F "file=@$attachment;type=$MIMEType;encoder=base64" \
-F "=)"
Make sure to replace the SMTP server address, port, and any authentication credentials with your own if you’re not using Gmail’s SMTP server. Additionally, ensure that the file path provided for the attachment is correct.
Conclusion
In conclusion, sending emails from the system terminal or creating a Bash script for sending emails is not a straightforward task. However, once you send your first email from the command line, you will be a pro in sending emails with Bash.
People Also Ask
How to send emails from Linux terminal?
To send emails from the Linux terminal, use malix command in the below syntax:
echo "Message body" | mailx -s "Subject" [email protected]Replace “Message body”, “Subject”, and [email protected] with your desired content.
How to send emails with multiple recipients in Bash?
To send emails to multiple recipients using mailx command, add the recipients’ mail one after one delimited by comma.
How to preserve whitespaces while sending emails using mailx command?
To preserve whitespace, including newlines, when sending emails using the mailx command in Bash, you can use the -E option. This option ensures that the body of the email is sent to the recipients without any modifications.
How can I check whether my emails are delivered or not?
To check whether your emails are sent or not, use the $? variable to check the exit status of the previously executed command. Here’s how you can check the exit status of the mail command in Bash:
mail -s "Subject" [email protected] <<< "Message body"
# Check exit status of the mail command
if [ $? -eq 0 ]; then
echo "Email sent successfully."
else
echo "Failed to send email."
fi
Related Articles
- How to Get Date in Bash [2 Methods with Examples]
- How to Print Time in Bash [2 Quick Methods]
- How to List Users in Bash [2 Easy Ways]
- How to Get Current Time in Bash [4 Practical Cases]
- How to Use Date Format in Bash [5 Examples]
- How to Get Timestamp in Bash [2 Practical Cases]
- How to Copy and Paste in Bash [2 Methods & Cases]
- How to Read Password in Bash [3 Practical Cases]
- Bash Script to Send Email with Attachment [Step-by-Step Guide]
- How to Get IP Address in Bash [3 Methods]
- How to Find and Replace String in Bash [5 Methods]
- How to Get Script Name Using Bash Script? [3 Easy Ways]
- How to Call Another Script in Bash [2 Methods]
- How to Generate UUID in Bash [3 Simple Methods]
- 3 Easy Ways to Write to a File in Bash Script
- How to Write the Output to a File in Bash Script [5 Practical Cases]
- How to Create a List in Bash Scripts? [2 Easy Methods]
- How to Clear History in Bash [2 Practical Cases]
- How to Clear Screen Using Bash Script? [2 Effective Methods]
- How to Check Ubuntu Version Using Bash Scripts? [2 Methods]
<< Go Back to Bash Script Examples | Bash Scripting Basics | Bash Scripting Tutorial
FUNDAMENTALS A Complete Guide for Beginners


