Managing file permissions in Linux is an important aspect of system administration. In this multi-user environment, it’s vital to restrict or grant access to users based on their roles & responsibilities. Hence, by setting appropriate permissions, you can restrict or allow access to files and directories for different users on the system. To change folder permissions recursively in Linux, use: sudo chmod -R <permissions> <folder>to your terminal. Further this article will discuss different ways how you can change Linux folder permissions recursively with some practical examples.
2 Methods to Change Linux Folder Permissions Recursively
In Linux, changing file & folder permissions recursively means recursive operations are applied to all files & subdirectories within a particular directory. To change or modify file or folder permissions in Ubuntu, you must either be the root user or have root/sudo privileges. Moreover, you need the necessary permissions to access a directory along with its contained files & sub-folders to change it recursively. Now I will show different ways to change folder permissions recursively using both CLI & GUI.
Anyway, you can read our Comparision of Methods to distinguish between these two methods and pick one for your needs.
1. Change Permissions Recursively Using the Terminal in Linux
In Linux, you can easily & quickly change any folder permission recursively using the Command Line Interface (CLI). In this case, the command that is used to change permissions is the chmod command.
Moreover, you can use some other commands like the find command along with the chmod command to modify the permission settings recursively. Read the following examples for detailed information on each cases:
A. Change Folder Permissions Recursively Using “chmod” Command
To recursively change the Linux folder permissions, you can use the chmod command with the –recursive or -R option. Hence use the command either in the absolute mode of the chmod command or the symbolic mode of the chmod command. To change directory permissions recursively follow the below steps:
- First, open your Ubuntu terminal application.
- Then, write the following command in your command prompt to view home directory contents:
ls -lEXPLANATION- ls command: Lists directory contents.
- -l –long: Option of the ls command where -l gives long lists.
- Press the ENTER button.
- Next, change the ‘Documents’ directory permission recursively using the following command (command syntax:
chmod -R absolute value /location/path/of/file):chmod -R 777 DocumentsEXPLANATION- chmod: Changes access permission of files & directories.
- -R: Option of the chmod command (Recursive).
- 777: Absolute value of the chmod command where, 7 denotes read-write-execute for all (Owner, Group & Others).
- Documents: One of the Directory.
- Subsequently, hit the ENTER key & check the changed directory permission attributes using the ls command:
ls -l | grep DocumentsEXPLANATION- grep: Looks for a specific pattern given to it as an argument.
- Documents: One of the system folders.
-
Afterward, type the following command to change the working directory to the ‘Documents’ directory to view permission changes to all files & sub-directories inside the directory:
cd DocumentsEXPLANATION- cd command: Changes working directory.
- Documents: One of the Directory.
- Press ENTER.
- Subsequently, check the directory contents to see if the command has changed permissions recursively using the list command:
ls -l - Finally, press the ENTER button again.

Notice from the output that each & every file & sub-directory within the “Documents” directory has the same permission settings. The chmod command has changed the permission as specified, recursively.
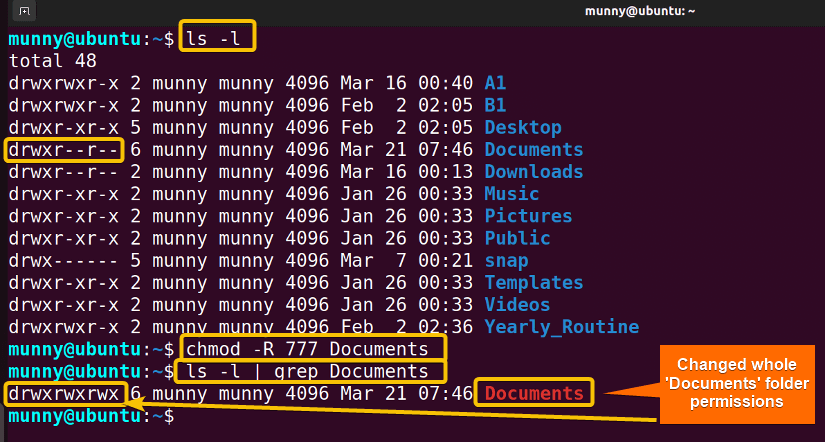 At first, you can see from the output of the ls command is showing the permission attributes (drwxr–r–) for the directory “Documents”. Afterward, run the command & it sets specified permissions (777) for the directory recursively. At this point, check the result by running the ls -l command again. The command shows permission attributes as (drwxrwxrwx).

B. Change Folder Permissions Recursively Using “find” command
Another way to change folder permissions recursively is that you can use the find command. It looks for all files or sub-directories inside a directory & then passes those to the chmod command to execute individually using the exec command to change their permissions. Go through the below steps, to see how it works:
- First, open your terminal.
- Then, type the following command (command syntax:
find /location/path/to/folder [options] -exec chmod permission_values {} ;) in your command prompt:find /home/munny/Downloads -type d -exec chmod 750 {} ;EXPLANATION- find: Searches for files & directories in a specified location based on provided options.
- home/munny/Downloads: Location path to the “Downloads” folder.
- -type d: find command option to search for specific (-d) ‘directory’.
- -exec: Used to execute the chmod command on each file found by the find command.
- chmod: Changes access permission of files & directories.
- 750: Absolute value of the chmod command where ‘7’ denotes read-write-execute for the Owner, ‘5’ denotes read-execute permission for the Group & ‘0’ represents ‘no permission’ for Others.
- {} : A placeholder that represents the name of the found file & is replaced with the actual file name when the command is executed.
- ; : indicates the end of the command.
- Press the ENTER key.
-
Afterward, type the following command to change the working directory to the ‘Downloads’ directory to view permission changes to all files & sub-directories inside the directory:
cd Downloads - Press the ENTER key.
- At this point, check the contents using the list command, and finally, press the ENTER button again:
ls -l
The find command upon execution, searches for all ‘directory’ types that reside in the “Download” folder & then passes the result to the chmod command to execute. Subsequently, the chmod command changes specified permissions (750) for the directory recursively. At this time, you can see the result by running the ls -l command, showing permission attributes as (drwxr-xx–) for the sub-directory “ella doo”.

C. Change Folder Permissions Recursively for Specific File Types
Let’s say you want to change permissions for all text files inside a directory but not other file types, in that case, you can use the find command with the -name option & then give the file name or extension inside the double quotation (“ ”) to search for all same type files. Subsequently, pipe those files as a bundle of standard inputs to the chmod command using the xargs command.
To change permissions recursively for specific file types within a folder, follow the below steps:
- First, open your terminal.
- Next, type the following command (command syntax:
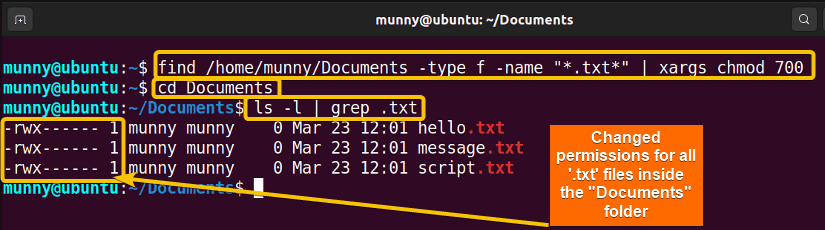
find /location/path/to/folder options | xargs chmod permission_values) in your command prompt:find /home/munny/Downloads -type f -name “*.txt*” | xargs chmod 700 {} ;EXPLANATION- find: Searches for files & directories in a specified location based on provided options.
- home/munny/Documents: Location path to the “Documents” folder.
- -type f: find command option to search for specific (-f) ‘file’.
- -name: Option of the find command to search for files with a specific name or pattern.
- “*.txt*”: To search for all files with “.txt”
- Pipe (|): Redirects the standard output.
- xargs: Builds up inputs into a bundle that is provided as an argument list to the next command.
- chmod: Changes access permission of files & directories.
- 700: Absolute value of the chmod command where ‘7’ denotes read-write-execute for the Owner, & ‘0’ represents ‘no permission’ for Groups & Others.
- Press the ENTER key.
-
Afterward, type the following command to change the working directory to the ‘Downloads’ directory to view permission changes to all files & sub-directories inside the directory:
cd Downloads - Press the ENTER key.
- Subsequently, check the contents executing the list command:
ls -l | grep .txtEXPLANATION- ls: Lists directory contents.
- -l –long: Option of the ls command where -l gives long lists.
- grep: Looks for a specific pattern given to it as an argument.
- .txt: Files with .txt
- Finally, press the ENTER button again.

The find command upon execution, searches for all ‘files’ with the extension “*.txt*” that reside in the “Documents” folder & then pipe the result to the xargs command. The xargs command creates a bundled standard input for the chmod command to set permission on each file found recursively. Hence, the chmod command changes specified permissions (700) for all the text files recursively. Afterward, see the result by running the ls -l command, showing permission attributes as (-rwx——) for all the text files.
- How to Give Permission to User in Linux? [4 Methods]
- 2 Ways to Change Folder Permissions from Root to User in Linux
D. Set 2 Different Permissions for All Files & Sub-Folders of a Directory
In this example, let’s try to set two different permissions for all the files & sub-folders inside the directory. This command variation could be surprisingly useful in the case, where you need to set one type of permission for all the files whereas another type of permission for all the sub-folders within a directory. Therefore, go through the below steps to perform practically:
- First, open your terminal.
- Then, type the following commands in your command prompt:
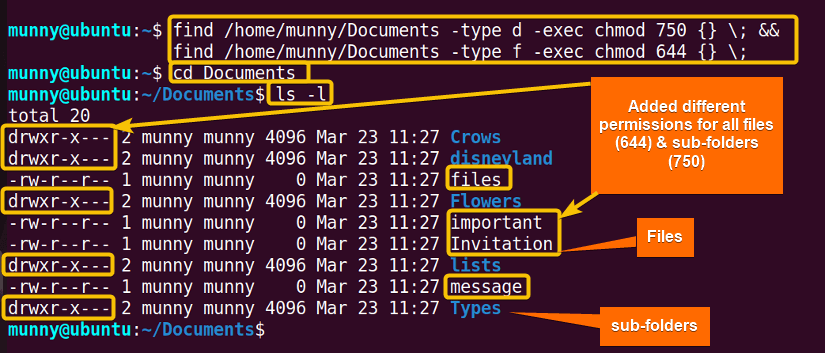
find /home/munny/Documents -type d -exec chmod 750 {} ; && find /home/munny/Documents -type f -exec chmod 644 {} ;EXPLANATION- find: Searches for files & directories in a specified location based on provided options.
- home/munny/Downloads: Location path to the “Downloads” folder.
- -type d: find command option to search for specific (-d) ‘directory’.
- -type f: find command option to search for specific (-f) ‘file’.
- -exec: Used to execute the chmod command on each file found by the find command.
- chmod: Changes access permission of files & directories.
- 750: Absolute value of the chmod command where ‘7’ denotes read-write-execute for the Owner, ‘5’ denotes read-execute permission for the group & ‘0’ represents ‘no permission’ for others.
- 644: Absolute value of the chmod command where ‘6’ denotes read-write permission for the Owner, ‘4’ denotes read-only permission for the Group & Others.
- {} : A placeholder that represents the name of the found file & is replaced with the actual file name when the command is executed.
- ; : Indicates the end of the command.
- && : An operator that means that the next command should only be executed if the first command succeeds.
- Next, press the ENTER key.
-
Afterward, type the following command to change the working directory to the ‘Downloads’ directory to view permission changes to all files & sub-directories inside the directory:
cd Downloads - Press the ENTER button.
- Subsequently, check the contents executing the list command:
ls -l - Finally, press the ENTER button again.

At first, two separate commands have been run with && separator. And, it has been used for two different permission settings for all the files & sub-directories inside the “Documents” directory. Afterward, you can see the resulting different permissions for the files & directories by changing the working directory to ‘Documents’ & then running the ls -l to view its contents with changed permissions. Therefore, from the output image, see different permissions for files (-rw-r–r–) & sub-directories (drwxr-x—).
2. Change Permissions Recursively Using GUI in Linux
When you are not sure which command to use or getting unexpected errors while using CLI to change folder permission recursively, you can always use the Graphical User Interface (GUI). Even though it could be a little more time-consuming, it is handy for beginners without CLI knowledge.
To change permissions recursively using GUI in Linux, please follow the below steps:
-
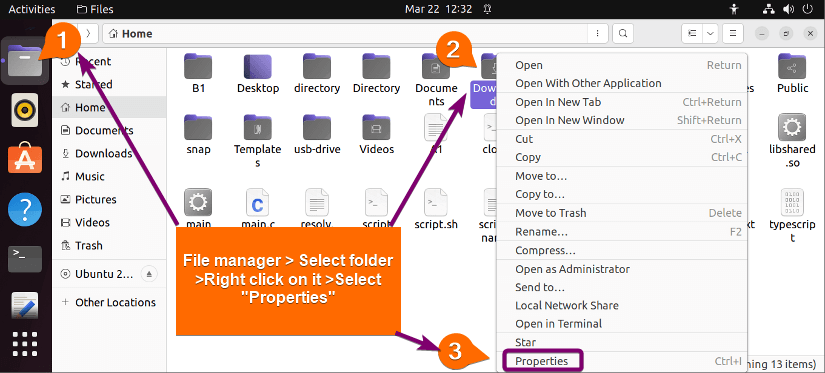
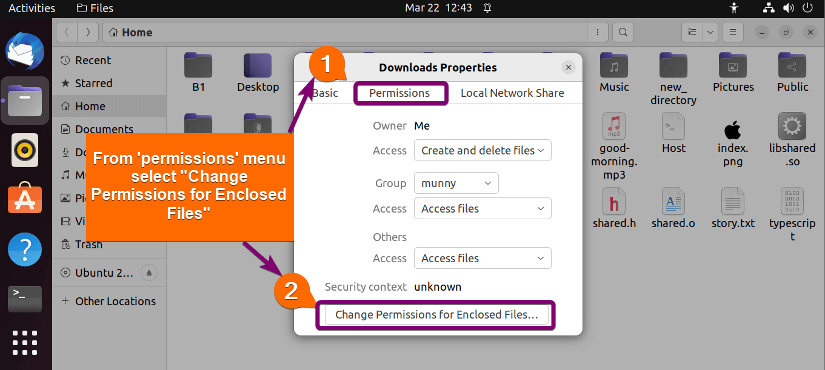
First, go to your file manager & from there select the folder you want to change permissions of & right-click on it. A bunch of options will pop up, anyway, you will notice the “Properties” option at the bottom, click on it.

- Afterward, click on the permissions. From there you will notice 3 permission groups, along with their permission box. And, at the bottom, you will see “Change permissions for enclosed files” which denotes all files & sub-folders inside the directory, click on it.

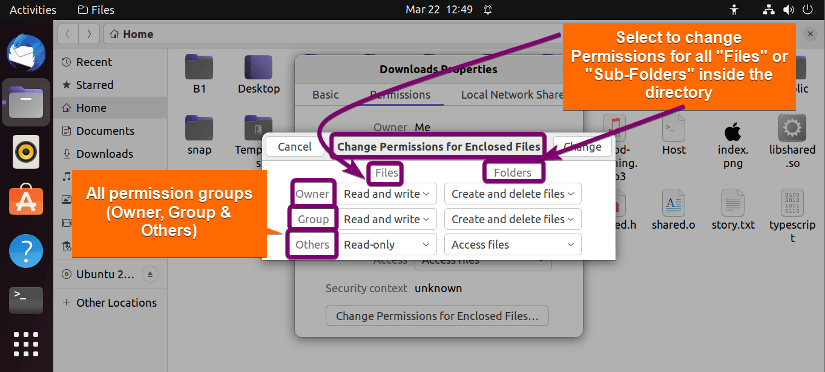
- Subsequently, on the next page, you will get the permission-changing options for both the ‘Files’ & ‘Folders’ in two columns inside the directory. From there set the appropriate file permission for Owner, Group & Others.

- Next, check out the folder permissions available to set from the GUI, which are listed below:
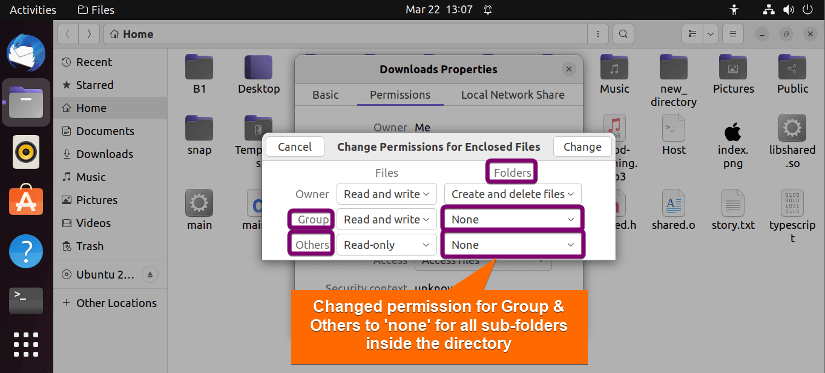
Permission Options Access Type Read-only Read-only (r) Read and write Read-Write (r-w) Access files Read & Execute (r-x) List files only Read-Only (r) Create and delete files ALL ( r-w-x) None No access Then, select the permission as per your need. I have changed Group & Others permissions to ‘none’ for all the sub-folders inside the directory.
To sum up, in this way, you can change any folder permissions recursively on your system using GUI. Moreover, you do not need any separate task to view updated permissions as it is visible in the GUI.
 To sum up, in this way, you can change any folder permissions recursively on your system using GUI. Moreover, you do not need any separate task to view updated permissions as it is visible in the GUI.
Comparison of Methods to Change Folder Permissions
In this article, I showed you how to modify files & folder permissions recursively using both GUI & CLI. Anyway, check the following table where I have comparatively analyzed the pros & cons of both methods:
| Methods | Pros | Cons |
|---|---|---|
| Method 1 |
|
|
| Method 2 |
|
|
In summary, both methods have their pros and cons. If you have good CLI knowledge and feel more comfortable using it over GUI, use method 1. On the other hand, if you are unsure about some commands or facing unknown errors, use method 2.
Change Folder Ownership Recursively in Linux
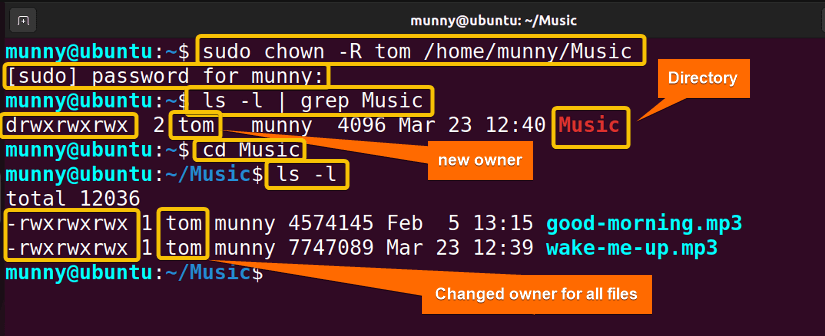
To change folder or directory ownership recursively in Linux, you can use the chown command with the –recursive or -R option. This will change ownership for the entire folder along with its contents (files or subfolders) inside it. Follow the below steps with the syntax for the practical example:
- First, open your Ubuntu terminal application.
- Then, type the following command (command syntax:
sudo chown options user_name /folder/path/location) in your command prompt:sudo chown -R tom .home.munny/MusicEXPLANATION- sudo: permits administrative privileges.
- chown: Changes ownership of files & directories.
- -R: Option of the chown command, stands for Recursive).
- tom: User name.
- /home/munny/Music: “Music” directory location path.
- Next, press the ENTER button.
- Subsequently, check directory ownership & permission attributes using the following command:
ls -l | grep MusicEXPLANATION- ls: Lists directory contents.
- -l –long: Option of the ls command where -l gives long lists.
- grep: Looks for a specific pattern given to it as an argument.
- Music: One of the system folders.
-
Afterward, type the following command to change the working directory to the ‘Music’ directory to view permission changes to all files & sub-directories inside the directory:
cd MusicEXPLANATION- cd: Changes working directory.
- Music: One of the Directory.
- Press the ENTER key.
- At this point, check the directory contents executing the list command:
ls -l - Finally, press the ENTER button again.

After running the command, it changes the folder ownership recursively. At this point, check the result by running the ls -l command again, which will show permission attributes as (drwxrwxrwx) for the directory along with the new owner ‘tom’ of the directory. Next, cd into the directory to check that all the files inside it also have the new owner “tom”. Hence, the command has changed ownership recursively.
- How to Change File Permissions to 777 in Ubuntu?
- How to Change Folder Permissions in Linux? [2 Methods]
Change Group Permissions Recursively in Linux
To change permissions for a group of users recursively, follow the below command syntax & act according to the below steps:
-
Start by opening your Ubuntu terminal application.
-
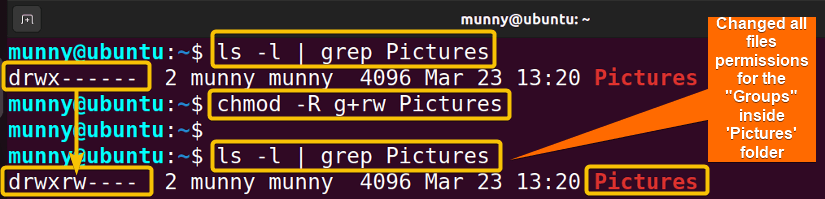
Next, type the below command to select the folder you want to change permissions recursively for the group. Here, I will change permission for the groups for my “Pictures” folder:
ls -l | grep PicturesEXPLANATION- ls: Lists directory contents
- -l –long: Option of the ls command where -l gives long lists.
- grep: Looks for a specific pattern given to it as an argument.
- Pictures: One of the system folders.
- Press the ENTER key.
- Then type the following command (command syntax:
chmod option permission_group+/-permission_types /location/path/to/folder) to change ‘Pictures’ folder permissions recursively for the ‘Group’:chmod -R g+rw PicturesEXPLANATION- chmod: Changes access permission of files & directories.
- -R: Option of the chmod command (Recursive).
- g+rw: Adding read-write (r-w) permissions to Groups (g).
- Pictures: One of the directory names.
- Press the ENTER button.
- Subsequently, view the changed folder permissions using the list command:
ls -l | grep Pictures
At first, you can see from the output of the ls -l command is showing the permission attributes (drwx——) for the directory “Pictures”. Afterward, run the command & it sets specified permissions (g+r) for all the users of the Group of that directory recursively. Subsequently, see the result by running the ls -l command again, showing permission attributes as (drwxrw—-).
-
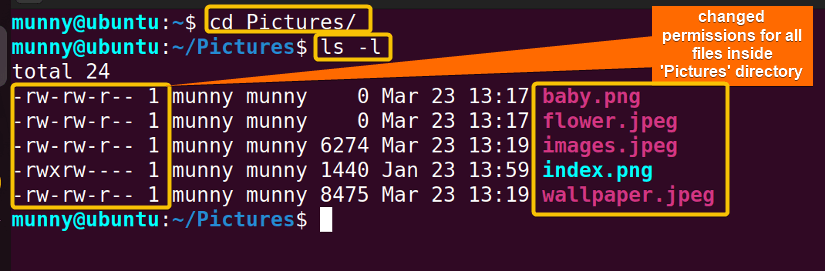
Next, type the following command to change the working directory to the ‘Pictures’ directory to view the changed permission to all files & sub-directories inside the directory:
cd Pictures - Press the ENTER key.
- Subsequently, check the contents by executing the list command in the command prompt:
ls -l | grep Pictures -
Finally, tap the ENTER key again.
 At first, change the working directory to the “Pictures” directory with the cd command. Then, view all contents list with their changed (-rw-rw-r–) permission. Thus, you can see the command has changed permissions for all file group permissions recursively.
 At first, change the working directory to the “Pictures” directory with the cd command. Then, view all contents list with their changed (-rw-rw-r–) permission. Thus, you can see the command has changed permissions for all file group permissions recursively.
Conclusion
In conclusion, changing Linux folder permissions recursively is a crucial aspect of managing files & folders. In this article, I have shown how to do that using both the CLI & GUI. Moreover, I used different command combinations to modify the permission settings. Anyway, if you go through the examples I provided, you will get most of the ways to change folder permissions recursively. Happy Learning!
People Also Ask
How do I change permissions on a recursive file?
To change permissions recursively for files and directories within a folder in Linux, you can use the chmod command with the -R option. Here’s the syntax: sudo chmod -R <permissions> <folder>. Replace <permissions> with the desired permission settings, such as u+rwx for the owner having read, write, and execute permissions, g+rx for the group having read and execute permissions, and o-rwx for others having no permissions. Replace <folder> with the name of the folder whose permissions you want to change.
How do I view the current permissions of a file in Linux?
To view the current permissions of a file, use the ls command, followed by the -l option and the file name. This will show a detailed list of the file’s information, including the owner, group, and others and their respective permissions.
How to change Linux folder permissions from root to user?
To change folder permissions from root to user, use the chown command. Since the command changes ownership. As soon as group ownership is modified, all members of the group can access this file.
What does change permissions recursively mean?
Changing permissions recursively means applying the same permission settings to a directory, its sub-directories, and all the files within them. Therefore, with a single command, you can change the entire folder permissions.
What type of file is chmod?
Chmod is not a file type itself but a command that operates on files & directories to modify their permissions. It is a command in Linux, that allows changing the permissions on a file using either absolute values or symbols as arguments with the command.
How to change chmod 777 in Linux?
To change the permission of a file or directory to chmod absolute value 777, use the command syntax chmod 777 file_or_folder_location. To illustrate, the ‘777’ permission setting gives full permissions to the owner, group, & others to read, write, & execute the file or directory. Since the value 7 indicates binary 111, hence it represents (rwx).
What is 444 permission in Linux?
A permission value of 444 in Linux means that the owner, group, and others all have read-only (denoted by value ‘4’) permission for the file. Since the value 4 indicates binary 100, hence it represents (r–).
Related Articles
- How to Change Permissions of All Files in a Folder in Linux?
- Manage File Permissions in Ubuntu Using Command?
- How to Change File Permissions in Linux? [6 Examples]
- 2 Cases to Give User Permission to Folder and Subfolders in Ubuntu
- How to Change Directories and Files Recursively with “chmod”
- Change Permissions on Mounted Drive in Linux
FUNDAMENTALS A Complete Guide for Beginners


