In Linux, file permissions are an important aspect of ensuring system security. The chmod command is a powerful utility that allows system administrators to easily change file and directory permissions. To change the directories and files permission with chmod, You must have root/sudo access to Ubuntu. In this article, you’ll learn how to use the chmod command for recursive change of the directories and files permissions.
Process flow chart to change directories and files recursively with “chmod” command: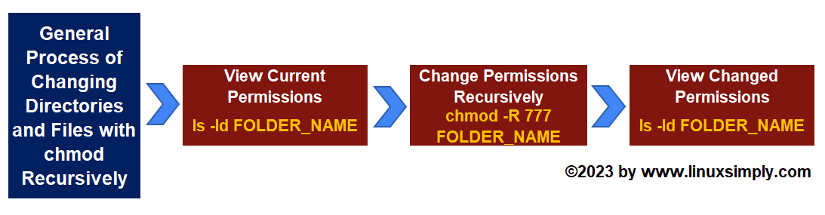
[Distro Used Throughout the Tutorial: Ubuntu 22.04.1 LTS]
Read, Write & Execute Permissions in Linux
File and directory permissions are used in Linux to control resource access. Read, write, and execute permissions, which are denoted by the letters “r,” “w,” and “x,” respectively, are three basic forms of permissions. These permissions can be assigned to 3 types of users: the file or directory’s owner, the group that owns the file or directory, and others.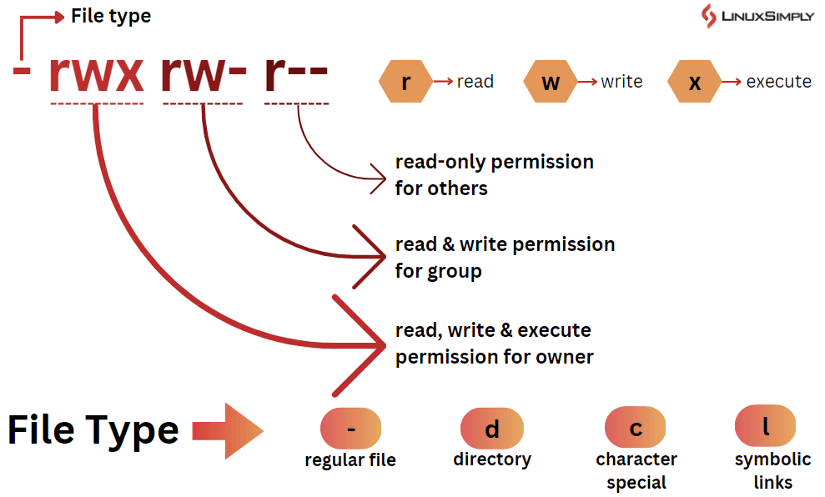
- Read permission (r): Allows a user to view the contents of a file or lists of a directory, but cannot modify them.
- Write permission (w): Allows a user to modify the contents of a file or to create, delete, or rename files in a directory. For example, a user with only written permission on a file can modify its contents but can’t view or execute it.
- Execute permission (x): Allows a user to run an executable file or change into a directory, but can not view or write onto it.
Read, write, and execute permissions can be represented using either octal or binary numbers. Here is a table below showing octal representation, binary representation, file permission set, and corresponding permissions of any file/directory.
| Octal Representation | Binary Representation | File Permission Set | Permission | ||
|---|---|---|---|---|---|
| 0 | 000 | — | No permission | ||
| 1 | 001 | –x | Execute | ||
| 2 | 010 | -w- | Write | ||
| 3 | 011 | -wx | Write | Execute | |
| 4 | 100 | r– | Read | ||
| 5 | 101 | r-x | Read | Execute | |
| 6 | 110 | rw- | Read | Write | |
| 7 | 111 | rwx | Read | Write | Execute |
Watch How to Change Permissions of Directories and Files Recursively with “chmod” Command
Steps to Change Permissions of Directories and Files Recursively with “chmod” Command
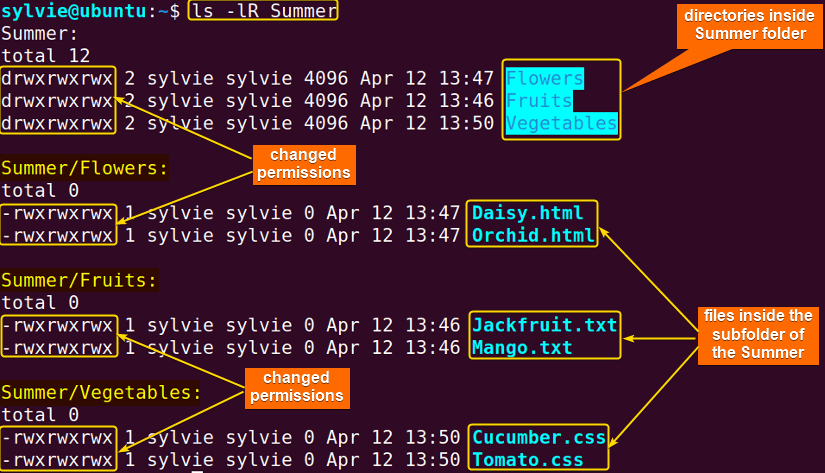
In Linux, you can easily change the permissions of directories and files’ permission recursively using the chmod command. To change the Linux folders and files’ permissions recursively, you can use the chmod command with the –recursive or -R option. 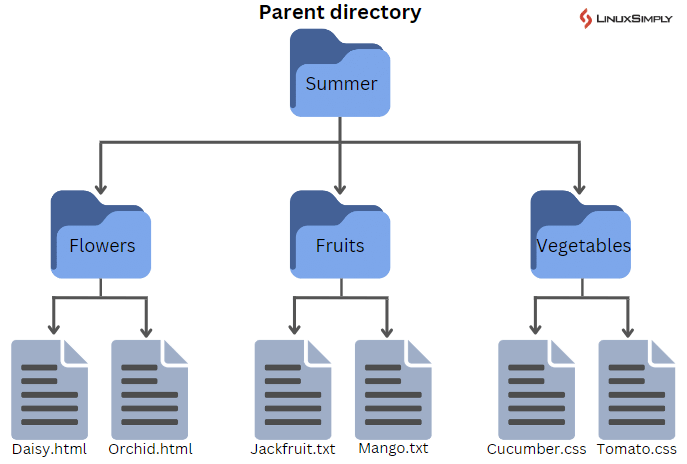 Here, I am going to recursively change the permissions of the subdirectories Flowers, Fruits & Vegetables of the Summer directory and files Daisy.html, Orchid.html, Jackfruit.txt, Mango.txt, Cucumber.txt & Tomato.txt inside the subdirectories of the Summer directory.
To change the file and directory permission recursively, follow the steps below:
- At first, open the Ubuntu terminal.
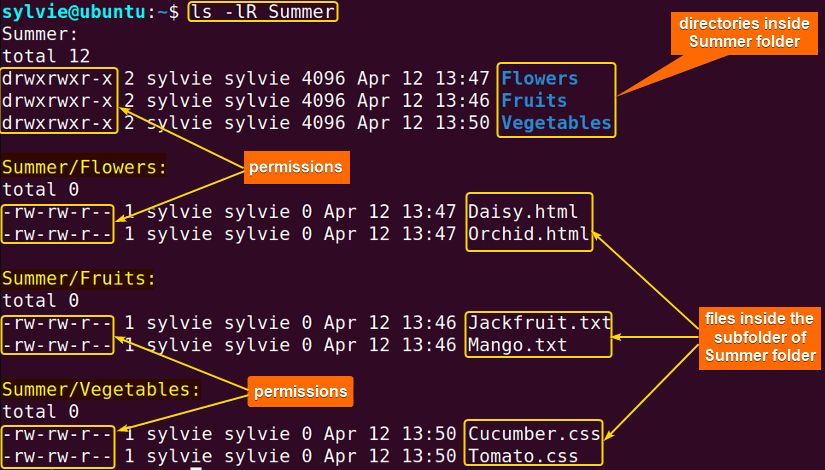
- Copy the following command in the command prompt to view the current permissions of the subfolders and files inside the subfolders of the Summer folder:
ls -lR SummerEXPLANATION- ls: Shows all the files in a specific folder.
- option -l: Long listing format.
- option -R: Enables Recursive mode.
- Summer: The folder to change permission.
- Hit the ENTER button.
 In the image above, you can see the current permissions of the subfolders and the files inside the subfolders of the Summer folder.
 - Now, run the following command to change permissions recursively:
chmod -R 777 SummerEXPLANATION- chmod: Changes file permissions.
- -R option: Enables recursive mode.
- 777: Read, Write & Execute Permission.
- Summer: The folder to change permission.

- To check the changed permissions of the subfolders and the files inside the subfolders of the Summer folder, execute the command below to the command prompt:
ls -lR SummerEXPLANATION- ls: Shows all the files in a specific folder.
- option -l: Long listing format.
- option -R: Enables Recursive mode.
- Summer: The folder to change permission.

 In the image above, you can see the current permissions of the subfolders and the files inside the subfolders of the Summer folder.
Complementary Information
You will find the following information helpful along with learning how to change directories and files recursively with the chmod command.
How to Change Permissions of Files Only, not Directory in Linux
You can change the permissions of only files without changing directory permissions using the chmod command with the find command Here, I am going to change the permissions of the files inside the Summer directory without changing directory permissions. To do the same follow the following process:
- Initially, open the Ubuntu terminal.
- Copy the following command in the command prompt to view the current permissions of the Summer folder and its files:
ls -ld Summerls -l SummerEXPLANATION- ls: Shows all the files in a specific folder.
- option -l: Long listing format.
- option -d: Shows information about the given directory.
- Summer: The folder to change permission.
- Hit the ENTER button.
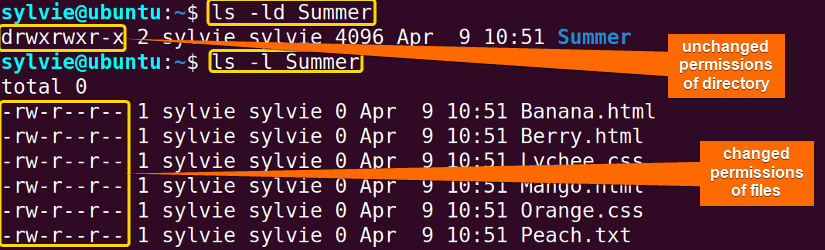
 As you can see in the image above, the terminal is displaying the current permissions of the Summer folder and the files inside it.
 - Now, run the following command to change permissions:
find ~/Summer -type f -exec chmod 644 {} ;EXPLANATION- find: Used to perform search operations.
- ~/Summer: Absolute path of the directory.
- –type f: Specifies only regular files.
- -exec: Used to execute the chmod command on each file found by the find command.
- chmod: Changes file permissions.
- 644: Read, Write & Execute permission.
- {}: Placeholder for the current pathname.
- : Used before (;) to treat it like an argument rather than a separator.
- ;: Indicates the end of the command.

- To check the changed permissions of the files inside the Summer directory, execute the command below to the command prompt:
ls -ld Summerls -l SummerEXPLANATION- ls: Shows all the files in a specific folder.
- option -l: Long listing format.
- option -d: Shows information about the given directory.
- Summer: The folder where all the files are.

 As you can see in the image above, the terminal is displaying the current permissions of the Summer folder and the files inside it.
How to Change Permissions of Directory Only, not Files in Linux
You can change the permissions of the directory only using the chmod command with the find command Here, I am going to change the permissions of the Summer directory but not the files’ permission. Now, to do the same follow the instructions below:
- Start by opening the Ubuntu terminal.
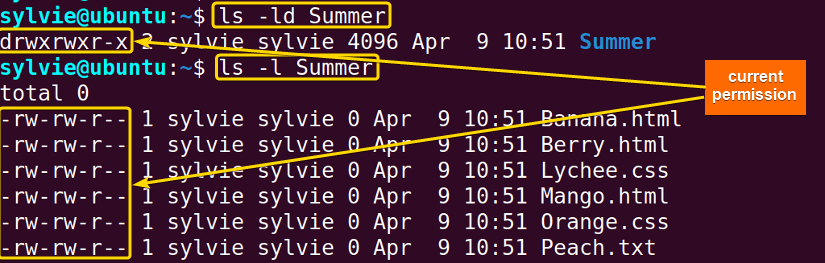
- Type the following command in the command prompt to view the current permissions of the Summer folder and its files:
ls -ld Summerls -l SummerEXPLANATION- ls: Shows all the files in a specific folder.
- option -l: Long listing format.
- option -d: Shows information about the given directory.
- Summer: The folder to change permission.
- Strike the ENTER button.As you can see in the image above, the terminal is displaying the current permissions of the Summer folder and the files inside it.
- After that, execute the following command to change permissions:
find ~/Summer -type d -exec chmod 776 {} ;EXPLANATION- find: Used to perform search operations.
- ~/Summer: Absolute path of the directory.
- –type f: Specifies only regular files.
- -exec: Used to execute the chmod command on each file found by the find command.
- chmod: Changes file permissions.
- 644: Read, Write & Execute permission.
- {}: Placeholder for the current pathname.
- : Used before (;) to treat it like an argument rather than a separator.
- ;: Indicates the end of the command.

- To check the changed permissions of the Summer directory, run the command below to the command prompt:
ls -ld Summerls -l SummerEXPLANATION- ls: Shows all the files in a specific folder.
- option -l: Long listing format.
- option -d: Shows information about the given directory.
- Summer: The folder to change permission.
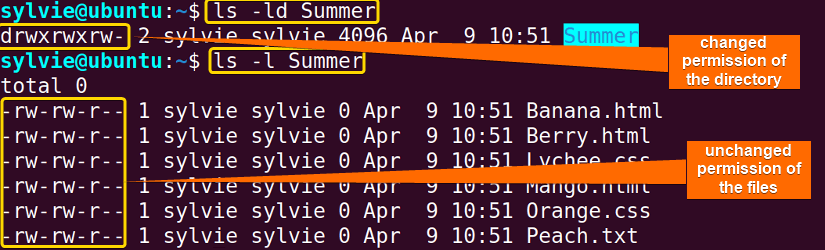
 As you can see in the image above, the terminal is displaying the current permissions of the Summer folder and the files inside it.
- How to Give Permission to User in Linux? [4 Methods]
- 2 Ways to Change Folder Permissions from Root to User in Linux
How to Change Ownership of a File in Linux
You can change a file’s ownership using the chown command in Ubuntu. You can change the ownership to a specific user, specific group, or both the user and the group. I have shown you how you can change the ownership of a file to these user types below.
Change the Ownership of a File to a Specific User in Linux
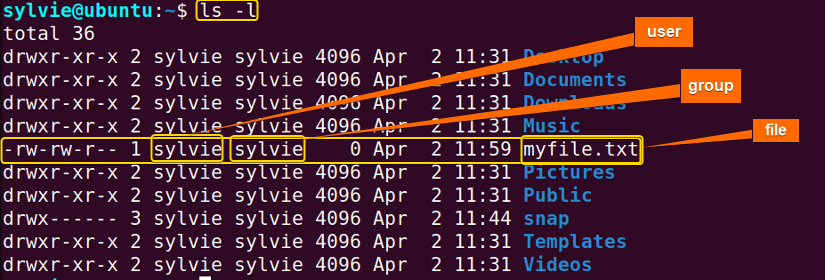
You can change the ownership of a file to a specific user in Ubuntu. Here I am changing ownership of myfile.txt from user sylvie to user rynvie. Follow the process below to do that:
- Open the Ubuntu Terminal.
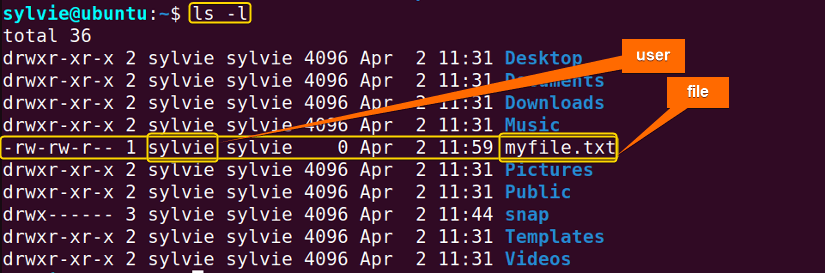
- To view the current owner/user of the file myfile.txt, run the following command in the command prompt:
ls -lEXPLANATION- ls: Shows all the files in a specific folder.
- option -l: Long listing format.
 In the image above, you can view the file with its current owner’s name.
 - To change the ownership of the file to a specific user, execute the following command in the command prompt:
sudo chown rynvie myfile.txtEXPLANATION- sudo: Grants administrative privileges.
- chown: Changes the file’s ownership.
- rynvie: name of the user.
- myfile.txt: The file to change ownership.
- Then, type the password and press the ENTER button.

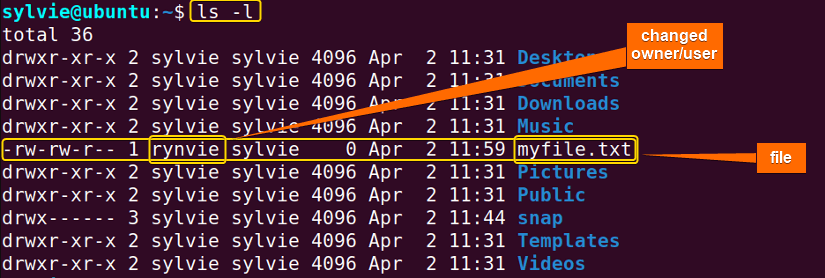
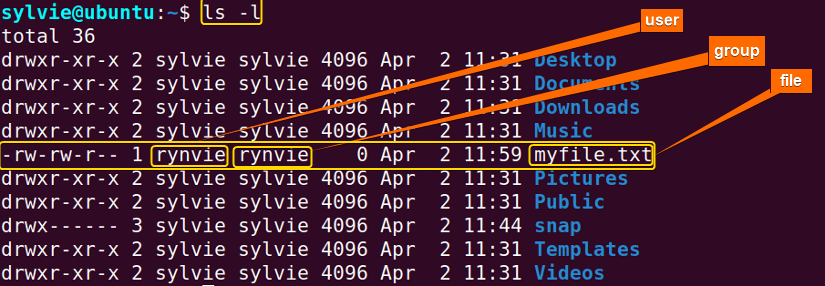
- Finally, execute the following command to check if the ownership of the myfile.txt file is changed:
ls -lEXPLANATION- ls: Shows all the files in a specific folder.
- option -l: Long listing format.
 As you can see, the ownership of the file is changed.
 In the image above, you can view the file with its current owner’s name.
 As you can see, the ownership of the file is changed.
Change the Ownership of a File to a Specific Group in Linux
You can change the ownership of a file to a specific group in Ubuntu. Here I am changing ownership of myfile.txt from group sylvie to group rynvie. Follow the procedure below to do that:
- Open the Terminal in Ubuntu.
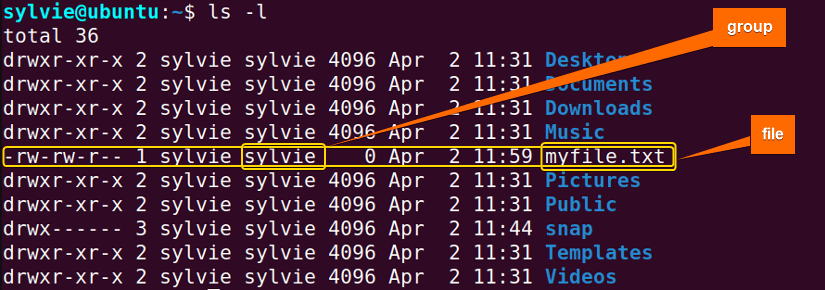
- To view the current group of the file myfile.txt, run the following command in the command prompt:
ls -lEXPLANATION- ls: Shows all the files in a specific folder.
- option -l: Long listing format.
 In the snapshot above, you can view the file with its current group’s name.
 - To change the ownership of the file to a specific group, execute the following command in the command prompt:
sudo chown :rynvie myfile.txtEXPLANATION- sudo: Grants administrative privileges.
- chown: Changes the file’s ownership.
- rynvie: name of the group.
- myfile.txt: The file to change ownership.
- Then, type the password and press the ENTER button.

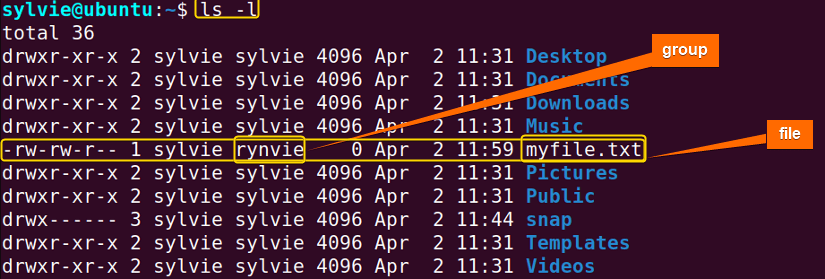
- Finally, execute the following command to check if the group of the myfile.txt file is changed:
ls -lEXPLANATION- ls: Shows all the files in a specific folder.
- option -l: Long listing format.
 As you can see, the ownership of the file is changed.
 In the snapshot above, you can view the file with its current group’s name.
 As you can see, the ownership of the file is changed.
- How to Change File Permissions to 777 in Ubuntu?
- 2 Ways to Change Folder Permissions Recursively in Linux
Change Both the User and Group Ownership of a File in Ubuntu
You can change both the user and group ownership of a file in Ubuntu. Here I am changing both the user and group ownership of myfile.txt from sylvie to rynvie. Follow the instructions below to do that:
- Initially open the Ubuntu Terminal.
- To view the current owner/user and group of the file myfile.txt, run the following command in the command prompt:
ls -lEXPLANATION- ls: Shows all the files in a specific folder.
- option -l: Long listing format.
 In the image above, you can view the file with its current owner and group name.
 - To change both the user and group ownership of a file, execute the following command in the command prompt:
sudo chown rynvie:rynvie myfile.txtEXPLANATION- sudo: Grants administrative privileges.
- chown: Changes the file’s ownership.
- rynvie: name of the user and group.
- myfile.txt: The file to change ownership.
- Then, type the password and press the ENTER button.

- Finally, execute the following command to check if the ownership of both the user and group of the myfile.txt file are changed:
ls -lEXPLANATION- ls: Shows all the files in a specific folder.
- option -l: Long listing format.
 As you can see, the ownership of the file is changed.
 In the image above, you can view the file with its current owner and group name.
 As you can see, the ownership of the file is changed.
Conclusion
The chmod command is a powerful tool that allows system administrators to change file and directory permissions in Linux. You can simply change the permissions of entire folders and their contents by using the -R option, which allows you to change permissions recursively. While changing permissions, keep in mind to proceed with caution to avoid unwanted consequences.
People Also Ask
What are the 3 types of permissions?
In Linux, there are three different permission types: read, write, and execute. These permissions determine what operations can be performed on a file or directory.
What do the letters in the chmod command mean?
The letters in the chmod command stand for the various operations and permission levels. The initial three letters, “u,” “g,” and “o,” stand for the owner, the group, and the others, respectively. The second letter ‘r’, ‘w’, and ‘x’ indicate read, write, and execute permissions. The third letter ‘+’ and ‘-‘ are used to add and delete permissions.
How do I give read/write access to a specific user on a file?
To give a specific user read/write access to a file, use the “chown” command to change the file’s ownership to that user, then use the “chmod” command to give that user read and write permissions.
How do I change the owner of a file in Linux?
To change the owner of a file in Linux, use the “chown“ command, followed by the new owner’s username and the file name. For instance, sudo chown newOwner fileOne would make “newOwner” the owner of “fileOne”.
How do I view the current permissions of a file in Linux?
To view the current permissions of a file, use the “ls” command, followed by the “-l” option and the file name. This will show a detailed list of the file’s information, including the owner, group, and others and their respective permissions.
How do I add execute permission to a file in Linux?
To add execute permission to a file use the “chmod“ command, followed by the permission level and the file name. For instance, sudo chmod +x fileOne would give the file “fileOne” execute permission.
How do I set default permissions for newly created files in a directory?
To specify default permissions for newly created files in a directory, you can use the “umask” command followed by the desired permissions. For instance, “umask 002” would change the default permissions to allow read, write, and execute permissions for the owner and group, and read and execute permissions for others.
Related Articles
- How to Change Permissions of All Files in a Folder in Linux?
- Manage File Permissions in Ubuntu Using Command?
- How to Change File Permissions in Linux? [6 Examples]
- 2 Cases to Give User Permission to Folder and Subfolders in Ubuntu
- How to Change Folder Permissions in Linux? [2 Methods]
- Change Permissions on Mounted Drive in Linux
FUNDAMENTALS A Complete Guide for Beginners


