In Linux and Unix-like operating systems, file permissions are used to control access to files and directories that ensure privacy & security. By setting appropriate permissions, you can restrict or allow access to files and directories for different users on the system. From this article, you will learn how to change file permissions in Linux with some practical examples.
How Linux File Permissions Work?
In general, there are three types of file permissions that are set for three categories of users in Linux. The permissions are represented by a 10-character string, with the first character representing the file type (– for normal files & d for directory). Check the following sections where I will explain in detail.
Permission Groups in Linux
In Linux, file and directory permissions can be set for three different categories of users. Here are the main permission groups:
- Owner: Represents the creator of the file. The owner has full control over the file and can modify its permissions.
- Group: A collection of users who share a common set of permissions. When a file is created, it is assigned to a specific group & all users who are members of that group, are granted the same permissions on the file.
- Others: Refers to all users who are not the owner of the file, also who do not belong to the group that the file belongs to. Other users are granted permissions separately from the owner and group.
Types of Permissions
Files and directories in Linux can be assigned three different types of permissions. These permissions determine the level of access and control that users have over the files. Those are as follows:
- Read (r): Allows a user to view the contents of a file or lists of a directory, but cannot modify them.
- Write (w): Allows a user to modify the contents of a file or to create, delete, or rename files in a directory. For example, a user with only written permission on a file can modify its contents but can’t view or execute it.
- Execute (x): Allows a user to run an executable file or change into a directory, but can not view or write onto it.
Permission Indicators in Linux Files
There are several ways to view file permissions in Linux, but the frequently used way is to use the ls command with the -l option. Since the command upon execution displays a long list of files & directories, with file attributes (first 10 characters that we get). From there, you can get a full idea of the file’s permission.
To view the permissions of any file, just type the command ls -l in the directory in which the file resides. You will get output, like the following image: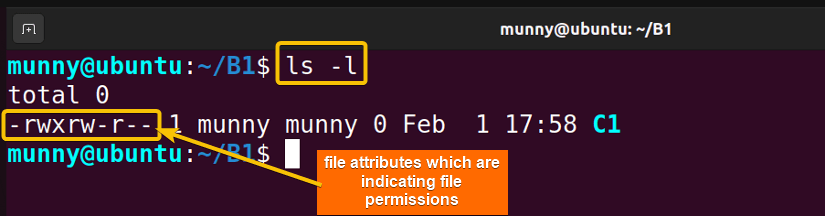 The first 10 file attributes (-rwxrw-r– ) of the output indicate file type & permissions to read-write-execute the file for the owner, group & others. Check the below illustration for a clear understanding:
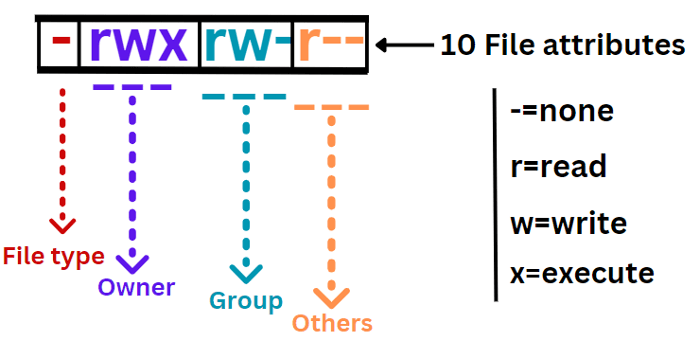
2 Methods to Modify File Permissions in Linux
To change or modify file or folder permissions in Ubuntu, you must either be the root user or have root/sudo privileges. Now that you know how file permissions work in Linux, next, let’s see how to modify these permissions. I will show the procedure using both CLI & GUI.
You can read our Comparative Analysis of Methods to distinguish between these two methods and pick one for your needs.
Method 1: Change File Permissions in Linux Using Terminal
The command that is used to change any file or folder permission is the chmod command (Change mode). It changes access permissions of the files for the specified permission group. The command works in two modes:
- Symbolic → In this mode, permissions are represented in symbolic form.
- Absolute → In this mode permissions are represented in numeric (octal) form.
Symbolic Mode of Chmod Command
In this mode, the chmod command uses different symbols for modifying the permissions of a file. Check out the below chart for a clear concept:
| Who are you changing permissions for (permission groups) | What changes | Which permissions |
|---|---|---|
| Owner/ User (u) | – (removes) | Read (r) |
| Group (g) | + (grants) | Write (w) |
| Others (o) | = (sets one permission by removing others) | Execute (x) |
| All Classes (a) |
Now, let’s see how the command works in symbolic mode with some practical examples.
Example 1: Add Permissions to File in Linux
To modify any file permissions open the directory in which the file resides. After that, view the long list of contents of that directory using the ls command with the option –long or -l:
ls -l- ls: Lists directory contents.
- -l –long: Option of the ls command where -l gives long lists.
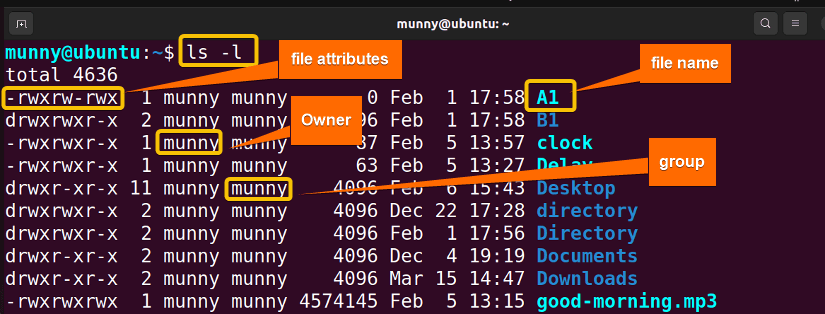
From the output, you will notice file attributes showing the current permissions of the file. In the next columns, the file owner & group name followed by file size, modification time stamp, and in the last column file/directory name.
Now from the files list, let’s add permissions attributes to file A1, follow the below steps:
-
First, open your Ubuntu terminal application.
-
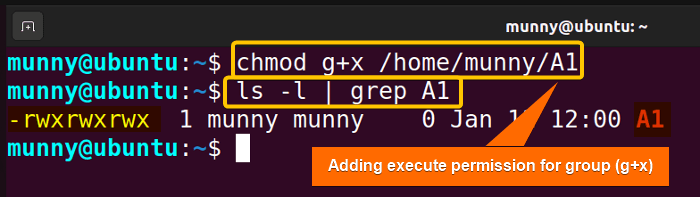
Afterward, type the following command in your command prompt to add permissions for the user & others for the file A1 using the command syntax
chmod permission_group_name+permission_type /location/path/of/file:chmod g+x /home/munny/A1EXPLANATION- chmod: Changes access permission of files & directories.
- g+x: Adding execute (x) permission to group (g).
- /home/munny/A1: Location path of the file.
-
Next, press the ENTER button.
-
Then again, type the ls command to see changes in permissions attributes:
ls -l -
Finally, press the ENTER key again.
 After running the command, the A1 file has new permissions set. Now, “group” also has all sets of permissions like the “user” & “others”.
 After running the command, the A1 file has new permissions set. Now, “group” also has all sets of permissions like the “user” & “others”.
Example 2: Remove File Permissions in Linux
After adding permission what if you want to remove that later? Check this example to remove permissions from any permission group for any specified file. Go through the below steps:
-
First, open your Ubuntu terminal application.
-
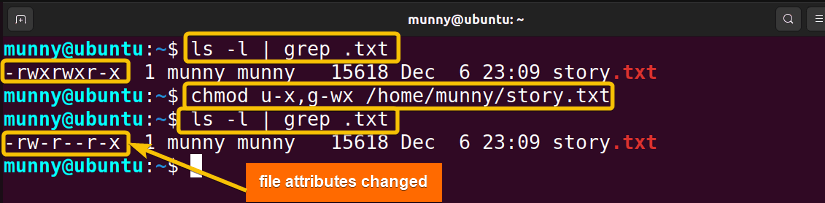
Now, type the following command to check the current permissions for the text file story.txt:
ls -l | grep .txtEXPLANATION- ls: Lists directory contents
- -l –long: Option of the ls command where -l gives long lists.
- grep: Looks for a specific pattern given to it as an argument.
- .txt: Searches for all the files with the ‘.txt’ extension.
-
Afterward, type the following command (command syntax:
chmod permission_group_name-permission_type /location/path/of/file) to remove permissions from the user & group for the text file story.txt:chmod u-x,g-wx /home/munny/story.txtEXPLANATION- chmod: Changes access permission of files & directories.
- u-x,g-wx: Removes execute permission from the user (u-x) & write-execute permission from groups (g-wx).
- /home/munny/story.txt: Location path of the story.txt file.
-
Next, press the ENTER button.
-
Then again type the ls command to see the changes in permissions attributes:
ls -l | grep .txt -
Finally, press the ENTER key again.

At first, you can see from the output of the ls command permission attributes (-rwxrwxr-x) for the story.txt file. After running the command, it removes specified permissions from the user (execute) & groups (write-execute). We can see this by running the ls -l again, resulting in file attributes as (-rw-r–r-x).
- How to Change File Permissions to 777 in Ubuntu?
- 2 Ways to Change Folder Permissions Recursively in Linux
Example 3: Change Permissions of Other User’s Files in Linux
In the previous two examples, I have shown how to change the file permissions of the currently logged-in user. However, you can change the folder or file permissions of other users too if you are a root user or have sudo privileges.
In this example, I will change another user’s (named jerry) documents file permission. That file resides in the jerry users /home/jerry location path and has read-write permission for the owner, as you can see from the following image: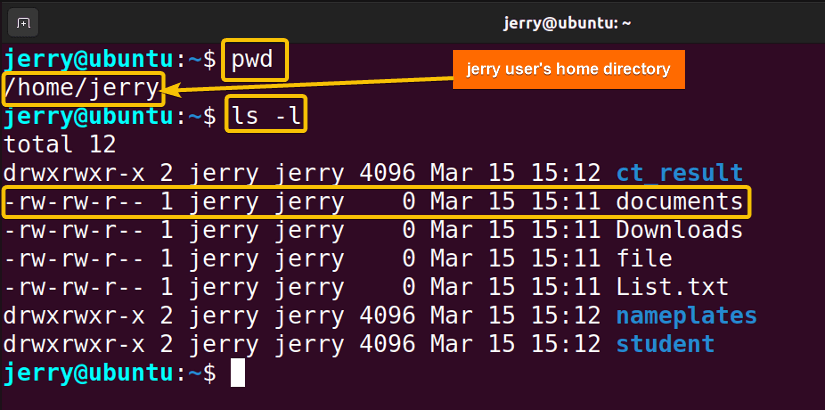 Now, see the below steps to change the permission of documents file permission:
-
First, launch your Ubuntu terminal application.
-
Afterward, type the following command (command syntax:
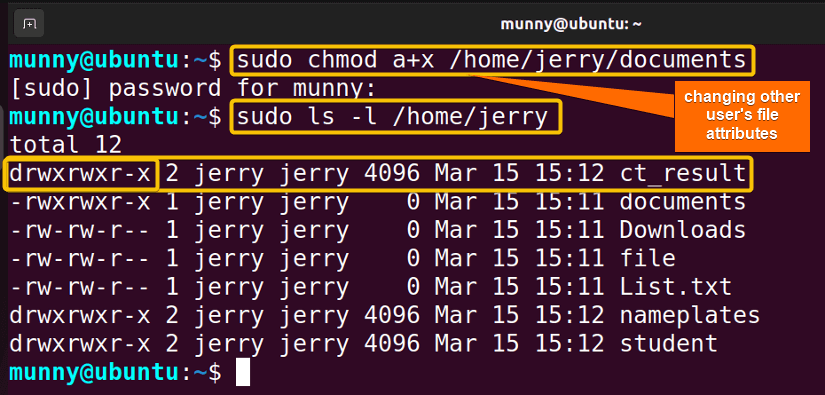
sudo chmod permission_group_name+/-permission_type /location/path/of/file) to add executive permission to all the permission groups:sudo chmod a+x /home/jerry/documentsEXPLANATION- sudo: permits administrative privileges.
- chmod: Changes access permission of files & directories.
- a+x: Adds execute permission to all permission groups removing all other permission types.
- /home/jerry/documents: File path location of ‘documents’.
-
Now, press the ENTER button.
-
Then, type the below command to see changes in permissions attributes:
ls -l /home/jerryEXPLANATION- ls: Lists directory contents
- -l –long: Option of the ls command where -l gives long lists.
- /home/jerry: Location path of the “jerry” user’s home directory.
-
Finally, press the ENTER key again.
 From the output image, you can see the currently logged-in user (munny) has changed the “documents” file permissions that belong to another user (jerry), as the user (munny) is a root user or has sudo privileges.
 From the output image, you can see the currently logged-in user (munny) has changed the “documents” file permissions that belong to another user (jerry), as the user (munny) is a root user or has sudo privileges.
Absolute Mode of Chmod Command
In this chmod command mode, read, write, and execute permissions are represented using either octal or binary numbers. By using these numbers, you can represent the entire permission set for any permission group. See the below charts to understand how they are assigned:
| Octal representation | Binary representation | Sets of Permissions | Permission | ||
|---|---|---|---|---|---|
| 0 | 000 | — | No permission | ||
| 1 | 001 | –x | Execute | ||
| 2 | 010 | -w- | Write | ||
| 3 | 011 | -wx | Write | Execute | |
| 4 | 100 | r– | Read | ||
| 5 | 101 | r-x | Read | Execute | |
| 6 | 110 | rw- | Read | Write | |
| 7 | 111 | rwx | Read | Write | Execute |
Now that you know what number represents which permission, let’s try using the command in absolute mode practically.
Example 4: Add Permissions 777 in Linux for Every Permission Group
To add read-write-execute permission (denoted by 1+2+4=7 for octal or 111 for binary) to each permission group, use 777 or the universal permission numeric value. Follow the below steps:
-
Open your Ubuntu terminal application.
-
Search for the file you want to change permissions for from the list, by using the below command:
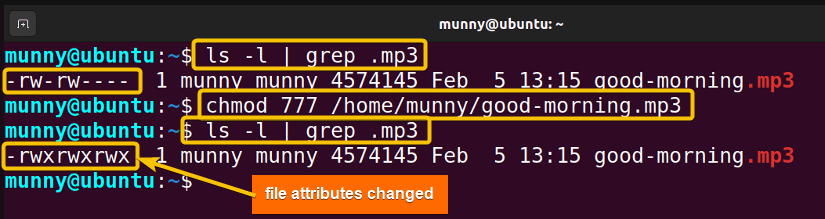
ls -l | grep .mp3EXPLANATION- ls: Lists directory contents
- -l –long: Option of the ls command where -l gives long lists.
- grep: Looks for a specific pattern given to it as an argument.
- .mp3: Files with .mp3
-
Now, type the following command (command syntax:
chmod numeric value /location/path/of/file) to add every permission for the .mp3 file named “good-morning” to all the permission groups:chmod 777 /home/munny/good-morning.mp3EXPLANATION- Chmod: Changes access permission of files & directories.
- 777: All permissions for all permission groups.
- /home/munny/good-morning.mp3: Location path for the audio file good-morning.mp3.
-
Press the ENTER button.
-
Now, type the first command again to see changes in permissions attributes:
ls -l | grep .mp3
Upon execution of the chmod command with absolute value ‘777’, you can see from the output that file permissions have changed. Now all the permission groups have all types of permissions (-rwxrwxrwx).
Example 5: Remove All Permissions from the Permission Groups Excluding the Owner
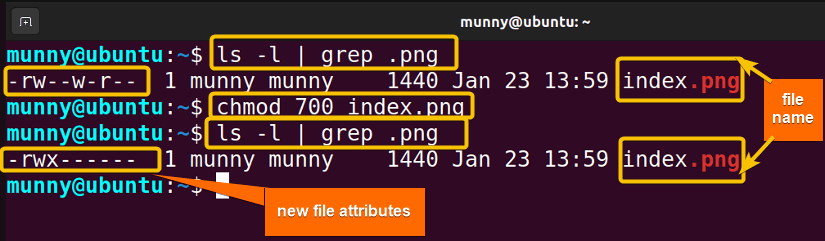
Let’s say, you want to remove groups & others’ permissions while setting all permissions for the owner, in that case, use the absolute value 700 with the chmod command. Follow the below steps with command syntax to change permissions for a .png file:
-
Open your Ubuntu terminal application.
-
Search in the list for the file you want to change permissions for, by using the below command:
ls -l | grep .png -
Now, type the following command (command syntax:
chmod numeric value /location/path/of/file) to add every permission for the .png file named “index” to all the permission groups:chmod 700 index.pngEXPLANATION- chmod: Changes access permission of files & directories.
- 700: Sets all permissions for owner (1+2+4=7 or 111) & removes permissions for groups & others (0 & 0).
- png: Location path of the image file index.png.
-
Press the ENTER button.
-
Now, type the first command again to see changes in permissions attributes:
ls -l | grep .png
From the output you can see, all permissions of the group (w) & others (r) for the file index.png has been reset to none, while the owner has full permissions (r-w-x). So the file’s new attributes are -rwx——.
Comparative Analysis of Chmod Command Modes
While the chmod command in symbolic mode specifies the permissions using a combination of letters & operators, in the absolute mode, it uses a three-digit number. Both modes have some pros & cons for the users. Check out the below chart to learn about them:
| Modes | Pros | Cons |
|---|---|---|
| Symbolic |
|
|
| Absolute |
|
|
Overall, both absolute and symbolic modes have their advantages & disadvantages. The choice of mode depends on the user’s level of expertise & specific permissions that need to be set. For beginners, the symbolic mode may be easier to use, while advanced users may prefer the absolute mode for precision.
- How to Give Permission to User in Linux? [4 Methods]
- 2 Ways to Change Folder Permissions from Root to User in Linux
Method 2: Using GUI to Change File Permissions in Linux
When you are not sure which command to use or getting unexpected errors while using CLI to change file permission, you can always use the graphical user interface (GUI). Even though it could be a little more time-consuming, it is handy for beginners without CLI knowledge.
To change the file permissions using GUI, please follow the below steps:
-
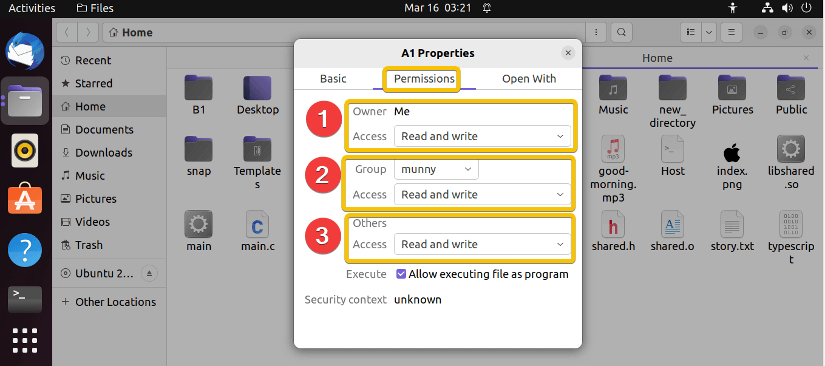
First, go to the file manager and then select the file you want to change permissions of & right-click on it. You will see the “Properties” option at the bottom, select it.

- After that, click on the Permissions. From there you will notice 3 permission groups, along with their permission box. The folder permissions available to set from the GUI are listed below:
You can select the desired permission type from the list. But with this approach, you cannot apply every combination of the read, write, and execute access.
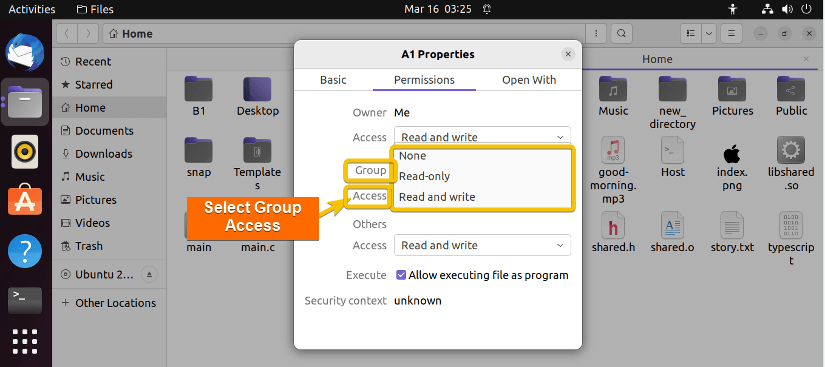
Permission Options Access Type List files only Read-only (r) Access files Read & Execute (r+x) Create and delete files ALL ( r+w+x) None No access 
- From the access list of each permission group select the appropriate permission for them.

- Now, let’s change the group & others’ permission from the list to read-only & none for the A1 file. This way, you can change any file permissions of your system using GUI. Moreover, you do not need any separate task to view updated permissions as it is visible in the GUI.

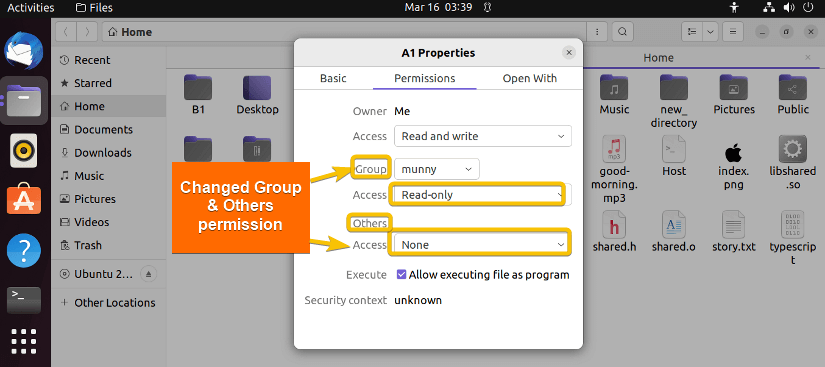 This way, you can change any file permissions of your system using GUI. Moreover, you do not need any separate task to view updated permissions as it is visible in the GUI.
Comparative Analysis of Methods to Change File Permissions in Linux
In this article, I showed you how to modify file permissions using both GUI & terminal. Anyway, check the following table where I have comparatively analyzed the pros & cons of both methods:
| Methods | Pros | Cons |
|---|---|---|
| Method 1 |
|
|
| Method 2 |
|
|
Special Permissions in Linux
Special file permissions are used to grant or restrict access to files & directories. These permissions go beyond the basic read, write, and execute permissions that can be applied to files. There are three types of special file permissions:
- Setuid: With the enablement of this permission on an executable file, it allows the user who executes the file to assume the permission of the owner of the file.
- Setgid: When setgid is enabled on a directory, it forces all files and subdirectories created within that directory to inherit the group ownership of the parent directory.
- Sticky bit: It restricts the deletion of files within that directory to only the owner of the file or the root user. This is used to ensure that important files are not accidentally deleted by other users.
Add Special Permissions to the File in Linux
To set special permissions use the chmod command followed by a numerical code for the absolute mode or a combination of letters and symbols for the symbolic mode to specify desired permissions. The syntax for adding special permissions using the chmod command in absolute mode is:
chmod Xnnn /location/path/of/file/directory- chmod: Changes access permission of files & directories.
- Xnnn: A fourth digit is used with the chmod command’s general 3 digits (nnn) to set the special permission. Which is denoted here by “X”. The values for “X” are:
- SUID: 4
- SGID: 2
- Sticky Bit: 1
Here are examples of how to set special file permission:
A. Setuid (SUID) in Linux
Set the setuid permission on an executable file, using a fourth preceding numerical digit in the chmod command. For SUID, that digit is 4, or use the letter ‘s’ for the symbolic mode. If the user does not have the execute permission, in that case, use the capital “S”. Follow the below steps to see practical examples:
-
Open your Ubuntu terminal application.
-
Type the following command in the command prompt to add setuid for the index.png file:
chmod 4755 index.jpegEXPLANATION- chmod: Changes access permission of files & directories.
- 4755: Absolute values of the chmod command where 4 indicates SUID & 755 represents rwx-rx-rx permission sets for user-group-others.
- jpeg: One of the file names.
-
Press the ENTER key.
 The command sets the setuid bit on the “index.png” file. The resulting permission is “-rwsr-xr-x”, where the first “s” indicates that the setuid bit is set.
 The command sets the setuid bit on the “index.png” file. The resulting permission is “-rwsr-xr-x”, where the first “s” indicates that the setuid bit is set.
- How to Change Permissions of All Files in a Folder in Linux?
- Manage File Permissions in Ubuntu Using Command?
B. Setgid (SGID) in Linux
You can set the setgid bit on a file to be executed as the group that owns the file or on a directory where any files created in the directory will have their group ownership set to that of the directory owner. For that use the chmod command with numerical code 2 or the letter ‘s’ in the group permission position. Follow the below steps:
-
Open your Ubuntu terminal application.
-
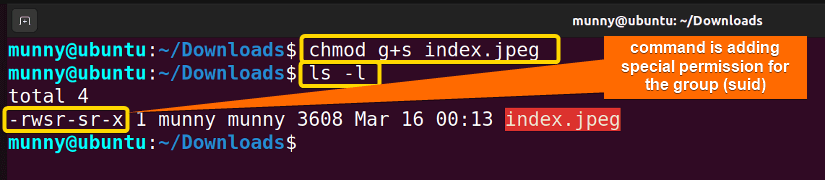
Type the following command in the command prompt to add setgid for the index.png file:
chmod g+s index.jpegEXPLANATION- chmod: Changes access permission of files & directories.
- g+s: Setting SGID (s) to the groups (g).
- jpeg: One of the file names.
-
Press the ENTER key.
 The command sets the setgid bit on the file “index.png”. The resulting permissions are “-rwsr-sr-x”, where the second “s” indicates that the setgid bit is set.
 The command sets the setgid bit on the file “index.png”. The resulting permissions are “-rwsr-sr-x”, where the second “s” indicates that the setgid bit is set.
C. Sticky Bit in Linux
Sticky bit permission bit can be set on a file or directory. Upon setting this special permission, even though it does not affect individual files, however, it sets restrictions on deletion files within the directory. Only the owner or root user will be able to delete files from the directory. Follow the below steps to set a sticky bit on a directory:
-
Open your Ubuntu terminal application.
-
Type the following command in the command prompt to add a sticky bit in the story directory:
chmod 1744 storyEXPLANATION- chmod: Changes access permission of files & directories.
- 1744: Absolute values of the chmod command where 1 indicates Sticky bit & 744 represents rwxr–r– permission sets for user-group-others.
- story: One of the directories.
-
Press the ENTER key.
 The command sets the sticky bit on the directory “story”. The resulting permissions are “drwxr–r-T”, where the second “T” indicates that the sticky bit is set.
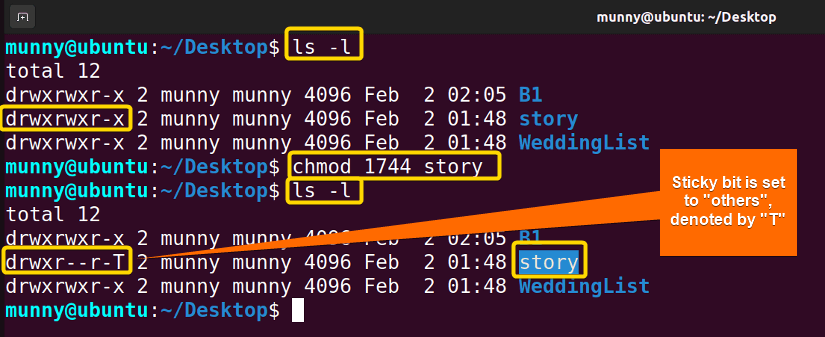 The command sets the sticky bit on the directory “story”. The resulting permissions are “drwxr–r-T”, where the second “T” indicates that the sticky bit is set.
Linux File Permissions Priority
File permissions in Linux are determined by a combination of the user’s identity, the group that the file belongs to, and the permissions assigned to the file. The order of precedence starts from the user then the group and after that to the others.
Upon execution of commands, the system checks who initiated the process. If the user is the owner of the file & initiated, his permissions take precedence over the group & others. If the user is a member of the group that owns the file & initiated, the group permissions take precedence over the users’ permissions. Moreover, if the user is not the owner or not a member of the group then the permissions for ‘others’ apply. Check out the below example for a clear concept:
-
At first, check for a file in which the user/owner of the file doesn’t have any permission. Use the below command to view the list:
ls -l -
Next, press the ENTER button.
 From the list, see the owner munny has no permissions on the “message.txt” file. But, the group, to which the owner is also a member, has read-write permissions for the file. Now, will the user be able to read the file?
 -
Afterward, try to read the file “message.txt” using the “nano” editor:
nano message.txtEXPLANATION- nano: Text editor for Unix-like operating systems.
- message.txt: One of the text file types.
-
Finally, Tap the ENTER button.

From the output, you can see the user can not read the “message.txt” file. Since the user (munny) who initiated the process (tried to read the file), is also the owner of the file, as a result, the user permission bits are set here. And the user has no permission for the file. Hence, the user is unable to read the file even though the group (user is a member) has permission to read or write the file.
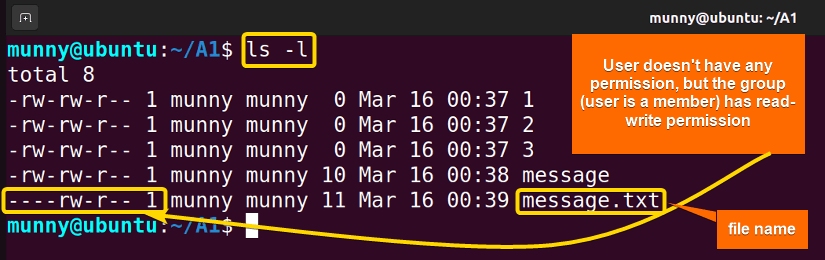 From the list, see the owner munny has no permissions on the “message.txt” file. But, the group, to which the owner is also a member, has read-write permissions for the file. Now, will the user be able to read the file?
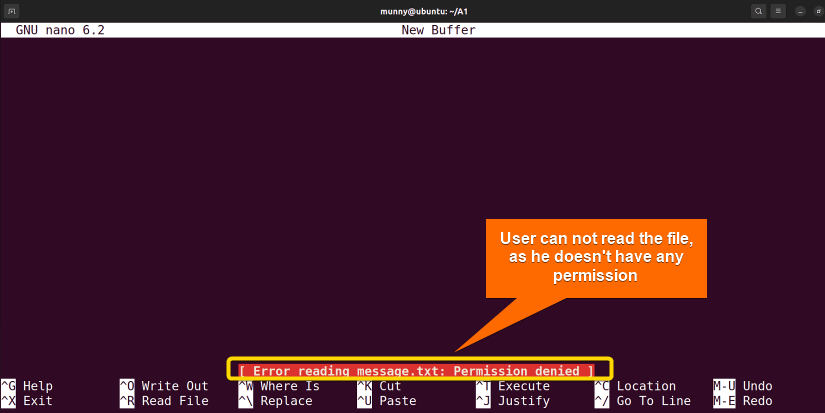
Conclusion
To sum up, understanding file permissions is crucial for working with files and directories in Linux. Since file permissions define who can access a file, how they can access it, and what they can do with it. In this article, I discussed how Linux file permissions work and further explained how you can modify them using both CLI & GUI. Hope this article helps you in the Linux file permissions area.
People Also Ask
What are the 3 permission types in Linux?
The 3 types of Linux file permissions are the read, write & execute permissions which are denoted by r, w & x respectively.
How to change Linux file permissions?
To change any file permission, use the chmod command followed by the permission attributes (add or remove) to permission groups and then the specified file name. For example, to add read-write-execute permission to the user, use the command syntax, chmod u+rwx file_name. Similarly, to remove them, use the command syntax, chmod u-rwx file_name.
How do I give permission to a file in Linux example?
To modify file permissions in Linux, use the chmod command. For that, type the chmod command and then set or remove permissions using symbols of owners (u, g, o) & permissions (r, w, x), followed by the file location path.
What are the different types of file permission in Linux?
Different types of file permissions in Linux are, read, write & execute. Whereas read permission allows permission groups to access the file’s contents, write permission allows users to modify or change the contents of a file. Moreover, the execute permission allows you to execute the contents of a file.
What are the permissions of a file?
What user is allowed to perform which actions, is fully controlled by the file permissions. In Unix-like systems, for example, in Linux, file permissions are defined by three types of users: the owner of the file, the group associated with the file, and other users.
What type of file is chmod?
Chmod is a command in Linux, that allows changing the permissions on a file using either absolute values or symbols as arguments with the command. Hence, it is not a file type itself but a command that operates on files & directories to modify their permissions.
How do user permissions work in Linux?
By default, any file/folder created in Linux belongs to an owner and a group. The owner or any user from the group can change file/folder permissions using the chmod command. Moreover, users having sudo privileges can also change the permissions of files/folders belonging to any other users in the system.
What is 5 permission in Linux?
A permission value of 5 (binary 101) in Linux means that the owner has read-execute (1+4) permission, but not write permission.
What are the 7 Linux file types?
In Linux, the 7 types of files are regular file (-), directory (d), symbolic link (l), character device file (c), block device file (b), named pipe (p, and socket file (s).
What is 444 permission in Linux?
A permission value of 444 in Linux means that the owner, group, and others all have read-only (denoted by value ‘4’) permission for the file.
Related Articles
- How to Change File Permissions in Linux with 6 Examples
- 2 Cases to Give User Permission to Folder and Subfolders in Ubuntu
- How to Change Directories and Files Recursively with “chmod”
- Change Permissions on Mounted Drive in Linux
FUNDAMENTALS A Complete Guide for Beginners


