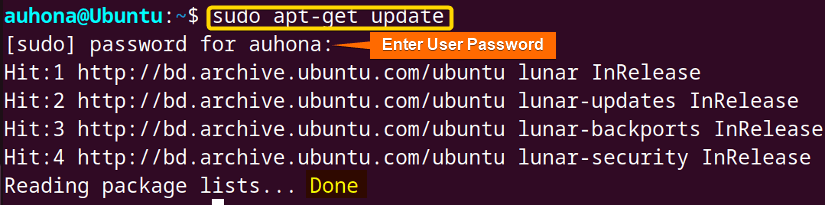
In Linux, the sudo apt-get update command plays a vital role in maintaining a healthy and up-to-date system. Nevertheless, there are situations where this straightforward command may not perform as anticipated. In case the apt-get update not working, you can troubleshoot the problem in several ways. In this article, I’ll investigate the prevalent factors contributing to potential failures of the sudo apt-get update command and offer guidance on resolving these issues through troubleshooting steps.
How Does “sudo apt-get update” Work?
In the Linux environment, the sudo apt-get update command serves the purpose of refreshing the local package index and fetching the most recent information about the available software packages from the software repositories. It’s important to note that this command doesn’t perform package installations or upgrades; instead, it renews the package cache to inform your package manager about available packages and newer versions. If I precisely break down the command, you’ll get it clearer.
- sudo: ‘Sudo’ is a utility that allows running commands with elevated administrative permissions, denoted as ‘superuser do’. Employing sudo empowers you to acquire the essential rights required for tasks like updating package repository data and installing or upgrading software packages on your system.
- apt-get: This is a legacy package management utility employed in Debian-based Linux distributions. It’s used for managing software packages, including installing, upgrading, and removing them. While apt, a more modern and user-friendly tool has gained popularity.
- update: This specific sub-command instructs apt-get to refresh its package data. Upon executing the sudo apt-get update, it communicates with the designated software repositories, retrieving the most recent details regarding accessible packages, their versions, and their dependencies.
Why Does “sudo apt-get update” not work?
The sudo apt-get update command can face a range of problems resulting in failures, often accompanied by error messages that offer clues about the underlying issues.
Here are some reasons why the sudo apt-get update may not work:
- Problems with internet connectivity.
- Errors in repository configuration.
- Software conflicts.
- GPG error.
- Release file issue.
7 Errors and Solutions to Fix “sudo apt-get update” Not Working
When you face issues during the execution of ‘sudo apt-get update’ on a Linux system, it’s crucial to identify and fix these problems to maintain the proper functioning of your package management system. Here are some typical errors and possible ways to address them.
Error 1: 404 Not Found Error with “apt-get update”
This error can occur for Linux users when apt cannot locate or retrieve the release file from a repository. This particular file holds crucial metadata related to the repository, encompassing details about the accessible packages their respective versions, and additional information. Here, you can see that the ‘https://ppa.launchpadcontent.net/deadsnakes/ppa/ubuntu lunar Release’ repository does not have any release file in my Ubuntu.
If a repository’s release file is absent, you can rectify the issue using either the Graphical user interface (GUI) or the Command-line interface (CLI). Here’s how you can tackle this problem, as outlined.
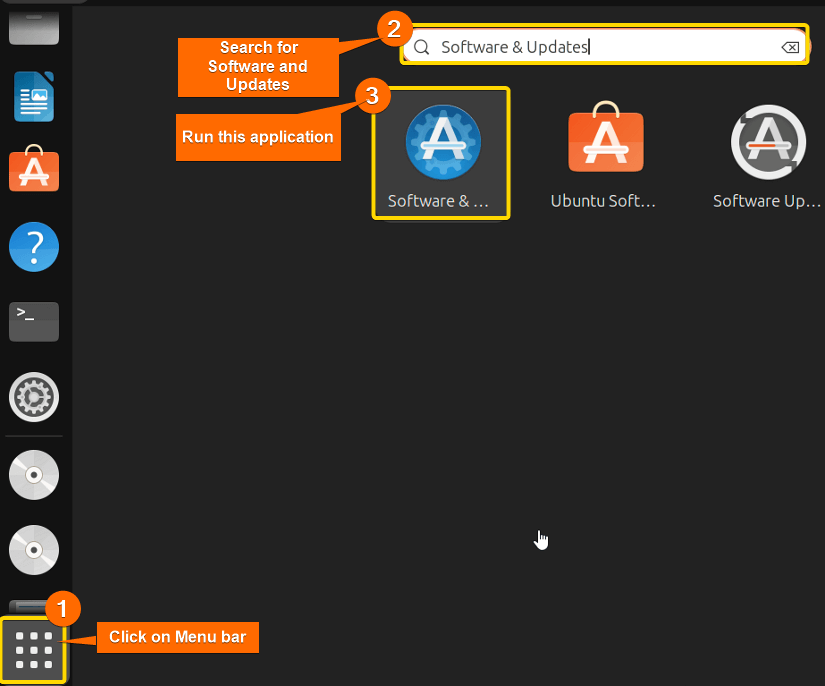
Solution 1: Using GUI to Fix 404 Not Found Error
To fix this “404 Not Found Error” to resolve the sudo apt-get update not working issue use the Software and Updates app from GUI. Here is how:
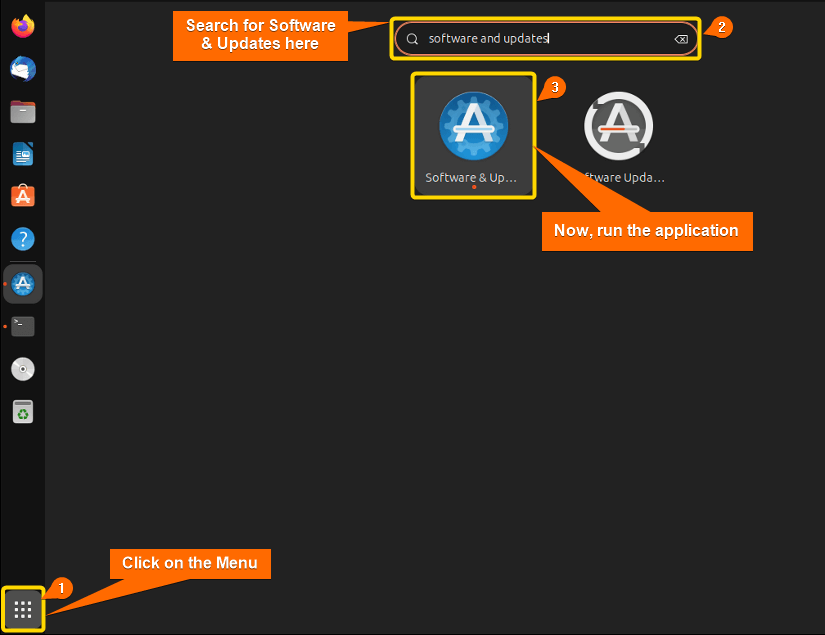
- Open the Menu bar, and find the Software and Updates from the search bar.

- Run ‘Software & Updates’ application.

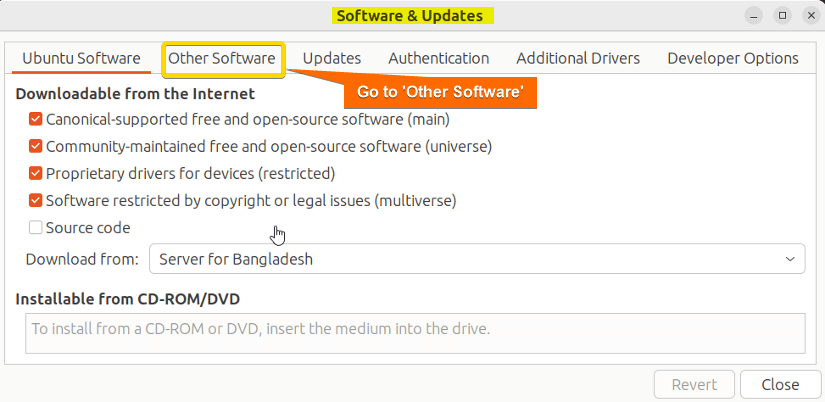
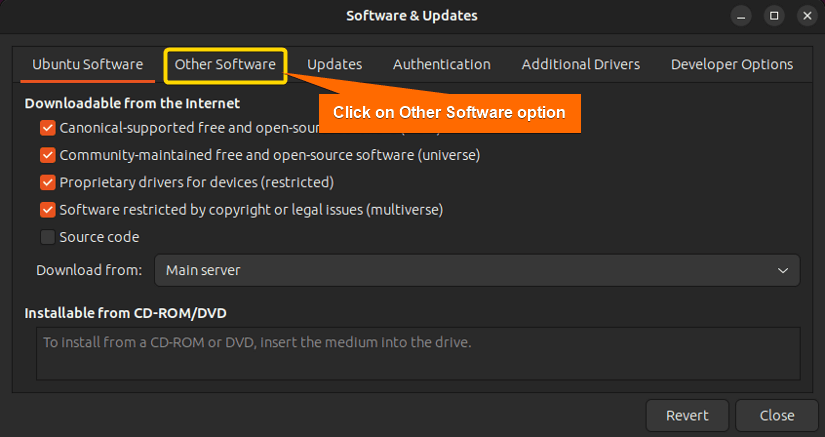
- Now, click on the ‘other software’ option.

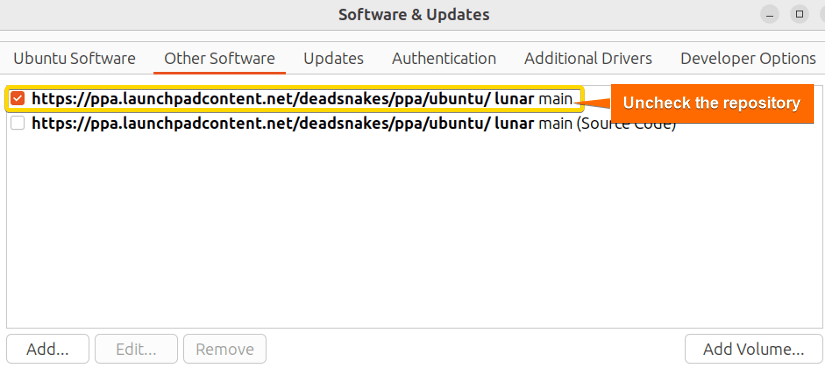
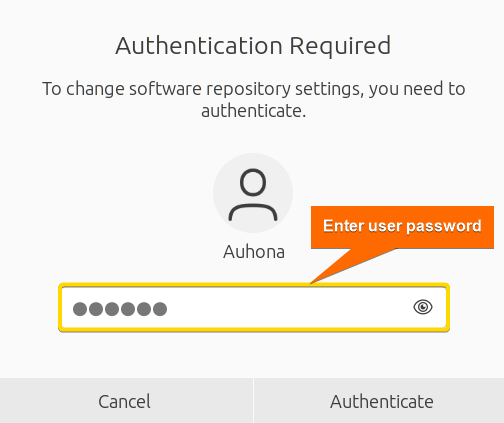
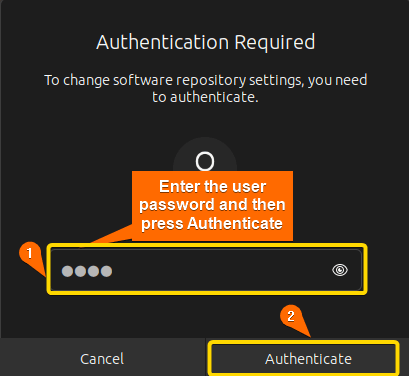
- Uncheck the repository. Immediately a prompt will appear asking for the user password to authenticate.
- Provide the user password.

- lastly, close the ‘Software & Updates’ application and again run the sudo apt-get update command:
sudo apt-get update Here, you can see that the sudo apt-get update is working properly.
 Here, you can see that the sudo apt-get update is working properly.
Solution 2: Using CLI to Fix 404 Not Found Error
To fix this “404 Not Found Error” to resolve the sudo apt-get update not working issue you can also use the CLI. Here is the full process:
- Open the terminal in Ubuntu.
- Run the following command:
sudo add-apt-repository --remove ppa:deadsnakes/ppa EXPLANATION
- sudo: Gives the permission to execute commands with superuser(root) privilege.
- add-apt-repository: Used to manage APT repositories specifically to add new repositories.
- –remove: This option tells ‘add-apt-repository’ to remove the mentioned repository in the command rather than add it.
- ppa:deadsnakes/ppa: Refers to a PPA maintained by the deadsnakes team which provides updated Python packages and I want to remove it.
- Now, run the sudo apt-get update command to check whether it’s working or not:
sudo apt-get updateHere, you can see that the sudo apt-get update works accordingly after all the necessary modification is done.

 Here, you can see that the sudo apt-get update works accordingly after all the necessary modification is done.
Error 2: Failed to Fetch Error
The ‘sudo apt-get update’ can face the ‘failed to fetch’ error due to conflicting software or repositories which hinders the ‘apt’ from fetching the update package information from the configured repositories.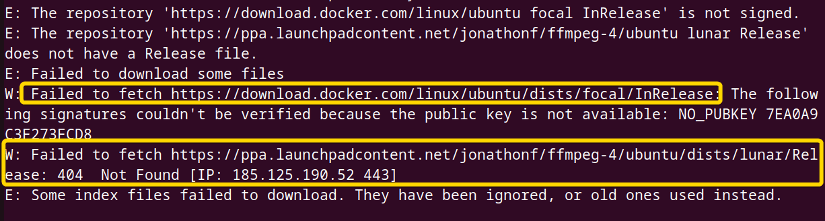
Solution 1: Using GUI Remove the Conflicting Software or Repositories
You can use Graphical User Interface (GUI) to solve the “Failed to Fetch” error while updating your system using the sudo apt-get update command through the ‘Software & Updates application. Here are the full steps:
- Click on ‘Show Apps’ and search for ‘Software & Updates’.

- Run the Application.

- Click on the ‘Other Software’ option.

- Now, uncheck the problematic repositories or packages. While doing this, Authenticate yourself by providing the user password.
 After Authentication is done the unchecked list will be shown.
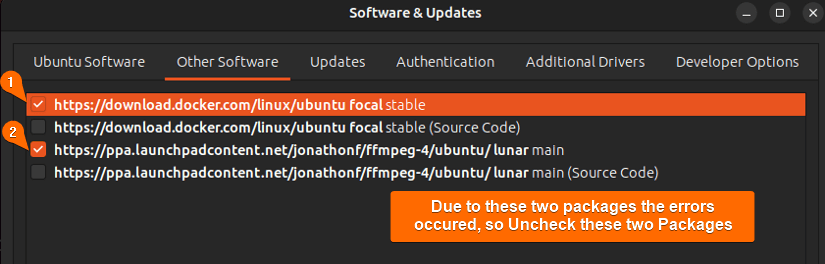
Here, you can see unchecked packages and now close the window and run the command ‘sudo apt-get update’ to update your system successfully.
Solution 2: Using CLI Remove the Conflicting Software or Repository
To resolve the ‘sudo apt-get update failed to fetch’ situation, you can remove the conflicting software or repositories using CLI(Command Line Interface). You can follow the steps described below:
- Open a terminal in Ubuntu.
- Run the following command to update your package list and find out the repositories or software that is causing the error from the error message:
sudo apt-get updateEXPLANATION- sudo: Provides user the root privilege.
- apt-get: A command line package management tool that allows users to install, upgrade, and remove software packages.
- update: A subcommand for ‘apt-get’ that tells to retrieve the latest package information including available updates.
-
Now, identify the lines that show errors and note down the erroneous repository or software.
 Here, you can see the error which includes the repository name and that is https://ppa.launchpadcontent.net/jonathonf/ffmpeg-4/ubuntu/dists/lunar/Release.
 -
After the identification of problematic repositories or software, run the following command to remove them:
sudo add-apt-repository --remove ppa:repository-name/ppaEXPLANATION- sudo: Gives users the privilege like root users.
- add-apt-repository: Used to add new repositories through APT.
- –remove: This option tells ‘add-apt-repository’ to remove the mentioned repository in the command rather than add it.
- ppa:jonathonf/ppa: Refers to a PPA maintained by the owners ‘jonathonf’
The command specifically identifies the PPA owned by ‘jonathonf’ and searches the system’s configuration files (typically in ‘/etc/apt/sources.list’ and ‘/etc/apt/sources.listd/’ ) to find any entries related to the specified PPA. After finding it, it removes the entry from the configuration files.
- After removing the problematic software or repository, clean the package cache using the following command:
sudo apt-get cleanEXPLANATION- sudo: Ensures all the privileges and accesses like the root users.
- apt-get: A command line package manager for Debian-based Linux distros, used for managing packages.
- clean: This subcommand tells ‘apt-get’ to remove cached package files from the local package cache.
-
Finally, run the following command to update the package lists and check whether it’s working or not:
sudo apt-get updateYou can see that the update has been accomplished perfectly.
 Here, you can see the error which includes the repository name and that is https://ppa.launchpadcontent.net/jonathonf/ffmpeg-4/ubuntu/dists/lunar/Release.
 You can see that the update has been accomplished perfectly.
Error 3: Could Not Resolve “archieve.ubuntu.com” Error
This error indicates a DNS resolution problem which means that your system cannot resolve the domain name for the repository.
Solution: Resolve the DNS Issue
To fix the DNS issue, to resolve the sudo apt-get update not working error follow the below steps:
- First, check your internet connection and ensure that your connection is stable. If the connection is okay then follow the next steps.
-
Now open the terminal and run the following command:
cat /etc/resolv.confEXPLANATION- cat: Used for concatenating and displaying the contents of files.
- /etc/resolv.conf: It’s a configuration file that is crucial for DNS resolution on a Linux system.
 By running the command, you can view the configuration on your system including the IP addresses of the DNS servers that your computer is using.
  In my case, the IP address of the nameserver is 127.0.0.53.
 -
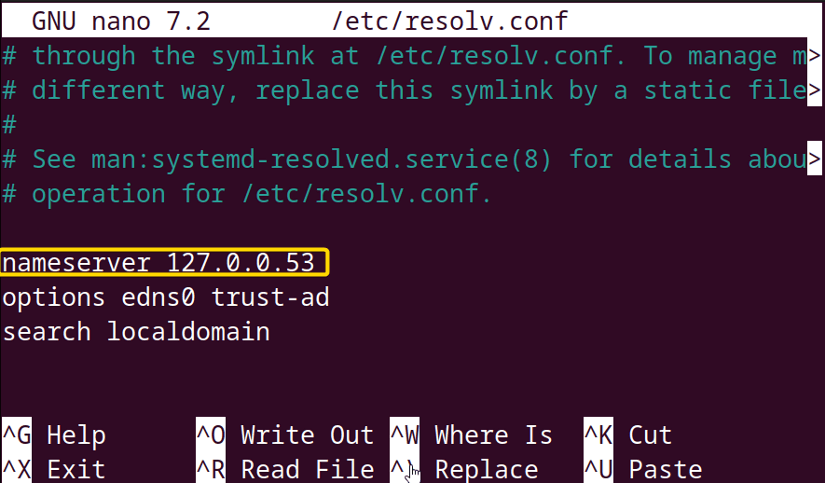
If the file appears empty or misconfigured, you can edit it manually to include a reliable DNS server by running the following command:
sudo nano /etc/resolv.confEXPLANATION- sudo: Used to get the root privilege.
- nano: This command opens a file and allows the user to edit the file like a text editor.
- /etc/resolv.conf: It’s the DNS configuration

 Now, replace the nameserver’s IP address with your preferred reliable DNS server’s IP address such as Google’s DNS (8.8.8.8 and 8.8.84.4). Then save and exit the file by pressing CTRL+O and CTRL+X respectively.
 -
At last, run the following command to check if you can reach the Ubuntu repository by pinging it:
ping archive.ubuntu.comEXPLANATION- ping: It checks and diagnoses the network connectivity between your computer and a remote host.
- ubuntu.com: It’s the hostname of a server within the Ubuntu archive.
-
Lastly verify your ‘sources.list’ file contains valid repository URLs. To do that run the following command:
sudo nano /etc/apt/sources.listEXPLANATION- sudo: Gives the user sudo privilege.
- nano: Opens a file in the CLI as a text editor.
- /etc/apt/sources.list: it’s a configuration file that contains repository URLs.


 By running the command, you can view the configuration on your system including the IP addresses of the DNS servers that your computer is using.
 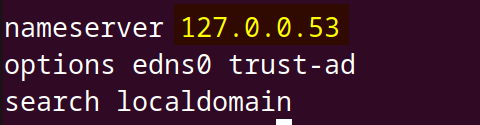 In my case, the IP address of the nameserver is 127.0.0.53.
 Now, replace the nameserver’s IP address with your preferred reliable DNS server’s IP address such as Google’s DNS (8.8.8.8 and 8.8.84.4). Then save and exit the file by pressing CTRL+O and CTRL+X respectively.
Error 4: Hash Sum Mismatch Error
Encountering a “Hash Sum Mismatch” error while running the sudo apt-get update command is not uncommon. This error typically occurs when the checksums of packages downloaded from the repositories do not match the expected values. It can happen for various reasons, including network issues, repository problems, or local caching problems.
Solution: Change the Repository Mirror
To change the repository mirror, try to switch to a different mirror or repository server. Here is how:
- Open the file ‘/etc/apt/sources.list’ using the following command and modify the server:
sudo nano /etc/apt/sources.listEXPLANATION- sudo: Provides root privilege.
- nano: Opens a file like a text editor.
- /etc/apt/sources.list: It’s the configuration file.
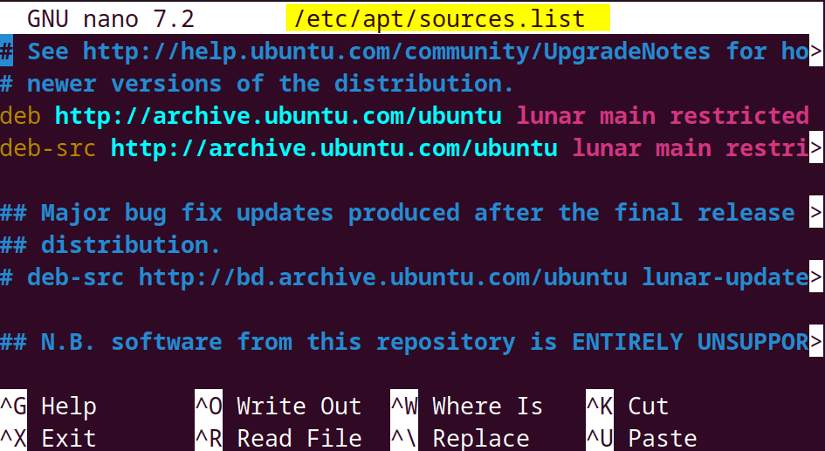
 Here in the sources.list file, notice the lines start with ‘deb’ and ‘deb-src’. These lines specify the repositories you are currently using as marked in the picture.
 - Now choose a new mirror from the Ubuntu Mirror list (https://launchpad.net/ubuntu/+archievemirrors). Pick a mirror that is compatible with your geographical location and replace the URL with the existing URL in the source.list file.

 Here in the sources.list file, notice the lines start with ‘deb’ and ‘deb-src’. These lines specify the repositories you are currently using as marked in the picture.
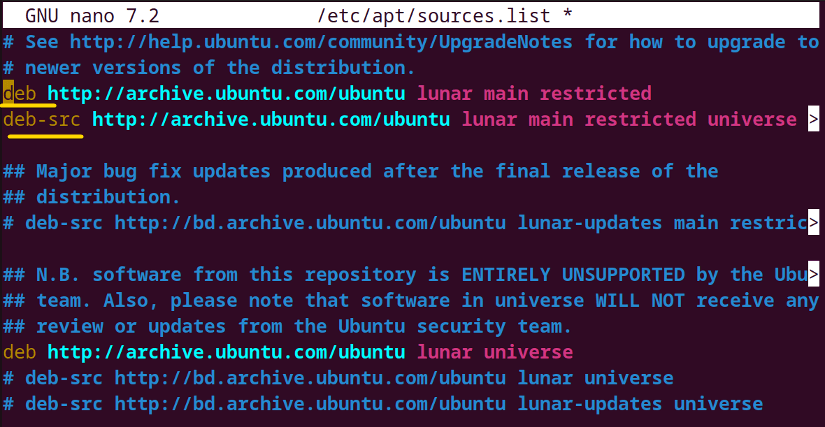
In my case, I’ve replaced the previous mirrors with the marked Mirror URLs. After modification, save the file and exit by pressing CTRL+O and CTRL+Z.
Error 5: Inadequacy of Disk Space
If your system is running out of disk space, it can prevent apt-get from updating which causes in ‘Failed to Fetch’ error.
Solution: Free up Disk space
To check the system’s disk space, follow as below:
- Open the Ubuntu terminal.
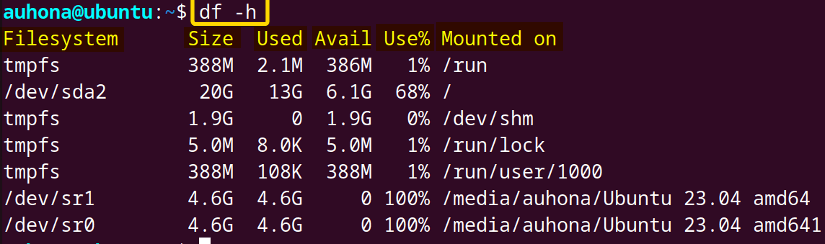
- Run the following command to get enlisted data of used and unused space of disk:
df -hEXPLANATION- df: This command displays disk space information.
- -h: The option ‘h’ stands for ‘human-readbale’. Due to using option ‘-h’ in the command, ‘df’ displays the sizes in an understandable format with kilobytes(K), megabytes(M), and gigabytes(G) units.
 Here, you can check the files that are occupying your disk space including their size, used space, and available space. The information also includes the ‘Mounted on’ column which indicates the mount point or directory where the system file is attached in the file system hierarchy.
 Here, you can check the files that are occupying your disk space including their size, used space, and available space. The information also includes the ‘Mounted on’ column which indicates the mount point or directory where the system file is attached in the file system hierarchy.
If your system’s disk space is full, then free up some space according to your needs. To clean up some unnecessary occupied spaces run the following commands:
sudo apt-get autoremovesudo apt-get autocleanError 6: GPG Errors
When you execute the sudo apt update command and come across the ‘GPG error’, it usually signals a problem with the GPG (GNU Privacy Guard) key responsible for confirming the authenticity of software packages within your package manager’s repository. This issue can impede your ability to update your package lists and install or upgrade software packages.
Solution: Find and Resolve Malfunction in the Configuration File
While trying to update my packages, the GPG error hinders the operation as you can notice from the picture. The error message includes the repository and mentions that the public key is not available. This problem can occur for multiple reasons. 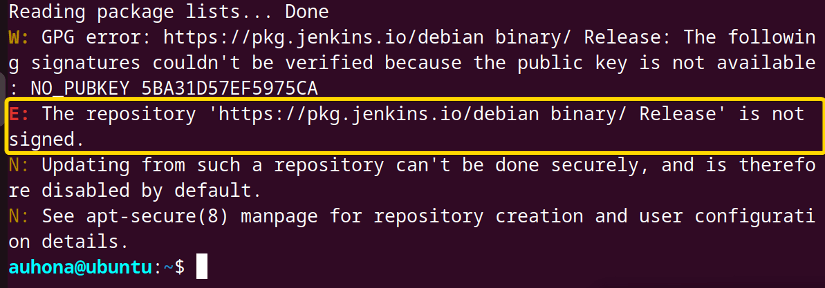
To resolve the GPG errors to fix the sudo apt-get update not working issue follow the steps below:
- Open a terminal on Ubuntu.
- Run the following command to open the file /etc/apt/sources.list:
sudo nano /etc/apt/sources.listEXPLANATION- sudo: Provides the root privilege to perform the administrative command.
- nano: Opens files in CLI and allows you to edit the file like a text editor including multiple features.
- /etc/apt/sources.list: contains a list of software repositories or sources from which the apt package manager retrieves and installs software packages.

- Enter the user password and the file will be opened.
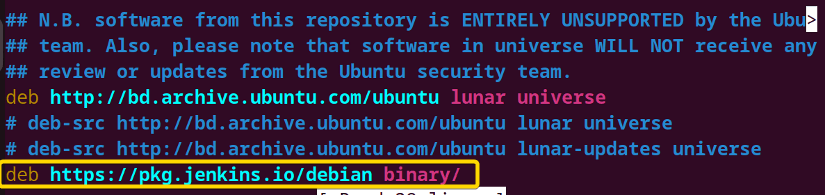
 As the file opened, I searched for the line ‘deb https://pkg.jenkins.io/debian binary/,’ which configures an APT repository for Jenkins. Jenkins is a widely used automation server that plays a crucial role in building, deploying, and automating software projects.
 -
Remove the marked line or use a hash ‘#’ icon in front of the line to comment out the line.
-
Now, run the command sudo apt-get update again and update your system packages:
sudo apt-get updateNow, here you can see the result of the sudo apt-get update command as you’ve anticipated.

 Now, here you can see the result of the sudo apt-get update command as you’ve anticipated.
Error 7: Could not Get Lock “/var/lib/apt/lists/lock” Error
This error occurs when another instance of ‘apt’ or package management tool is running. In this situation, if you run the command ‘sudo apt-get update’ command, you’ll get an error like below.
Solution: Check & Terminate Any Other APT Processes
You can check for any apt processes running or not and then if it’s necessary, you can terminate the process to run the sudo apt-get update command.
To resolve the sudo apt-get update not working error, check and terminate if any other “apt” processes are running. Here is how:
- Open the terminal in Ubuntu.
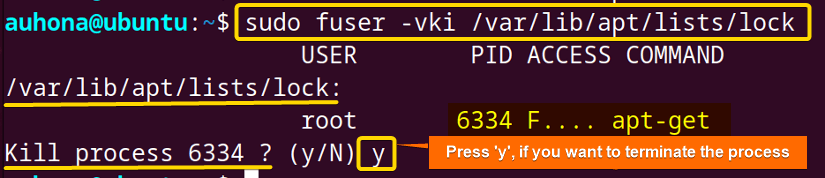
- Now, identify and terminate processes running on your system using the following command:
sudo fuser -vki /var/lib/apt/lists/lockEXPLANATION- sudo: Provides the root privilege.
- fuser: It’s a command used to identify which processes are currently using a particular file or resource.
- -v: This option stands for ‘verbose’ and instructs the command to display more information about the processes using the file.
- -k: This option tells the ‘fuser’ to send a signal to the processes using the file to kill them.
- /var/lib/apt/lists/lock: This is the absolute path to the lock file that is used by APT.
 Here you can see that the process running by APT is detected. If you press ‘Y’ the running process will be terminated as below.
Now, wait for a few moments to ensure that the lock is released.
 Here you can see that the process running by APT is detected. If you press ‘Y’ the running process will be terminated as below.
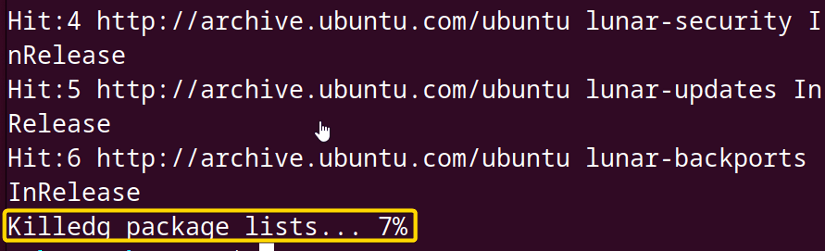
If you are sure that there are no other processes holding the lock, then it’s possible that a stale lock file is causing the issue. Then run the following command to remove the lock:
sudo rm /var/lib/apt/lists/lock- sudo: This is used to run another command with superuser privilege.
- rm: This is the remove command that deletes files and repositories.
- /var/lib/apt/lists/lock: This is the full path to the lock that you want to remove.
Fix the Slow APT-GET Update Issue
It’s not so rare to face a slow downloading speed for packages while running the ‘‘sudo apt-get update’ command. This issue can occur in case your connected server is really busy. Besides, slow speed happens due to mirror issues, name server issues, and repositories issues. To resolve the situation, you can check the repositories in your /etc/apt/sources.list file, or select a DNS server with fast speed, and clean the apt-get cache.
Solution 1: Transport HTTP Mirror to HTTPS Mirror in sources.list File
You can transport http to https to enhance the security and integrity of data. For that, you have to run the following command to install apt-transport-https package:
sudo apt install apt-transport-https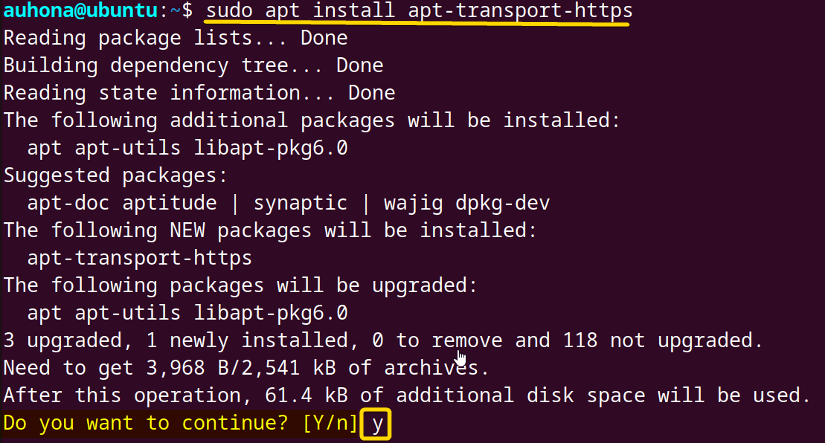 After installing the ‘apt-transport-https’ package, you have to edit resources in the sources.list file. To do that run the following command:
sudo nano /etc/apt/sources.list Here, you can see HTTP which you have to change to HTTPS. Everytime you encounter an HTTP, switch that to HTTPS in the sources.list file. Then save and exit from the file by pressing CTRL+O & CTRL+X.
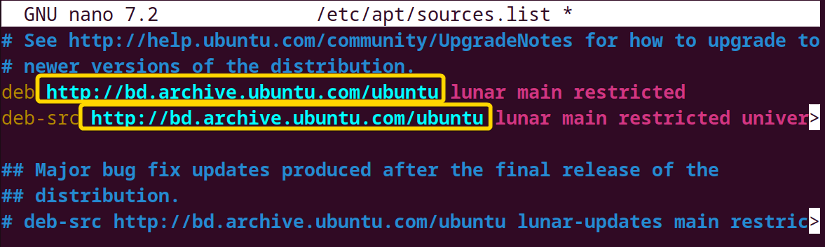 After changing all the HTTP to HTTPS, run the following commands respectively:
sudo apt updatesudo apt upgrade -y From the above image, you can see that the commands are working perfectly without any slow-down issues.
Solution 2: Change HTTP to Repo in sources.list File
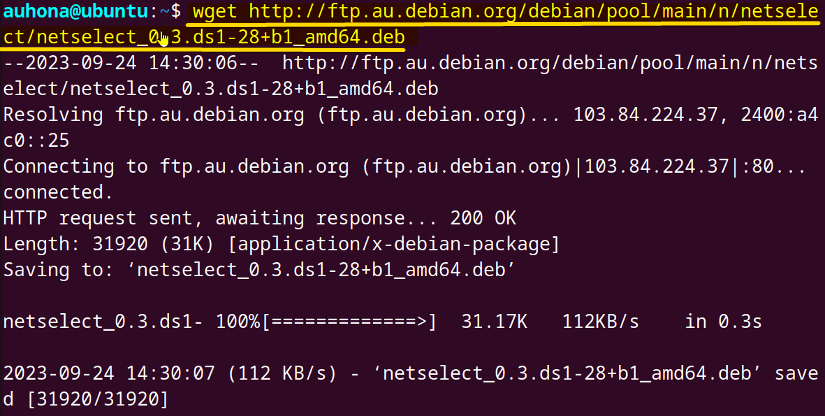
To change HTTP to repo in the sources.list file, you have to install a utility called netselect. Run the following command to install netselect:
wget http://ftp.au.debian.org/debian/pool/main/n/netselect/netselect_0.3.ds1-28+b1_amd64.deb- wget: This is a command line utility for downloading files from the internet.
- http://ftp.au.debian.org/debian/pool/main/n/netselect/netselect_0.3.ds1-28+b1_amd64.deb: This is the URL of netselect package file that I want to download.
 Now, using the command sudo dpkg -i netselect_0.3.ds1-28+b1_amd64.deb, install a Debian package with the filename netselect_0.3.ds1-28+b1_amd64.deb using the dpkg tool.
sudo dpkg -i netselect_0.3.ds1-28+b1_amd64.deb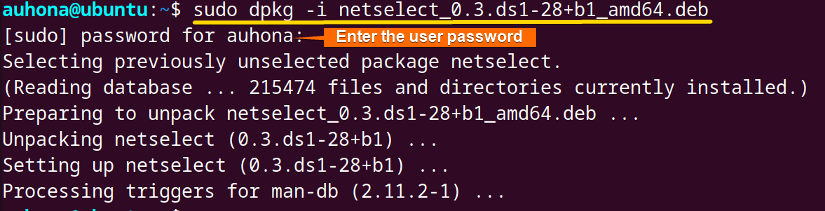 Then use the command netselect -s 20 -t 40 $(wget -qO – http://mirrors.ubuntu.com/mirrors.txt) to evaluate the performance of the top 20 source hosts listed in the mirror source list.
netselect -s 20 -t 40 $(wget -qO - http://mirrors.ubuntu.com/mirrors.txt) After that, from the enlisted mirror source list, you can replace the existing server domain (archive.ubuntu.com)with the first enlisted mirror server mirror.limda.net. Do this for all the entries of sources.list file and save the file using the following command:
vi /etc/apt/sources.list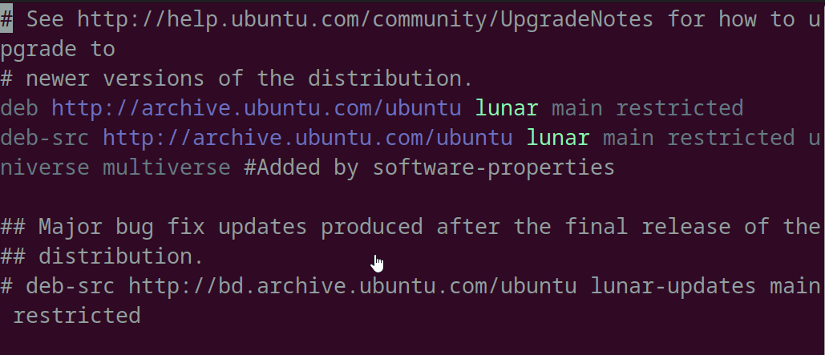 At last run the following commands separately to update the repository source:
sudo apt updatesudo apt upgrade -y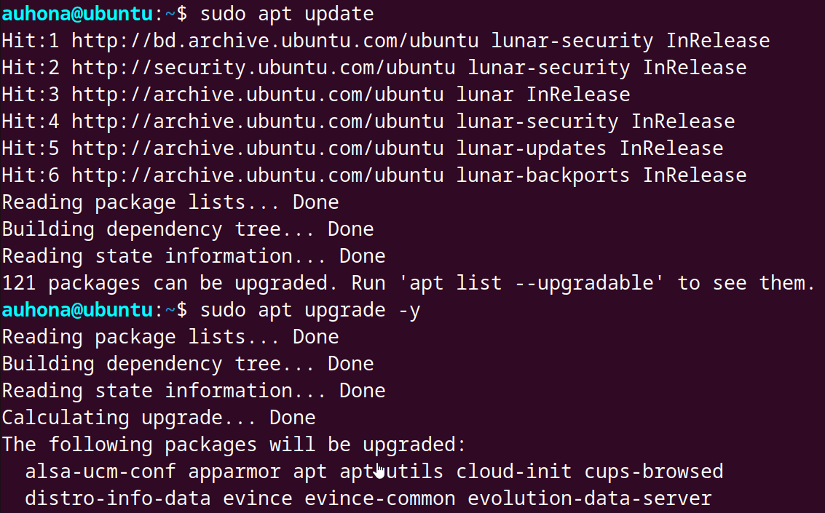 You can see here, the commands are working perfectly without any slow-down issues.
Conclusion
In summary, ‘sudo apt-get update’ is a crucial command for maintaining the stability, security, and optimal performance of your Debian-based Linux system. By regularly updating your package information, you ensure an up-to-date operating system environment. However, occasionally, unexpected issues may arise during the update process. Fortunately, this article has provided the solutions to the multiple errors a user may face while running the sudo apt-get update command. Hope this information has been helpful in troubleshooting and improving your Linux system’s overall health.
People May Ask
How do I fix update error in Ubuntu?
To fix the update error in Ubuntu:
- Check internet connectivity.
- Check Ubuntu software sources: Check the ‘/etc/apt/sources.list’ file or any incorrect entries to find any misconfigured software sources.
- Clear APT cache: Use the sudo apt-get clean command to clear the apt cache.
- Fix Dependencies: In case of any broken dependencies, use the sudo apt-get install -f command.
- Update and Upgrade Package lists.
- Check for error messages.
- Reboot the System.
How do I update my apt-get application?
To update the apt-get application, you can do it:
- Open the terminal and Update the package list using the sudo apt-get update command.
- Then, upgrade installed packages using the sudo apt-get upgrade command.
The commands will upgrade all the installed packages to their latest versions.
How do I update my apt version?
To update the apt version, first, ensure your current distro version is up to date by running the sudo apt-get update and sudo apt-get upgrade commands. Then, use the command sudo do-release-upgrade to check for and upgrade to the latest Ubuntu version.
How to force update Linux?
To force an update on Linux, you can run the update-manager -d command in the terminal to upgrade to the development release. The -d option is used to upgrade to the latest development release.
What does “apt-get clean” do?
The apt-get clean command removes all the downloaded package files (.deb) from the local cache (/var/cache/apt/archives). This frees up disk space by deleting unnecessary files.
What is ‘apt-get’?
The ‘apt-get’ (Advanced Package Tool – GET) is a command line tool used for package management in Debian-based Linux distributions. Its common functionality includes installing, removing, and updating packages.
What does apt-get upgrade do?
The ‘apt-get upgrade’ command mainly downloads and installs the latest versions of all currently installed packages. It replaces your system with the most up-to-date software by replacing the older package version with the newer one.
When should I run apt upgrade?
You should run ‘apt upgrade’ periodically to keep your system up-to-date with security patches and bug fixes.
How do I clear my apt update cache?
To clear the apt cache, use the apt-get clean command in the terminal. But first, update the package list using the “apt-get update” command to make sure you have the most recent version of the package lists. Then, clean the cache. The “clean” command clears out the local repository of the retrieved package files. It removes everything but the lock file from ‘/var/cache/apt/archieves/’ and ‘/var/cache/apt/archives/potential/’. If you want to remove packages that are no longer required, use sudo apt-get autoremove command after cleaning the cache.
Related Articles
- A Complete Overview of sudo apt update Command in Linux
- An Ultimate Guide of “sudo apt-get update” Command in Linux
- [Fixed] sudo apt update Not Working Error in Ubuntu
- [Fixed] APT-Get Update Failed to Fetch Error in Linux
- How to Update RPM Packages in RHEL? [6 Methods]
- How to Check Updates Using YUM on RHEL? [5 Practical Cases]
- How to Update All Packages in RHEL Using YUM? [3 Cases]
- How to Update a Specific Package in RHEL Using YUM? [2 Cases]
<< Go Back to Update Packages in Linux | Package Management in Linux | Learn Linux Basics
FUNDAMENTALS A Complete Guide for Beginners


thank you so much !
For those who don’t find the Application & update.
You need to install it with “sudo apt-get install ubuntu-desktop”
and follow his step by unchecking every checked button.
Thanks for the detailed troubleshooting steps! I was stuck with the “sudo apt-get update” error for hours. Your fix worked like a charm—greatly appreciated!