The sudo apt update command is the most essential command in Linux to keep a system healthy and up-to-date. The sudo apt update command finds out the latest versions of the packages and dependencies and lists the updates of the installed software packages of the system repository. However, this command does not install and download any of these updates. It just lists the updates for your system.
The execution of the sudo apt update command requires the user to possess root privileges.
This article comprehensively covers the sudo apt update command, its functionality, and its operations. Besides, the output of the command will be appropriately described.
Understanding the “sudo apt update” Command
In Linux-based operating systems, particularly Ubuntu, the sudo apt update command essentially serves as an instruction to update the local package index. It downloads package details from all set sources to refresh the package cache. The package manager (in this case ‘apt’) needs to know which packages are available and where to find them to install software or packages on your system.
To understand the sudo apt update command in detail, let’s break down the terms used:
What is “sudo”?
Sudo, which stands for ‘Superuser Do’, is a powerful utility, used in Linux and Unix-based operating systems. The ‘superusers’ or ‘root’ are the authorized users who get the elevated privilege to execute specific administrative commands and get the permissions to carry out any operations on the system.
It provides a secure way to perform administrative tasks without the need for logging in as the root user. The basic syntax of the sudo command is as follows:
sudo [OPTION] COMMAND [ARGUMENTS..]To learn more read: The “sudo” Command in Linux [8 Practical Examples]
What is “apt”?
APT (Advanced Package Tool) is a command-line tool that facilitates package management in Debian-based Linux systems. It simplifies the process of installing, updating, and removing software packages. The keyword ‘apt’ is used to call the apt repository which permits the users to install, update, or remove packages from the repositories of software distributions. The sudo apt allows a root user to perform operations in the apt repository.
sudo apt install <package_name>This command downloads the latest version available for the mentioned package name.
What does “sudo apt update” Do?
The sudo apt update command downloads package details from all set sources which are commonly listed in the /etc/apt/sources.list file and other files found in the /etc/apt/sources.list.d directory. Consequently, the update command fetches package information from the web, enabling users to obtain details about updated package versions and their dependencies. After running the sudo apt update command, your apt package cache will be updated ensuring your system has the latest package information.
How to Use the “sudo apt update” Command
Run the following command in the Ubuntu terminal and provide the root user’s password.
sudo apt update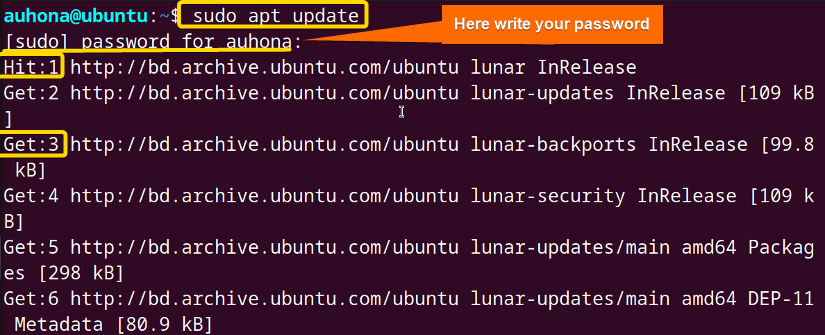
 Here you can see the package repository to update is http://bd.archieve.ubuntu.com/ubuntu and the output of the command sudo apt update shows that the packages have been updated successively.
Output Breakdown
- ‘Hit’ shows that the repository was successfully reached and that the package index for that repository was obtained.
- ‘Get’ shows that the repository’s package index or metadata are currently being retrieved.
- ‘Fetch’ represents the overall amount of data fetched throughout the update process from all of the repositories and the time it took to finish.
- ‘Reading Package list … Done’ denotes that the package management has completed reading the new package lists and that they have been updated correctly.
- ‘Building dependency tree . . . Done’ ensures that the installation and upgrades can be completed successfully, the package manager examines the package information and establishes the dependencies between packages.
- ‘Reading state information . . . Done’ tells that package management presently checks the system’s installed packages to ensure that updates will be applied successfully and without issues.
- ‘All the packages are updated’ indicates that all the installed packages have been updated successfully according to the latest package index.
NOTE: Using the sudo apt update command is a manual process to update the systems’ package database information.
How to Set up Automatic Package Updates
To enable automatic updates of packages, simply follow these steps:
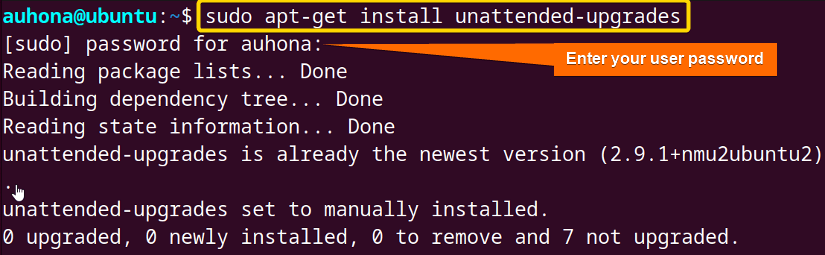
- Install the “unattended-upgrades” package using the
sudo apt-get install unattended-upgradescommand:
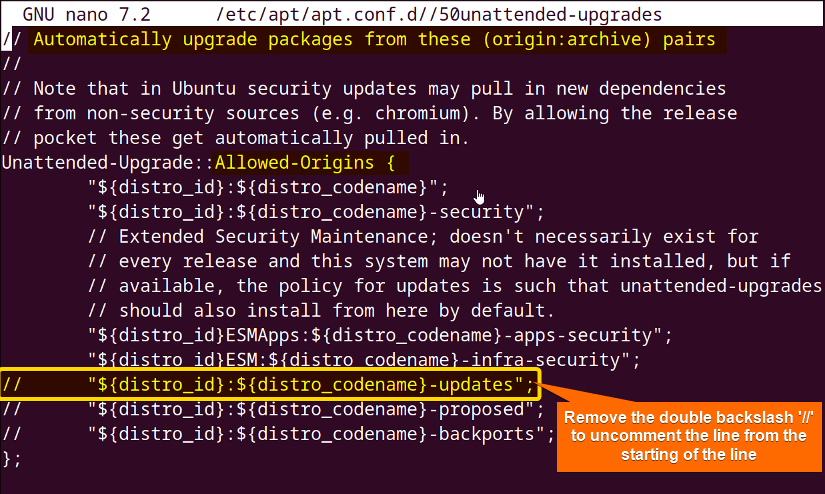
- Open the “50 unattended-upgrades” file using the
sudo nano /etc/apt/apt.conf.d/50unattended-upgradescommand.
- Configure the ‘unattended-upgrades’ file. Remove the double backslash to uncomment the line “${distro_id}:${distro-codename}-updates”.
 If you want to prevent automatic updates for specific packages, include the names to the list in the Package-Blacklist argument.
 To enhance the effectiveness of the update process, you can modify the file to integrate notification systems, for instance:
- To get notifications in email, enter a valid email address within the quotation mark “ “ of Unattended-Upgrade::Mail line.
- To receive error notifications for updates, uncomment the 2nd line marked in the image named “Unattended-upgrade: :MailReport “on-change;” and there, replace attribute “on-change” with “only-on-error”.
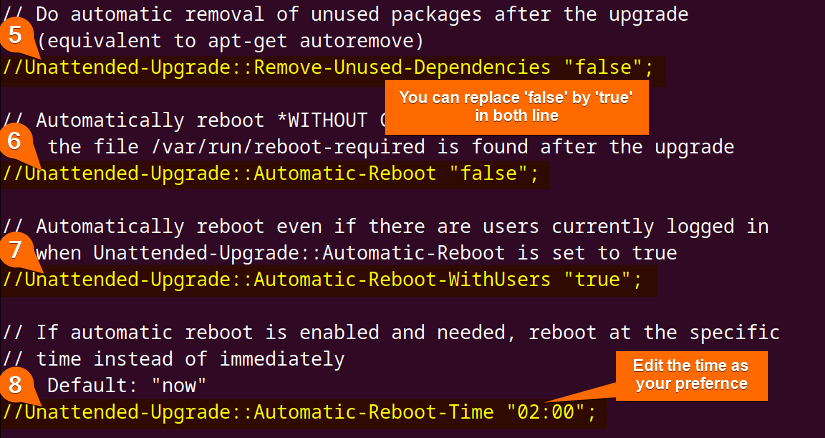
- To remove unused kernel and new unused dependencies, just uncomment the 3rd and 4th highlighted lines in the image below.

To enable auto-reboot, replace “false” with “true” at the ‘6’ marked line and uncomment the line. You can also modify the auto-reboot time at your convenience at the ‘8th’ highlighted line.

- Save the file and then exit by pressing CTRL+S and CTRL+X respectively.
- Enable automatic updates by editing the “20auto-upgrades” files. To access the file run the following command.
sudo nano /etc/apt/apt.conf.d/20aut-upgrades This file contains only two lines that enable automatic updates and upgrades. The two lines are:
- APT : : Periodic : : Update-Package-Lists “1”;
- APT : : Periodic : : Unattended-Upgrade “1”;
The first line is for the auto-update of the package lists and the second line initiates the auto-upgrade of the packages. The numerical value quoted in both lines can be “1” or “0” where 1 enables auto update and upgrade and 0 disables that.

 If you want to prevent automatic updates for specific packages, include the names to the list in the Package-Blacklist argument.
 To enhance the effectiveness of the update process, you can modify the file to integrate notification systems, for instance:

 This file contains only two lines that enable automatic updates and upgrades. The two lines are:
“sudo apt update” vs “sudo apt upgrade”
Although both sudo apt update and sudo apt upgrade are utilized for installing packages in Linux, their purposes differ. The “sudo apt upgrade” command is used to upgrade the installed packages on your system to their latest versions. On the contrary, the “sudo apt update” command ensures that the system has the latest information about the available packages. But it doesn’t install or upgrade any software packages.
In a nutshell, the key differences between sudo apt update and sudo apt upgrade commands are given below:
| Commands | Features |
| sudo apt update |
|
| sudo apt upgrade |
|
However, it’s recommended to run the sudo apt update command before sudo apt upgrade to ensure that the system has the latest information about available package updates before attempting to upgrade any installed package.
“sudo apt update” vs “sudo apt-get update”
sudo apt update and sudo apt-get update are the 2 command variants that serve the same purpose of updating the software package information database. In the Ubuntu system, all the package information is stored in the ‘/etc/apt/sources.list’ file and both commands download the latest information to update the packages along with fetching their latest versions.
To get a detailed comparison between sudo apt update and sudo apt-get update, see the table below:
| Commands | Features |
| sudo apt update |
|
| sudo apt-get update |
|
In summary, the sudo apt update and sudo apt-get update commands fulfill the same purpose of replacing the package database with the latest information for package updation in repositories. So, you can choose the one that suits your system configuration and personal preference.
However, if you want to learn more read: Apt Vs Apt-get What’s the Difference?
Conclusion
To conclude, for Ubuntu-based Linux systems, sudo apt update is crucial to maintain a robust environment. It ensures updated installations and downloads for existing packages. I hope that the essay has helped you to understand better.
People Also Ask
Is it safe to run “apt update”?
Yes, it’s more than safe and also a standard practice to run apt update command regularly to keep the system aware of the latest package update information. Running this command poses no threat to the system and is essential for maintaining an up-to-date package management system.
How to use “sudo apt update”?
To use sudo apt update, firstly you have to attain administrative permission. Secondly, open a terminal and write down the command sudo apt update. It will ask you for a password to verify whether you have all the required permissions or not. If the password becomes recognized, a list of repositories will start updating.
Why do we run “apt update”?
The sudo apt update command is used to download or refresh the local package index and to provide the system with the most recent information about available packages from the repositories. By updating the package index, any software installation or upgrades can be performed based on the latest package information.
Why is “sudo apt update” not working?
The most common causes of the sudo apt update not working are described below:
- Package Hash Mismatch: This error might occur when there is an issue with the cached package.
- Incorrect Repository Configuration: If the ‘sources.list’ file or any file in the ‘/etc/apt/sources.list.d/’ directory contains incorrect or outdated repository URLs, the update process may fail.
- GPG Errors: Any expired GPG key associated with a repository can cause the
apt updatecommand to fail. - Proxy Setting: Sometimes proxy servers or firewalls may block the connection to the repositories, preventing the update process from completing successfully.
To learn more and get a solution to the apt update not working issue, check this out: [Fixed] sudo apt update Not Working Error in Ubuntu
What is “sudo” short for?
The term sudo is an abbreviation for “superuser do,” indicating that it allows users to execute commands with the privileges of the superuser.
What is “apt” command in Linux?
The apt command is a powerful package management utility used primarily in Debian-based distributions, including Ubuntu. It is used to perform package management tasks, such as installing, removing, and upgrading software packages.
What is “apt update” in Linux?
The apt update command is used to refresh the local package index. When you run apt update, the package management system retrieves the latest information about the packages from the ‘sources.list’ file.
What is “apt install”?
The apt install is a command that installs software packages from the repository in Debian-based Linux distros such as Ubuntu. To install, type the command apt install followed by the package name if you have administrative privileges. Otherwise, prefix the command with sudo.
Does Linux update itself?
No, Linux does not update automatically, however, you can create a scheduler to ensure your system gets updated automatically by utilizing your Linux OS.
Does Ubuntu have an automatic update?
Yes, Ubuntu provides a unique tool called “unattended-upgrades” to automatically download and install security patches for your system.
Do I need to restart after “sudo apt upgrade”?
No, in most cases, you do not need to restart your system immediately after running the sudo apt upgrade command on your Linux system. The command is designed in such a way that it does not typically require a system reboot. Please refer to man apt-get for more details.
Is “sudo apt upgrade” safe?
Yes, the sudo apt upgrade command is safe to use as Debian and Debian-based distributions are usually stable and standard. This command is safe because major updates for packages, dependencies, and distributions are typically released only once or twice a year.
How to update package cache?
To update the package cache on a Linux system, you can simply use the sudo apt update command. This command will refresh the local package index.
Related Articles
- An Ultimate Guide of “sudo apt-get update” Command in Linux
- [Fixed] sudo apt update Not Working Error in Ubuntu
- [Fixed] sudo apt-get update Not Working in Ubuntu
- [Fixed] APT-Get Update Failed to Fetch Error in Linux
- How to Update RPM Packages in RHEL? [6 Methods]
- How to Check Updates Using YUM on RHEL? [5 Practical Cases]
- How to Update All Packages in RHEL Using YUM? [3 Cases]
- How to Update a Specific Package in RHEL Using YUM? [2 Cases]
<< Go Back to Update Packages in Linux | Package Management in Linux | Learn Linux Basics
FUNDAMENTALS A Complete Guide for Beginners


Auhona, this is a superbly-written article, stunningly so as often folks who are non-native English speakers write text that can be a little hard for a native-English speaker to follow. The vast majority of technical people I’ve worked with cannot write themselves out of a wet paper bag, no matter how smart they are. You, however, are a wonderful exception! Thanks for the work.
Hi Clink,
Thank you so much for your kind words. I’m thrilled to know that my article is able to bridge the gap for the native English speakers. Your compliment is really motivating. If there’s anything specific you’d like to know, you can check out other articles also. Once again, thank you for taking the time to share your positive thoughts.
I’ve been using Linux for a while now, but I never knew the ins and outs of the ‘sudo apt update’ command. This post really helped me understand the importance of regularly updating my package lists and how it affects my system’s security. Thanks for sharing your knowledge!