While working with a Debian-based Linux system such as Ubuntu, an ordinary job is keeping your system up-to-date and installing new software. The sudo apt-get update command is essential for this because it updates the lists of available software from the sources to make sure you can get the latest updates and security fixes. Yet, sometimes this apparently simple command can cause a problem, particularly the dreaded ‘Failed to Fetch’ error. In this article, we’ll look into why the ‘sudo apt-get update failed to fetch’ error occurs and provide solutions to resolve it.
Key Takeaways
- Getting introduced to the scenario of sudo apt-get update failed to fetch error.
- Learning some solutions to resolve the erroneous situation.
Requirements
- To resolve the issues, you must have root privilege as you may need to change files or repositories related to ‘apt’.
Why Does the Failed to Fetch Error Occur?
The ‘Failed to Fetch’ error is frequently encountered by Linux users during the execution of the apt-get update command and can be both common and puzzling. This problem arises when the package manager, apt-get, encounters difficulties in fetching package details from the designated repositories. While it may be vexing, comprehending the root causes and applying the correct troubleshooting methods can enable you to rectify this error and maintain your system’s current status. This error may occur due to various issues in the system as below:
- Network Connection Issues
- Incorrect Repository URLs
- Mirror Server Problems
- Expired or Missing GPG keys
- Software Conflicts
- Disk Space Issues.
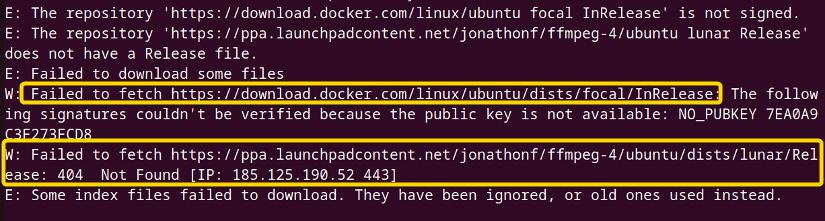 Here, you can notice the error named failed to fetch error while running the apt-get command in Ubuntu.
7 Reasons and Their Solutions for the Failed to Fetch Error of “sudo apt-get update” Command
There are several reasons why ‘apt-get update’ fails to fetch its desired package information from specific repositories. That’s why the solution to this error is not a one-way destination. Instead, there are a couple of approaches to address this flawed system configuration. I’ll try to present them in this guide.
Reason 01: Conflicting Software or Repositories
The ‘sudo apt-get update’ can face the ‘failed to fetch’ error due to conflicting software or repositories which hinders the ‘apt’ from fetching the update package information from the configured repositories.
Solution 01: Using GUI Remove the Conflicting Software or Repositories
If you choose to use Graphical User Interface (GUI) to solve the “Failed to Fetch” error while updating your system using the sudo apt-get update command, you can do that through the ‘Software & Updates application.
Steps to Follow >
➊ Click on ‘Show Apps’ and search for ‘Software & Updates’. ➋ Run the Application.
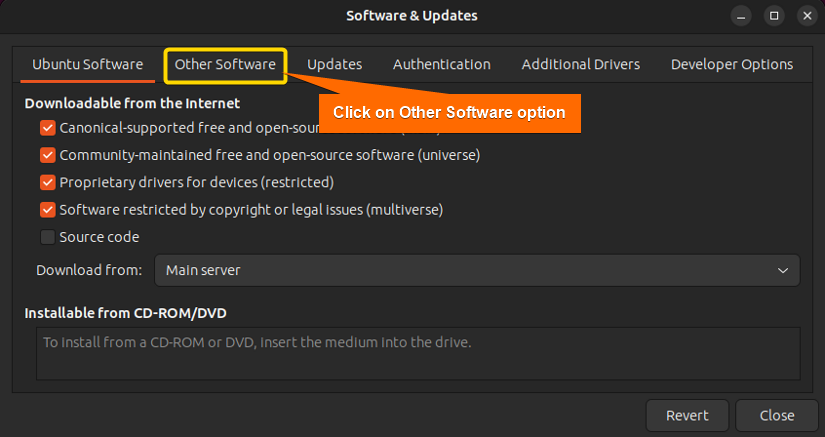 ➌ Click on the ‘Other Software’ option.
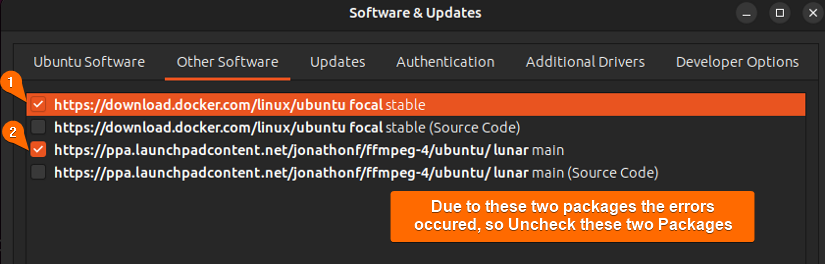 ➍ Now, uncheck the problematic repositories or packages. While doing this, Authenticate yourself by providing the user password.
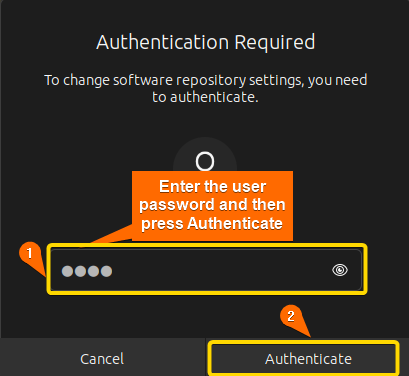 After Authentication is done the unchecked list will be shown.
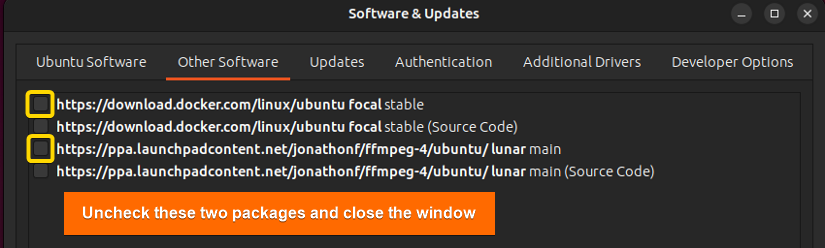 Here, you can see unchecked packages and now close the window and run the command ‘sudo apt-get update’ to update your system successfully.
Solution 02: Using CLI Remove the Conflicting Software or Repository
To resolve the ‘sudo apt-get update failed to fetch’ situation, you can remove the conflicting software or repositories using CLI(Command Line Interface). You can follow the steps described below.
Steps to Follow >
➊ Open a terminal in Ubuntu.
➋ Run the following command to update your package list and find out the repositories or software that is causing the error from the error message.
sudo apt-get update- sudo: Provides user the root privilege.
- apt-get: A command line package management tool that allows users to install, upgrade, and remove software packages.
- Update: A subcommand for ‘apt-get’ that tells to retrieve the latest package information including available updates.
➌ Now, Identify the lines that show errors and note down the erroneous repository or software. Here, you can see the error which includes the repository name and that is https://ppa.launchpadcontent.net/jonathonf/ffmpeg-4/ubuntu/dists/lunar/Release.
➍ After the identification of problematic repositories or software, run the following command to remove them.
sudo add-apt-repository --remove ppa:jonathonf/ppa- sudo: Gives users the privilege like root users.
- add-apt-repository: Used to add new repositories through APT.
- –remove: This option tells ‘add-apt-repository’ to remove the mentioned repository in the command rather than add it.
- ppa:jonathonf/ppa: Refers to a PPA maintained by the owners ‘jonathonf’
The command specifically identifies the PPA owned by ‘jonathonf’ and searches the system’s configuration files (typically in ‘/etc/apt/sources.list’ and ‘/etc/apt/sources.listd/’ ) to find any entries related to the specified PPA. After finding it, it removes the entry from the configuration files.
➎ After removing the problematic software or repository, it’s always a better practice to clean the package cache to ensure there are no traces of the conflicting packages. To do that simply run the following command:
sudo apt-get clean- sudo: Ensures all the privileges and accesses like the root users.
- apt-get: A command line package manager for Debian-based Linux distros, used for managing packages.
- clean: This subcommand tells ‘apt-get’ to remove cached package files from the local package cache.
➏ Finally, run the following command to update the package lists and check whether it’s working or not.
sudo apt-get update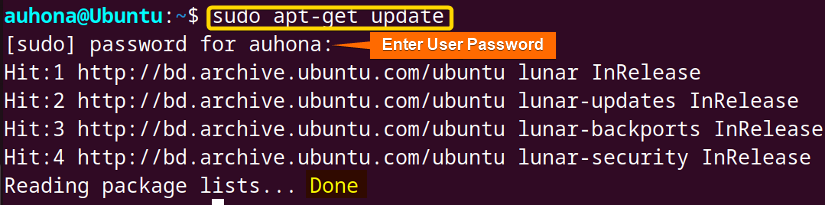 You can see that the update has been accomplished perfectly.
Reason 02: Incorrect Mirror Server
Occasionally, the error may occur due to issues encountered by the mirror server you are currently using. To address this, you have the option to change an alternative mirror server either by making a selection within the ‘Software & Updates’ or by making adjustments to your ‘sources.list’ file.
Solution 01: Choose a Mirror Server Using GUI
You can easily choose the mirror server using GUI as described below.
Steps to Follow >
➊ Click on the ‘Show Apps’ icon and search for ‘Software & Updates’ in the search bar.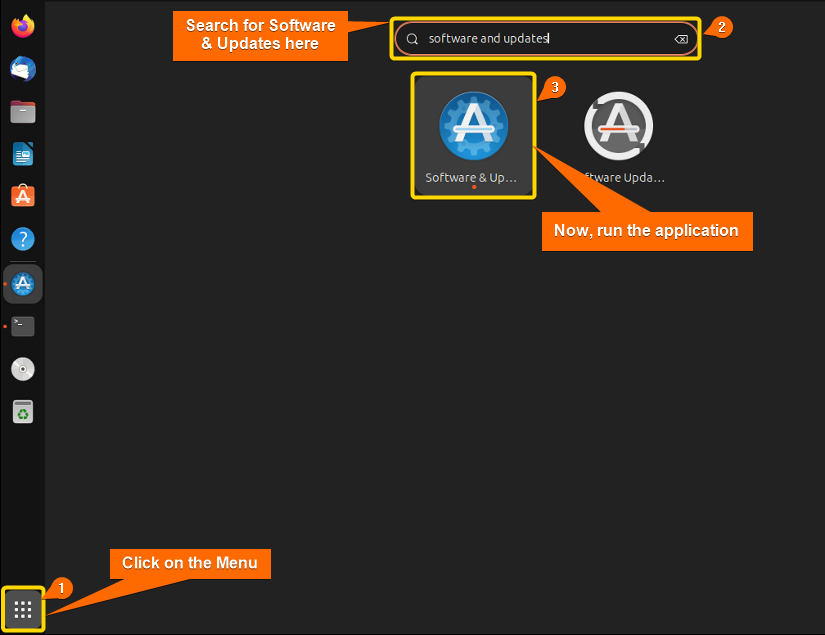 ➋ Now Run the application that will eventually open a prompt like below.
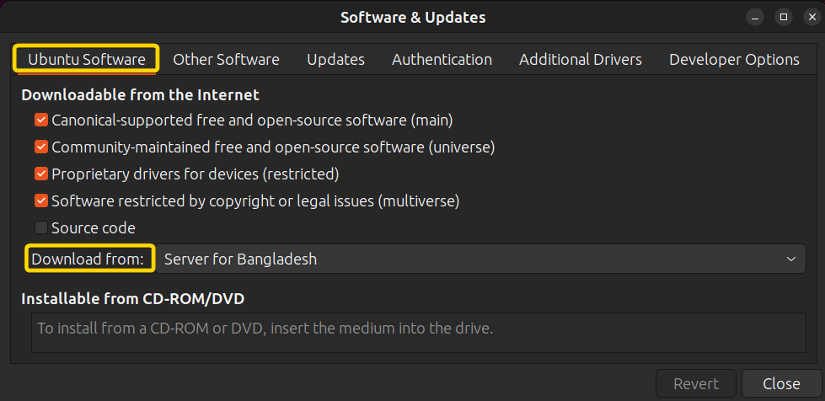 You can see the current server form ‘Download from’ which is ‘server for Bangladesh’.
➌ Click on the drop-down button shown in the option ‘Download from’ and choose another server.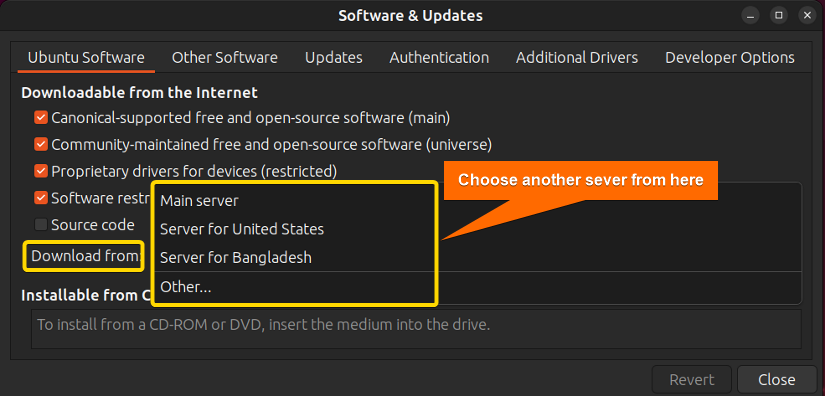 Here, you can notice a list of servers enlisted from which you have to choose a server at your convenience.
➍ At last, run the sudo apt-get update command as before to check whether the ‘Failed to Fetch’ error is solved or not. The update operation works perfectly here.
Solution 02: Select a Mirror Server Using CLI
To choose a mirror server using CLI, you can follow the steps below.
Steps to Follow >
➊ Open the terminal in Ubuntu.
➋ Run the following command to get the backup from the configuration file.
sudo cp /etc/apt/sources.list.back- sudo: Gives user root access.
- cp: This command actually copies files, groups of files, or directories.
- /etc/apt/sources.list.back: This is the repository location and includes the file name in which the backup will be copied.
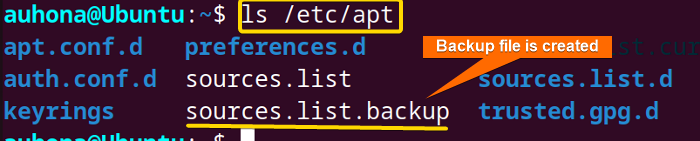
 ➌ Check the created backup file in the /etc/apt directory using the following command.
ls /etc/apt- ls: Enlists all the files and directories in the current directory.
- /etc/apt: It’s the directory whose content will be shown.
 ➍ Run the following command to open the configuration file.
sudo nano /etc/apt/sources.list- sudo: Gives the power like a superuser.
- nano: Opens files mentioned in the argument.
- /etc/apt/sources.list: It’s the file’s directory which the ‘nano’ command will open.
 ➎ Now, Find the lines that start with ‘deb’ and ‘deb-src’ in the ‘sources.list’ file.
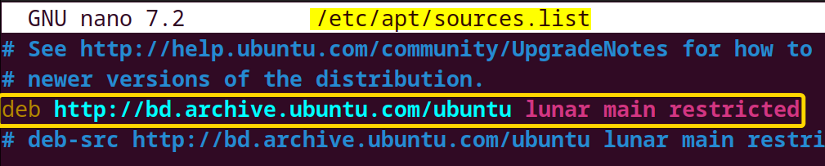 Here, the line provided, ‘deb http://bd.archive.ubuntu.com/ubuntu lunar main restricted’ is a configuration entry that specifies the URL of the Ubuntu repository you are connecting to.
- deb: indicates that this line refers to a binary repository that contains pre-built software packages that can be effortlessly installed on your system.
- http://bd.archive.ubuntu.com/ubuntu: This is the regional server URL to which the system is connected.
- lunar: This is the code for the specific release version of Ubuntu.
- restricted: It contains proprietary software packages.
➏ Lastly, Replace the marked URL of your system with another server’s URL you want to switch with. Now press CTRL+O to save the changes and then press CTRL+X to exit. Obviously, check whether apt-get is working or not by running the ‘sudo apt-get update’ command.
Reason 03: Network Issues
While the sudo apt-get update command is run, ‘apt-get’ actually fetches the packages from the web server that is connected to the system through the Internet connection. For that reason, any instability or poor quality of network connection can hinder ‘apt-get’ from getting the packages which causes to ‘Failed to Fetch’ error.
Solution: Check the Internet Connection
In case you doubt while troubleshooting why the CLI is unable to connect with the Internet, then follow the steps below to check your Internet connection’s state.
Steps to Follow >
➊ Open the terminal in Ubuntu.
➋ Run the following command.
ping www.google.com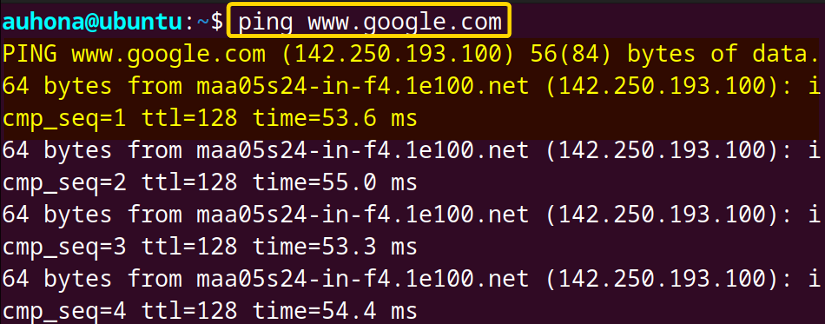 After running the command, you’ll get a continuous response from the host if the internet connection remains right. To stop the ping operation, press CTRL+C. If the ping operation doesn’t perform accordingly, check your Internet connection first.
Reason 04: Inadequacy of Disk Space
If your system is running out of disk space, it can prevent apt-get from updating which causes in ‘Failed to Fetch’ error.
Solution: Free up Disk space
To check the system’s disk space, follow as below.
Steps to Follow >
➊ Open the Ubuntu terminal.
➋ Run the following command to get enlisted data of used and unused space of disk.
df -h- df: This command displays disk space information.
- -h: The option ‘h’ stands for ‘human-readbale’. Due to using option ‘-h’ in the command, ‘df’ displays the sizes in an understandable format with kilobytes(K), megabytes(M), and gigabytes(G) units.
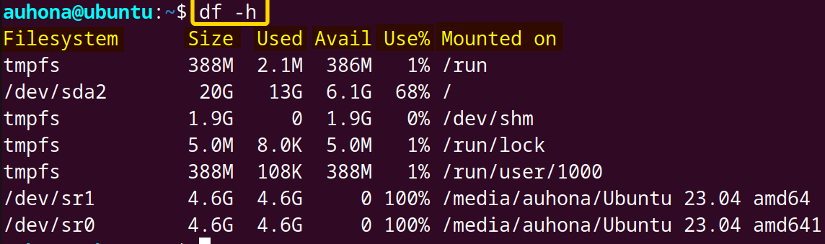 Here, you can check the files that are occupying your disk space including their size, used space, and available space. The information also includes the ‘Mounted on’ column which indicates the mount point or directory where the system file is attached in the file system hierarchy.
If your system’s disk space is full, then free up some space according to your needs.You can use the following commands to clean up some unnecessary occupied spaces.
sudo apt-get autoremove
sudo apt-get autocleanReason 05: Package Cache Issue
If the ‘apt cache’ becomes corrupted, the error can occur while running the ‘apt-get update’ operation.
Solution: Clean Cache
To clean the cache run the following command.
sudo apt clean- sudo: Provides root privilege to the user.
- apt: It’s the package manager of Ubuntu which manages the installation, and updating of packages.
- clean: This subcommand of ‘apt’. This subcommand tells ‘apt’ to clean its local package cache.
 Run the ‘sudo apt-get update’ command to update to update packages.
 The update command would work like this after fixing the error.
Reason 06: Syntax Error
Sometimes due to any typographical errors in ‘/etc/apt/sources.list’ or repository files, this error can occur.
Solution: Resolve Syntax Error
To resolve the situation, you can check the erroneous repository name (mentioned in the error text) in the ‘/etc/apt/sources.list’ and make the error right by editing the repository name. You can check the file by opening it using the following command.
sudo nano /etc/apt/sources.listReason 07: EOL (End of Life) of a Release
If you are using Ubuntu of an older release or older version, then it might have touched its end of life. So When you try to update your packages, your older release doesn’t support the newer versions which causes the ‘Failed to fetch’ error.
Solution: Upgrade to the Latest Version
If your system’s release version is way older compared to the latest releases, then it’s high time to upgrade your system to the latest version. To achieve that you can follow the steps below.
Steps to Follow >
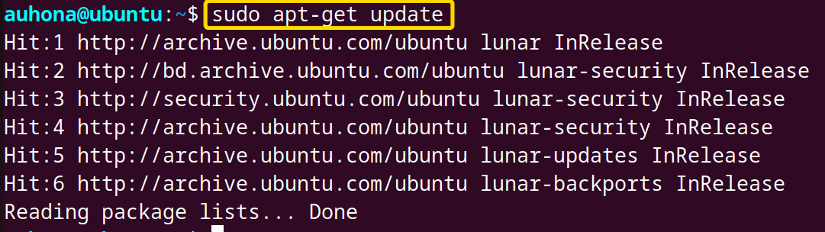
➊ Open the terminal and retrieve the updated package list using the following command.
sudo apt-get update- sudo: Gives access like a root user.
- apt-get: Package manager to handle the packages in Ubuntu.
- update: Retrieves the latest versions of the packages.
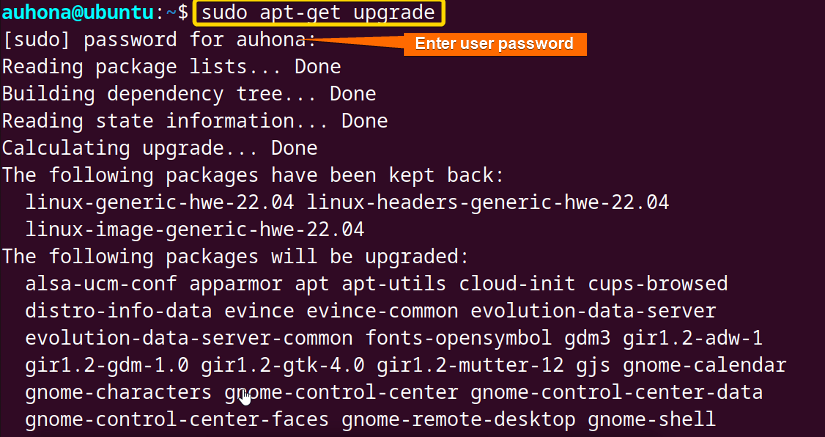
 ➋ Now upgrade your system using the command
sudo apt-get upgrade- upgrade: This subcommand tells ‘apt-get’ to upgrade the installed packages of the system.
 ➌ After that, install the update manager.
sudo apt-get install update-manager-core- install: This subcommand tells ‘apt-get’ to install a package.
- update-manager-core: This is the name of the package manager that the ‘apt-get’ would install.
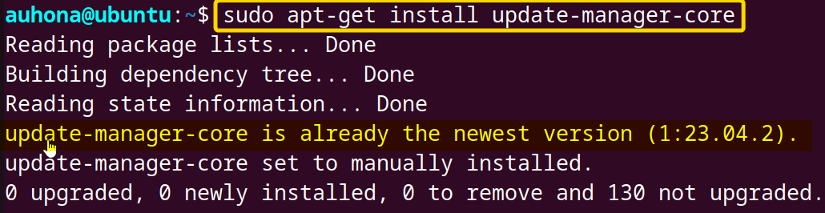 As my system owns the updated already, it’s showing that ‘update-core-manager’ is already a newer version.
➍ Reboot your system and then download and upgrade your distro using the following command
sudo do-release-upgrade- sudo: Need to have the root privilege.
- do-release-upgrade: This is the actual command that performs the release upgrade process.
 After upgrading your system to the newer version, the system will be upgraded, and ‘sudo apt-get update’ will perform accordingly.
Conclusion
To summarize, as it’s a fundamental and crucial task to update your system regularly for a compatible work environment, any problem while performing the update may impact a lot for Linux users. The ‘sudo apt update failed to fetch’ errors also affect the workflow of the users significantly. I think this guide has made the users’ hassle a bit easier to fix the error as illustrated above.
People Also Ask
Related Articles
- A Complete Overview of sudo apt update Command in Linux
- An Ultimate Guide of “sudo apt-get update” Command in Linux
- [Fixed] sudo apt update Not Working Error in Ubuntu
- [Fixed] sudo apt-get update Not Working in Ubuntu
- How to Update RPM Packages in RHEL? [6 Methods]
- How to Check Updates Using YUM on RHEL? [5 Practical Cases]
- How to Update All Packages in RHEL Using YUM? [3 Cases]
- How to Update a Specific Package in RHEL Using YUM? [2 Cases]
<< Go Back to Update Packages in Linux | Package Management in Linux | Learn Linux Basics
FUNDAMENTALS A Complete Guide for Beginners


