The Universe Repository is a perfect archetype of Ubuntu serving as a cornerstone of accessibility. It is a warehouse including a wide range of third-party software packages, libraries, and tools that are open source, and maintained on a community basis. The users realize the potential of the universe repository in Ubuntu when access to the software beyond the ones available in the main repository becomes quintessential.
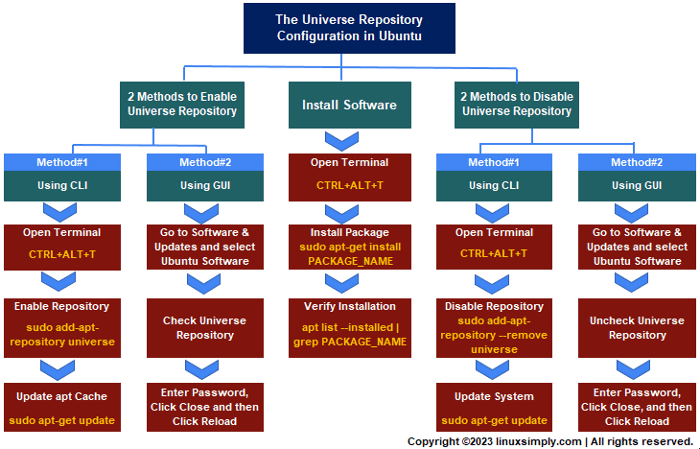
Process Flow Chart to Enable, Disable Repositories and Install Software
 [Distro Used Throughout the Tutorial: Ubuntu 22.04]
What is Universe Repository in Ubuntu?
The universe repository in Ubuntu is a community-maintained standard repository. Maintaining strictly by the community, it provides the users with free and open-source software. By default, the universe repository comes enabled in the latest versions of Ubuntu.
The APT Universe Repository Configuration in Ubuntu
Located at the heart of the Ubuntu ecosystem, the Universe repository demands to be learned thoroughly by Linux practitioners. Therefore, as an advocate, I will now provide an in-depth analysis of configuring the Universe repository by illustrating how to enable and disable the Universe repository and also display the installation processes of software within the Universe repository.
A. Enable the Universe Repository in Ubuntu
To work with the Universe repository, you must enable it as the foremost step. So, in the next section, I will mention two methods (using CLI and GUI) for this purpose.
Method 01: Using CLI to Enable the Universe Repository in Ubuntu
The CLI (Command Line Interface) lets you enable the Universe repository in very straightforward steps.
Steps to Follow >
➊ First, get access to your Ubuntu Terminal. [ Use shortcut: CTRL+ALT+T ]
➋ Secondly, type the following command and hit the ENTER button.
sudo add-apt-repository universe- sudo: For executing the command with superuser privilege.
- add-apt-repository: The utility command for repository management.
- universe: Telling the command to add the universe repository.
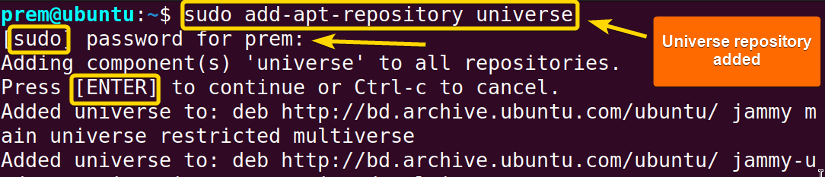 In the above image, you see that I am adding the universe repository to my system which also enables it at the same time.
➌ Now, run the below command.
sudo apt-get update- sudo: Granting superuser privilege.
- apt-get: The command for repository addition/deletion/updation.
- update: Denoting apt–get to update the package index.
 For instance, the aforestated snap exemplifies that I have updated the system with the latest package information.
Now, you can further verify the installation and enabling of the Universe repository by utilizing a simple command mentioned below.
apt-cache search universe- apt-cache: Interact with package cache.
- search: Argument used for searching specified package information.
- universe: Query for fetching package list relating to the universe repository.
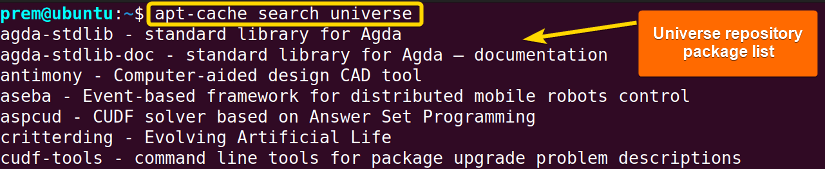 So, in this screenshot, you spot that I have listed all the available software packages from the universe repository. And the smooth running of the command signifies that I have installed and enabled the apt universe repository successfully.
Method 02: Using GUI to Enable the Universe Repository
You can also make use of the Graphical User Interface (GUI) for enabling the Universe repository.
Steps to Follow >
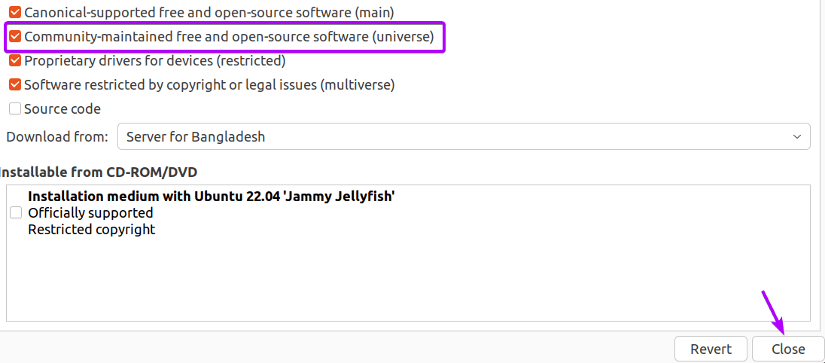
➊ Go to Software & Updates. ➋ Now, redirect to Ubuntu Software.
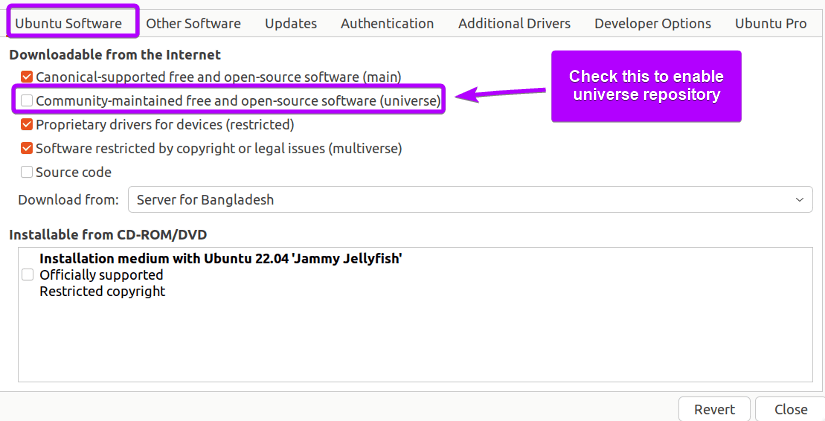 ➌ At this point, enter the user password for authentication.
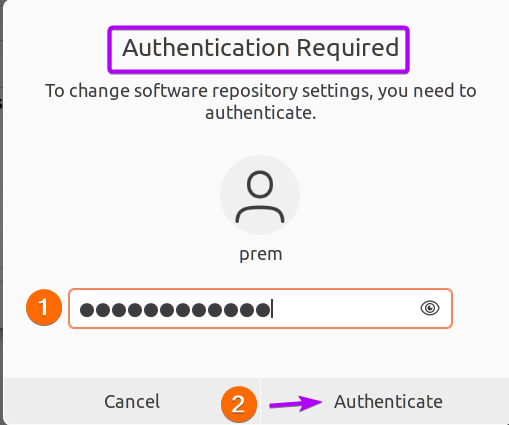 ➍ Now, click on the Close button.
➎ Finally, click on Reload for updating the system cache.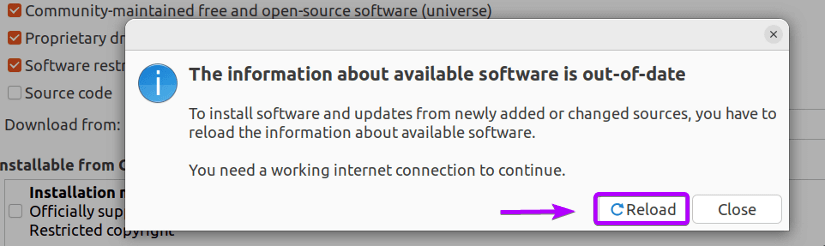 Hence, this will smoothly add and enable the universe repository to the system.
B. Install Software Packages From the Universe Repository in Ubuntu
Previously, I have referred that the Universe repository works as the storage of a vast amount of free and third-party software packages that are community maintained. Also, I have taught you to enlist the available packages from the Universe repository. Now, in this part, I will show you the illustration of the installation of packages.
Steps to Follow >
➊ At first, navigate to the Terminal.
➋ Now, type the following command.
sudo apt-get install antimony- sudo: Grants root privileges.
- apt-get: The command line tool for managing repositories.
- install: Specifies the installation of a software package.
- antimony: The software to be installed.
 Here, in the above image, I have installed software namely antimony from the universe repository.
➌ After that, type the below command and press ENTER.
apt list --installed | grep antimony- apt: The package management tool.
- list: The command entity used to list available packages.
- –installed: Specifies to enlist only the installed package from the universe repository.
- | (Pipe): The pipe symbol sends the first command output to the second command.
- grep: Searches for a pattern.
- antimony: Name of the package.
 Thus, the aforementioned snapshot is a testament to my successful installation of software using the universe repository.
C. Disable the Universe Repository in Ubuntu
After successfully using the Universe repository, you may want to remove it. Well, this, you can do by following some easy steps. However, the latest versions of Ubuntu such as Ubuntu 22.04 do not entirely remove the repository. It only disables the repository from the system. Here, in this scope, I have mentioned two methods for undoing the enabling of the Universe repository.
Method 01: Using CLI to Disable the Universe Repository
The active nature of the Universe repository can be attenuated and that too using a single-line super simple command.
Steps to Follow >
➊ First, open the system terminal by pressing CTRL+ALT+T.
➋ Secondly, type the following command on your prompt.
sudo add-apt-repository --remove universe- sudo: For getting superuser attribute.
- add-apt-repository: The standard apt command for adding/removing
- –remove: Specifies the command to remove a repository.
- universe: Denotes the universe repository to remove.
 In the above image, you see the removal process of the universe repository which exactly disables it for the user to handle package management.
Method 02: Using GUI to Disable the Universe Repository
Likewise, you can achieve the disabling of the Universe repository via GUI. This visual depiction of Ubuntu lets you do it through the most easy procedures.
Steps to Follow >
➊ Go to Software & Updates and select Ubuntu Software.
➋ Now, uncheck the universe repository. ➌ After that, enter the user password for authentication, and click Close.
➍ On an end note, click the Reload button for system updation.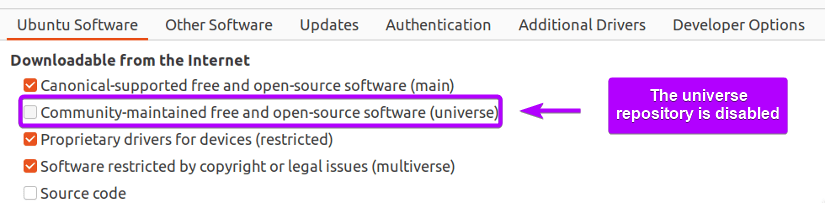 So, in the image, it’s apparent that I have disabled the universe repository with ease.
Comparative Analysis of Methods
The below table provides you with an essence of the methods that I have discussed regarding the Universe repository enabling and disabling. (Using CLI) (Using GUI) (Using CLI) (Using GUI)
Tasks
Methods
Pros
Cons
Enable Universe Repository
Method 1
Method 2
Disable Universe Repository
Method 1
Method 2
Easy for beginners.
The aforementioned methods require the user level for selection. For instance, the professional user will adopt the CLI-based methods whereas the beginner will feel comfortable using the GUI-centric configuration methods. So, it depends on personal choice.
Conclusion
In this feature, I have attempted to discuss the Universe repository in Ubuntu. In addition, I have attached numerous hands-on examples for you to get a solid grasp on the topic. I strongly believe that you will be able to tweak the universe repository for your necessary fulfillment of the software package handling and make a mark for being an advanced Linux user.
People Also Ask
What does the universe repository do in Ubuntu?
The universe repository in Ubuntu offers community-maintained packages that are not officially supported. It offers a diverse selection of software contributed by the Ubuntu community. It is one of the 4 basic repositories in Ubuntu: Universe, Multiverse, Main, and Restricted.
Is the Ubuntu Universe repository safe?
Like the others, the Universe repository is secure. This is because anything in the Ubuntu repository goes through scrutiny and then gets approval from the Ubuntu devs.
How to delete the universe repository in Ubuntu?
You can remove any unnecessary universe repository by typing and running the command sudo apt-add-repository -r universe. But remember to run the<strong> sudo apt update</strong> command for the repository index updation. Also, prefix the commands with sudo to earn sudo/root user privilege.
How to list all the system repositories in Linux?
To list all the system repositories in Ubuntu, open the terminal and run the command apt-add-repository –list. It will return a list of available repositories of your Ubuntu system on the terminal.
Is the Universe Repository useful?
Yes. The universe repository is useful since it comes with unofficial software packages that are not made available by the Ubuntu team. In Linux distros, the apt package management tool provides users with the usefulness of handling software repositories. However, all the necessary packages are not always present in the official repositories and here the universe repository becomes handy.
Related Articles
- How to Remove APT Repositories in Linux[2 Easy Methods]
- The Repository Mirror in Ubuntu [An Extensive Overview]
- How to Add Repository in Ubuntu? [2 Simple Methods]
- How to Update Repository List in Ubuntu[3 Cases]
- [Solved] add-apt-repository Command Not Found Error in Ubuntu
- How to add an APT Repository Proxy in Ubuntu [Easiest Guide]
<< Go Back to Repository Configuration in Linux | Package Management in Linux | Learn Linux Basics
FUNDAMENTALS A Complete Guide for Beginners


Terrific instructions. Congrats man!