Elevating software experience through optimized download speeds and swift access to key packages is crucial in the software package handling universe. The Repository Mirror, in this regard, is an effective strategy to ensure a robust software distribution ecosystem for Linux practitioners. Therefore, in this article, I will discuss the quintessential aspects revolving around the repository mirror in Ubuntu.
What is a Mirror Repository in Ubuntu?
Referred to as simply a mirror or an Ubuntu mirror, the Ubuntu Repository Mirror is a server or collection of servers that is a duplicate of the official software repositories. The numerous servers are placed carefully around the globe by keeping their necessary entities in sync with the official ones. It ensures the users faster downloads and configuration of software packages with efficacious utilization of time and effort.
The Necessity of the Mirror Repository in Ubuntu
There are several necessities behind the use of the mirror in Ubuntu to achieve the seamless configuration of repositories which are as follows:
- Geographical Spread: The mirror repositories provide quicker access to the software packages through the distribution of copied servers across geographical locations. This allows the system users to manage packages via servers located physically closer to them.
- Balance of Loads: The apt package manager usually handles the management of software by connecting to the official repositories. However, the central servers may face a heavy load of traffic. The mirror repository is useful in such situations because of its capability to stem the heavy strain on the mains and reinforce the Ubuntu system’s being readily accessible.
- Reliability and Redundancy: Users can make use of the same software by switching to another mirror, in case, the currently used one is seized with issues. As a result, this redundancy elevates the dependability of the Ubuntu package delivery system.
- Enhanced Customization: On local scope, the mirror operators might tailor the mirrors further to meet the needs of their preferred users. One good exemplification may be the access to older versions of software packages suffering from unavailability in the official repositories.
- Reduced Bandwidth Cost: Due to the mirror repositories, Ubuntu users are spread around the world via numerous networks rather than relying on the primary servers. In consequence, this leverages the truncation of the bandwidth expenses.
View the Available Repository Mirrors in Ubuntu
You can get informed of the available mirrors for your system by using the combination of the CLI (Command Line Interface) and GUI (Graphical User Interface). Here’s a step-by-step guide:
- First, turn on your Ubuntu terminal. [Shortcut: CTRL+ALT+T ]
- Type the below command and hit the ENTER button:
software-properties-gtkEXPLANATION- software-properties: Refers to the software properties management tool on Ubuntu.
- gtk: Flag opening the Sofware & Updates application with a graphical interface.
 In the above snap, you are noticing the Ubuntu Software window. And, in the Download from section, you can explore the available mirrors for your interest.
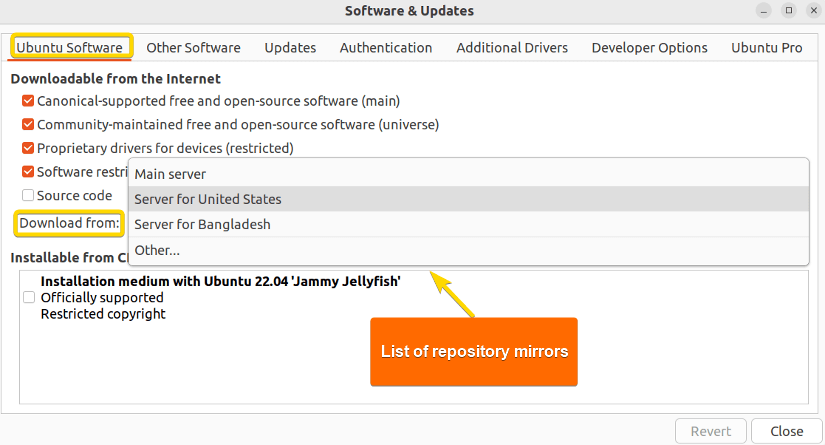 In the above snap, you are noticing the Ubuntu Software window. And, in the Download from section, you can explore the available mirrors for your interest.
Get the Current Repository Mirror in Ubuntu
You already learned how you can access the available list of mirror servers for your system. In addition, you can get the current mirror already working for you to download packages. So, to fetch the current repository mirror, access the sources.list file. To do so run the command below:
nano /etc/apt/sources.list- nano: opens the file in the nano text editor.
- /etc/apt/sources.list: the source file to be modified for configuration.
 In this image, you can discern that my system’s Ubuntu mirror is defined within my country Bangladesh using the country code bd.
2 Methods to Change the Repository Mirror in Ubuntu
You can use a different Ubuntu repository mirror in case you find out that the current one is too slow. On a usual note, if your location is significantly far from the download source, this modification is required. Thus, for a successful alteration, follow my steps a bit further to get acquainted with some useful practices.
In this feature, I will display two methods (Using CLI and GUI) to change the repository mirror to another source. These you can use to find a better mirror repository than the present one based on the network latency.
Method 01: Using the Command Line
You can make use of simple commands in the command line to shift to a faster repository mirror for a trouble-free computing experience in terms of software package management. Here’s how:
- Open the terminal and run the command mentioned below:
nano /etc/apt/sources.listEXPLANATION- nano: Opens the file in the Nano text editor.
- /etc/apt/sources.list: The apt repository configuration file.
 Here, in the screenshot, you can see that my system currently is defined within the official Ubuntu archive mirror. Now, I will change it to a new mirror hosted by Tsinghua University, China.
 - Then, copy the HTTP URL of the mirror you intend to use.
- At this point, replace all the old mirror URLs with the newly copied URL.

- Now, press CTRL+S to save and CTRL+X afterward to exit the source file.
- After that, type the below command and hit ENTER to update the system cache:
sudo apt updateEXPLANATION
- Finally, run the following command for verification:
add-apt-repository --listEXPLANATION- add-apt-repository: Adds/deletes a repository.
- –list: Enlists all the available system repositories.
 Here, in the above image, you see that the new mirror repository is working without any issues.
 Here, in the screenshot, you can see that my system currently is defined within the official Ubuntu archive mirror. Now, I will change it to a new mirror hosted by Tsinghua University, China.

 Here, in the above image, you see that the new mirror repository is working without any issues.
Method 02: Change Repository Mirror from Software & Updates
Likewise, you may use the Software & Updates application to alter your current repository mirror and get access to a better one if you like the visual interface more. For instance, I will change the mirror source of my system from the Main server to the mirror namely ftp.usf.edu hosted by the University of South Florida (USF) located in Florida. For similar results, follow the guided steps below:
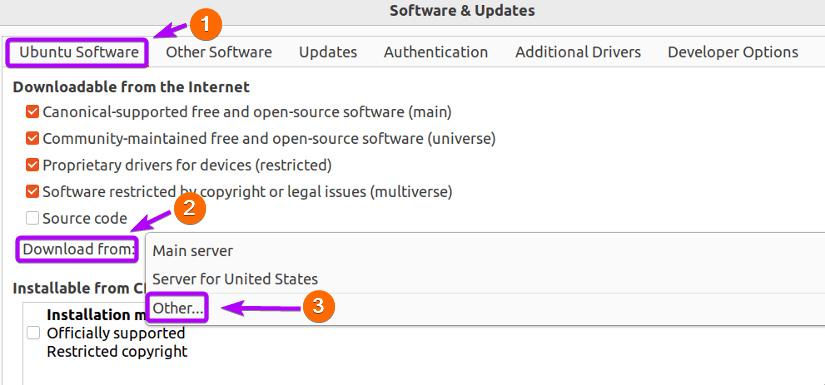
- First, go to Software & Updates.

- Secondly, select Ubuntu Software, navigate to Download from, and choose Other…
 After choosing the Other… option, you will see the available repository mirrors based on different countries in the dialogue box like the following:
 In the snap above, you can see the different repository mirrors that are available for you to replace the older one with.
 - Now, check the mirror server name you want to use from the dialogue box and click on Choose Server.

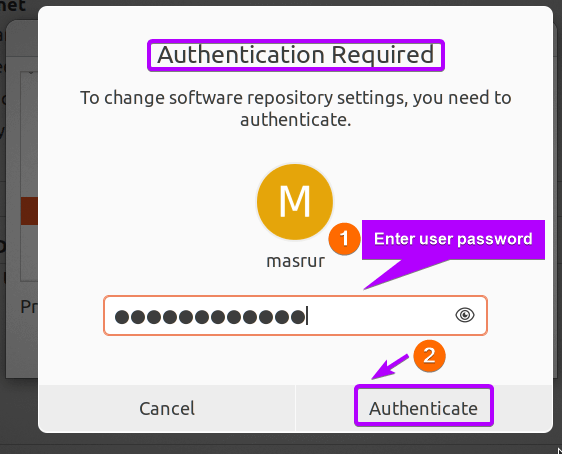
- Then, type the user password and click on Authenticate.

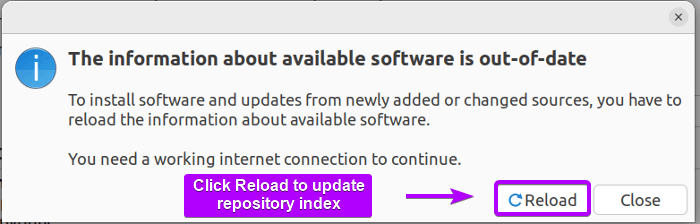
- After that, click on Close and subsequently click on Reload to update the system cache with the new mirror address.

- Finally, for verification purposes, repeat step 1 and renavigate to Download from.
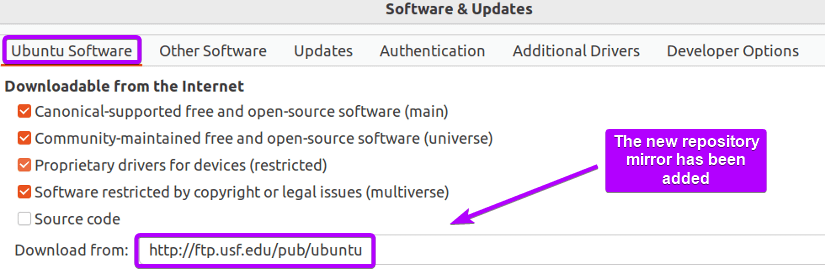
 So, from the aforestated snapshot, you notice that I have successfully changed my repository mirror from the Main Server to the one hosted by the University of South Florida (USF).

 After choosing the Other… option, you will see the available repository mirrors based on different countries in the dialogue box like the following:
 In the snap above, you can see the different repository mirrors that are available for you to replace the older one with.
 So, from the aforestated snapshot, you notice that I have successfully changed my repository mirror from the Main Server to the one hosted by the University of South Florida (USF).
2 Methods to Find the Best APT Repository Mirror in Ubuntu
Till now, you have seen what it takes to choose a mirror to serve your needs promptly. However, you can take the software computing experience to the next level by hand-picking the best possible repository mirror. It offers the optimal download rate and update status. Henceforth, I will discuss a few useful methods with hands-on tips and tricks in the subsequent section.
In this section, I will show you 2 methods (using CLI and GUI) with pragmatic instances so that you can use the best available repository mirror for software package handling in an efficacious manner.
1. Find the Best APT Repository Mirror Using the Command Line
The CLI (Command Line Interface) lets you supplant the old mirror with a new one for quick and efficacious repository configuration. You just have to use some simple commands to achieve that like the below:
- Type the below-mentioned command on the Terminal and hit the ENTER button:
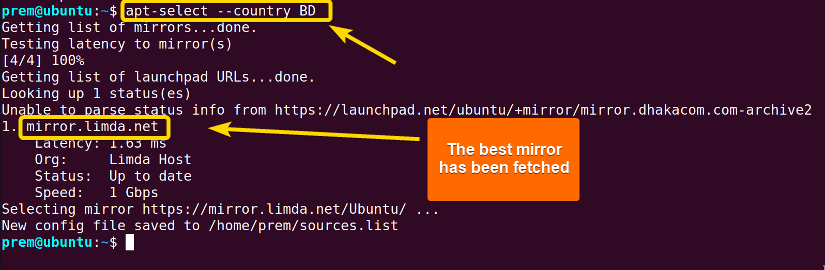
apt-select --country BDEXPLANATION- apt-select: CLI tool selecting the best Ubuntu repository mirror.
- –country: Telling apt-select to fetch mirror from a country.
- BD: The country code you want the best mirror of.
 The above-captured image shows that I have found the best repository mirror for my system namely mirror.limda.net with the URL http://mirror.limda.net/Ubuntu/.
 The above-captured image shows that I have found the best repository mirror for my system namely mirror.limda.net with the URL http://mirror.limda.net/Ubuntu/.
 2. Find the Best APT Repository Mirror Using GUI
You can employ the graphical way using the Software & Updates application to find and eventually choose the best suitable apt repository mirror for package configuration. Below are the guided steps:
- First, go to Software & Updates.
- Secondly, select Ubuntu Software, navigate to Download from, and choose Other…
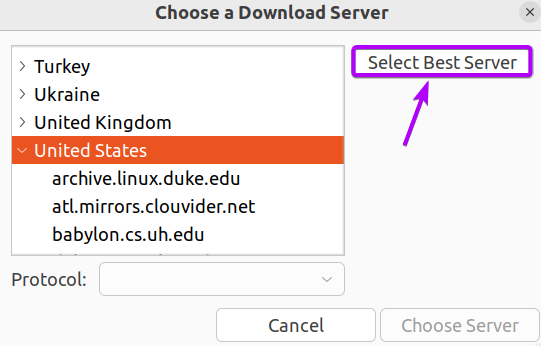
- Now, click on the Select Best Server option.
 After choosing the Select Best Server option, the system will go through some rigorous testing like the below image:
 Finally, the system will return you the best possible repository mirror based on the speed that is closest to your geographical location for the best experience.
 In the aforementioned snapshot, you spot that the best repository mirror server for me is mirror.xeonbd.com which is based in my country Bangladesh. After that just click the Choose Server option if you want to use the best-enlisted mirror.


 After choosing the Select Best Server option, the system will go through some rigorous testing like the below image:
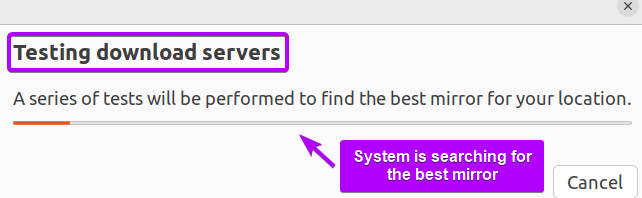 Finally, the system will return you the best possible repository mirror based on the speed that is closest to your geographical location for the best experience.
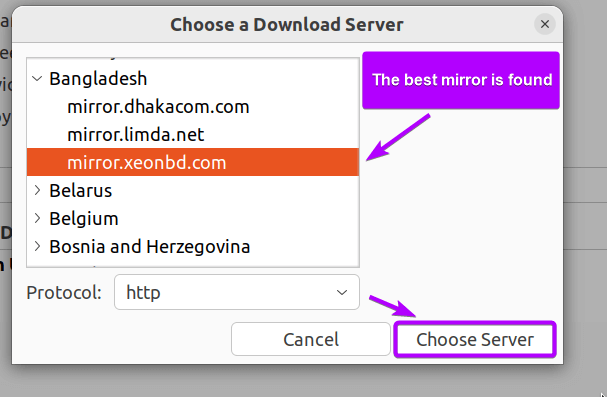 In the aforementioned snapshot, you spot that the best repository mirror server for me is mirror.xeonbd.com which is based in my country Bangladesh. After that just click the Choose Server option if you want to use the best-enlisted mirror.
1 Common Pitfall to Find the Best APT Repository Mirror
Previously, I mentioned how to find the best mirror server along with presenting you with demonstrations using the apt-select command in the command line. However, while using the apt-select command, you can run into the following scenario: Here, you notice that the system throws the Command not found error running apt-select to search for the best mirror repository since the tool is written in Python programming language.
Solution: Just follow the step-by-step guide and install the apt-select tool to the Ubuntu system:
- First, run the following command to install pip (The Python package manager):
sudo apt install python3-pipEXPLANATION- sudo: Grants superuser or administrative privileges.
- apt: Used to manage software packages in Ubuntu and Debian-based Linux.
- install: Tells apt to install a package.
- python3-pip: Flag indicating to install the python3 version of pip package manager.
 As you can see in the aforestated image, I have already installed pip. Similarly, you can do the installation. Don’t forget to enter the user password for a successful insertion.
 - Secondly, type the following command and hit the ENTER button to install apt-select using pip:
pip3 install apt-selectEXPLANATION- pip3: Used to interact with the python3 package manager pip.
- install: Indicates pip to install a package.
- apt-select: Tells pip to insert the python package apt-select to the system.
 In the above-mentioned screenshot, you see that I have already installed apt-select, and is ready to use for pertinent purposes.
Now, at the time of installation, you will receive an alert like the one below:
 So, it says that the apt-select is a script installed in, /home/prem/.local/bin, not aligned to the PATH. Next, I will shed light on solving this issue. For alike achievements, follow the subsequent steps.
 - Now, run the below-mentioned command to access the .bashrc file:
nano ~/.baschrcEXPLANATION- nano: Opens the command-line nano text editor.
- ~/: Redirects to the home directory.
- .bashrc: Refers to open the Bash shell configuration file.
You will get the file opened like the following snap:

- At this point, go to the end of the file and specify the script path by defining the PATH variable:
 In the above-captured snap, you spot that I have added the path of apt-select in the PATH environment variable.
 - After that, Press CTRL+S to save and CTRL+X to exit the configuration file.
- Now, run the following command to verify the path addition.
echo $PATHEXPLANATION- echo: Displays the value of a given variable or text on the terminal.
- $PATH: Fetches the current value of the variable named PATH.
 In the image, you can see the command outputs list of directories separated by colons (:). These directories typically are the representatives of locations where the system looks for executable files when users enter commands in the prompt. Scrutiny shows that the path for apt-select is added effortlessly.
Finally, you are good to go.
 As you can see in the aforestated image, I have already installed pip. Similarly, you can do the installation. Don’t forget to enter the user password for a successful insertion.
 In the above-mentioned screenshot, you see that I have already installed apt-select, and is ready to use for pertinent purposes.
 So, it says that the apt-select is a script installed in, /home/prem/.local/bin, not aligned to the PATH. Next, I will shed light on solving this issue. For alike achievements, follow the subsequent steps.
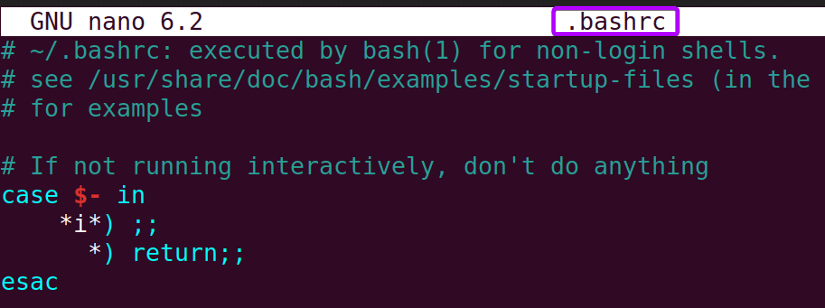
 In the above-captured snap, you spot that I have added the path of apt-select in the PATH environment variable.
 In the image, you can see the command outputs list of directories separated by colons (:). These directories typically are the representatives of locations where the system looks for executable files when users enter commands in the prompt. Scrutiny shows that the path for apt-select is added effortlessly.
Conclusion
In this feature, I have enlightened you on the Ubuntu repository mirror that has established itself as one of the vital remains of the Linux repository configuration. In addition, for a comprehensive view, I have attached some pragmatic illustrations using both the CLI and GUI. My strong belief is that you will be able to be a part of the advanced user community and make noteworthy contributions in the realm of the software dispersal system in Linux.
People Also Ask
How the repository mirrors are useful in Ubuntu?
The Ubuntu repository mirrors are handy in making copies of the official software repositories and ensuring faster downloads and updation of the packages and the Ubuntu system.
How to change the current repository mirror for my Ubuntu system?
You can easily change the current mirror of your Ubuntu system by selecting the “Ubuntu Software” tab in the “Software & Updates” and selecting the mirror from the “Download from” dropdown menu.
Are all repository mirrors in Ubuntu the same?
No, not all the Ubuntu repositories are the same and they differ by their geographic locations as well as the community of maintainers. However, all the official mirrors are synchronized with the main Ubuntu repositories.
How often Should I update my Ubuntu repository mirror settings?
You need not update the repository mirror settings in Ubuntu since it automatically checks for updates. However, if you encounter a slow download speed or any other system issues, you can still update the mirror settings on a manual basis via GUI.
Related Articles
- How to Remove APT Repositories in Linux[2 Easy Methods]
- The Universe Repository in Ubuntu [Enable, Install, Disable]
- How to Add Repository in Ubuntu? [2 Simple Methods]
- How to Update Repository List in Ubuntu[3 Cases]
- [Solved] add-apt-repository Command Not Found Error in Ubuntu
- How to add an APT Repository Proxy in Ubuntu [Easiest Guide]
<< Go Back to Repository Configuration in Linux | Package Management in Linux | Learn Linux Basics
FUNDAMENTALS A Complete Guide for Beginners


