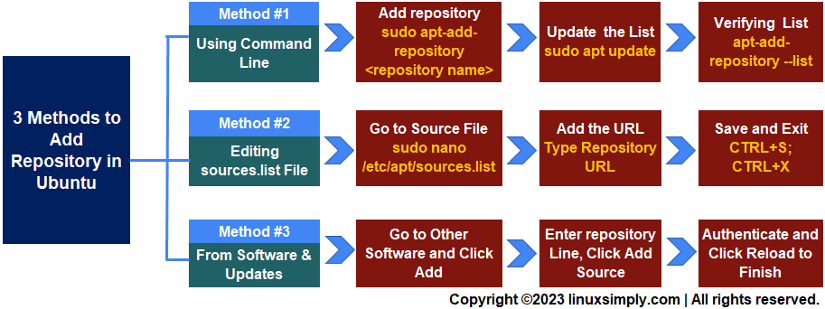
You can use the following methods to add a repository in Ubuntu:
- Using the command line: run
sudo apt-add-repository <repository_name> - Editing the sources.list file: Add the “repository URL” and save the file.
- From Software & Updates: Go to Other Software, add the “repository URL”, click Add Source, and finally click Close.
Availability and Accessibility to extensive software packages are two of the prime attributes coming with Linux distributions such as Ubuntu. On top of that, repositories are the stockpile of those software packages and the effortless availing of software starts with learning how to add a repository. This article discusses an in-depth analysis of 3 methods of how to add repository in Ubuntu. It discusses the process of adding PPA repositories to Ubuntu including mentioning the addition of APT repositories.
Process Flow Chart to Add Repository in Ubuntu
 [Distro Used Throughout the Tutorial: Ubuntu 22.04]
3 Easy Methods to Add Repository in Ubuntu
In Linux, adding repositories for availing the use of software packages is a fundamental operation that involves straightforward methods with easy-to-follow steps.
This section discusses 3 methods to add a repository in Ubuntu. It will mention the methods using the command line, and editing the sources.list file for adding repositories. Furthermore, it will shed light on adding a repository from the application Software & Updates advocating the friendly GUI-based approach.
Method 01: Using the Command Line
The CLI (Command Line Interface) lets you add a new repository with a few steps just by using the apt-add-repository command within the command line. Here’s how:
- First, open the Ubuntu terminal.
- Then, run the command mentioned below:
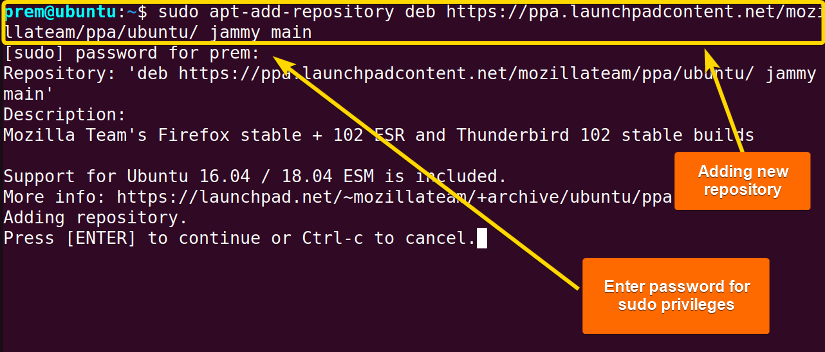
sudo apt-add-repository deb https ://ppa.launchpadcontent.net /mozillateam/ppa/ubuntu/ jammy mainEXPLANATION- sudo: Grants root privileges.
- apt-add-repository: Adds a new repository to the system.
- deb: Points out repository type in Debian-based distro such as Ubuntu.
- https ://ppa.launchpadcontent.net/mozillateam/ppa/ubuntu/: Repository web address.
- jammy: Codename for Ubuntu 22.04.
- main: Indicates that the software packages are within the main repository.
 In the above image, you see that I am adding a new repository to the system.
 - After that, run the command below to update system repository list:
sudo apt updateEXPLANATION- sudo: Grants root privileges.
- apt: The package management tool.
- update: Action updating the system repository index.
 Here, you see that I have updated my system with the latest repository information.
 - Finally, run this command to display the added repository for verification:
apt-add-repository --listEXPLANATION- apt-add-repository: Adds/deletes a repository.
- – -list: Enlists all the available system repositories.
 So, in the snapshot above, you see that I have added a new repository to the existing list without any issues.
 In the above image, you see that I am adding a new repository to the system.
 Here, you see that I have updated my system with the latest repository information.
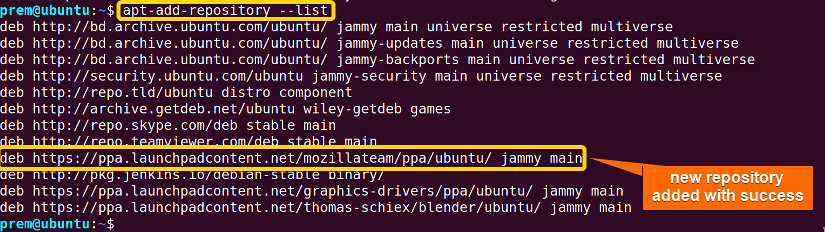 So, in the snapshot above, you see that I have added a new repository to the existing list without any issues.
Method 02: By Manually Editing the “sources.list” File
The system directory named (/etc/apt/sources.list.d/) is responsible for repository storage. So, you can insert any new repository by simply modifying the sources.list file by accessing it via text editors such as nano. Here’s a step-by-step guide on how to add a repository by editing the “sources.list” file:
- First Run the below command in the prompt:
nano /etc/apt/sources.listEXPLANATION- nano: Opens a file in the nano text editor.
- /etc/apt/sources.list: The configuration file to open for adding repository.
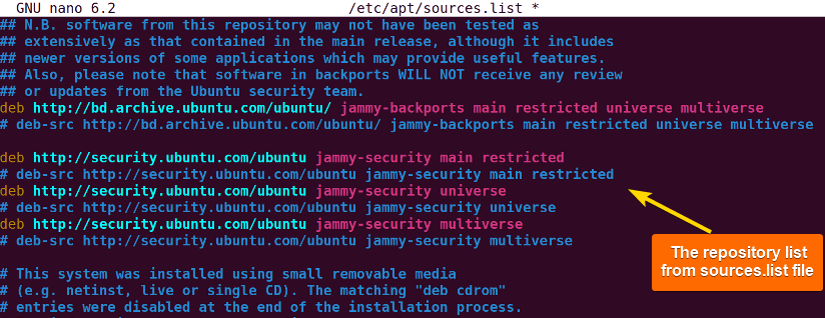
 Here, you can see the current repositories from the source file.
-
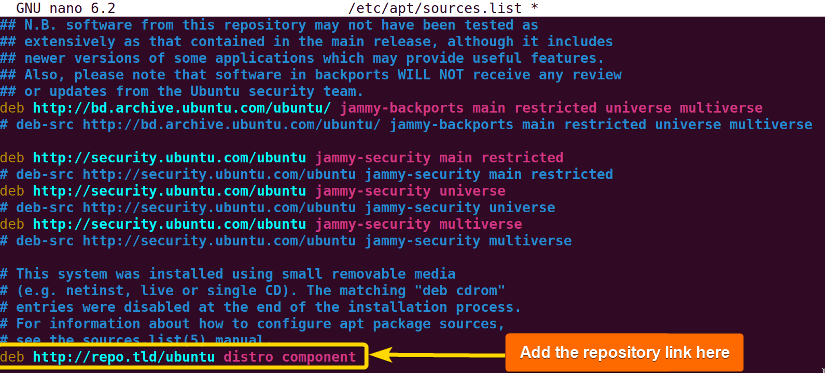
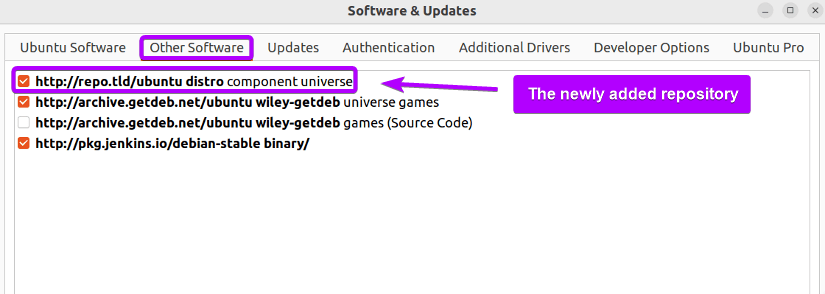
Now, type the repository address you want to add to the system:
 In the image, for example, I have added the repository named deb http://repo.tld/ubuntu distro component.
 - After that, press CTRL+S to save the file and then press CTRL+X to exit.
- Finally, after updating the system using
sudo apt update, list repositories to reflect on the changes:apt-add-repository --list In the screenshot above, you can notice that I have added a new repository with ease from the sources.list file.
 Here, you can see the current repositories from the source file.
 In the image, for example, I have added the repository named deb http://repo.tld/ubuntu distro component.
 In the screenshot above, you can notice that I have added a new repository with ease from the sources.list file.
Method 03: Add Repository from Software & Updates
You can use the GUI (Graphical User Interface) to add a new repository to the system which only requires the use of the “Software & Updates” application and it is the most beginner-friendly method to add repository providing a visual interface. Here’s how to add repository in Ubuntu via Software & Updates:
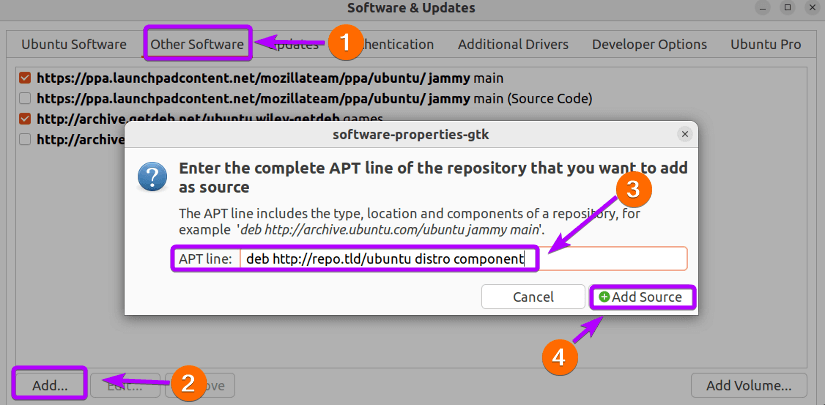
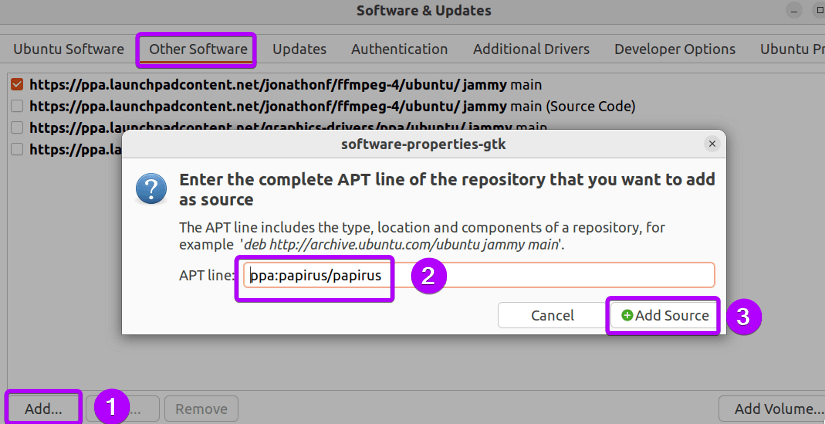
- Go to Software & Updates.

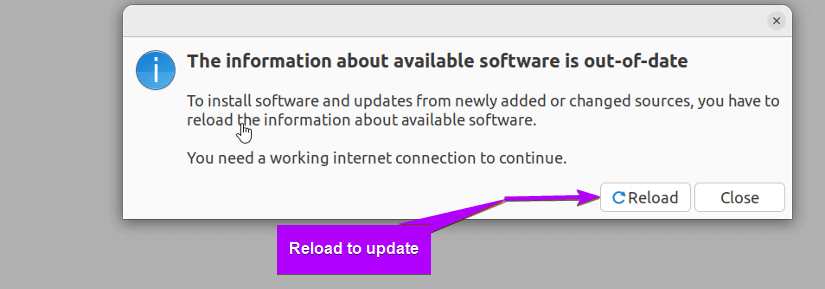
- Now, redirect to Other Software, click Add, provide the repository URL, and click Add Source.

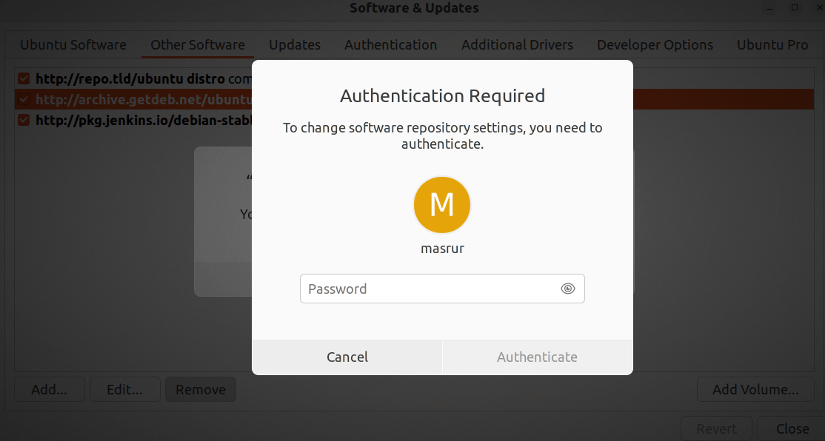
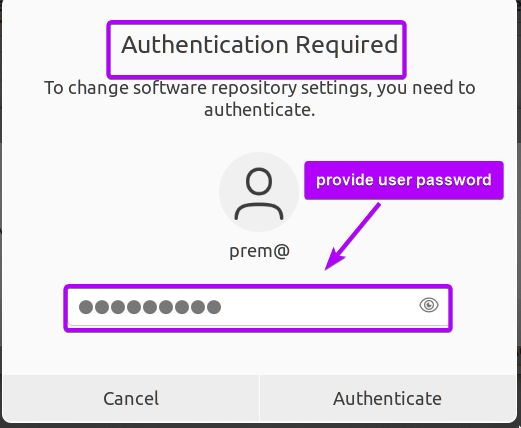
- At this point, enter the user password for authentication.

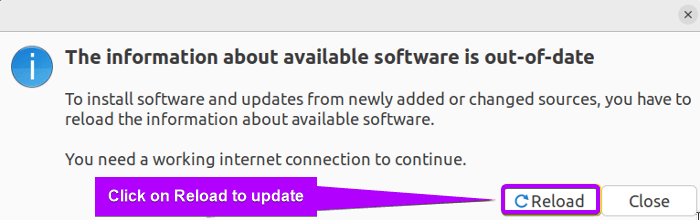
- Click on Reload to update the software cache.

- Finally, go to the Other Software tab to see the changes in the repository list.
 So, in the above image, you see I have successfully added a new repository using GUI.

 So, in the above image, you see I have successfully added a new repository using GUI.
Add PPA repository in Ubuntu
The PPA (Personal Package Archive) repository is a subset of apt repositories that supply additional software resources for Debian-based systems like Ubuntu. These are widely used software versions with packages not usually found in the official ones. It allows users to upload Ubuntu source packages to be built and published as an apt repository hosted by Launchpad.
Here’s a step-by-step guide on how to add a PPA repository using the command line:
- Run the apt-add-repository command followed by the name of the PPA repository. For example, to add Jonathan F’s PPA containing “FFmpeg version 4X”, run:
sudo apt-add-repository ppa:jonathonf/ffmpeg-4 In the above, the apt-add-repository command adds a new PPA repository jonathanf.
 - Now, after repository addition, run the following command and update the system repository index:
sudo apt update Finally, in the following, running the
 apt-add-repository --listcommand shows that the PPA repository has been successfully added.
 In the above, the apt-add-repository command adds a new PPA repository jonathanf.
 Finally, in the following, running the
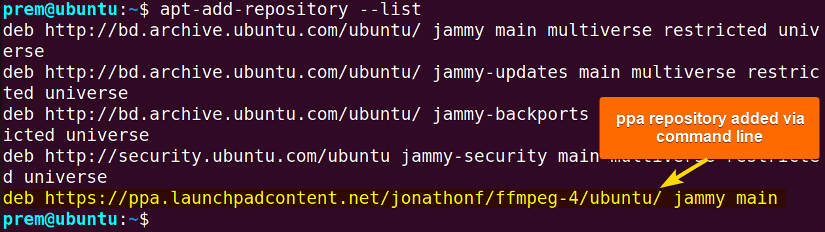
Adding a PPA Repository Using GUI
Apart from adding a repository using the terminal, the GUI lets users add a PPA repository in Ubuntu easily from the Software & Updates application. Here’s how to add a PPA repository via “Software & Updates”:
- First, Go to the Other Software option from the Software & Updates application. Then Click Add, provide the repository URL, and click Add Source.

- At this point, provide a user password for authentication.

- Finally, click the Reload button to update the system cache.

Conclusion
This article discusses 3 simple methods for how to add a repository in Ubuntu which is an active footstep in the realm of software repository configuration. It discusses adding repositories using the command line as well as using the graphical interface and by editing the sources.list configuration file. Furthermore, it mentions the addition of PPA repositories using the terminal and visual interface. I hope this article aids your learning of repository management and takes you one step further in becoming a Linux power user.
People Also Ask
How to install a software package using the PPA repository in Ubuntu?
To install a software package after adding a PPA repository in Ubuntu using the sudo add-apt-repository <ppa_repository> command, you can run the command sudo apt install <package_name> to install the intended package using the PPA repository with all the dependencies.
What is a repository in Linux?
A Linux repository is a location where the information and metadata of software packages are stored for your OS to retrieve and use. It is used to install and update the software packages that you intend to utilize for different needs.
Can I add a repository in Ubuntu without using the apt-add-repository command?
Absolutely. To add a repository in Ubuntu without using the apt-add-repository command, run the command sudo nano /etc/apt/sources.list. This opens the source configuration file sources.list. Then go to the end of the file, add the repository URL you intend to add to the system, and save the file by pressing CTRL+S. Finally, exit the file with CTRL+X and update the system repository log running sudo apt update.
How many repositories are there in Ubuntu?
There are four main repositories in Ubuntu: Main, Universe, Multiverse, and Restricted. Some other Ubuntu repositories are the partner and third-party repositories.
Where are Linux repositories located?
The Linux repositories are located at the /etc/apt/sources.list.d/ directory in the main source.list file. However, you can create a new file in the same location with a .list extension.
Should I update after adding a repository in Ubuntu?
Yes. You should update the system after adding a new repository. This is due to making the system aware of the recent changes on the repository list and fetching the latest information. To update the system after adding a repository, run the command sudo apt update in the terminal.
Related Articles
- How to Remove APT Repositories in Linux[2 Easy Methods]
- The Universe Repository in Ubuntu [Enable, Install, Disable]
- The Repository Mirror in Ubuntu [An Extensive Overview]
- How to Update Repository List in Ubuntu[3 Cases]
- [Solved] add-apt-repository Command Not Found Error in Ubuntu
- How to add an APT Repository Proxy in Ubuntu [Easiest Guide]
<< Go Back to Repository Configuration in Linux | Package Management in Linux | Learn Linux Basics
FUNDAMENTALS A Complete Guide for Beginners


