A well-functioning system in the world of Debian-based Linux distros such as Ubuntu demands effective and seamless software package management. The repository proxy can be a handy tool in ensuring network efficacy and curtailing the load on the external repository. Therefore, in this article, I will lead you through the procedures of how to add an apt repository proxy in your Ubuntu environment.
Process Flow Chart to Add APT Repository Proxy in Ubuntu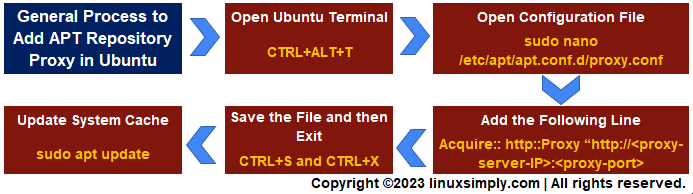 [Distro Used Throughout the Tutorial: Ubuntu 22.04]
What is an APT Repository Proxy in Ubuntu?
The APT (Advanced Package Tool) repository proxy is a server or software configuration acting as the intermediary between the user system Ubuntu and the official package repositories. The fundamental goal of an Ubuntu repository proxy is to elevate network effectiveness, reduce bandwidth usage, and accelerate package management for a smooth interaction with software.
The Benefits of the APT Repository Proxy in Ubuntu
The apt repository proxy provides Ubuntu practitioners with several advantages in terms of package handling and some of the essential ones are mentioned below:
- Bandwidth Optimization: The repository proxy handles package management through a local cache and this, in turn, reduces the external bandwidth consumption.
- Load Balancing on External Repositories: The proxy server stores the frequently accessed packages in its local storage. As a result, the package request from the user end is processed via proxy and it balances the repeated need of external repositories.
- Quick Retrieval of Packages: Since the download of packages is not done from the main remote repositories during the use of a repository proxy, the fetching of software packages becomes faster.
- Offline Access: The proxy server operates using a local cache. Hence, the downloading, installing, and updation of software packages are served even in isolated environments without rigorous efforts.
Easiest Process to Add an APT Repository Proxy Server in Ubuntu
In this feature, I will discuss how to add the repository proxy in Ubuntu to boost your package management experience. Specifically, I will cover the CLI (Command Line Interface) based method for this phenomenon that demands just a few easy steps along with executing effortless commands:
- At first, open your Ubuntu terminal. [Shortcut: CTRL+ALT+T]
- Secondly, type the following command and hit the ENTER button:
sudo nano /etc/apt/apt.conf.d/proxy.conf - Now, enter the following lines to the file to add the repository proxy:
Acquire::http::Proxy "http://<proxy server ip address>:<proxy-port>" So, in the image above, you spot that I have added a proxy server IP address and port number for configuration.
 - After that, press CTRL+S to save and CTRL+X afterward to exit the file.
- At this point, run the below-mentioned command to update the system cache:
sudo apt updateEXPLANATION- sudo: Grants root privileges.
- apt: The package management tool.
- update: Action updating the system repository index.
 Here, you see that I have run the above command to update my system repository index. Also, the proxy settings will be enabled the next time I run anything related to APT. For instance, I will install a package namely net-tools and the system will use the repository proxy server for this purpose.
 - Now, type the below command and press Enter to install net-tools from the proxy server:
sudo apt install net-toolsEXPLANATION- sudo: Grants sudo privileges.
- apt: The package management tool.
- install: The apt subcommand for package installation.
- net-tools: Name of the package to be installed.
 In the above snap, I have displayed the installation of the net-tools package. Due to the earlier configuration, the repository proxy server maintains the package handling.
 So, in the image above, you spot that I have added a proxy server IP address and port number for configuration.
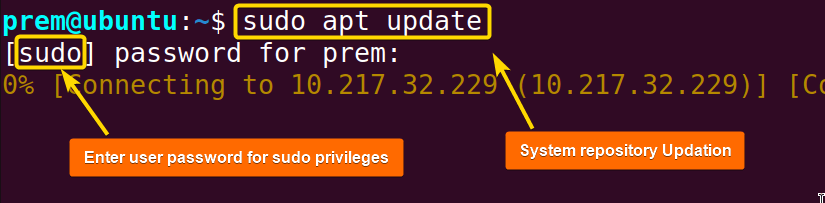 Here, you see that I have run the above command to update my system repository index. Also, the proxy settings will be enabled the next time I run anything related to APT. For instance, I will install a package namely net-tools and the system will use the repository proxy server for this purpose.
 In the above snap, I have displayed the installation of the net-tools package. Due to the earlier configuration, the repository proxy server maintains the package handling.
Configure APT Proxy to Resolve “sudo add-apt-repository” Hanging Issue in Ubuntu
The add-apt-repository is the fundamental command in terms of apt repository management. Now, sometimes it may hang during execution due to its inability to connect to the external repository server. However, this is seamlessly resolved by adding the repository proxy in your Ubuntu system. This, in consequence, solves the hanging issue of running the add-apt-repository command smoothly and serving your software package management needs. Therefore, I will now attach the necessary steps below:
- Now, run the below command in the terminal to open the APT configuration file:
sudo nano /etc/apt/apt.conf.d/proxy.conf - After that, add the following lines:
Acquire:: http::Proxy “http://<proxy server ip address>:<proxy-port>”

Acquire:: https::Proxy “http://<proxy server ip address>:<proxy-port>”
Note: Replace the proxy server IP address and proxy port with your actual proxy server address and port. In the image snapshot, you can discern I have added the proxy server IP address and port number in the configuration file.
 - Finally, press CTRL+S to save and then CTRL+X to exit.
 In the image snapshot, you can discern I have added the proxy server IP address and port number in the configuration file.
Finally, this will allow APT to work behind the proxy server and resolve the hanging issue.
Conclusion
In this article, I have walked you through the concepts of the repository proxy in Ubuntu along with mentioning practical illustrations. I hope this will be enough to get started with proxy server configuration and make you a proud member of the Linux power user community.
People Also Ask
What does the apt repository proxy do in Ubuntu?
The repository proxy serves as an intermediary server by using a local cache. It lets users manage Ubuntu software packages and handle updates to reduce the load of the external repositories. It reduces bandwidth usage and enables faster installations with enhanced package control.
Can I set up the Ubuntu repository proxy server using GUI?
Yes, you can. Go to Ubuntu’s main Settings and select the Network setting option. Then from the Network Proxy option, select Manual and enter the proxy server information such as the proxy server IP address and port number. Finally, exit the dialogue box and Ubuntu will automatically set the proxy settings.
Which proxy server software is commonly used for Ubuntu repository proxies?
The squid server is a popular choice for creating an Ubuntu repository proxy since it can efficiently cache and distribute packages from Ubuntu repositories to client systems.
Where is the apt repository list in Ubuntu?
The apt repositories in Ubuntu are primarily located in the /etc/apt/sources.list.d/ directory. This directory contains the repository configuration file sources.list.
Is the apt repository proxy useful in Ubuntu?
The apt repository proxy is useful because it enhances the package management system’s efficiency, speed, and security for Ubuntu and other Debian-based Linux distributions.
How to list the system repositories in Ubuntu?
To list the system repositories in Ubuntu, open the terminal and type the command apt-add-repository --list. Pressing the ENTER button will return a list of available software repositories for your Ubuntu system.
Related Articles
- How to Remove APT Repositories in Linux[2 Easy Methods]
- The Universe Repository in Ubuntu [Enable, Install, Disable]
- The Repository Mirror in Ubuntu [An Extensive Overview]
- How to Add Repository in Ubuntu? [2 Simple Methods]
- How to Update Repository List in Ubuntu[3 Cases]
- [Solved] add-apt-repository Command Not Found Error in Ubuntu
<< Go Back to Repository Configuration in Linux | Package Management in Linux | Learn Linux Basics
FUNDAMENTALS A Complete Guide for Beginners


Hello, in this article: https://linuxsimply.com/linux-basics/package-management/repository-configuration/add-apt-repository-proxy/, there is a wrong blank space in the bash command between “Acquire::” and “http”.
Hope it helps.
Regards
Thanks for your response. It is a thrill. And you are right. Somehow such space was added in writing the command. I have already made it correct.
Thanks again for the concern and support. This will keep me motivated to write more useful content with extra care.