VirtualBox is a popular open-source virtualization software that allows you to create and run different virtual machines in your host operating system. This flexibility makes it an ideal environment for experimenting with various operating systems, including lightweight and highly customizable distributions, like Arch Linux, known for its simplicity and minimalism.
This article demonstrates how to install Arch Linux on VirtualBox using the Command Line Interface (CLI) and Graphical User Interface (GUI).
Minimum Requirements to Install Arch Linux on VirtualBox
- Basic understanding of command line interface (CLI).
- Active internet connection (Wired preferable).
- Minimum 512 MB RAM (2 GB+ recommended).
- Minimum 2 GB free storage (20 GB+ recommended).
What is Arch Linux?
Arch Linux is a lightweight, flexible, and rolling-based open-source Linux distribution. It is known for its simplicity. Specially, it is optimized for the x86-64 architecture. Arch Linux follows a do-it-yourself (DIY) philosophy. This means a user has complete control over the system configuration such as installing app packages or components according to his/her choice. It follows a rolling release system which means it does not have any major version release and regular software update is enough to maintain an up-to-date Arch Linux system.
Features of Arch Linux
- Customizability: Tailor your system to your exact needs.
- Up-to-date Software: Access the latest packages and updates.
- Minimal Bloatware: Build a streamlined, efficient system.
- Active Community: Find support and documentation easily.
- Educational Value: Learn about Linux from the ground up.
If you want to have an ideal Arch Linux experience using the command line interface (CLI) then follow Method 01: Install Arch Linux on VirtualBox Manually. In case, you want to automate some of the tasks but still want to use the command line interface then follow Method 02: Install Arch Linux on VirtualBox Using the “archinstall” Command. If you prefer the graphical user interface (GUI) then follow Method 03: Install Arch Linux GUI Directly on VirtualBox.
Method 01: Install Arch Linux on VirtualBox Manually
To install Arch Linux on VirtualBox manually using the command line interface (CLI) follow these step-by-step processes:
Step 1: Download Arch Linux ISO Image
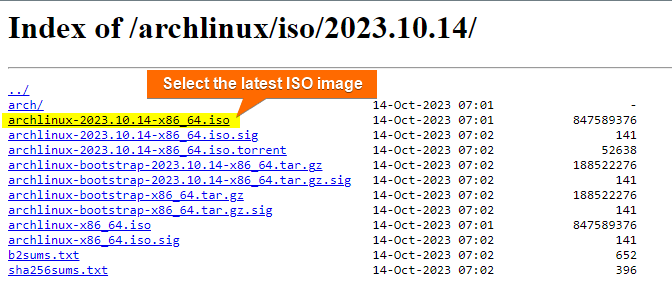
Before installing Arch Linux on VirtualBox as a VM you need to download the Arch Linux image first. To download the Arch Linux image:
- Visit the Arch Linux official website’s download page.
- Select the nearest server from your current location. Then click on the latest release’s ISO file. This will start downloading the iso file in your system.
 This ISO image file will be a foundation for installing Arch Linux on VirtualBox.
 This ISO image file will be a foundation for installing Arch Linux on VirtualBox.
Step 2: Create an Arch Linux VM
To create an Arch Linux VM, follow these steps:
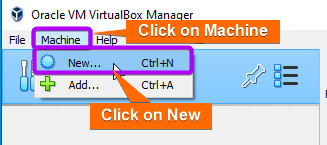
- First, open VirtualBox, and select Machine > New.

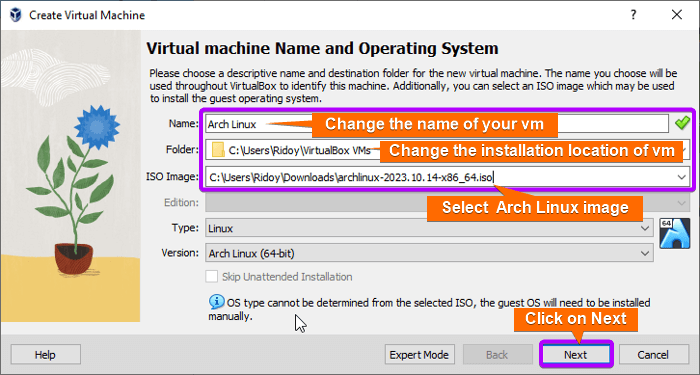
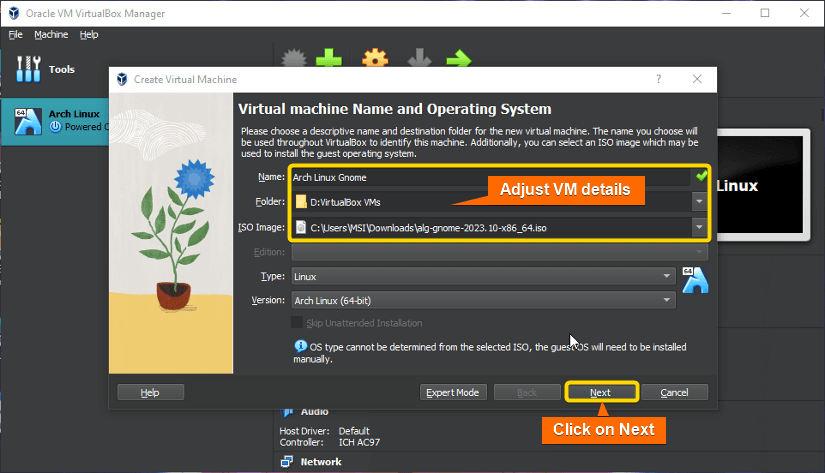
- Then, add a name for your virtual machine, set its installation location, and select Arch Linux Iso image. Click on Next.

- Now, assign base memory (RAM) and CPU cores for your VM. Select Enable EFI in the checkbox if you have a more modern processor. It will boot your OS faster. Then click on Next.
- After that, allocate storage size for the VM and click on Next.
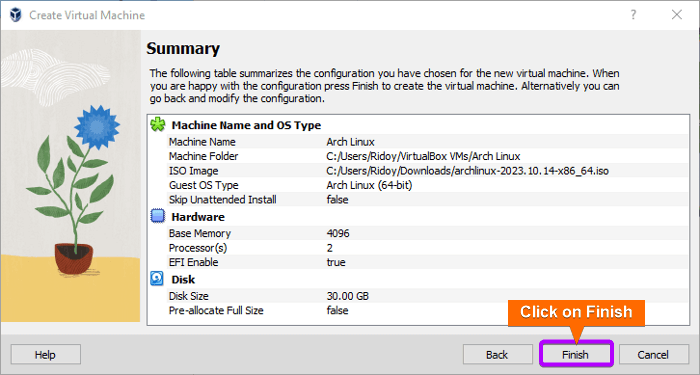
- Now, revise the Summary and if everything is as you wanted then hit “Finish”. Otherwise, go back and change those settings.
- After finishing this, you will be back to the VirtualBox Manager interface.


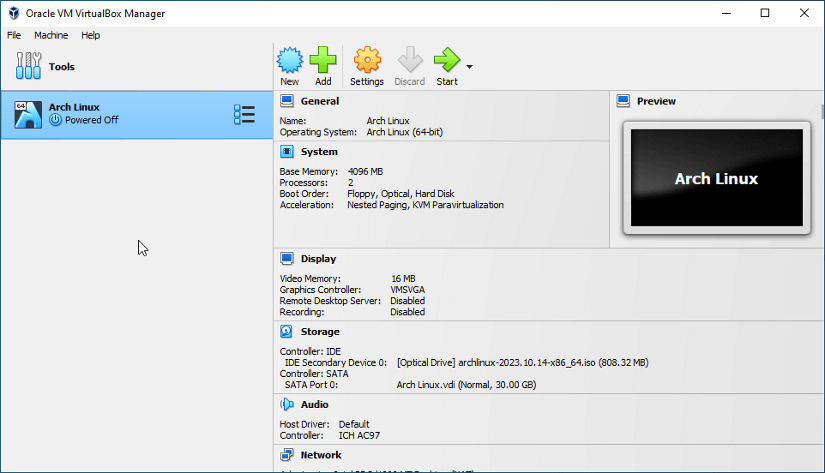
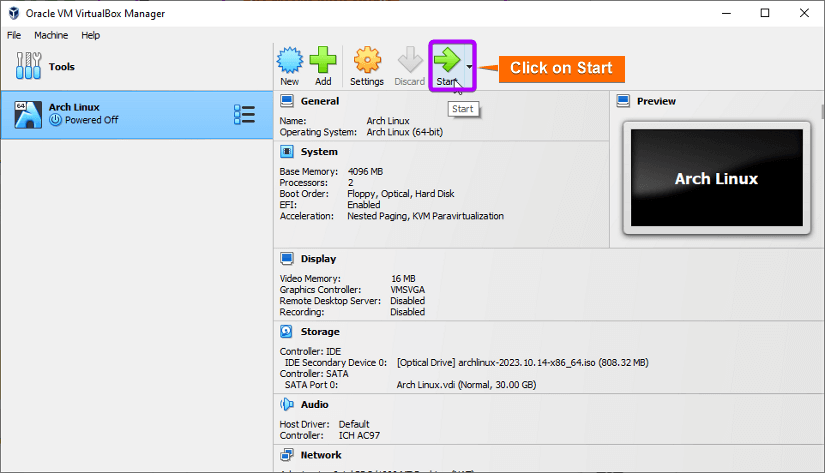
Step 3: Start Arch Linux VM
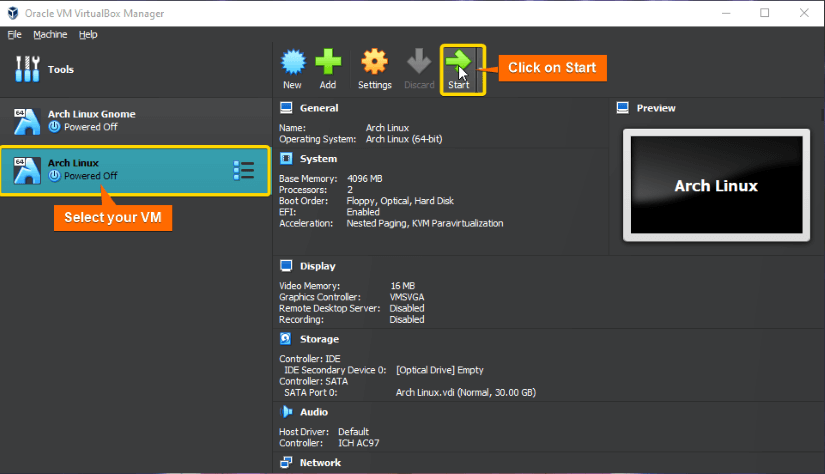
Select the newly created Arch Linux VM from the VirtualBox manager interface and click on Start. The VM will boot up and lead you to install Arch Linux on the VM.
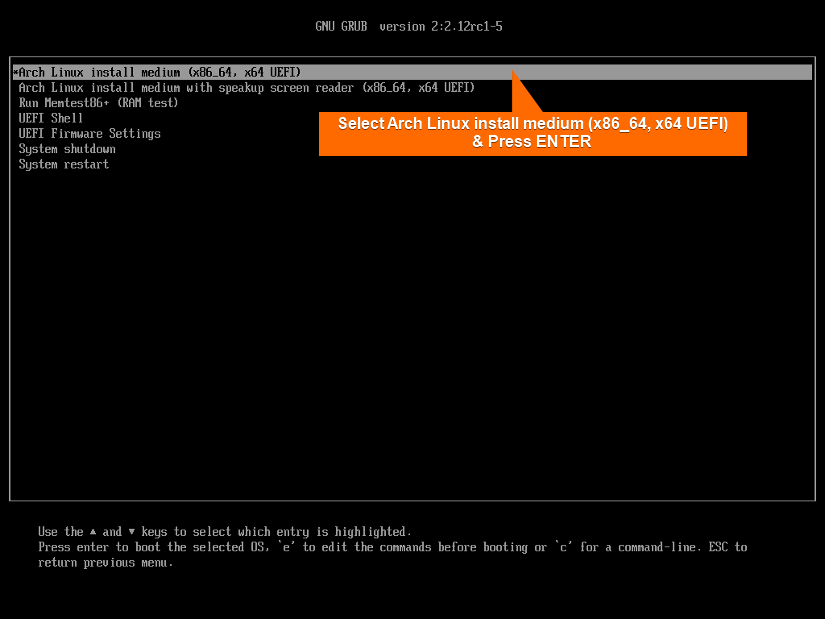
Step 4: Pre-Installation Setup
After booting up, you need to perform some pre-installation setup before installing your base system. Here’s how to complete the pre-installation setup:
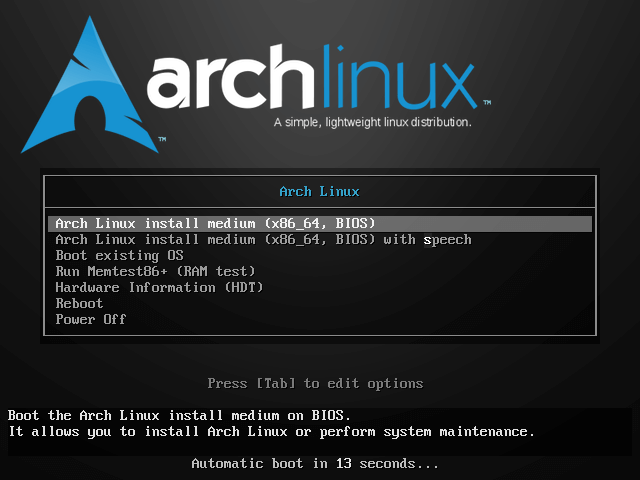
- Select “Arch Linux install Medium” using the UP arrow and Down arrow from the keyboard and press ENTER. VirtualBox will automatically detect your mouse and keyboard.
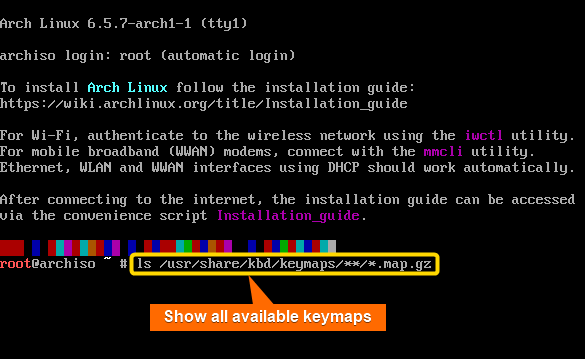
 Arch Linux tty will open now.
 In Arch Linux TTY (teletypewriter), at any stage, if you want to clear your screen, press CTRL+L or, run
clear
- Now, execute
ls /usr/share/kbd/keymaps/**/*.map.gzto view all available keymaps. To set the keymap according to your preference run
 loadkeys us.The US is the default keymap. So, if you use US keyfont you can skip this step. For better visualization, you can change your font. Run
ls /usr/share/kbd/consolefonts/to check all available fonts. Change the font by runningsetfont ter-124b. To reset your font runsetfont. - After that, check the system boot mode by running
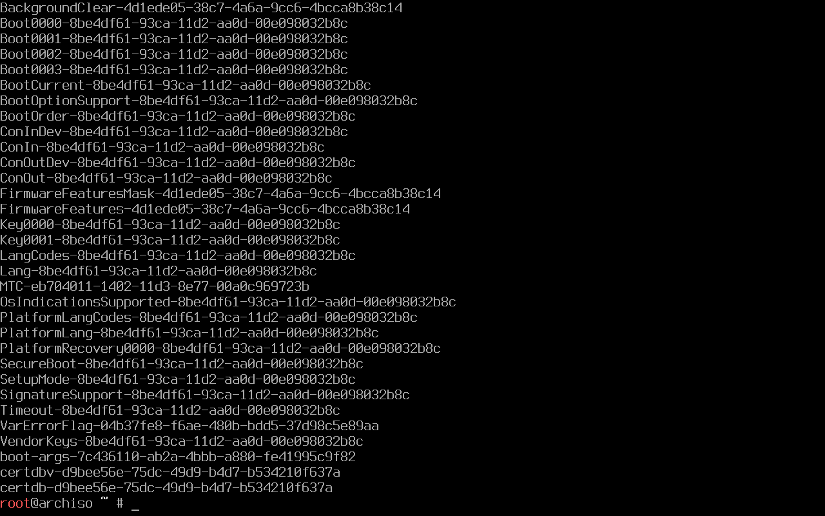
cat /sys/firmware/efi/fw_platform_size If this command returns 64 or 32 like the above image then the system will be booted in 64-bit and 32-bit UEFI respectively. Otherwise, it will be booted in BIOS mode. Or, you can also run
 ls /sys/firmware/efi/efivars/to check if the system booted in UEFI mode.
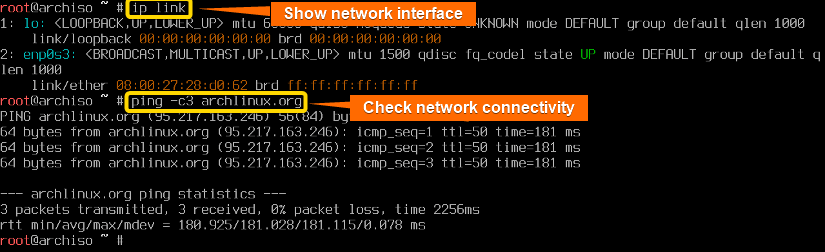
- It is essential to have an active internet connection during the Arch Linux installation. To check your network interface run
ip link. Then executeping -c3 archlinux.orgto check your internet connectivity.
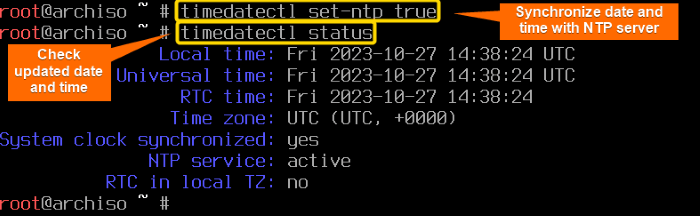
- Now, run
timedatectl set-ntp trueto enable NTP (Network Time Protocol) time synchronization and update your system clock. Runtimedatectl statusto check your time and date.
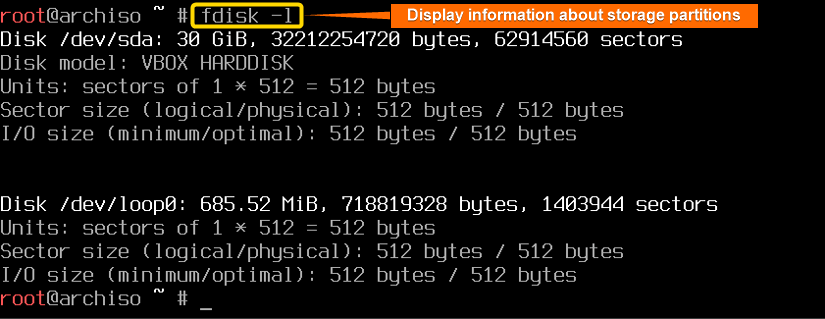
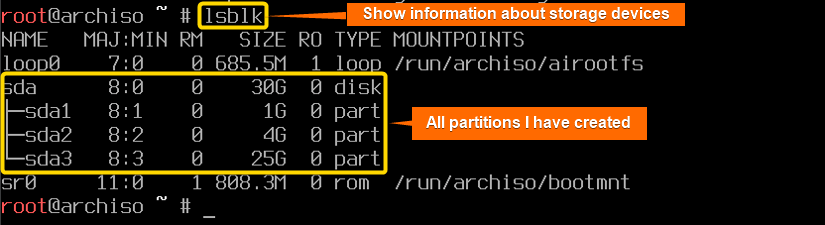
- It’s time to create partitions in your disk. First, run
fdisk -lto list information about the partitions in your storage device. Now run
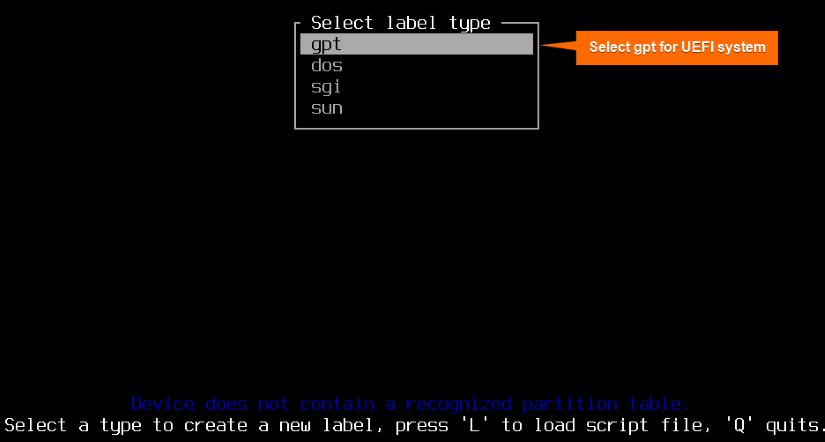
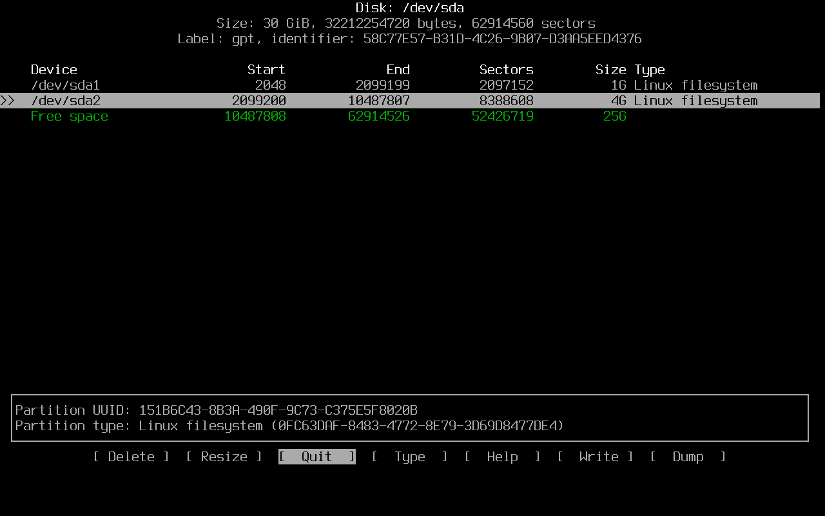
 cfdiskto view and modify disk partitions interactively. You can create, delete, or resize partitions on a storage device using this tool. Use your keyboard to navigate through this tool.
Select “gpt” (GUID Partition Table) which is a modern partitioning scheme used for UEFI-based firmware systems.

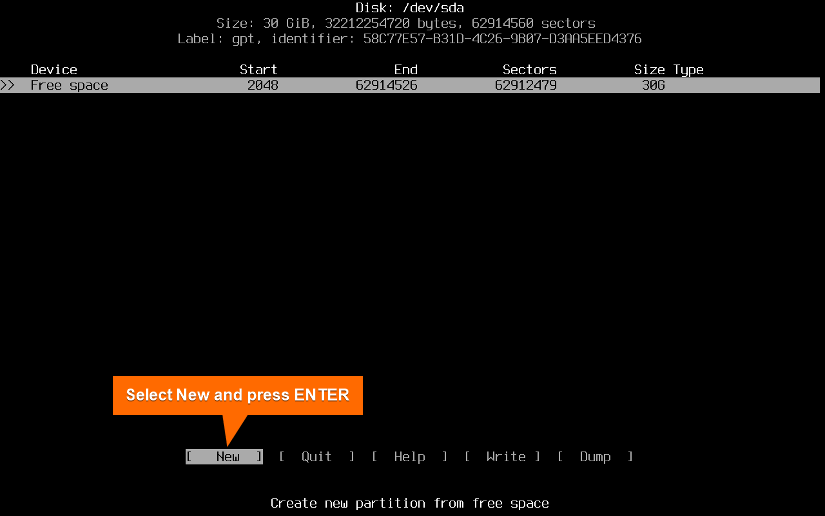
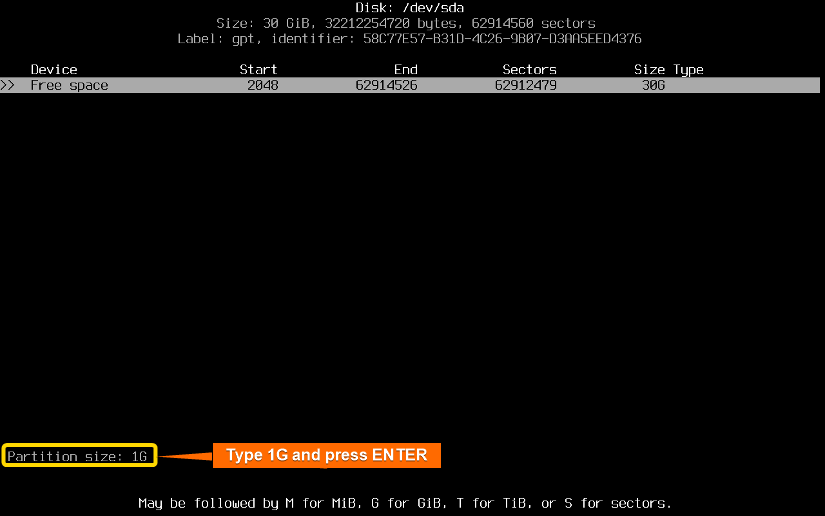
You have to create 3 partitions. To do that, select NEW and press ENTER.
First, create a partition for the boot drive of 1GB. A minimum of 100MB size is required for the boot drive. If you want to install more than 1 kernel then at least 1GB is recommended. Type 1G and press ENTER.
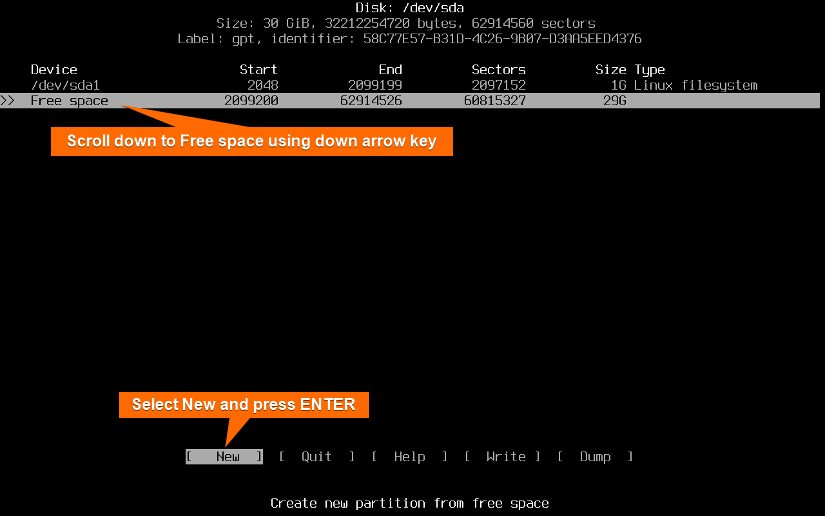
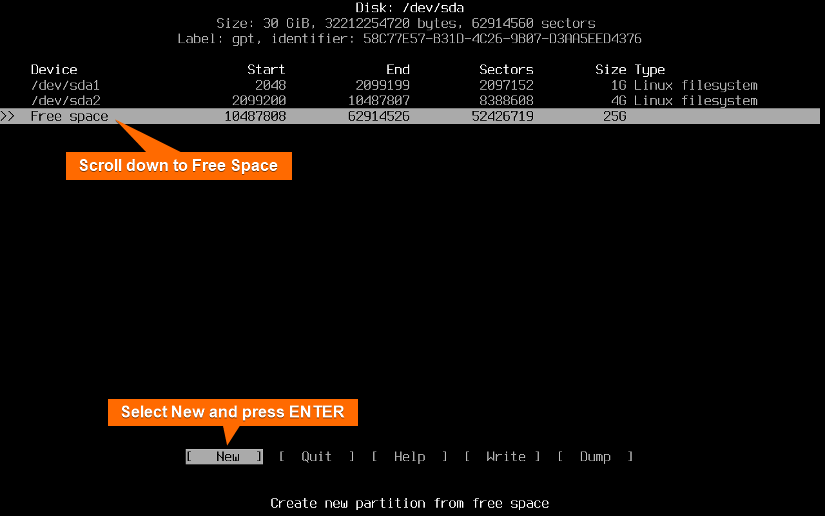
Scroll down and select Free Space again.
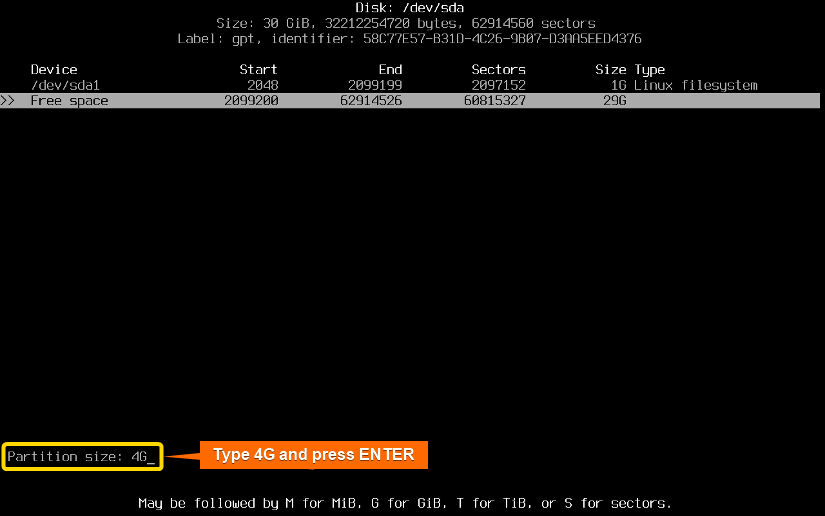
Create the SWAP partition now. It is the dedicated section of the storage device that serves as virtual memory in a Unix/Linux system. It provides additional memory space for the system when the physical RAM is fully utilized.
Type 4G and press ENTER.
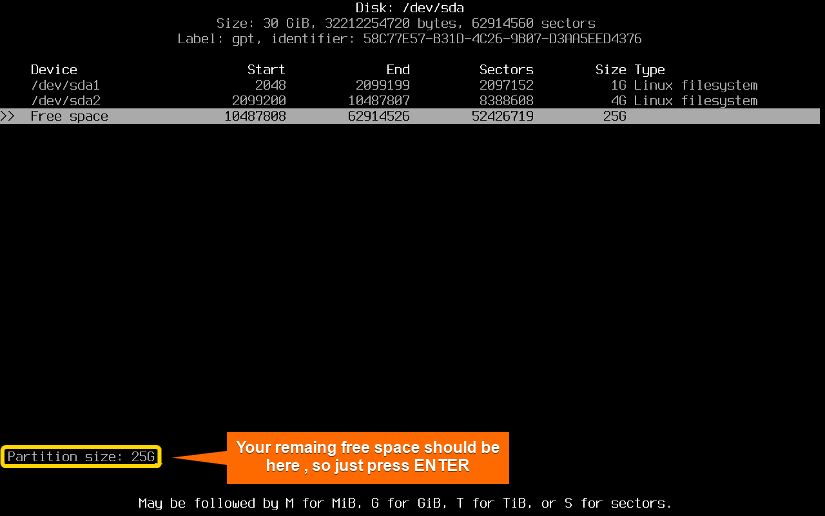
Now, scroll down and select Free Space again.
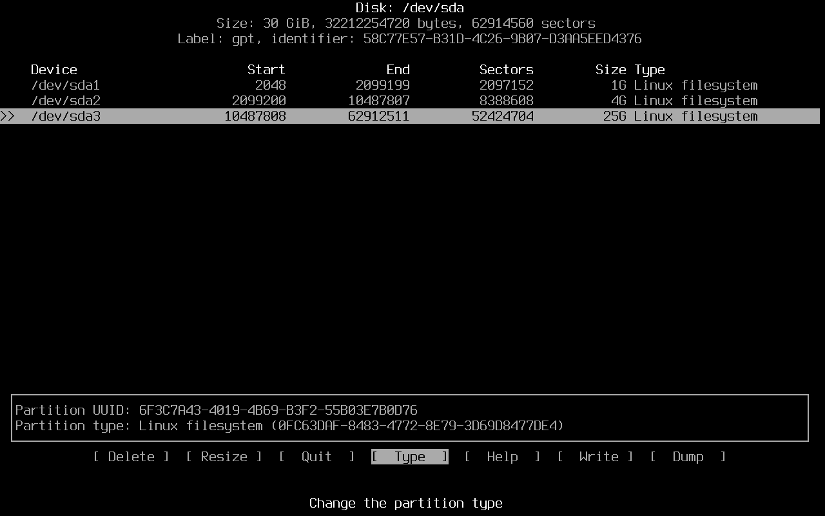
The remaining storage should be auto-selected now for the Root drive. So press ENTER.
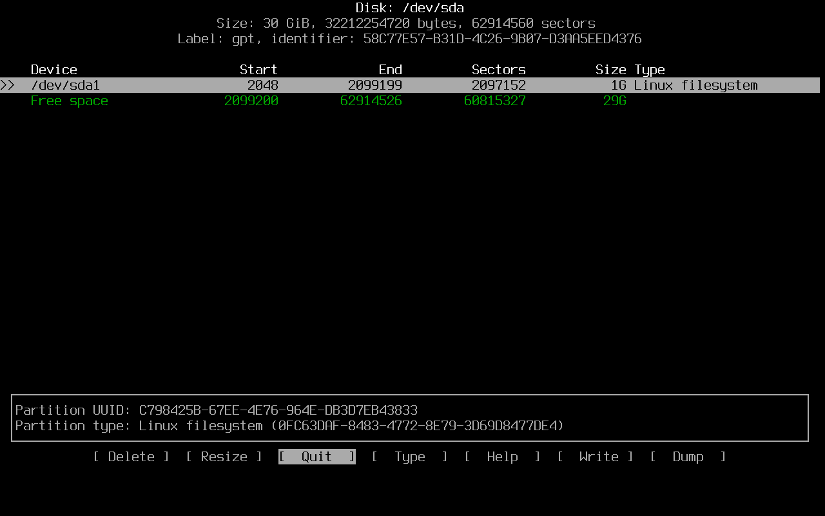
Exit from this tool by selecting Quit and pressing ENTER.
Now run
lsblkto get a structured overview of storage devices and their respective partitions.
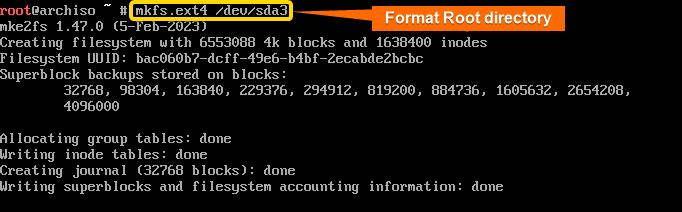
First, format the root partition in “ext4” format which is Linux’s default storage file system format. To format the root partition run
mkfs.ext4 /dev/sda3.
Then, run
mkfs.fat -F 32 /dev/sda1to format the boot partition as the FAT32 file system.
You do not need to format the swap partition; you just need to create a swap space on the specified partition. To do that, run
mkswap /dev/sda2
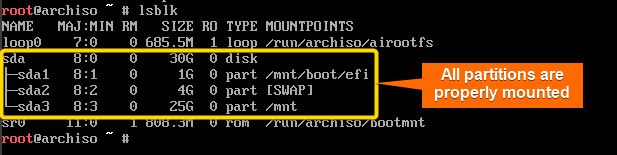
- Once you have created the partition, run the following commands to mount the partition you have created and formatted into your system:
mount /dev/sda3 /mntto mount the partition located at /dev/sda3 which is the root partition to the /mnt directory.mkdir -p /mnt/boot/eficommand to create the directory structure required for the EFI System Partition.mount /dev/sda1 /mnt/boot/efito mount the boot partition (/dev/sda1) in that directory.swapon /dev/sda2to activate the swap partition located at /dev/sda2.
Now, run
lsblkagain to check whether all partitions have mounted properly.
 Arch Linux tty will open now.
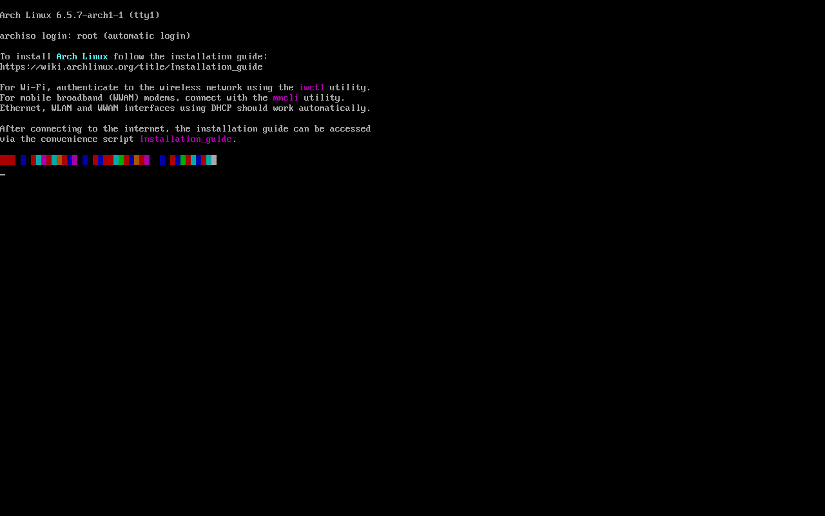
 To set the keymap according to your preference run
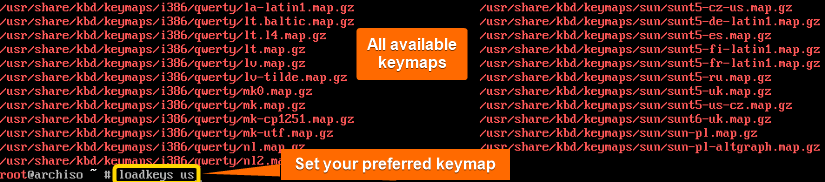
 If this command returns 64 or 32 like the above image then the system will be booted in 64-bit and 32-bit UEFI respectively. Otherwise, it will be booted in BIOS mode. Or, you can also run
 Now run


Step 5: Installing the Base System With Essential Packages
To install the essential packages and set up the base system for Arch Linux run pacstrap /mnt base linux linux-firmware base-devel grub nano efibootmgr networkmanager command:


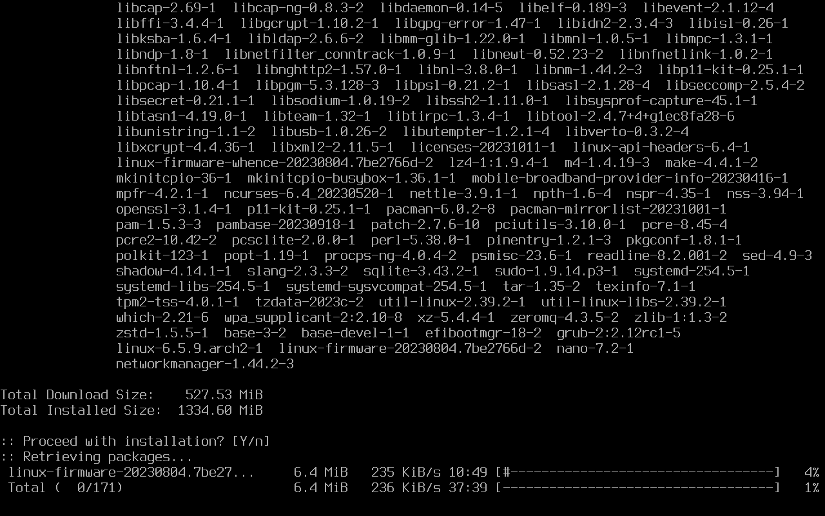
This will take some time. So, wait and let the process finish.

Step 6: Post-Installation Configuration of the System
To configure the installed system, follow the below steps:
- Run
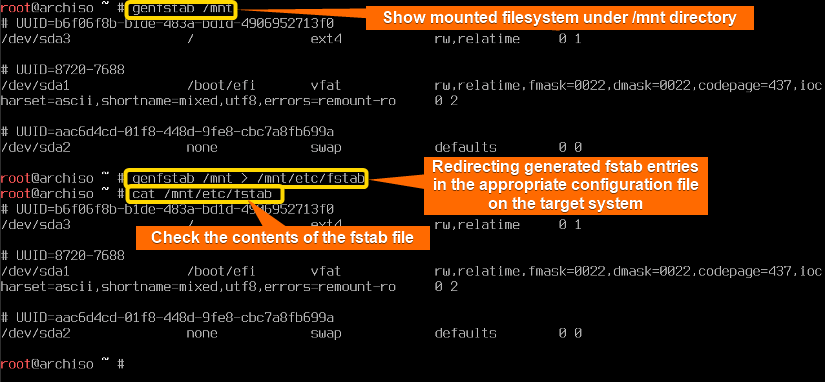
genfstab /mntto generate and view the contents of the fstab file, which shows the mounted filesystem under the /mnt directory and gives you information about the filesystems that are mounted there. - After that, execute
genfstab /mnt > /mnt/etc/fstabto redirect the generated fstab entries to the appropriate configuration file on the target system, this ensures that they will be automatically appropriately mounted at the system startup.
Note: You can check the contents of the fstab file usingcat /mnt/etc/fstab.
- Execute
arch-chroot /mntto transition from working within the live environment of the Arch Linux ISO image to directly configuring and customizing the Arch Linux installation on your storage device. You will see a visual change in the formatting after changing the root into the new system.
- Set the timezone using
ln -sf /usr/share/zoneinfo/Asia/Dhaka /etc/localtimecommand. Replace “Asia/Dhaka” according to your preference. Then synchronize the hardware clock with the system time usinghwclock --systohc. Use thedatecommand to check the updated time and date.
- Now, configure the locale.gen file. This file is important for automatically suiting the language, region, and cultural preferences of the user while displaying content, dates, times, and messages. To configure the locale.gen file, execute
nano /etc/locale.gento open the list of locales that can be used on the system: Remove “#” from your preferred locale, for example, change “#en_US.UTF-8 UTF-8” to “en_US.UTF-8 UTF-8”. Then press CTRL+O and ENTER to save the changes and CTRL+X to exit from the nano editor. Now run
 locale-gencommand to generate and update the locale settings on your Arch Linux system.
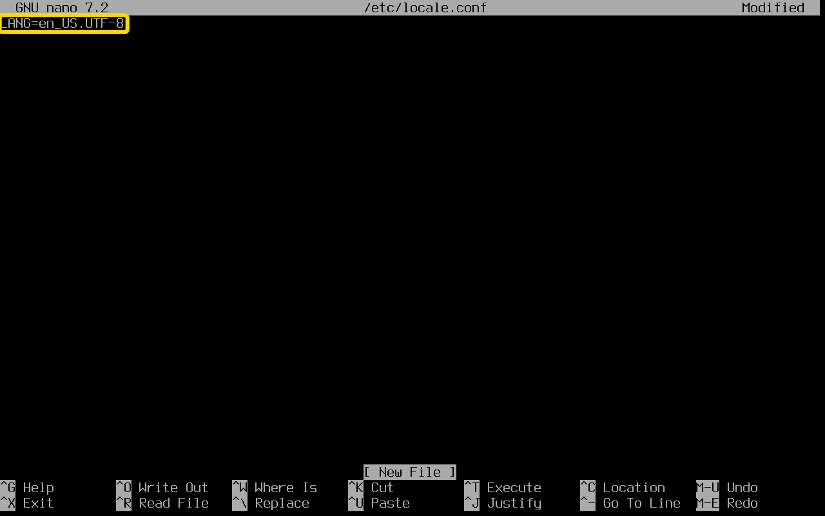
Open the locale.conf file using
nano /etc/locale.confand then also specify your locale information by adding “LANG=en_US.UTF-8”. Some programs check this file instead.Then press CTRL+O and ENTER to save and CTRL+X to exit from the nano editor.
- Now, configure the hostname of the Arch Linux system. The hostname will be used to identify your computer on the network. First, open the hostname file using
nano /etc/hostnamecommand: After that set your preferred hostname for example “Arch Linux” into the file. Then save the file using CTRL+O and ENTER. Exit from the nano editor by pressing CTRL+X.
 - After that, set your root password. Execute
Passwdcommand. Then add your root password, re-type it, and press ENTER.
- It’s time to add the user account. Run
useradd -m -G wheel -s /bin/bash ridoycommand to create a user and add the user to the wheel group. Replace “ridoy” with your preferred username. Now add your user password usingpasswd <the username you used> For security reasons, it is better to set the user password differently than the root password.
 - Execute
EDITOR=nano visudocommand to open the sudoers file. Remove the “%” from the “%wheel ALL=(ALL:ALL) ALL” line to uncomment it. It will give all members of wheel group the administrative privileges. Then save using CTRL+O and ENTER and exit using CTRL+X from the sudoers file.
 - Now enable your core services like network managers by running
systemctl enable NetworkManager
- Run
grub-install /dev/sdato install the grub bootloader in your primary storage Execute
 grub-mkconfig -o /boot/grub/grub.cfgcommand to examine the system for kernels, operating systems, and other boot parameters, and then compile the GRUB configuration file based on this information. If you see a warning as shown in the image above it is for dual booting so you can ignore it.


 Remove “#” from your preferred locale, for example, change “#en_US.UTF-8 UTF-8” to “en_US.UTF-8 UTF-8”. Then press CTRL+O and ENTER to save the changes and CTRL+X to exit from the nano editor.
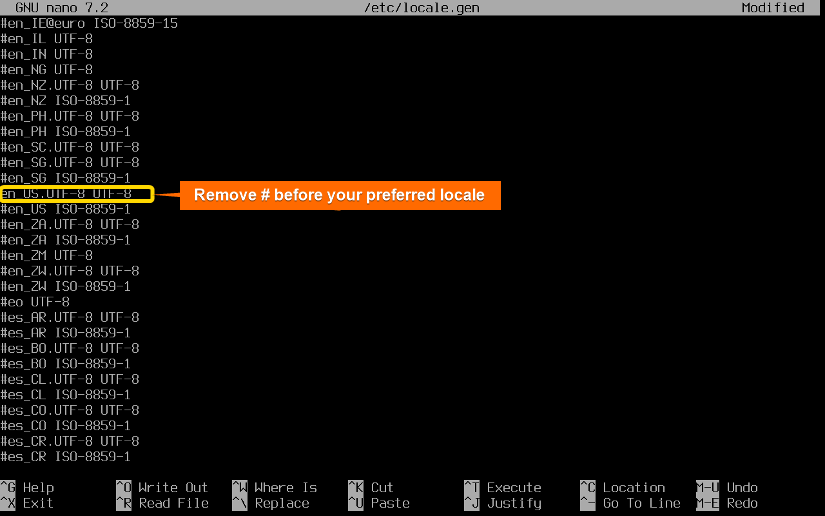 Now run
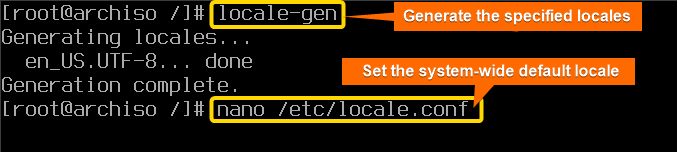
 After that set your preferred hostname for example “Arch Linux” into the file.
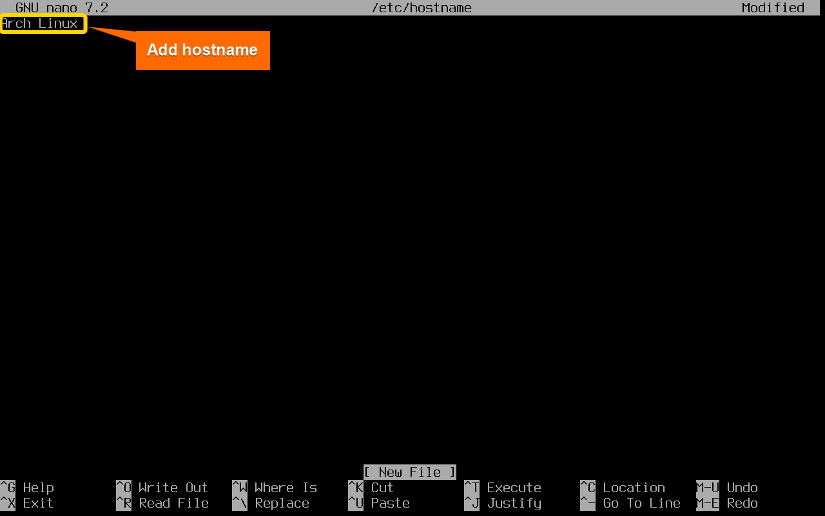 Then save the file using CTRL+O and ENTER. Exit from the nano editor by pressing CTRL+X.
 For security reasons, it is better to set the user password differently than the root password.
 Remove the “%” from the “%wheel ALL=(ALL:ALL) ALL” line to uncomment it. It will give all members of wheel group the administrative privileges.
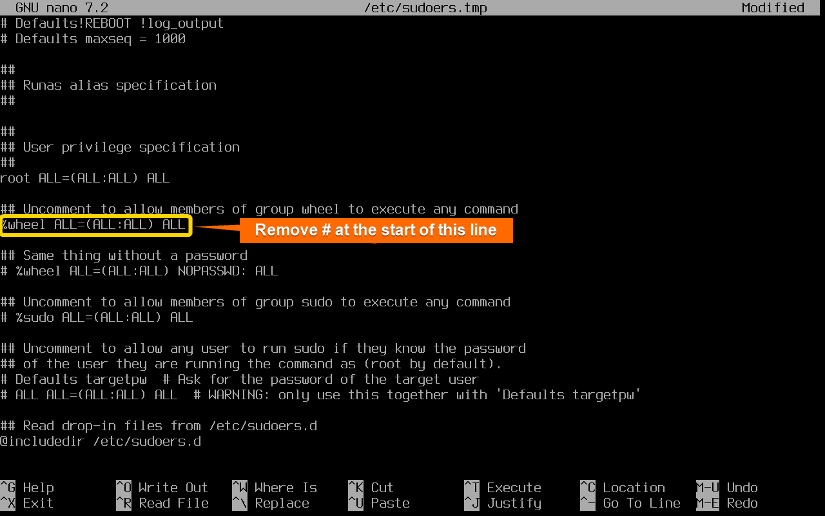 Then save using CTRL+O and ENTER and exit using CTRL+X from the sudoers file.
 Execute
 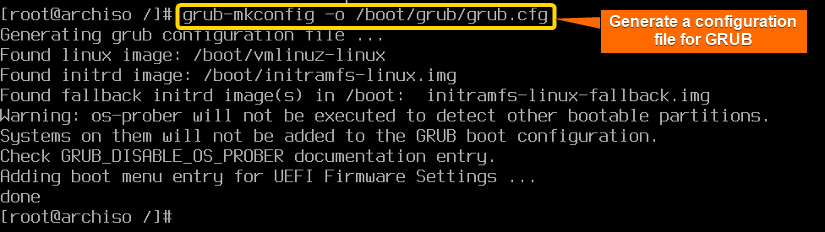 If you see a warning as shown in the image above it is for dual booting so you can ignore it.
Step 7: Reboot System
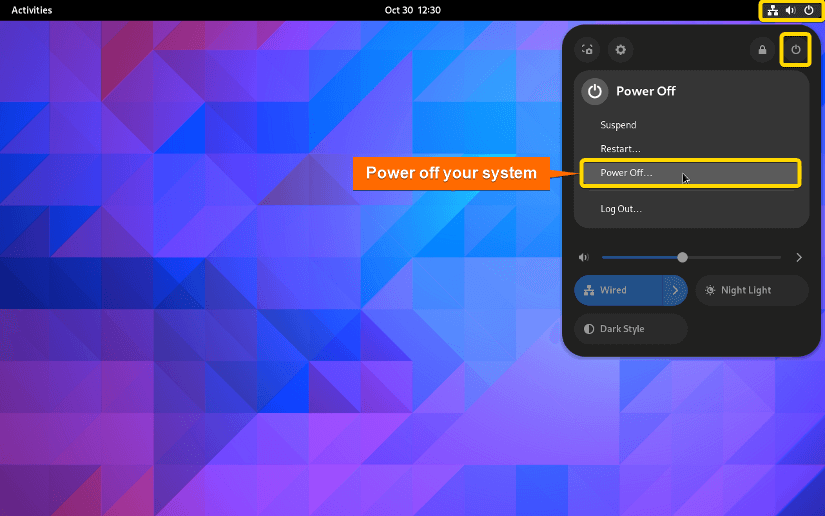
Exit from your system using exit and shut down the VM using poweroff command.

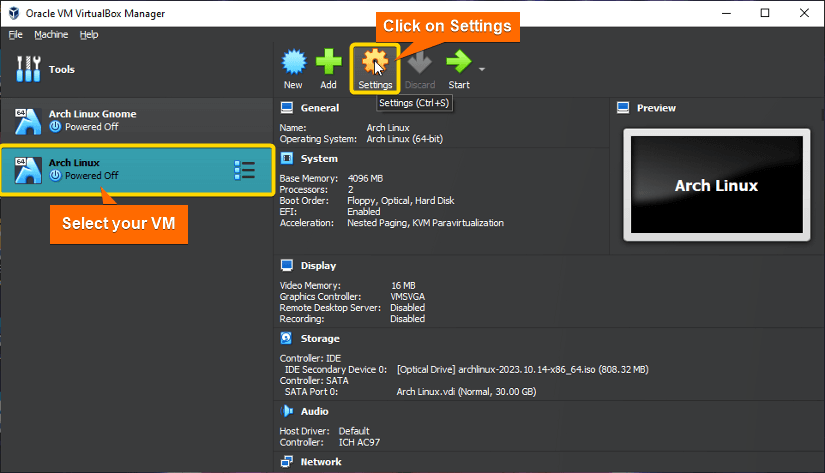
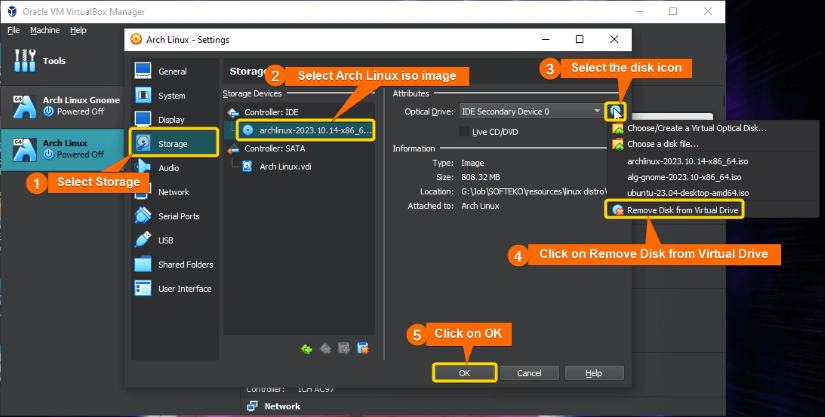
At this stage, you have to remove the Arch Linux installation ISO image. To do that select your VM > Settings > Storage > Arch Linux ISO image > disk icon > Remove Disk from Virtual Drive > OK.
Now start your VM again.
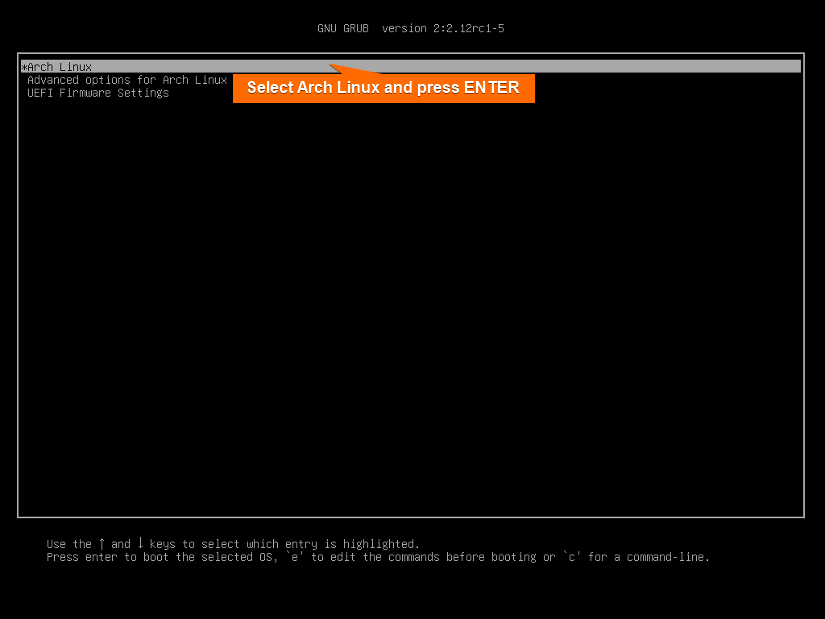
Select Arch Linux and press ENTER. If you do not select anything then after some time it will automatically select Arch Linux.
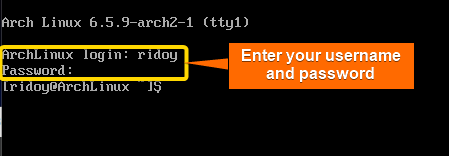
Log in with your username and password that you set previously. You can now use Arch Linux as you want.
Note: For better visualization, run setfont -d to make your font double in size. To reset your font run setfont. To check your internet connection run ping -c3 archlinux.org.
Step 8: Graphical Desktop Environment
To have a better visualization and ease of use you install and set a desktop environment in your Arch Linux system.
Setup Graphical Desktop Environment
Here is a list of all officially and unofficially supported desktop environments from the official Arch Linux wiki. You can select any of those desktop environments. In this demonstration, I will show the GNOME desktop environment.
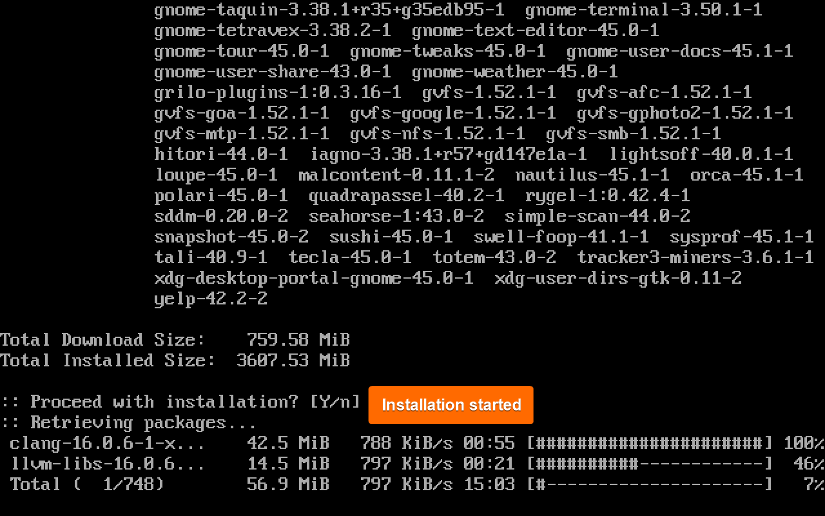
First, download base GNOME software, additional GNOME software, and GNOME display manager, and then set up the GNOME desktop environment using sudo pacman -S gnome gnome-extra gdm command.
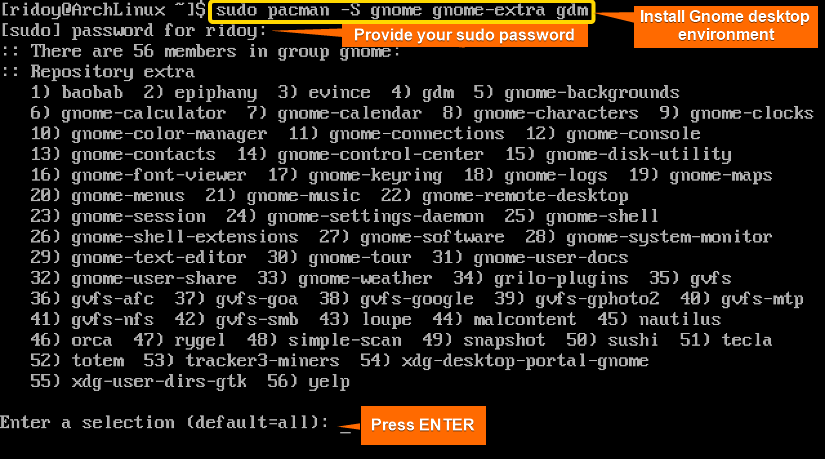
Provide the sudo password. Press ENTER several times to select packages and press Y to confirm the installation. This will automatically download and set up the GNOME desktop environment in your Arch Linux system.
Start Desktop Environment
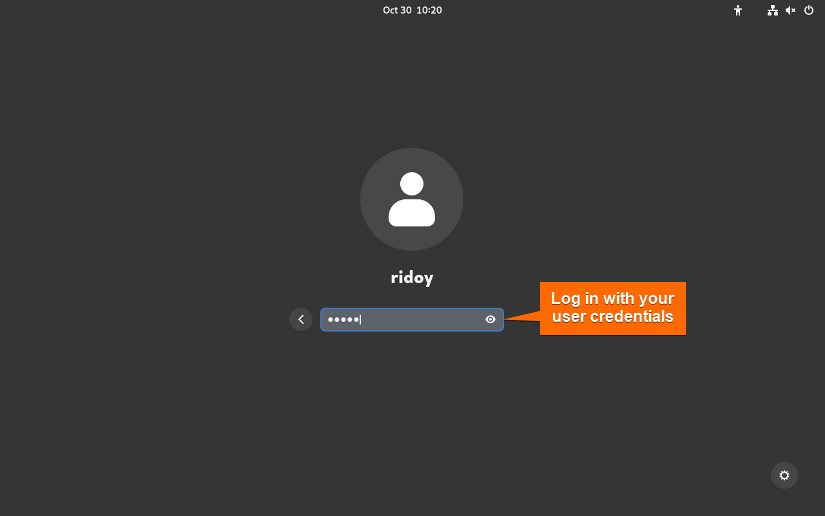
To start the GNOME desktop environment immediately, enable GNOME Display Manager (gdm) with the “now” option by running sudo systemctl enable --now gdm command.

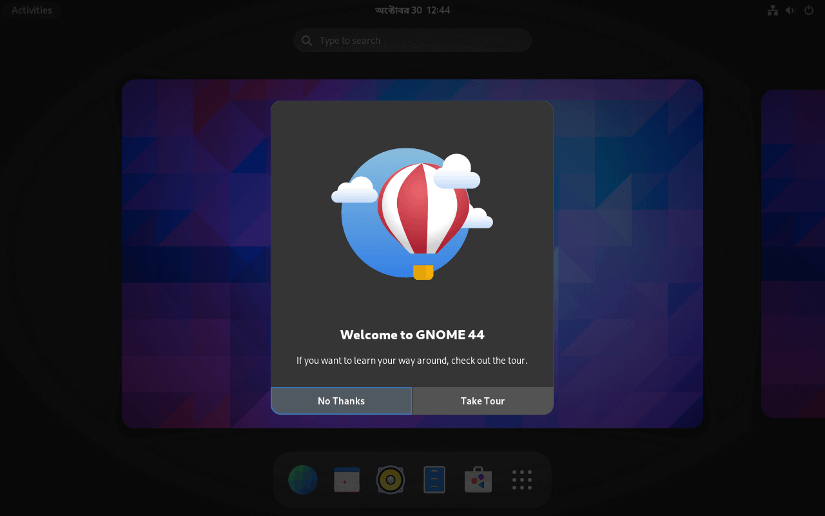
It will open the login screen with the desktop environment. Log in with your user credential.
You are now in the GNOME desktop environment.

Check system details
To check the details of the installed Arch Linux system, open the terminal and run sudo pacman -S neofetch command to install neofetch. It is an easy-to-use command-line tool for Linux/Unix-based operating systems that shows system info and other info about your computer in an attractive and customizable way. Then, run the neofetch command.

You can see that Arch Linux is running in the Virtualbox host with the GNOME desktop environment.
Note: It is a good practice to update the system packages after installing an OS. Run Sudo pacman -Syu command on the Arch Linux terminal to update your system.
Method 02: Install Arch Linux on Virtualbox Using the “archinstall” Command
The “archinstall” is a command line tool that automates the installation process of Arch Linux in TTY. To install Arch Linux on VirtualBox using the “archinstall” command follow the following processes:
Step 1: Download Arch Linux GUI ISO Image
First, Download the Arch Linux ISO Image, Create an Arch Linux VM, and Start the Arch Linux VM.
Step 2: Setup Arch Linux Installation
Select “Arch Linux install Medium”.
Arch Linux tty will open now.

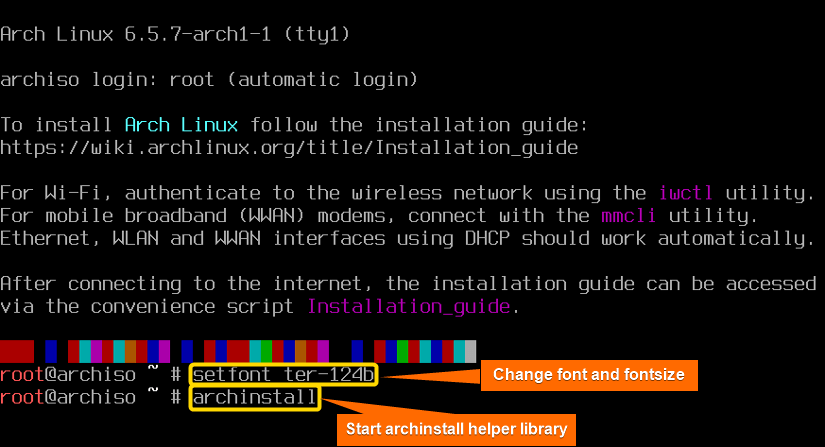
For better visualization, you can change your font. Run ls /usr/share/kbd/consolefonts/ to check all available fonts. Change the font by running setfont ter-124b. To reset your font run setfont.
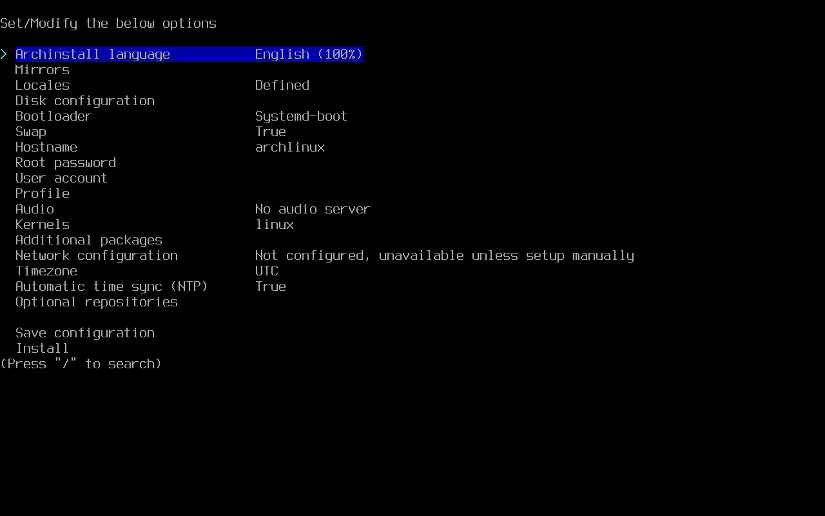
Now, run archinstall to open the archinstall tool’s user interface. You have to navigate through the tool using your keyboard.
Set your preferred language.
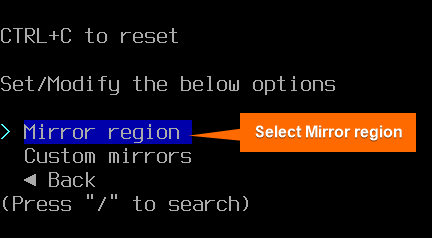
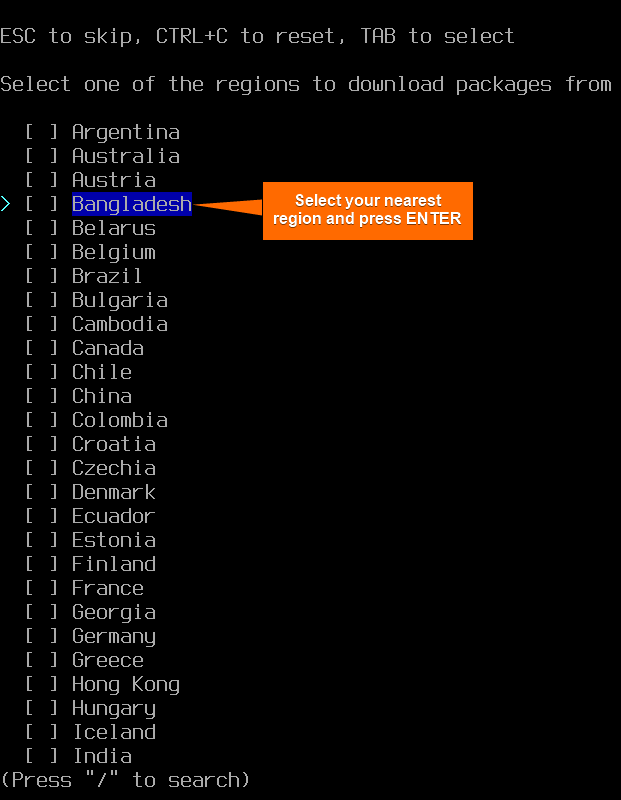
Select Mirrors > Mirror region > your nearest region > Back
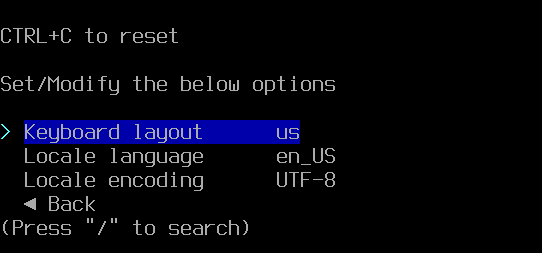
Then set the Keyboard layout and Locale language according to your preferences. Then select Back and press ENTER.
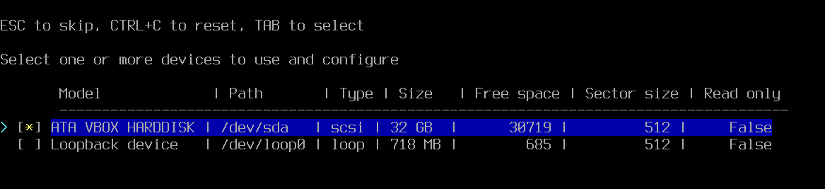
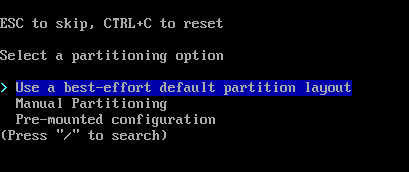
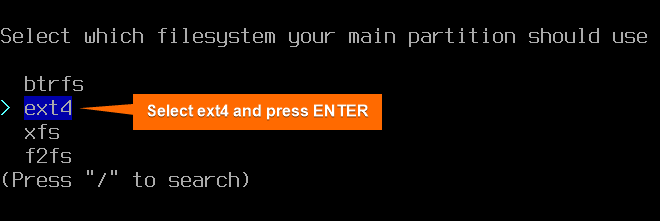
Select Disk configuration > Use a best-effort default partition layout> ATA VBOX HARDDISK > ext4.
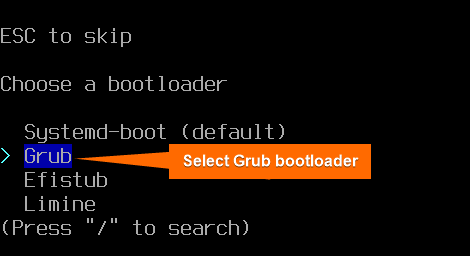
Select Bootloader > Grub.
Make sure Swap is set to True.
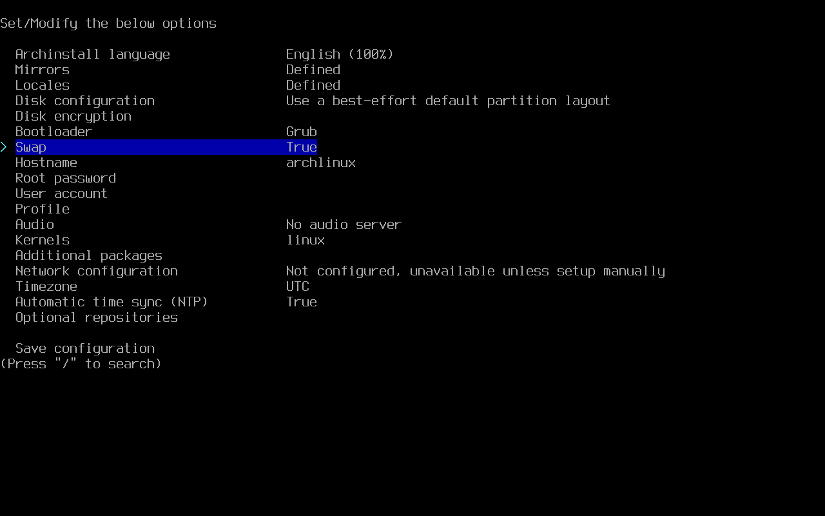
Set your preferred hostname for the system.

Type and re-type a password to set the Root Password.

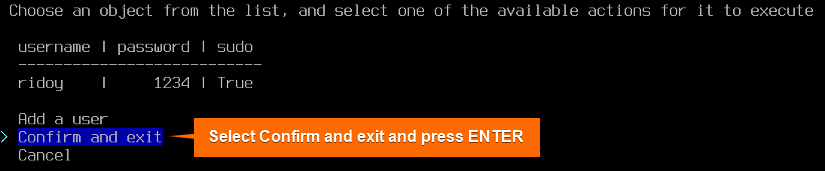
Select User account > Add a user > enter username > type user password > retype user password > yes > Confirm and exit.

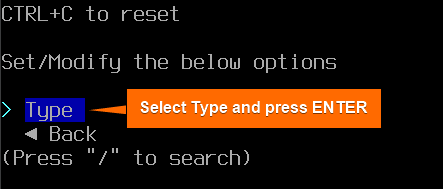
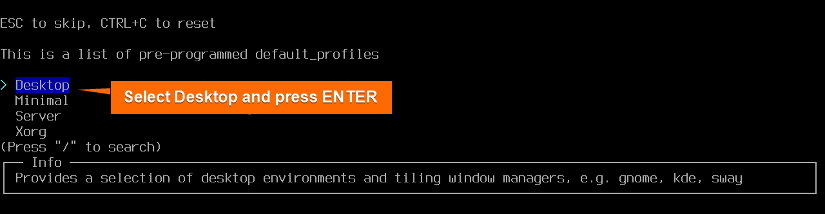
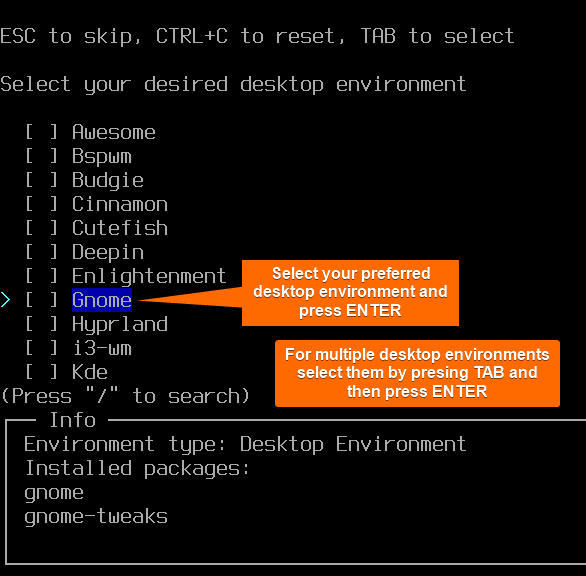
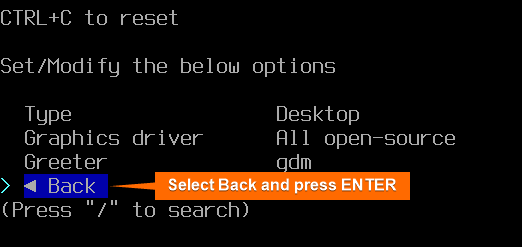
Select Profile > Type > Desktop > Gnome (You can choose another desktop environment according to your preference) > Back
To select multiple desktop environments select them with TAB and then press ENTER.
Set the Audio server according to your preference. I am skipping this in this demonstration.
The default kernel is Linux. If you want to change it select Kernals and set it as you prefer.
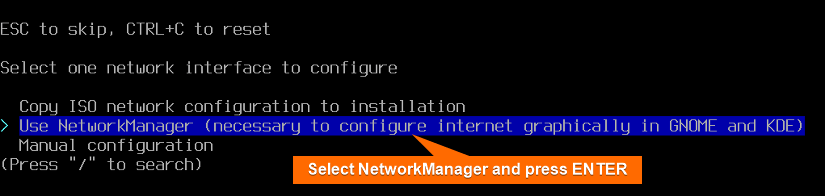
Select Network Configuration> Use NetworkManager.
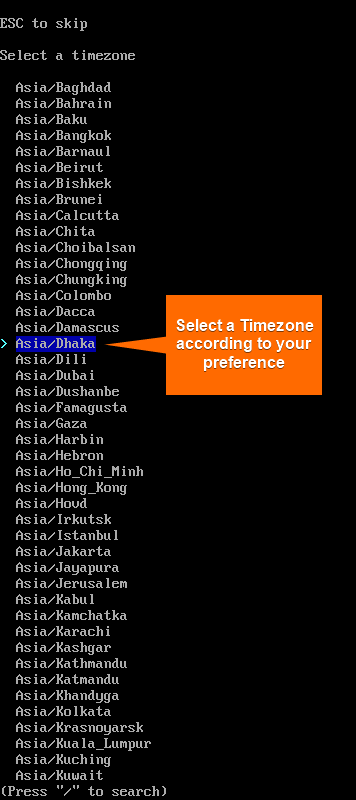
Select a Timezone according to your location
Here’s the summary of all the settings. Check it and scroll down, select Install, and press ENTER.
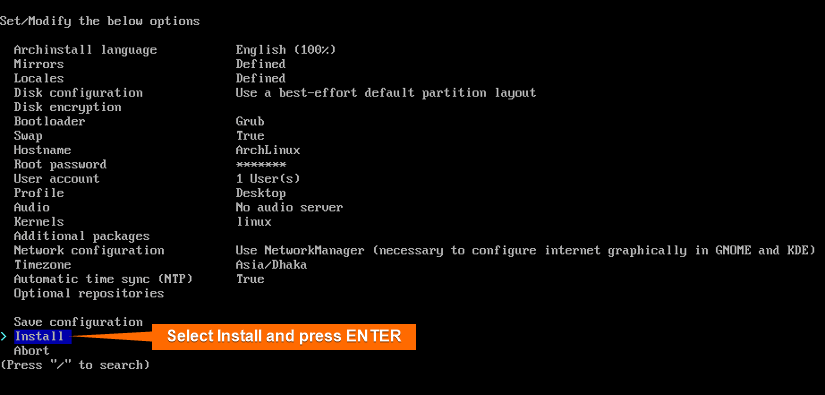
Press ENTER again. “archinstall” will automatically download and install everything. This process will take some time.


Step 3: Reboot the VM
Now Reboot your system after removing your Arch Linux ISO image.

After starting your system you will be asked to log in.
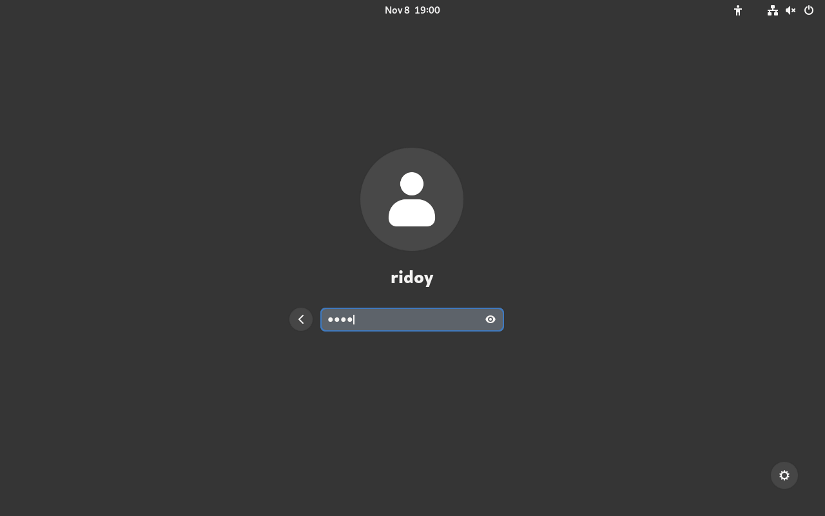
Log in with your user credentials.
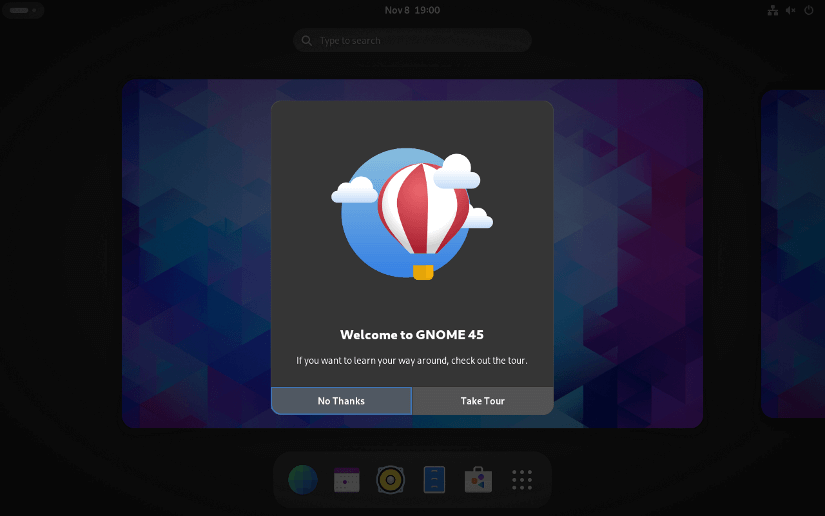

You can now use Arch Linux with the gnome desktop environment.
Method 03: Install Arch Linux GUI Directly on VirtualBox
To install the Arch Linux desktop environment directly follow this step-by-step process:
Step 1: Download Arch Linux GUI ISO Image
Download any variation of the Arch Linux GUI ISO image from SOURCEFORGE.
Step 2: Create Arch Linux GUI VM
Create an Arch Linux VM with the Arch Linux GUI image.
Step 3: Start the Newly Created VM
Now, start your newly created VM.

Select “Arch Linux Installer” using the up-arrow and down-arrow from the keyboard and press ENTER.
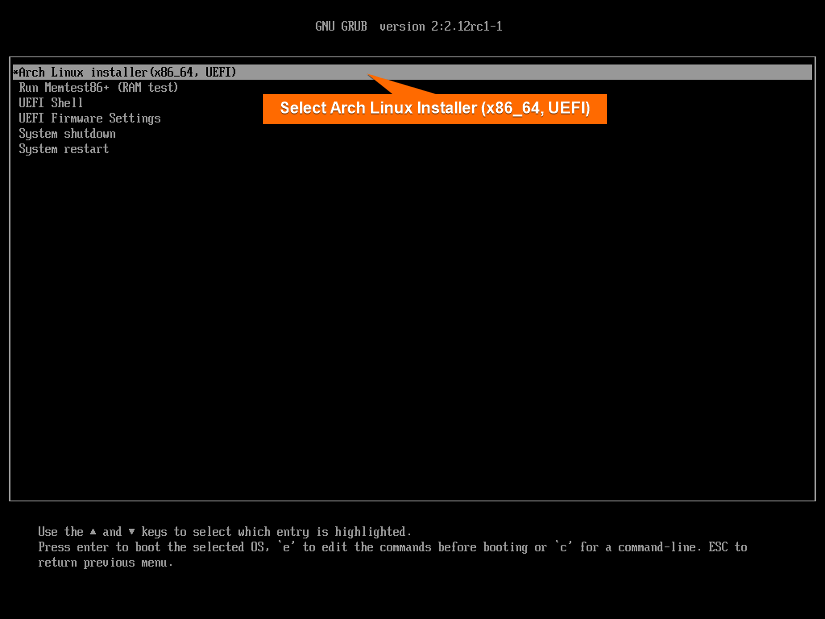
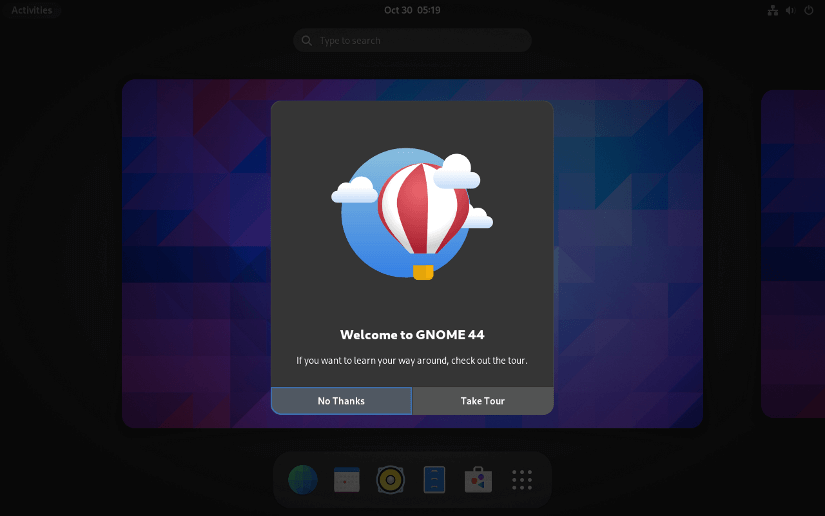
Arch Linux Live installer GUI will open now.
Step 4: Install Arch Linux
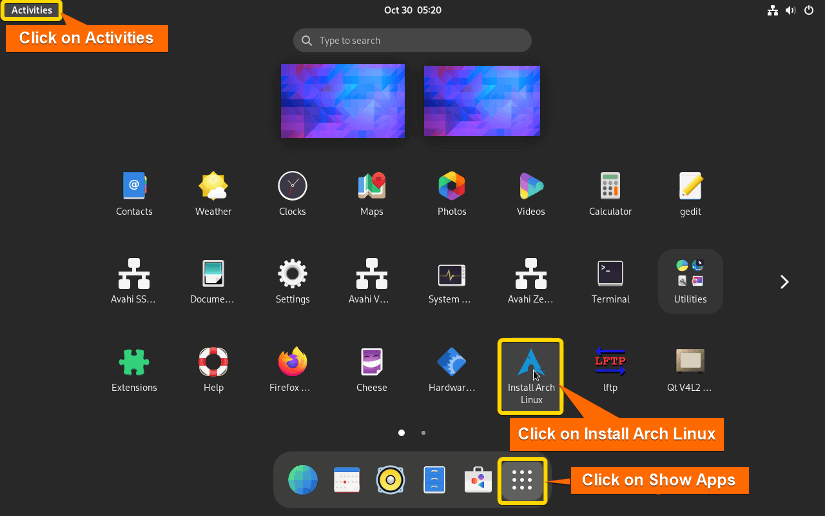
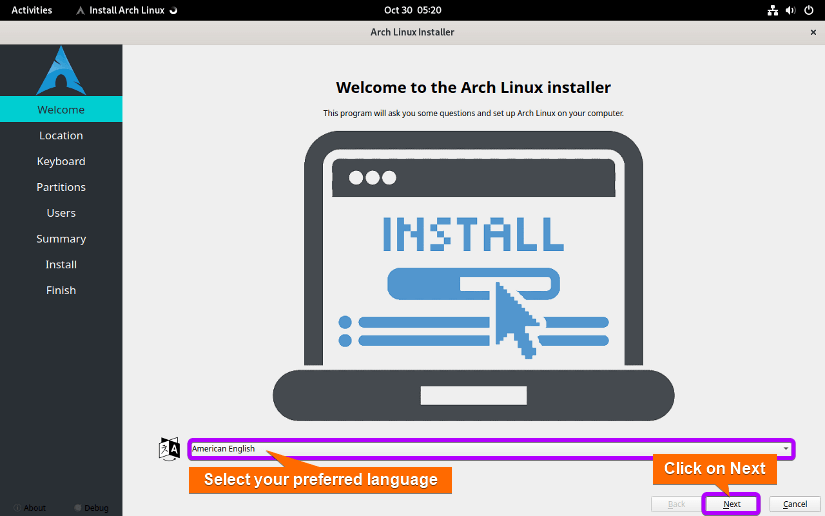
Open the app menu and click on Install Arch Linux.
Set your preferred language and click on Next.
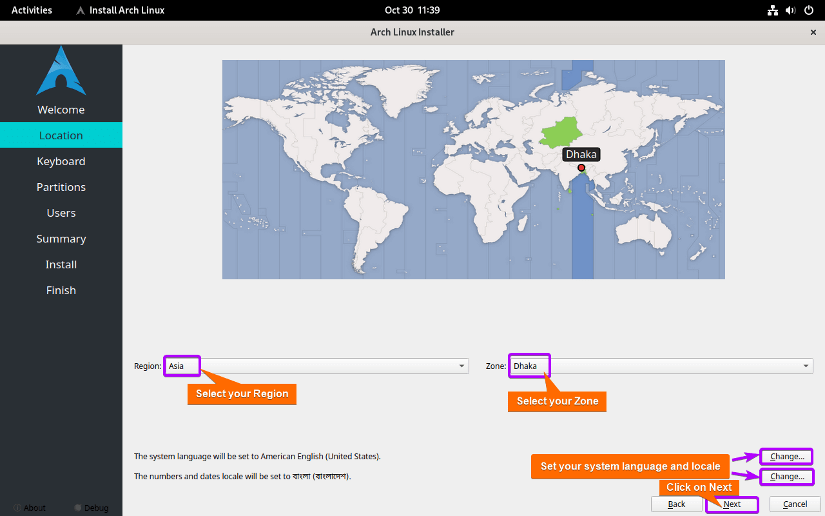
Adjust your timezone and locale then click on Next.
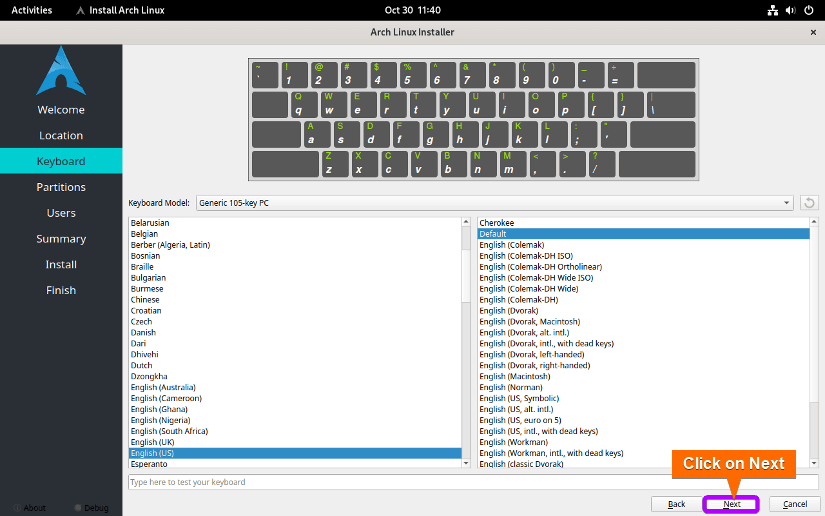
Set your preferred keyboard layout and click on Next.
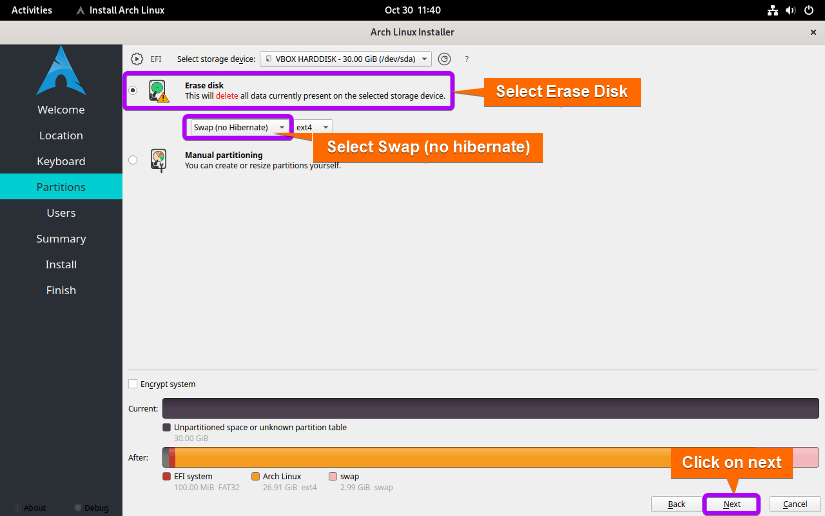
Select Erase disk. Select Swap (no hibernate) and click on Next.
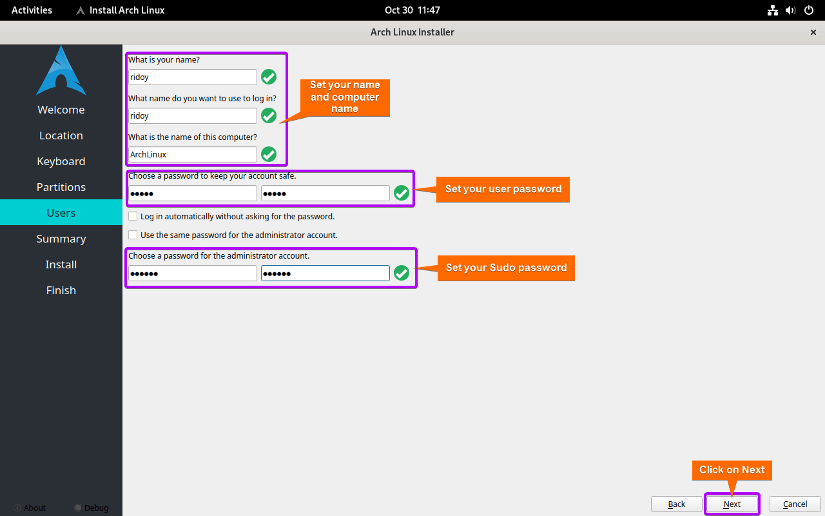
Set your user details, user password, and root password. Then click on Next.
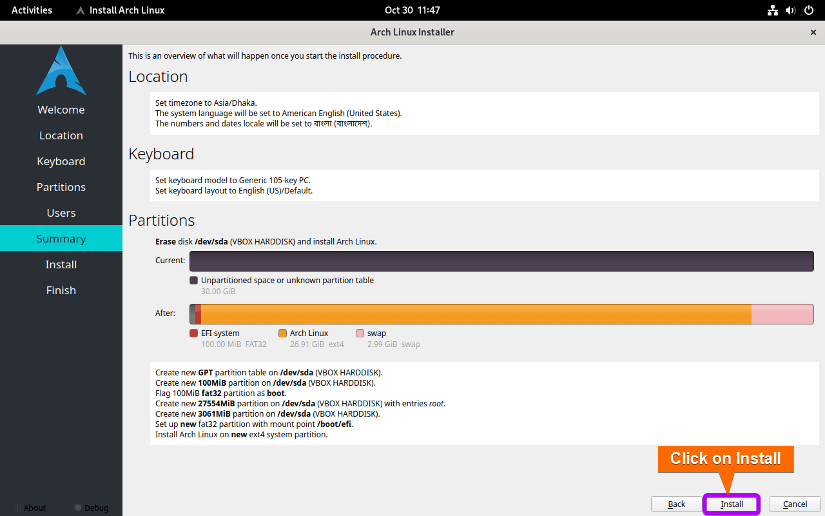
Click on Install.
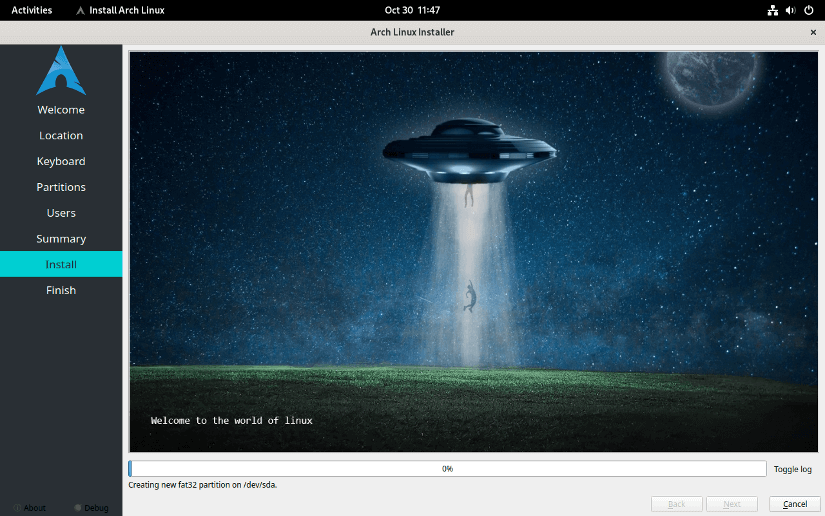
The installation process will take some time.
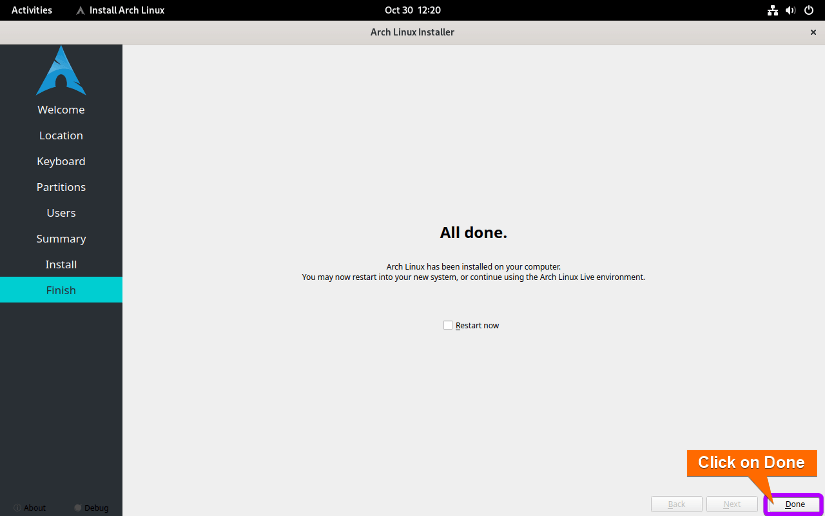
After installation is complete click on Done.
Shut down your system.
Now remove the Arch Linux GUI image ISO file as shown in “Reboot System”. Start your VM, and log in to your system with the login credentials.

Arch Linux is now ready to use.

You can Check system details after the installation.
Conclusion
Installing Arch Linux on Virtualbox will open up a world of endless possibilities. This guide has covered all the steps required to install Arch on a virtual machine. Whether you are new to Linux or have been using it for a long time, this guide will provide you with all the information you need about installing Arch Linux on VirtualBox.
People Also Ask
Is there a GUI to install Arch Linux?
Yes, though as of now there is no official GUI installer for Arch Linux, there are some unofficial projects that create GUI installers for Arch Linux. SOURCEFORGE is one of them.
Is 2 GB RAM enough for Arch Linux?
Yes, 2 GB of RAM is generally sufficient to run Arch Linux effectively, especially if you are using it as a lightweight, minimalistic desktop environment or a server. Arch Linux is known for its minimal resource requirements, and it can run on relatively modest hardware.
Is Arch Linux good for beginners?
No, Arch Linux is not typically recommended for complete beginners to Linux, especially those who have no prior experience with Linux operating systems. Arch Linux is known for its minimalistic, do-it-yourself approach, which requires a significant amount of manual configuration and system administration.
Is Arch Linux good for gaming?
Yes, Arch Linux can be a good choice for gaming, especially if you value control and customization of your gaming environment. However, it’s important to note that setting up a gaming environment on Arch Linux may require some technical knowledge and configuration, especially if you plan to run Windows games using compatibility layers.
Why Arch Linux is so popular?
Arch Linux has become popular due to a variety of factors, including:
- Streamlined Simplicity: Arch Linux follows the KISS (keep it simple, stupid) way of doing things. It’s got a pretty basic base system, which is great for people who want to have full control over their Linux environment.
- Cutting-Edge Updates: Arch Linux is known for its ability to deliver the most recent software updates on time. This is due to its rolling release distribution status, which allows users to enjoy the benefits of software updates without the inconvenience of version upgrades.
- Versatile AUR (Arch User Repository): The AUR is a vast library of user-maintained packages, enabling easy access to software not found in official repositories. This expansive ecosystem provides abundant choices.
- Exceptional Documentation: Arch Linux is well-known for its extensive documentation, particularly the Arch Wiki, which is a collection of resource-rich guides designed to simplify the process of problem-solving and system configuration.
- User Empowerment: Arch Linux takes the guesswork out of system configuration. It lets you create systems that are exactly how you want them to be.
- Strong User Community: Because the Arch community is so active and knowledgeable, forums are great places to get help and solutions.
- Educational Value: The minimalist nature of Arch Linux encourages you to learn more about Linux and system management, making it an excellent option for those looking to broaden their knowledge.
- Adaptability: Arch Linux is highly adaptable and can be tailored to meet a variety of needs, regardless of whether it is used on a server or a desktop.
If you’re just starting with Linux, Arch might not be the best choice for you. It’s a bit of a DIY project, so it can be a bit of a challenge for newbies. But if you’re into the principles and philosophy of Arch, it’s a great platform to use.
Related Articles
- How to Install Ubuntu on VirtualBox [A Complete Guide]
- How to Install Fedora on VirtualBox [Simple Guide]
- How to Install Debian on VirtualBox [Step-by-Step]
- How to Install VirtualBox Guest Additions on Debian
- How to Install Kali Linux on VirtualBox [Easiest Guide]
- How to Install CentOS 7 on VirtualBox [8 Easy Steps]
- How to Install VirtualBox Guest Additions on CentOS
<< Go Back to Virtual Machine Installation Guide | Linux OS Installation Guide | Learn Linux Basics
FUNDAMENTALS A Complete Guide for Beginners


