Debian is a free and open-source operating system (OS) that belongs to the Linux family. It’s known for stability, security, and commitment to free software principles. Debian is developed by a community of volunteers worldwide.
VirtualBox is a powerful and open-source virtualization platform that enables users to run multiple operating systems on a single physical machine. Developed by Oracle, VirtualBox provides a versatile and user-friendly environment for creating and managing machines (VMs).
This article will walk you through the step-by-step process of installing Kali Linux on VirtualBox.
Requirements to Install Debian on VirtualBox
- Minimum 512 MB RAM (2 GB+ recommended).
- Minimum 10 GB free storage (20 GB+ recommended).
- A dual-core or higher processor is recommended.
- Active internet connection to install the Debian system.
Steps to Install Debian on VirtualBox
The process of installing Debian on VirtualBox requires a few fundamental tasks. This includes downloading a Debian ISO file, creating a virtual machine on VirtualBox, installing the OS, and finally Post-installation setup.
To install Debian on VirtualBox easily follow the steps below:
Step 1: Download the Debian ISO File
First, download the ISO file of Debian from the official website of Debian. 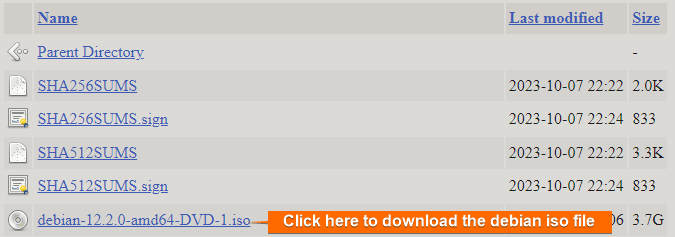
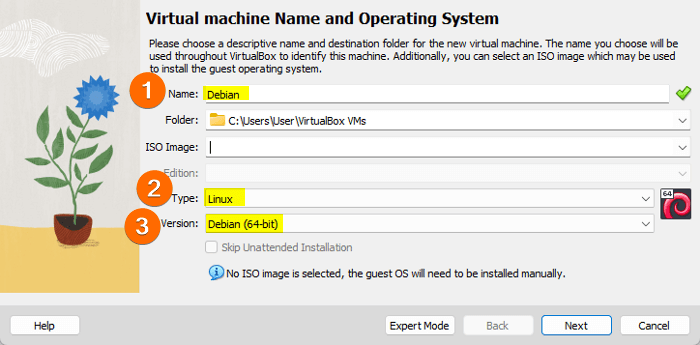
Step 2: Create a New Debian Virtual Machine
- Open the VirtualBox and click on New.

- First, set a name for the VM (for example Debian), then choose Linux as the “Type” of the VM, and finally choose Debian (64bit) as the “Version”.

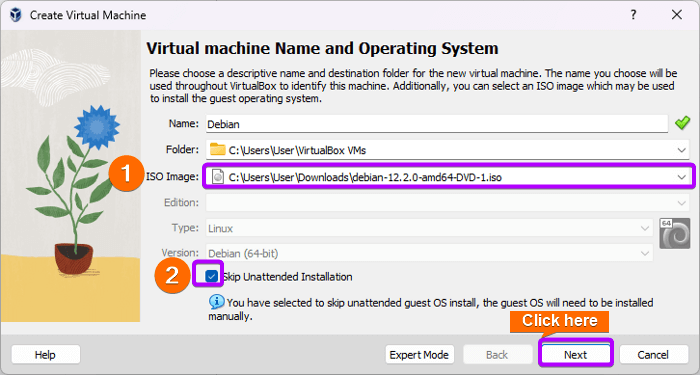
- Now, click on the “ISO Image” and select the downloaded Debian ISO file from the host operating system. Then, click on “Next”.

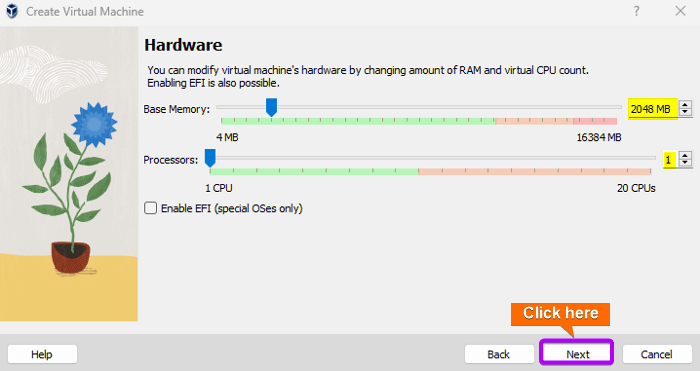
- In hardware settings, set 2GB as base memory, specify 1 processor for the VM, and click “Next”.

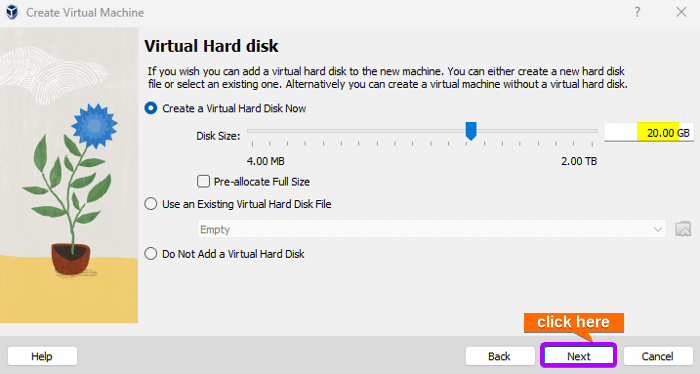
- Create a virtual hard disk of 20 GB, and hit “Next”.

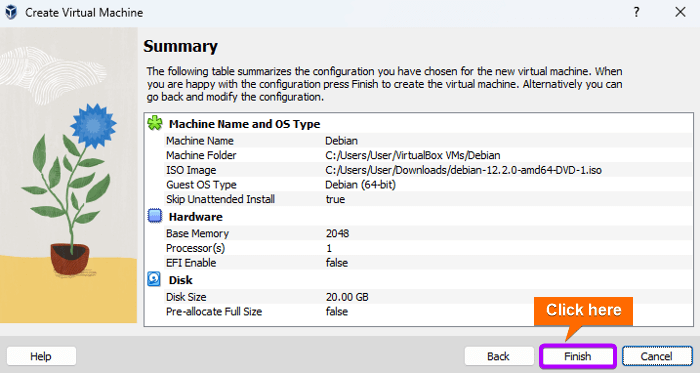
- The following table in the image summarizes the configuration of the new virtual machine. Finally, click on “Finish”.
 Finally, the Debian VM has been created.

 Finally, the Debian VM has been created.
Step 3: Launch and Install Debian
To install Debian on the newly created virtual machine follow the below steps:
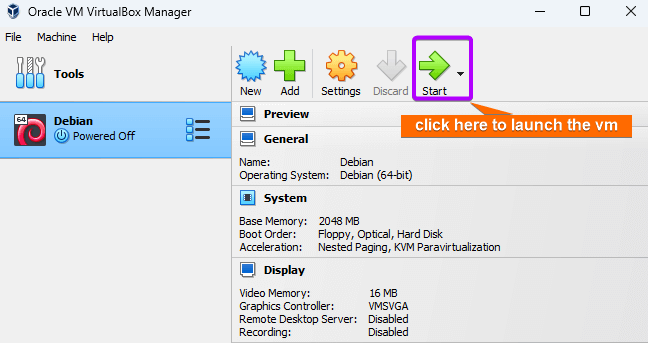
- Click on “Start” to power on the VM. Upon powering the virtual machine, the installation window for Kali Linux will appear on the screen.

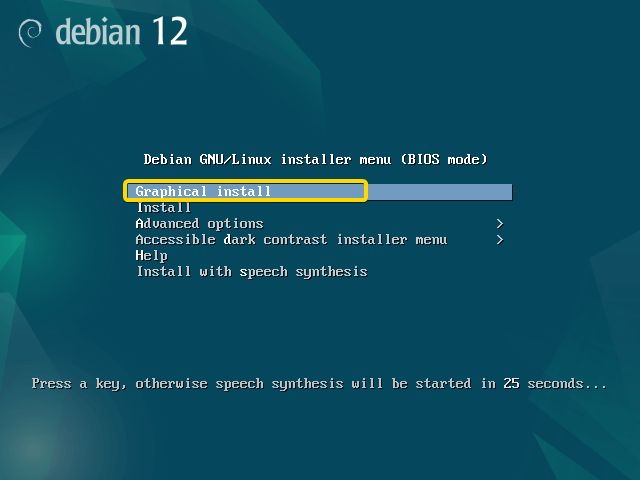
- Now, use the UP and DOWN arrow keys to navigate to “Graphical Install” and press ENTER.
 Note: If you don’t select any option from the “Kali Linux Installer menu”, it will choose the first option by default within a few seconds.
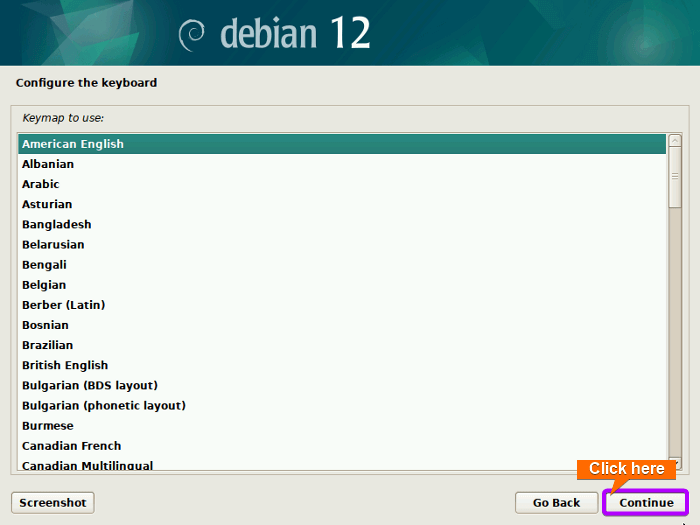
Step 4: Configure Keyboard and Language
- Select a language as your preference (for example English) and click on Continue.

- Select your preferred keymap and hit Continue.

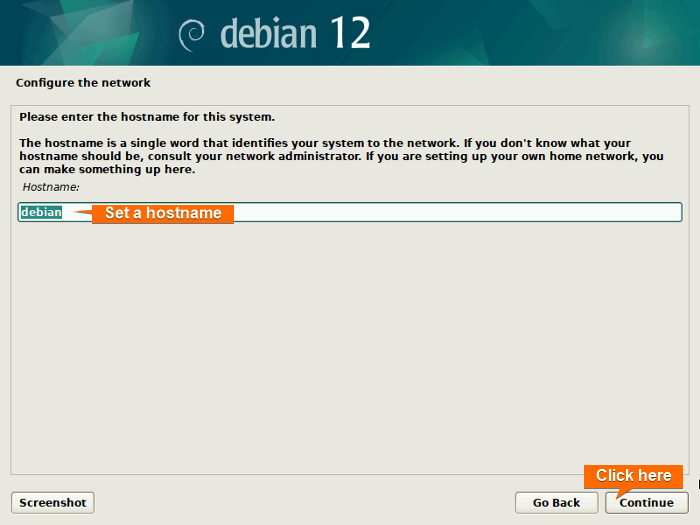
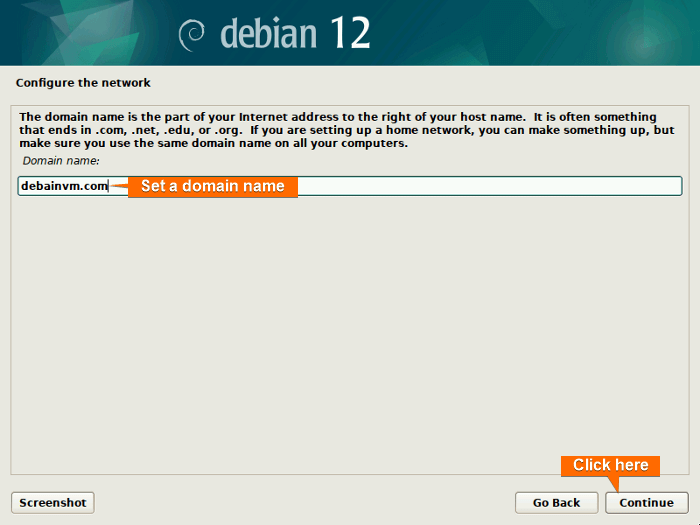
Step 5: Configure the Network
To configure the network follow the steps below:
- Type a hostname for the Debian VM and click on Continue.
- Now, type a domain name for the network like below and click on Continue to proceed with the installation.
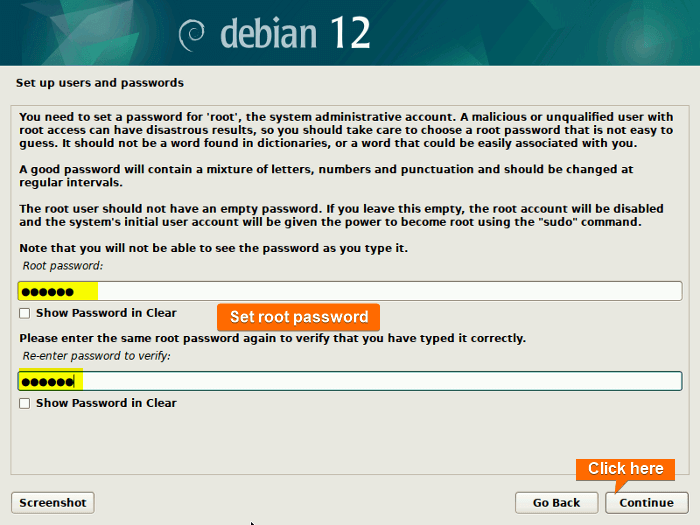
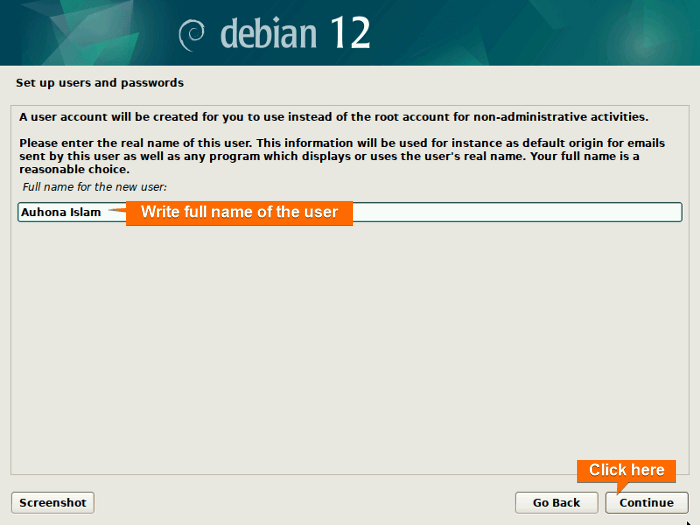
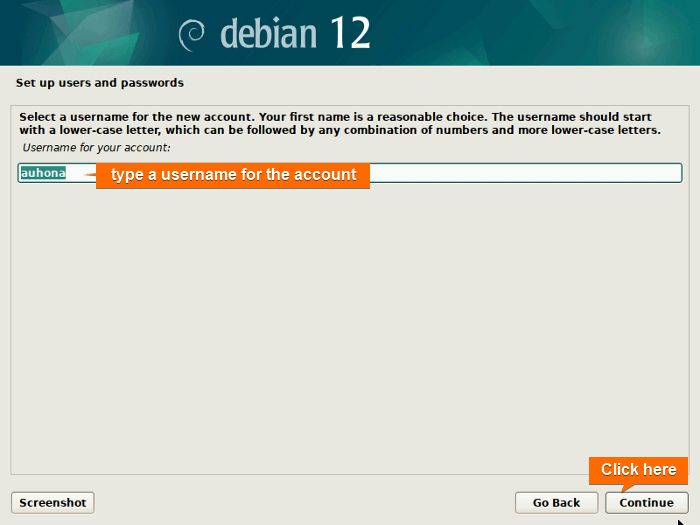
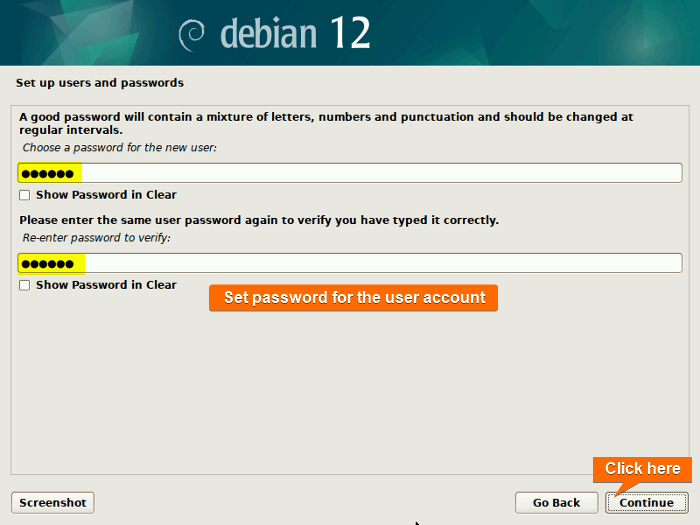
Step 6: Set up Users and Passwords
You have to create a user account to work on the Kali Linux VM. For that:
- First, set a root password and click on Continue.
- Enter your full name and click on Continue.
- Then, type a short user for your user account.
- Finally, set a password for the user account which will be asked for every time you turn on the VM. Click on Continue.
Step 7: Select Time Zone
Select your time zone and click on Continue. 
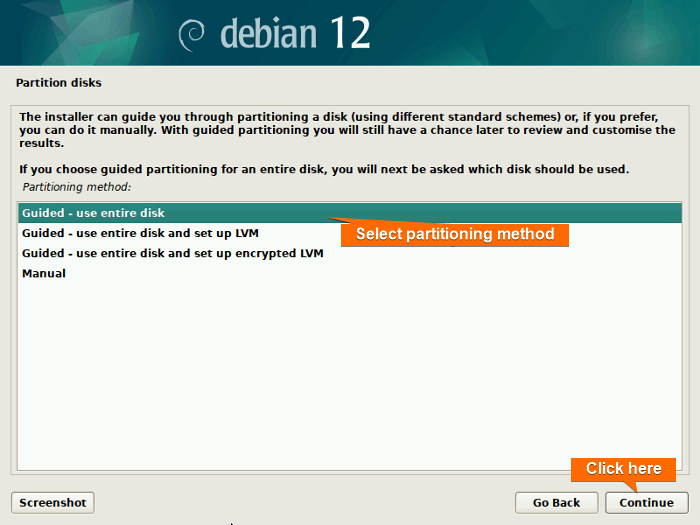
Step 8: Set up the Disk Partition
To ensure the operating system functions smoothly, you have to partition the disk.
- First, select “Guided – use entire disk” as the partitioning method and click on Continue.
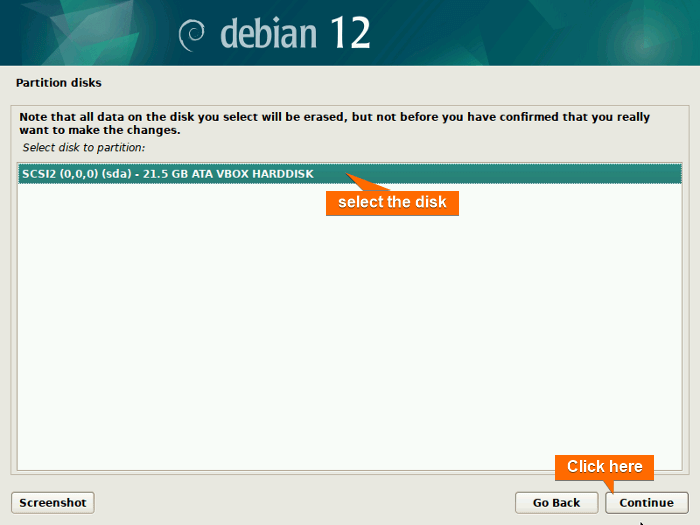
- Select the partitioning disk and click on Continue.
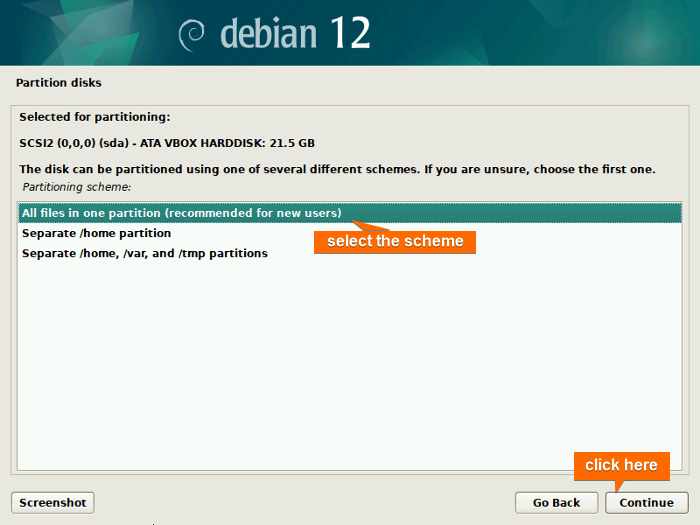
- Choose “All files in one partition” as the partitioning scheme.
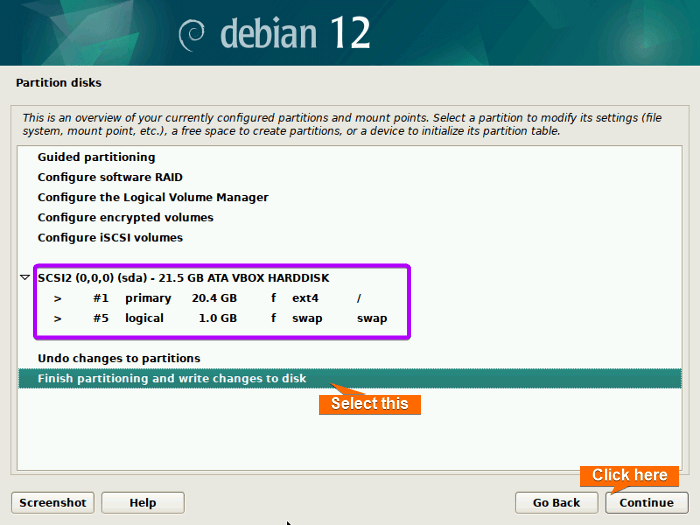
- Here, a prompt shows the summary of the configured partition. Click on Continue.
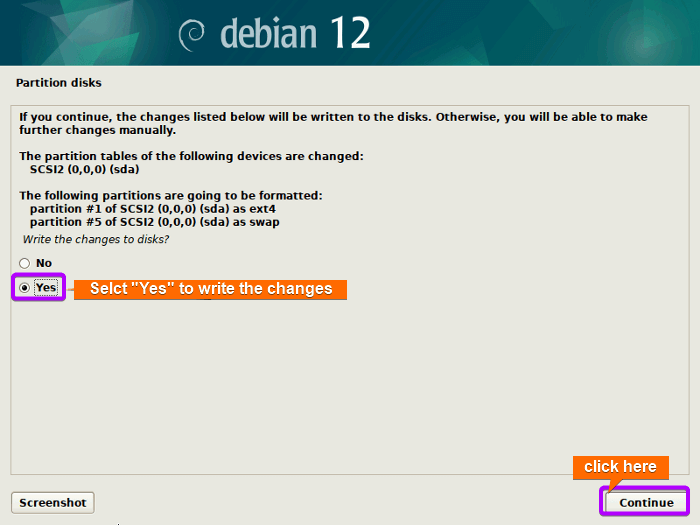
- Check the Yes option and click on Continue to allow writing the changes to the disks.
After that, the installation of the base system starts as below. 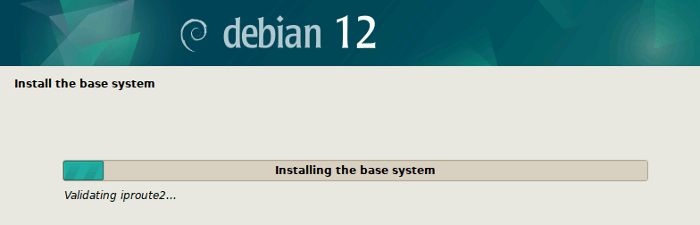
Step 9: Configure Package Manager
To make the installation faster, select “No” for scanning extras installation and click on Continue. 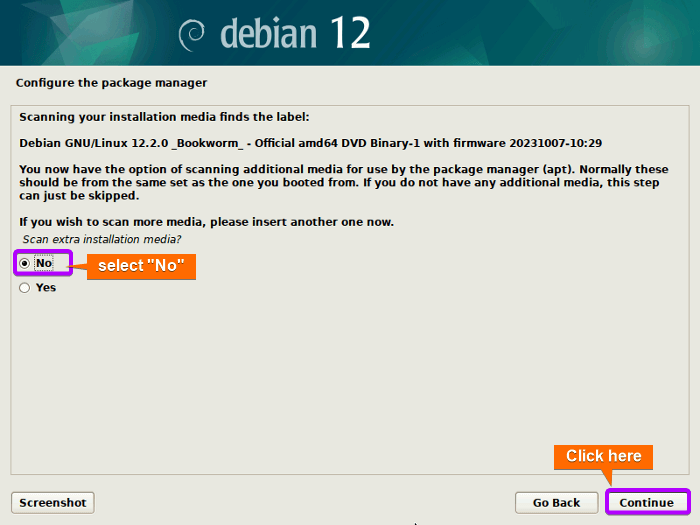 After a few moments, a window will appear asking for “Use a network mirror?”. Select “No” and click on Continue.
 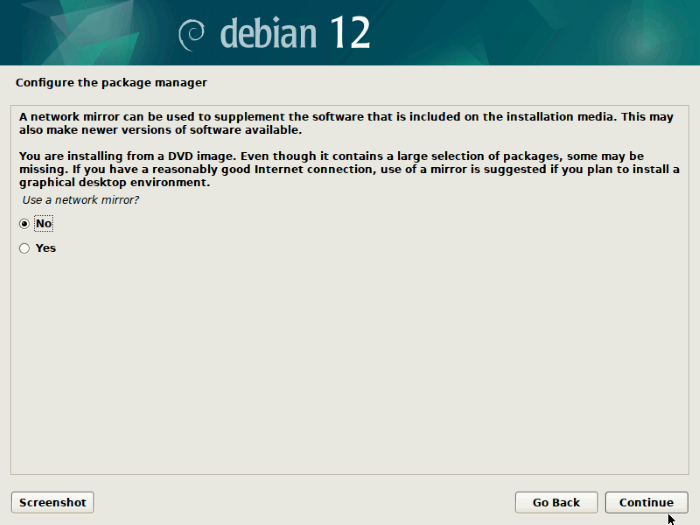 Again deny to configure popularity-contest by selecting “No” and click on Continue.
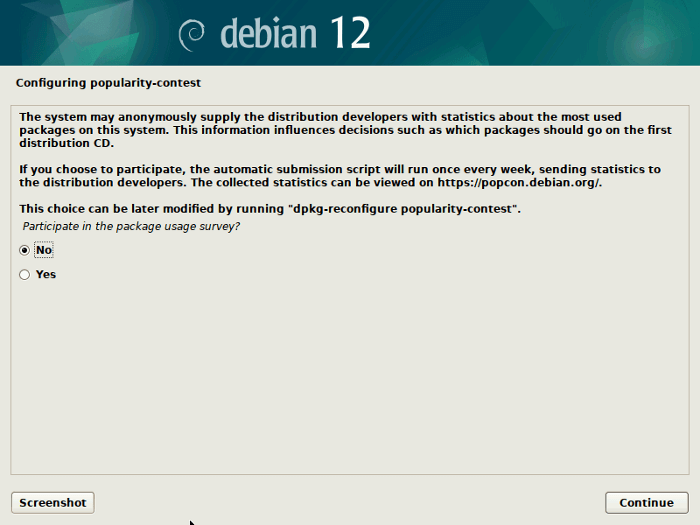
Step 10: Selected Software Installation
At this stage, choose the software from the list you wish to install during the Debian installation process as depicted in the image below. Click on Continue to proceed. 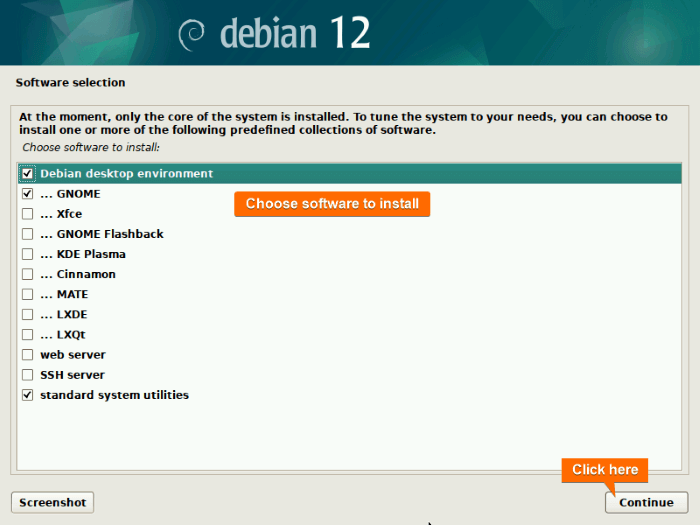 After a little time, all the checked software will be installed in your Debian system as below.
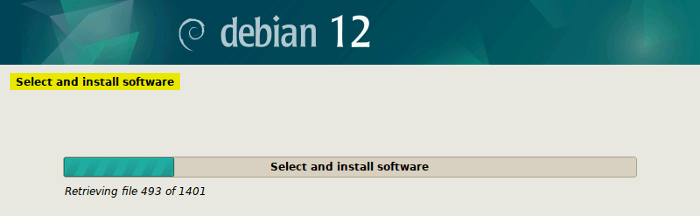
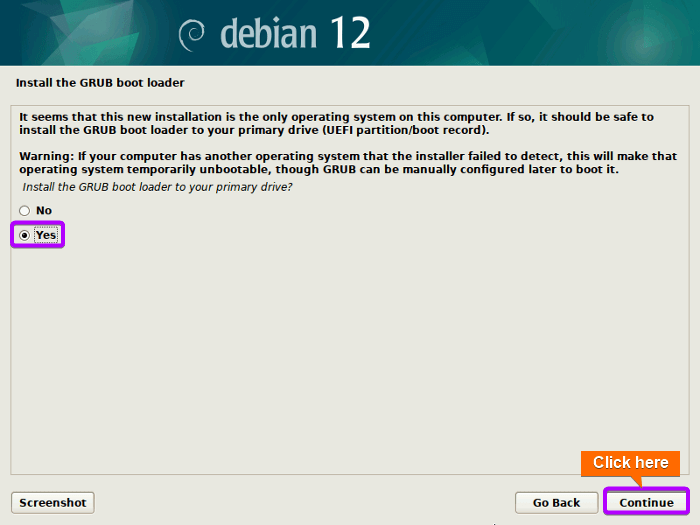
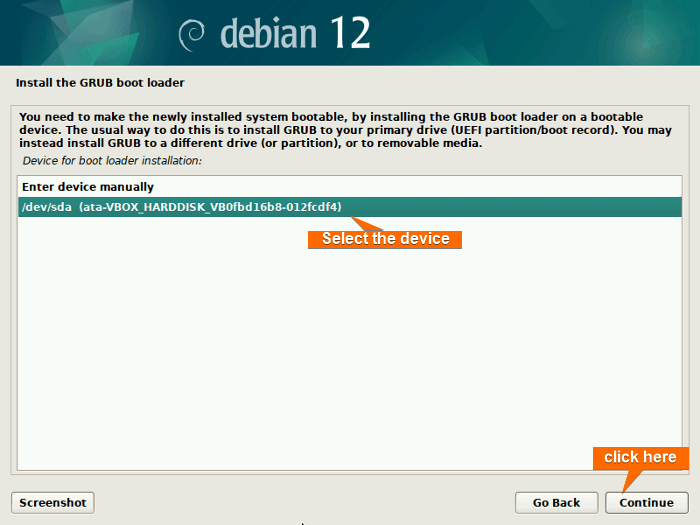
Step 11: Install the GRUB Bootloader
- To install the GRUB bootloader, check the “Yes” option in the confirmation window and click on Continue.
- Now, select “dev/sda” as the device for boot loader installation and hit the Continue button.
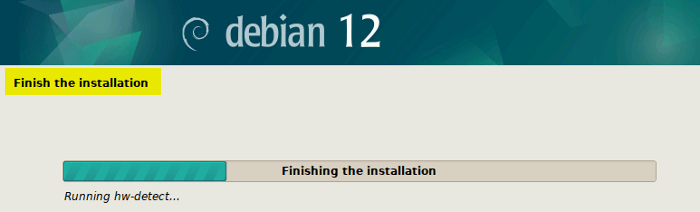
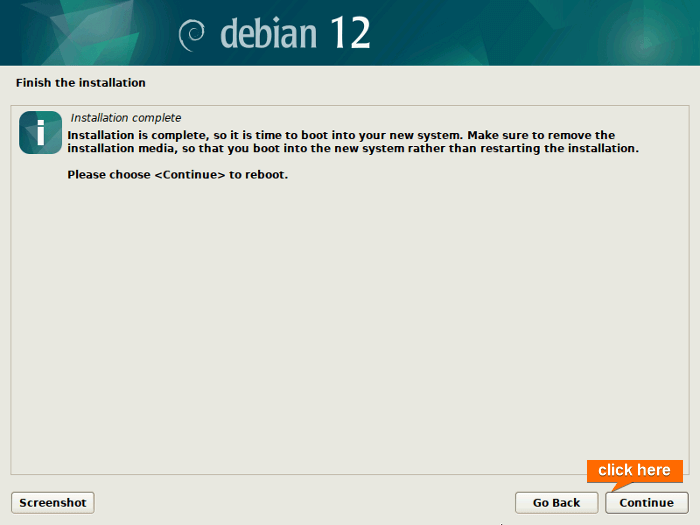
- Subsequently, it proceeds to install GRUB and terminates the installation.

- Finally, reboot your computer by clicking on Continue.
Step 12: Post Installation Setup
Following the completion of the installation, there are a few additional configurations required to set up the operating system. Follow the steps below:
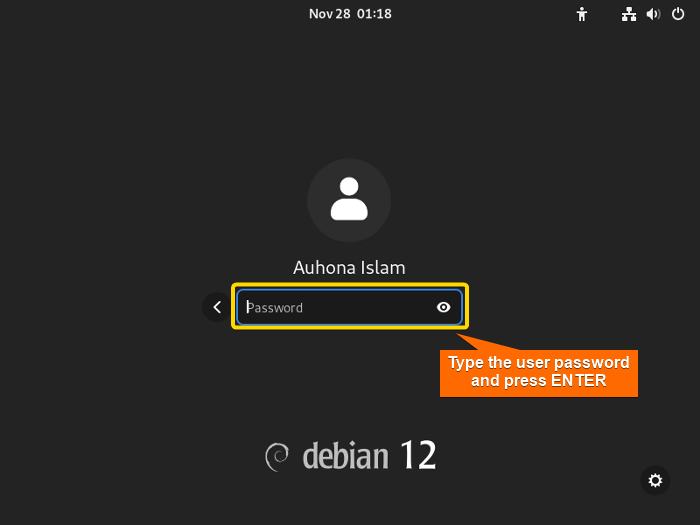
- Upon rebooting, a login prompt will be displayed. Enter your password and press ENTER to log in.
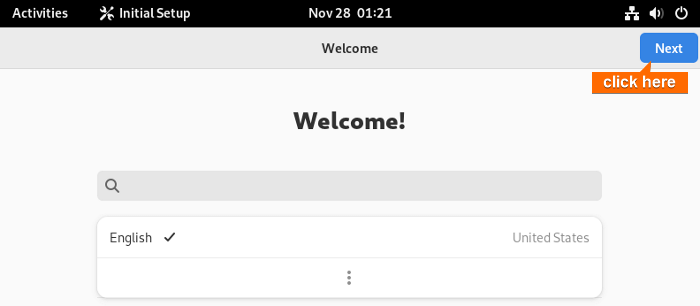
- After logging in, it’s time to configure a few more settings. First, a window with the system language (English) will appear. Click on NEXT.

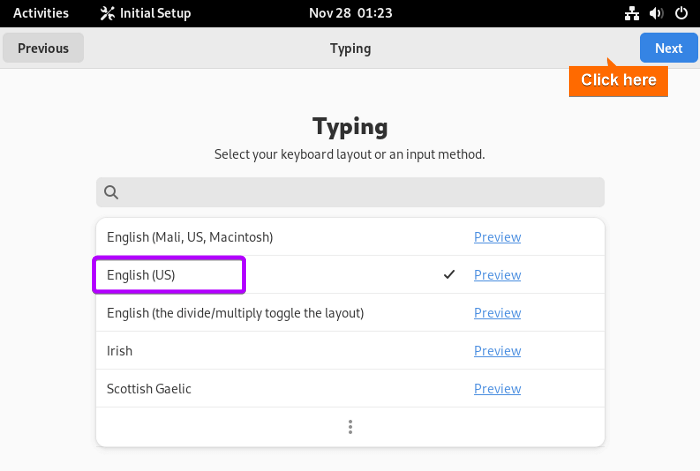
- Now, select your keyboard layout or an input method (for example English (US)) and click on NEXT.

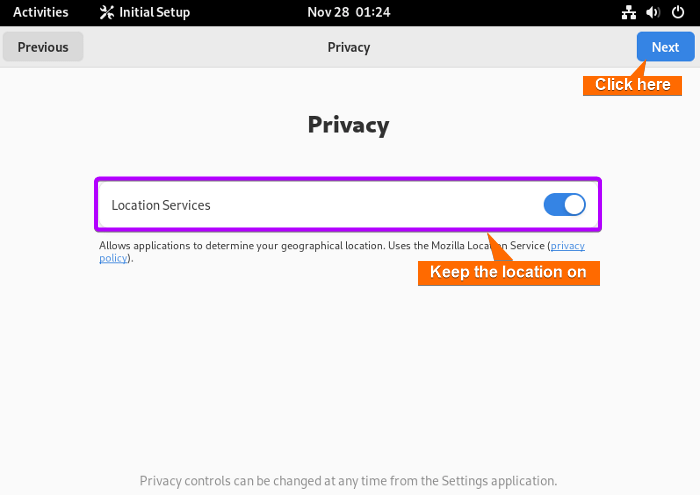
- You can keep your location ON/OFF according to your convenience and click on NEXT.

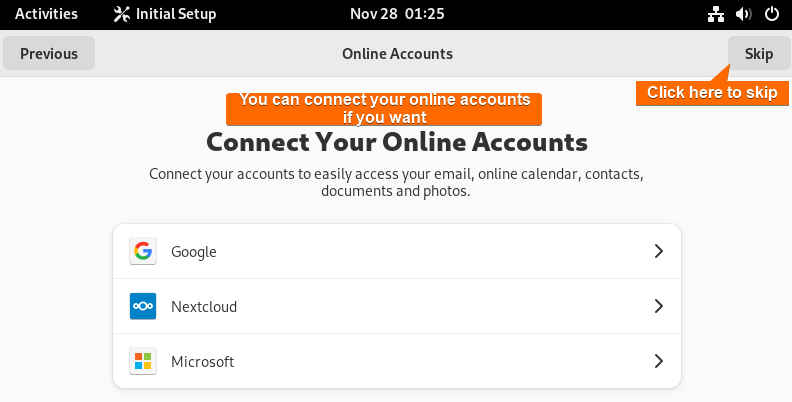
- You now have the choice to link your Debian system with online accounts from the provided list in the image below. Alternatively, you can skip the process by clicking on the Skip button located in the top right corner.

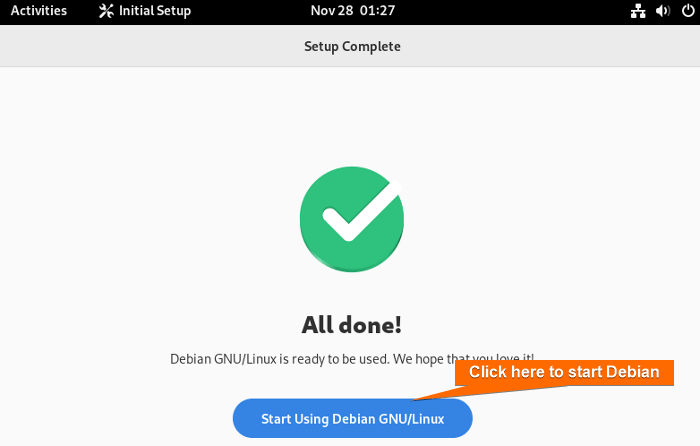
- Then, click on “Start Using Debian GNU/Liunx”.

- Finally, the desktop interface of Debian OS will appear as below. Congratulations! The installation of Debian on your computer has been completed.
- After installation, update the system using:
sudo apt updateWhile running this command you may face the following error:
 This apt update error in Debian occurs as your system tries to download the updates from the CDROM instead of the internet.
 Congratulations! The installation of Debian on your computer has been completed.
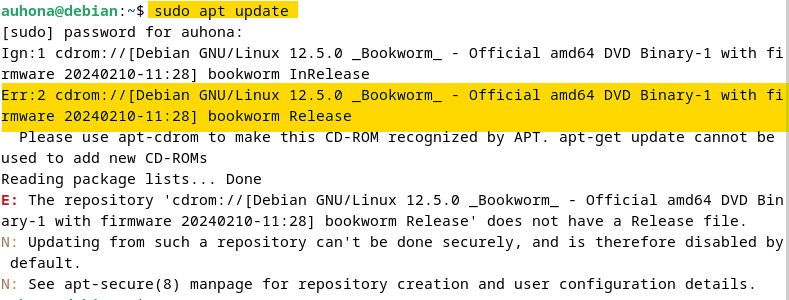 This apt update error in Debian occurs as your system tries to download the updates from the CDROM instead of the internet.
To resolve this issue, modify the repository by following the steps below:
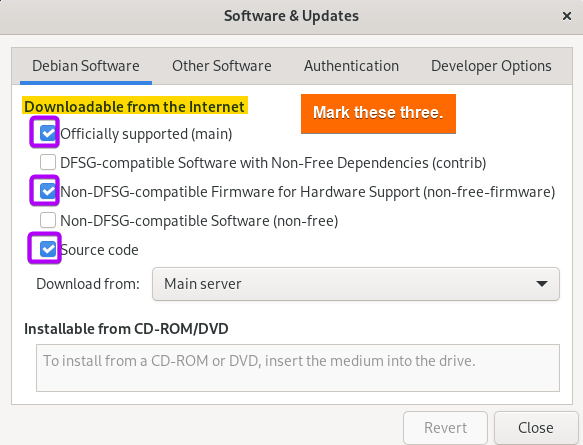
- Navigate to Show APP > Software & Updates > Debian Software.
- After that, mark the following options under the Downloadable from the Internet section. Here you have to authenticate yourself using the root password.

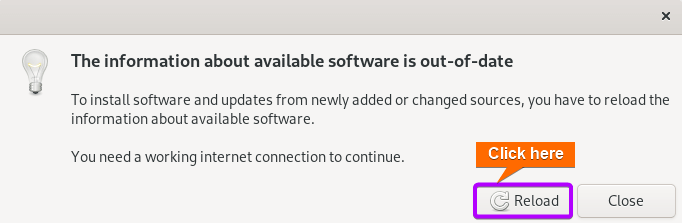
- Then, navigate to Other Software, unmark the cdrom repository as below, and click on Close.

- Lastly, click on Reload to install software and updates from newly added or changed sources.

- Now, run the command
sudo apt update.

- Open the sources.list file in the terminal using the command:
sudo nano /etc/apt/sources.list - Now add uncomment the cdrom repository using a
#sign before it and add the following repository to enable updates and software installation from the internet:deb https://deb.debian.org/debian/ bookworm main contrib non-free-firmware non-free
- Lastly, press CTRL+S to save and CTRL+X to exit. Now, run the command
sudo apt update.

Conclusion
In conclusion, this comprehensive guide has equipped you with the knowledge to seamlessly install Debian on VirtualBox, opening up a world of possibilities for exploring and experimenting with this renowned Linux distribution in a virtual environment. By following the step-by-step instructions, you’ve successfully configured VirtualBox, initiated the Debian installation process, and performed essential post-installation steps to enhance your virtual machine’s performance.
People Also Ask
What are the recommended system’s memory requirements for running Debian on VirtualBox?
While Debian itself has modest system requirements, for a smooth experience on VirtualBox, it’s recommended to allocate at least 2GB of RAM to the virtual machine.
How do I update and upgrade Debian after the installation?
To update and upgrade Debian after the installation, open the terminal and run the following command:
sudo apt update

sudo apt upgrade
Can I run other operating systems alongside Debian in VirtualBox?
Yes, VirtualBox allows you run to multiple virtual machines with various operating systems simultaneously. You can experiment with different OS environments without affecting your primary system.
How do I install VirtualBox on my computer?
To install VirtualBox, follow the steps below:
- Visit the official VirtualBox website and click on the “Download” button.
- Run the installer and follow the installation wizard.
- During the installation, you may be prompted to install additional components such as network interfaces.
- After the installation is complete, launch VirtualBox from the Start menu or desktop shortcut.
To get a comprehensive guide on the installation of VirtualBox, you can check the VirtualBox installation guide.
What is the purpose of the VirtualBox Guest Additions, and how do I install them?
VirtualBox Guest Additions enhance the virtual machine’s performance and usability. To install them, start your Debian virtual machine, go to the VirtualBox menu, select “Devices,” and click on “Insert Guest Additions CD image.” Follow the on-screen instructions to complete the installation.
Related Articles
- How to Install Ubuntu on VirtualBox [A Complete Guide]
- How to Install Arch Linux on VirtualBox [3 Methods]
- How to Install Fedora on VirtualBox [Simple Guide]
- How to Install VirtualBox Guest Additions on Debian
- How to Install Kali Linux on VirtualBox [Easiest Guide]
- How to Install CentOS 7 on VirtualBox [8 Easy Steps]
- How to Install VirtualBox Guest Additions on CentOS
<< Go Back to Virtual Machine Installation Guide | Linux OS Installation Guide | Learn Linux Basics
FUNDAMENTALS A Complete Guide for Beginners


THanks !!! Great Tutorial !!!
Thanks for your acknowledgment. Please don’t hesitate to get in touch for any queries.
Hi !!! two comments… If you assign 2 Mb to the VM, Debian BookWorm 12.5 DVD does not boot !!!! (two hours lost trying to understand the problem) … if you say NO to Configure the Package Manager, apt will be unable to get packages and updates, so the system will be totally useless !!! DO NOT DO THAT !!!! (1 day lost debugging this USER ERROR !!!
Hi Noberto,
Great findings. I truly appreciate the time and effort you’ve put into it. Please try to be careful of memory allocation to the VM. Before proceeding to the installation, it’s better to check out the requirements section.
Regarding the second issue, in your installed Debian system, the

sudo apt updateis trying to install updates from the CDROM instead of online repositories as a result it’s not working.To resolve this issue, you have to add the
deb https://deb.debian.org/debian/ bookworm main contrib non-free-firmware non-freerepository to the sources.list file and comment out the cdrom repository using#before it.It’s mention-worthy that if you choose YES to the scan extra media file in the configure package manager section, the same screen may appear repeatedly. That’s why it’s better to choose NO and modify the sources.list file after installation as above.
To have a Debian system that can be updated immediately after installation without any error, you can go for the netinst ISO file instead of the mentioned DVD ISO in the article.
Thank you very much, great tutorial
Welcome Martin. Thanks for the kind words.
Hello, thanks for your tutorial wich really helped me!
I only have a problem at the last step where my profil is not part of the sudoers list. I’ve tried to fix this issue but apparently i must connect with an account that is already a sudoer to do so and i don’t know how to do so. Where did i messed up ? How can i promote my profil ?
Hmm, after selecting “Graphical Install” the virtual display goes black and nothing happens for around a minute – and then the virtual environment closes and is reported as “Aborted” in VirtualBox. This is on the latest version of VirtualBox and 12.5 of Debian. The last few lines of the log file aren’t particularly enlightening..
00:01:22.030859 GIM: KVM: VCPU 0: Enabled system-time struct. at 0x0000000045601000 – u32TscScale=0xa6978af4 i8TscShift=6 uVersion=2 fFlags=0x1 uTsc=0x7371bb48 uVirtNanoTS=0x12c8058bf6 TscKHz=24010
00:01:22.031119 TM: Switching TSC mode from ‘Dynamic’ to ‘RealTSCOffset’
00:01:23.210179 GIM: KVM: Enabled wall-clock struct. at 0x0000000045600000 – u32Sec=1718758863 u32Nano=832984725 uVersion=2
00:01:23.218452 PIT: mode=2 count=0x12a5 (4773) – 249.98 Hz (ch=0)
00:01:23.218658 APIC0: Switched mode to x2APIC
00:01:23.888386 PIT: mode=0 count=0x10000 (65536) – 18.20 Hz (ch=0)
00:01:27.413974 OHCI: Software reset
good effort put in preparing this article. thanks.