The neofetch command in Linux is a shell built-in command line system information tool. People use this command to aesthetically display system information such as the hostname, operating system, kernel version, and desktop environment. As well as information about the system’s CPU, memory, and disk usage. It also displays information about the terminal and shell being used and who is the currently logged-in user. In this article, I will talk about the neofetch command & how you can customize the display using different command line options with some practical examples.
A. Description
The neofetch command is an easy and super-fast command line tool to fetch system information in an artistic and visually charming way within seconds. This command can be run on more than 150 operating systems including Windows, Mac OS X, and Linux. As it is a bash-written CLI utility, you can use the command anywhere you run the Bash. Neofetch is also very popular because of its higher adjustability for configuration changes, as you can customize your display the way you like. The command is mainly used in screenshots to display to other users all the info about the system.
B. Syntax
The neofetch command is very useful for system administrators and developers to quickly gather system information and troubleshoot issues. The syntax of the neofetch command is quite straightforward. The syntax is,
neofetch <func_name> [OPTION]... “value”Here,
- func_name → It specifies a function name to quickly display that function’s information. Which is the second part of the information on the display configuration.
- Options → Options are used to modify and increase the usage of the command in a user-friendly way.
- Value → These are the values that we assign to our options to modify the command.
C. Options
There are several options to use with the neofetch command. A user can use them to configure the output display of the system information along with the logo. I will shortly discuss some of the most used options here. As the neofetch command is a shell built-in command, it does not have the man page. But you can get all the information of the command using the –help option. Just write the following command in your terminal.
neofetch --helpUseful Options
Info:
- –disable infoname, to disable an info line from appearing in the output. Where infoname is the function name that can be memory, disk, hostname, shell, or any info you want to disable.
- –speed_type type, to change the type of CPU speed to display, these types could be current, min, max, bios, etc.
- –cpu_brand on/off, to enable or disable CPU brand in the display.
- –cpu_speed on/off, to show/hide the CPU speed.
- –cpu_temp C/F/off, to show/hide CPU temperature.
- –cpu_brand on/off, to show/hide CPU brand.
- –disk_parcent on/off, to show or hide disk percent.
- –disk_show value, to select the disk to display, possible values ‘/’, ‘/path/to/mount point’, ‘/dev/sdXX’.
- –disto_shorthand on/off, to shorten(on, tiny, off) the output of distro.
- –kernel_shorthand on/off, to shorten the output of kernel.
- –uptime_shorthand on/off, to shorten the output of uptime.
- –shell_version on/off, to enable/disable showing the SHELL version.
- –memory_percent on/off, to display the memory percentage or not.
- –memory_unit kib/mib/gib, to show/hide memory output unit.
Text formatting:
- –colors x x x x x x, to change the text colors in this order.
- –underline on/off, to enable/disable the underline.
- –bold on/off, to enable/disable bold text.
Color Blocks:
- –color_blocks on/off, to enable/disable the color blocks.
- –col_offset auto/num, to left-padding of color blocks.
- –block_width num, to set the width of color blocks in spaces.
- –block_height num, to set the height of color blocks in lines.
BARS:
- –bar_char ‘elapsed char’ ‘total char’, characters to use when drawing bars.
- –bar_border on/off, to surround the bar with [ ] or not.
- –bar_colors num num, to set colors to make the bar, the order is: elapsed, total.
- –cpu_display mode, Bar mode, possible values: bar, infobar, barinfo, off.
- –memory_display mode, Bar mode, possible values: bar, infobar, barinfo, off.
Image Backends:
- –backend backend, to select the image backend, possible values: ASCII, caca, jp2a, w3m, etc.
- –source source, which image or ASCII file to use, possible values: auto, ASCII, wallpaper, /path/to/image.
- –ascii source, to use the ‘ASCII’ backend.
- –caca source, to use the ‘caca’ backend.
- –jp2a source, to use the ‘jp2a’ backend.
- –w3m source, to use the ‘w3m’ backend.
- –off, to disable the ASCII art.
ASCII:
- –ascii_colors x x x x x x, to select the colors to print the ASCII art.
- –ascii_distro distro, which distro’s ASCII art to print.
- –ascii_bold on/off, to bold the ASCII logo or not.
- -L, –logo, to display only the logo by hiding the info text.
Image:
- –loop, to redraw the image constantly until Ctrl+C is used. This fixes issues.
- –size 00px | –size 00%, to size the image, possible values: auto, 00px, 00%, none.
- –crop_mode mode, to select the crop mode (normal, fit, fill).
- –crop_offset value, to change the crop offset mode to normal mode, possible values: (north, northeast, south, center, etc.).
- –clean, to delete cached files and thumbnails.
Other:
- –config /path/to/config, to specify a path to a custom configuration file.
- –config none, to launch the script without a config file.
- –no_config, to not create the user config file.
- –stdout, to turn off all colors and disable config file to stdout.
- –help, prints all the info about the neofetch command.
- –version, to display the neofetch version.
- -v, to display error messages.
- -vv, to display the error reports in a verbose log.
Installing the “neofetch” Command in Linux
The installation process of the neofetch command in Linux is relatively easy. When you type the command on your terminal, it will show you if the command is installed beforehand or not. From the below picture, you can see that the command is not installed on my machine. In that case, you can install the command within a few minutes by running the specified command. Follow the below steps to install the neofetch command.
Steps to Follow >
➊ At first open the Ubuntu Terminal
➋ Type the following in your command prompt:
sudo apt install neofetch➌ Type your password
➍ Now, press ENTER
Output >
After completing these simple four steps, like the below picture within 2-3 minutes, the neofetch command will be installed on your system.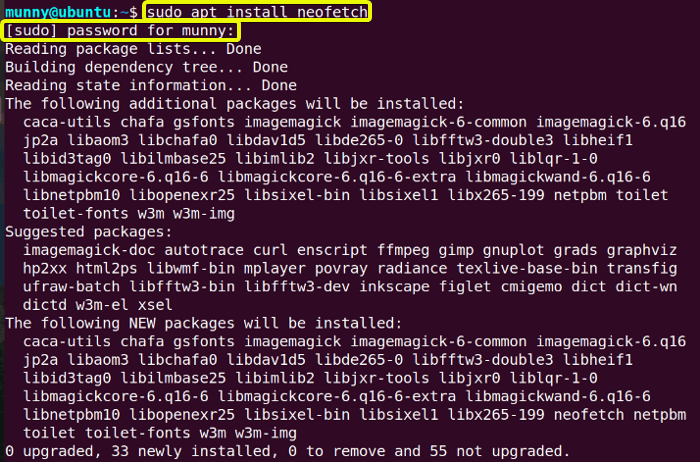
Practical Examples of the “neofetch” Command in Linux
The neofetch command in Linux is one of the most popular and fun command tools to display system information with logos. It has many usages. Below I will discuss some of the practical usage of the command with examples. Read through the examples to learn to use the neofetch command practically.
Example 1: Display the System Information Using the “neofetch” Command in Linux
The neofetch command displays all the system information. Just type the command and in the output display, you will see your system information such as the OS system version, hostname, memory, and disk storage along with the shell and kernel information. Moreover, you will see the system logo alongside all those info. The logo will be displayed on the left side of the information part. The syntax is,
neofetchTry this yourself by following the below steps:
Steps to Follow >
➊ Start by opening the Ubuntu Terminal.
➋ Type the following command in the command prompt:
neofetch➌ Now, press the ENTER button.
Output >
From the output image, you can see all your system info on the right side of the output display and the logo on the left side.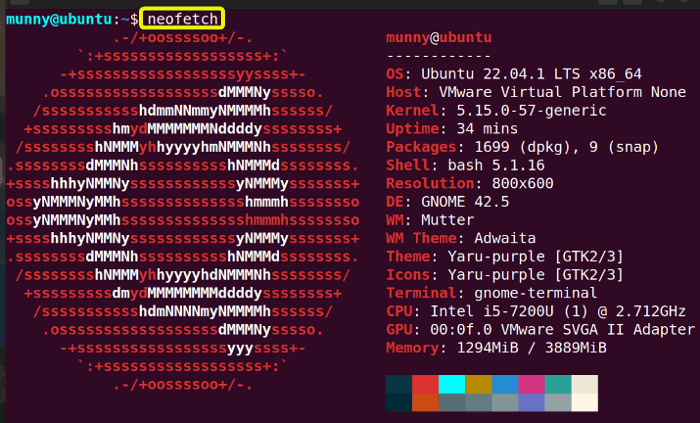
Example 2: Remove the Logo from the Output Display of the “neofetch” Command in Linux
When you only want the system information to be displayed, not the logo in that time use the neofetch command with the option –off. The syntax is,
neofetch --offFollow the below steps to display the system information excluding the logo.
Steps to Follow >
➊ At first open the Ubuntu Terminal.
➋ Type the following command in the command prompt:
neofetch --off➌ Now, press the ENTER button.
Output >
You can see only the system information on the output display and no logo.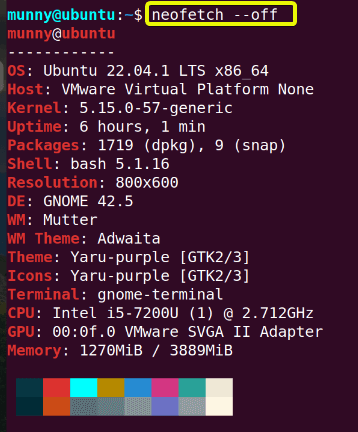
Similar Readings
- The “man” Command in Linux [6 Practical Examples]
- The “history” Command in Linux [6 Practical Examples]
- The “cal” Command in Linux [7 Practical Examples]
- The “bc” Command in Linux [10+ Practical Examples]
Example 3: Display Only the System Logo as the Output of the “neofetch” Command in Linux
You can only display the system logo excluding the information too. In that case, use the neofetch command with the option –L. The syntax is,
neofetch --LFollow the below steps to display the logo excluding system information.
Steps to Follow >
➊ Begin by opening the Ubuntu Terminal.
➋ Type the following command in the command prompt:
neofetch -L➌ Now, press the ENTER button.
Output >
From the output display, you can only see the logo of the system, not any other information.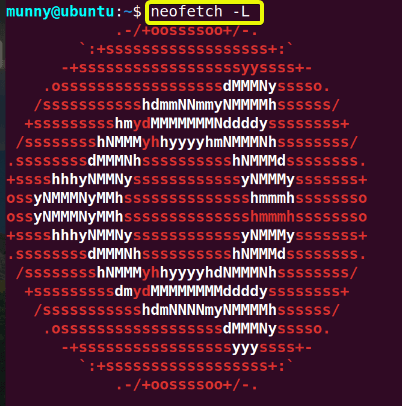
Example 4: Display Any Other ASCII Logo Using the “neofetch” Command in Linux
The neofetch command displays system information with its logo. But you can display any other ASCII (American Standard Code for Information Interchange) logo with the system information instead of the system logo. Just type the –ascii distro function name after the neofetch command followed by the system name whose logo you want to display. The syntax is,
neofetch --ascii distro <system_name>Follow the below steps to display different ASCII logos.
Steps to Follow >
➊ At first open the Ubuntu Terminal.
➋ Type the following command in the command prompt:
neofetch --ascii distro windows➌ Now, press the ENTER button.
Output >
From the output display, you can see the windows logo along with your current system information.
Example 5: Display the Small-Sized Logo Using the “neofetch” Command in Linux
To display any system logo in a shorter size with the neofetch command, use the argument small. Type the neofetch command and then the –ascii option with the system name followed by the argument small. The syntax is,
neofetch --ascii distro <system_name> smallProceed by following the below steps to do it yourself.
Steps to Follow >
➊ At first open the Ubuntu Terminal.
➋ Type the following command in the command prompt to display the smaller logo of ubuntu:
neofetch --ascii distro ubuntu small➌ Now, press the ENTER button.
Output >
As the output image displays, the ubuntu system logo is in a smaller size.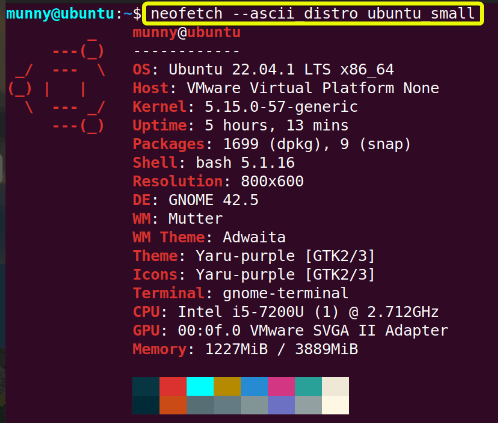
Example 6: Configure Colors of the Output Display Patterns of the “neofetch” Command in Linux
The neofetch command displays system information and the system logo in ASCII characters. As from the upper examples you can see, these info character strings along with the logo characters are in different color patterns. You can change the color of these patterns. Neofetch uses the terminal’s built-in ANSI escape codes for color output. These special codes can be changed to change the text colors of the terminal. Use the –colors option with the color codes (!!use spaces between codes!!) after the neofetch command. The syntax is,
neofetch --colors <codes>Follow the steps below to configure the colors of the display patterns.
Steps to Follow >
➊ At first open the Ubuntu Terminal.
➋ Type the following two commands in the command prompt:
neofetch --colors 4 1 8 8 8 7neofetch --colors 4 2 5 5 8 6➌ Now, press the ENTER button.
Output >
After running the first command, from the output image, we can see the colors of the output pattern just as the given color codes.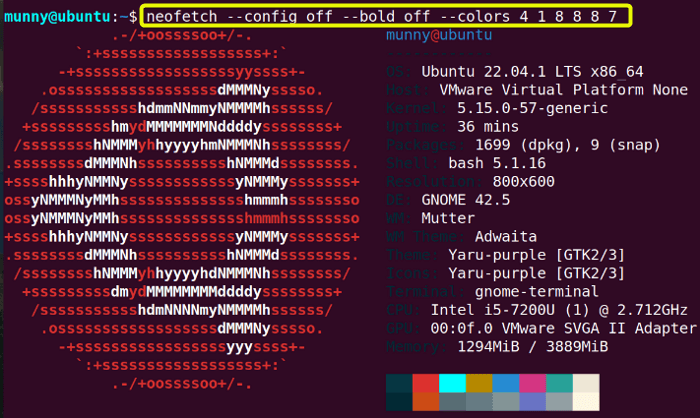 Then we ran the second command by changing the color codes, and from the output image, we can see the changes in the color output. This is how we can customize the color patterns of our output display.
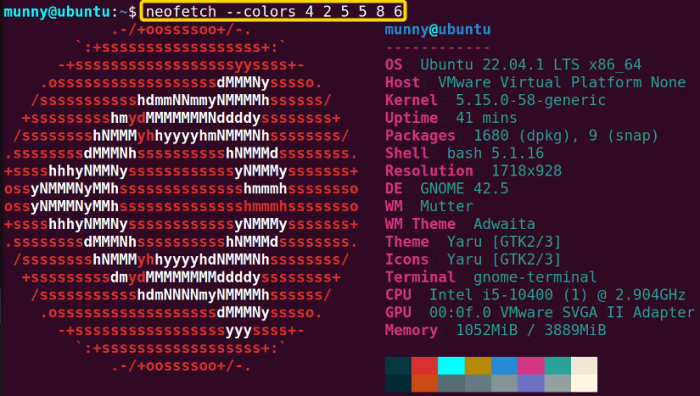
Example 7: Configure the Output Display Pattern of the “neofetch” Command
So far we now know that after running the neofetch command we get a lot of information about the system in our display prompt. We can customize what information to display or hide. You can do that in two ways. You can show or hide any information either by providing options to the neofetch command or by editing the configuration file. If you edit the configuration file, it will be permanent until you change it again. That way you won’t have to rewrite the command with options every time you want to disable the info from displaying. Anyway, I will show you both ways with examples.
7.1 Use Options
To hide a single or several pieces of info use the option –disable followed by the info names you want to disable from the display window with the neofetch command. The syntax is,
neofetch --disable <info_names>See through the following steps to learn how to remove some info from displaying.
Steps to Follow >
➊ Launch the Ubuntu Terminal.
➋ Type the following command in the command prompt:
neofetch --disable memory shell➌ Now, hit the ENTER button.
Output >
From the output display, you can see there is no info about the system memory or shell after the command is run with the option –disable to disable the memory and shell info.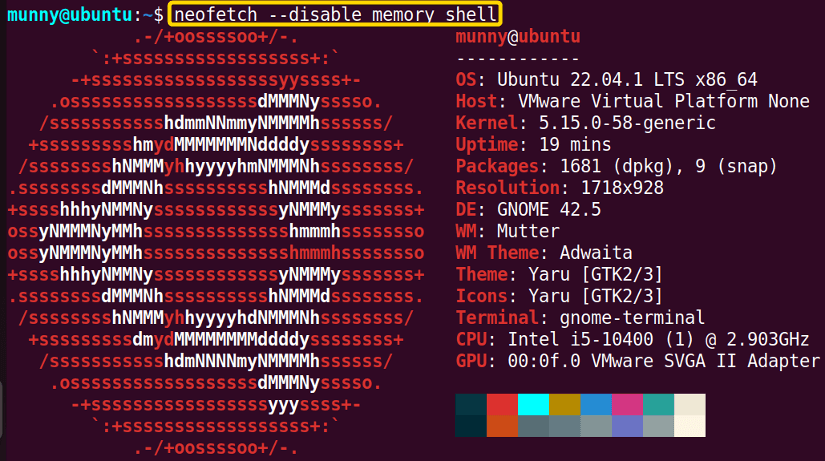
7.2 Edit configuration file
You can edit the neofetch configuration file after opening the file with the nano editor. After opening the file you will see the list of the info that the command displays after running. Comment on those lines of info you want to disable. To comment just add a hash ‘ # ’ sign before that info line. Later when you want that info to show again just remove that comment by removing the hash ‘ # ’ sign. Follow the below steps to configure the neofetch file.
Steps to Follow >
➊ Open the Ubuntu Terminal.
➋ Type the following command in the command prompt:
nano .config/neofetch/config.conf➌ Now, press the ENTER button.
➍ Then edit the file by commenting on the info lines you want to disable. And save the file by CTRL+S and exit by CTRL+X.
➎ Run the neofetch command again to check the info the command now displays.
neofetch➏ Finally, hit the ENTER key.
Output >
First, run the first command to open the neofetch configuration file with the nano editor like in the below picture. After that, the nano editor will pop up with the configuration file just like the below image.
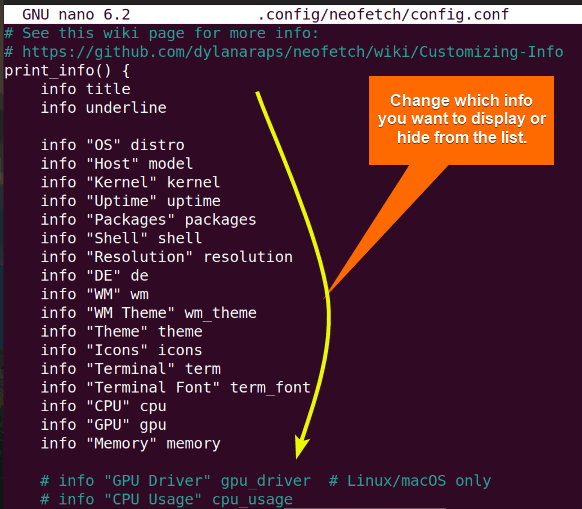 Next, comment on those info lines you want to disable. I commented on the memory and host info lines.
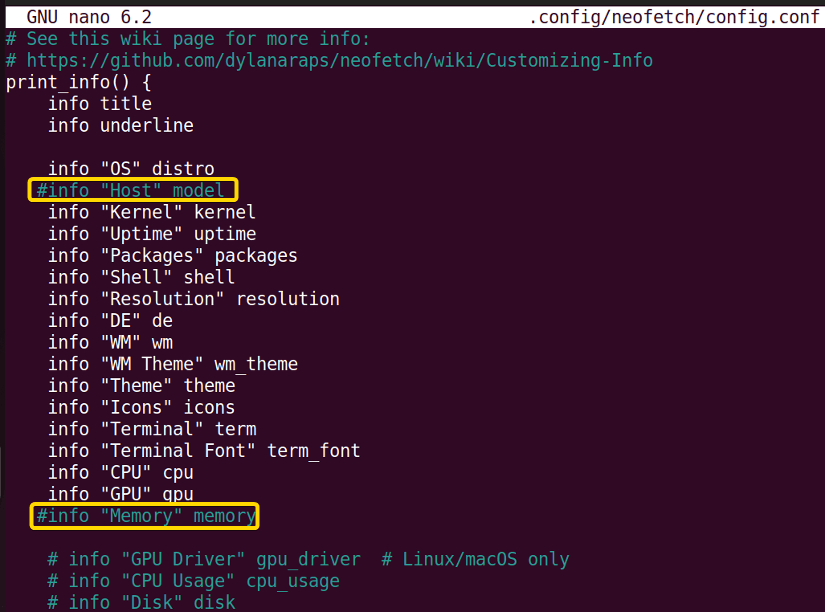 Afterward, save the file and run the neofetch command. From the below picture now you can see that the command isn’t displaying the host and memory info anymore. This way you can add or remove any info you want to display.
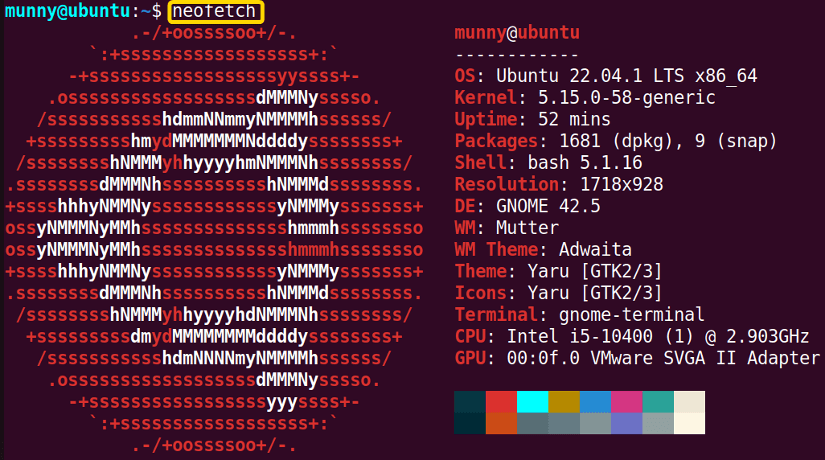
Example 8: Use a Custom Picture to Display Instead of the ASCII Art Logo
While using the neofetch command, you can use a customized picture as your ASCII logo, instead of the system logo. There are different backends the neofetch command uses to gather information about the system. And among them, there are some additional special backends like caca, jp2a, w3m, and many more that can be used to display the information in a visually pleasing way. Use these backends to set a custom picture for the ascii logo. Just type the neofetch command and give the backend name followed by the path of the custom picture. The syntax is,
neofetch --backend_name <path/to/the/image>Go through the following example to set a custom picture instead of the logo practically. I will use the picture index.png from my Pictures folder. You can use any of the pictures you like from your computer or you can also download mine from the below.
Steps to Follow >
➊ At first open the Ubuntu Terminal.
➋ Now type the following command in the command prompt to set the index.png picture instead of the system logo using the caca backend.
neofetch --caca /home/munny/Pictures/index.png➌ Then, press the ENTER button.
➍ After that, type the following command in the command prompt to set the index.png picture instead of the system logo using the jp2a backend.
➎ Finally, hit the ENTER button.
Output >
In the first command, I used the caca backend, and the output looks like the below picture. Where I used the index.png as the custom picture instead of the system logo.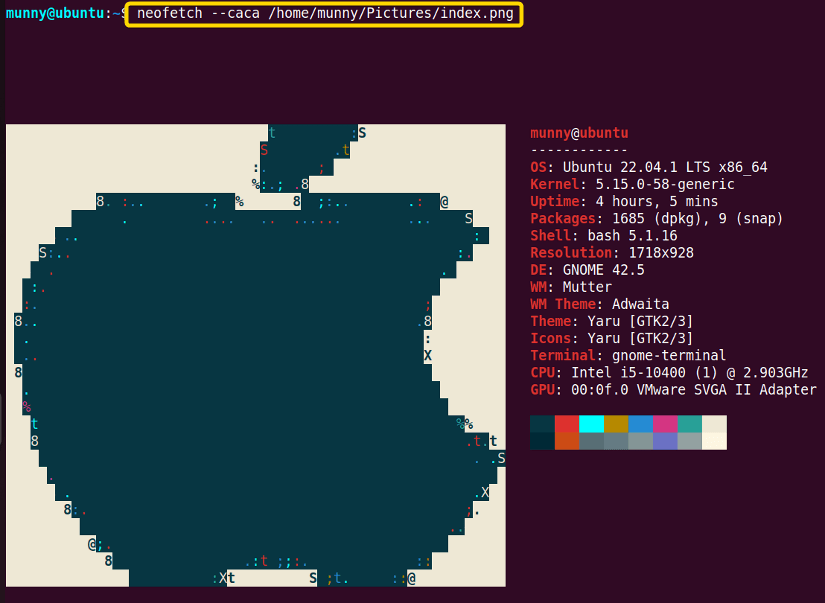 In the second command, I used the jp2a backend and the same picture. And you can see the output looks different. Here the image is in text format.
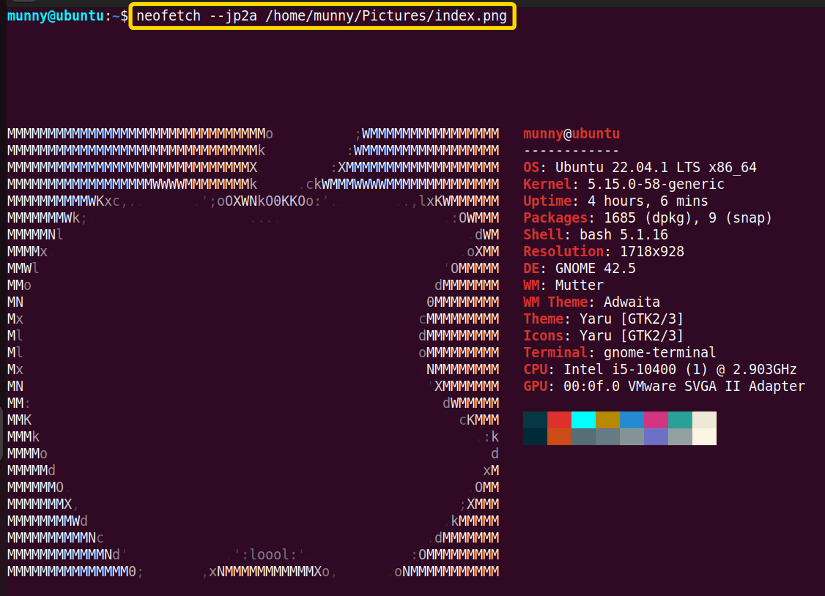
Similar Readings
- The “cron” Command in Linux [3 Practical Examples]
- The “crontab” Command in Linux [10 Practical Examples]
- The “date” Command in Linux [8+ Practical Examples]
- The “ncal” Command in Linux [8 Practical Examples]
Example 9: Add Gradient Colors in the Output Display of the “neofetch” Command
The neofetch command is a fun command and is mostly used as a screen saver for the system. To make the display look better and more vibrant you can use the lolcat command to add the rainbow coloring effect in the output. The lolcat command is a program that concatenates files or standard input and adds rainbow coloring to it. Most probably you do not have the lolcat command installed on your system, so first install the command. I will give details in the below steps. The syntax is,
neofetch | lolcatSteps to Follow >
➊ Open the Ubuntu Terminal.
➋ Type the following command to install the lolcat command.
sudo apt install lolcat➌ Give your PASSWORD
➍ Enter Y for yes.
➎ Press the ENTER button.
➏ After that type the following command to add gradient colors to the output of the neofetch command.
neofetch | lolcat➐ Finally, hit the ENTER key.
Output >
Install the lolcat command just like the picture below.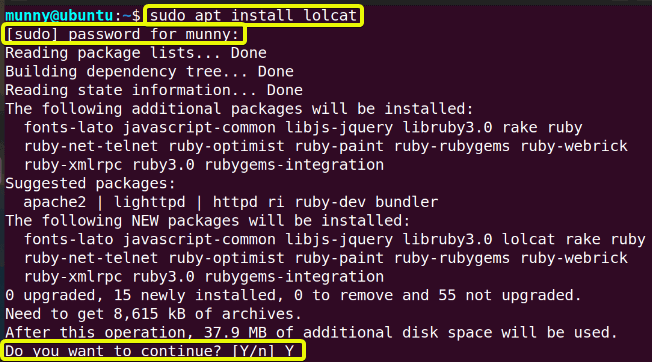 After that, run the second command to color the output of the neofetch command. And you can see how beautiful the output looks with all the vibrant colors, just like my output image below.
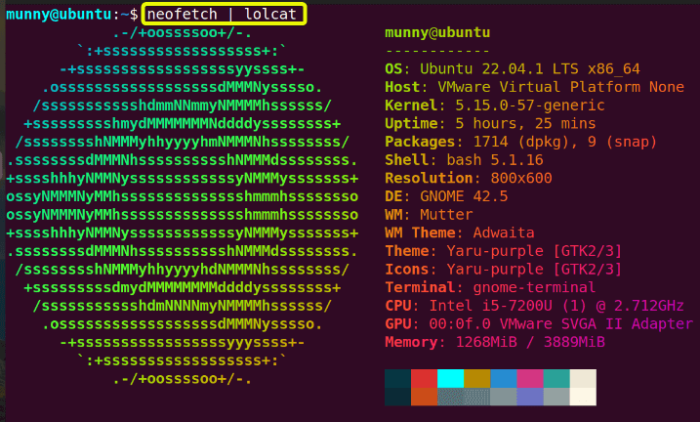
Example 10: Display from the cowsay File Using the “neofetch” Command
Cowsay is a pretty old program that generates ASCII art pictures of a cow with a given message in a speech balloon. To make the output more fun you can use this program with the neofetch command. Where the output will display the info beside the cowsay-generated art instead of the system logo. Use the options -w, -y, -b, or -d, any one of them, of the cowsay program to enter the message you want to display. Know more about them with the –help option with the cowsay command. Make sure to install the cowsay program before running the command. Follow the below steps to install and run the command. The syntax is,
neofetch --ascii “$(cowsay <option> <message>)”Check the below steps to try it yourself practically.
Steps to Follow >
➊ At first open the Ubuntu Terminal.
➋ Then type the following command in the command prompt to install the cowsay program.
sudo apt install cowsay➌ When the program has been installed successfully, type the below command to display from the cowsay file.
neofetch --ascii “$(cowsay -w Hi)”➍ At last, press the ENTER button.
Output >
Run the first command and install the cowsay program like in the below picture.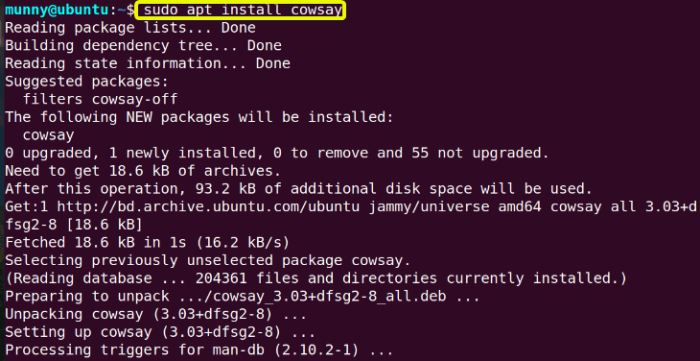 After that, run the second command, and from the output picture you can see that the neofetch is now displaying an ascii art of a cow saying my message “Hi”, beside the system info instead of the system logo.
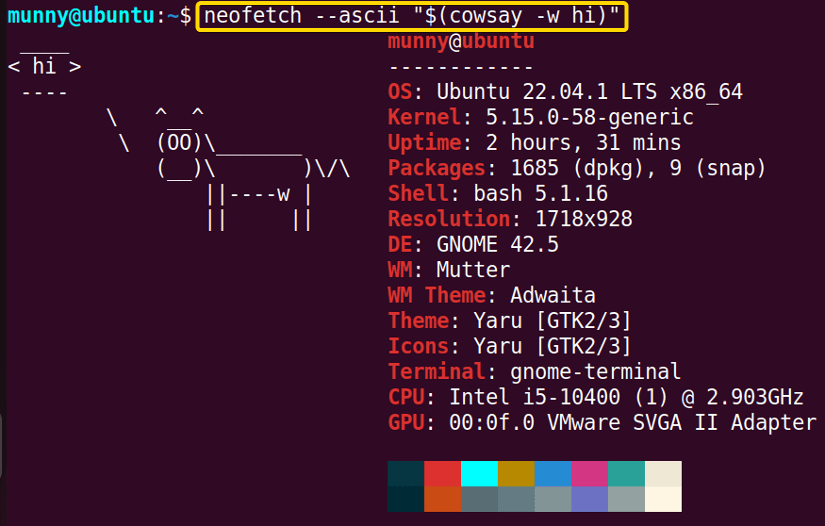
10.1 Display Different Cows from the cowsay File Using the “neofetch” Command
A fun fact about the cowsay program is that it contains different cow files, in a simple context, ascii art of different animals, not just a cow. Use the option –list with the cowsay program to view your system’s cow files. It contains the ascii art of sheep, dragon, kitty, and many more. You can use any of the cow files as an argument with the cowsay program. Just use the option -f and then the cow file name as an argument. You can use these cow files with the neofetch command just like the example 10. The syntax is,
neofetch --ascii “$(cowsay -f <cow_file_name> -w <message>Check the below example where I will use different cow files.
Steps to Follow >
➊ Start by opening the Ubuntu Terminal.
➋ Type the following command in the command prompt to display from the dragon cow file.
neofetch --ascii “$(cowsay -f dragon -w hi)”➌ Hit the ENTER button.
➍ Then, type the following command in the command prompt to display from the sheep cow file.
neofetch --ascii “$(cowsay -f sheep -w Helloo)”➎ Again, press the ENTER button.
Output >
From the output image, you can see all the system info is displayed beside the dragon cow file instead of the system logo. And it is also displaying your given message “hi”.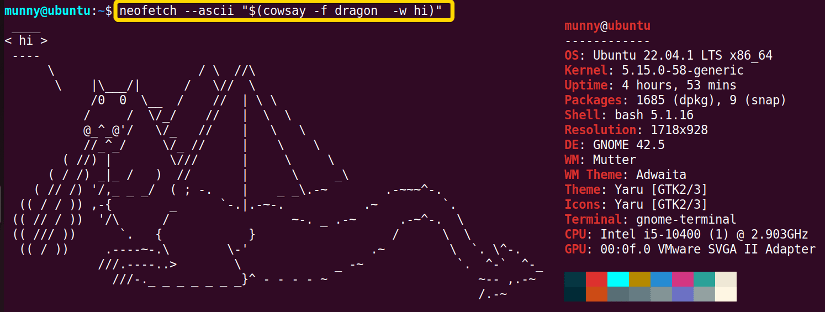 After running the second command you will get the output display picture like in the below picture. Where we can see a sheep in ascii art displaying the given message.
10.2 Display random messages
In the upper example, we saw how to display the messages we type to display. We can also make the command a little bit more fun by displaying random messages from the fortune program. The Fortune program displays pseudorandom messages from a database of quotations. We just have to pipe the fortune command to the cowsay file to display these messages. Make sure to install the fortune program before trying. The syntax is,
neofetch --ascii “$(fortune | cowsay)”Follow the below steps to run the neofetch command by displaying from the cowsay file with random messages from the fortune program.
Steps to Follow >
➊ Begin by opening the Ubuntu Terminal.
➋ Type the following command to install the fortune program.
sudo apt install fortune➌ After that type the following command in the command prompt to display random messages from the cow file.
neofetch --ascii “$(fortune | cowsay)”➍ Press the ENTER button.
➎ Then, type the following two commands in the command prompt to display a random message from the dragon and the sheep cow files in rainbow colors.
neofetch --ascii “$( fortune | cowsay -f sheep)” | lolcatneofetch --ascii “$(fortune | cowsay -dragon)” | lolcat➏ Again press the ENTER button to run the commands.
Output >
First, install the fortune program just as in the picture below.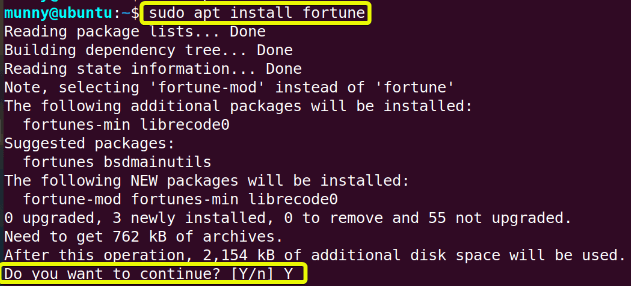 After that, run the next three commands one by one and you will see the output just like the below three pictures subsequently. In the first picture, you can see the cow from the cowsay file showing a random message from the fortune program.
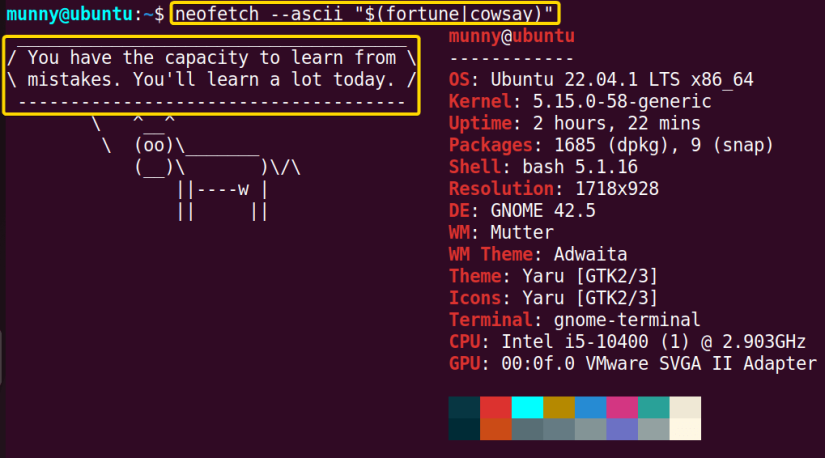 Then, you can see the dragon cow file showing a random message from the fortune program in the below picture as the output of the next command.
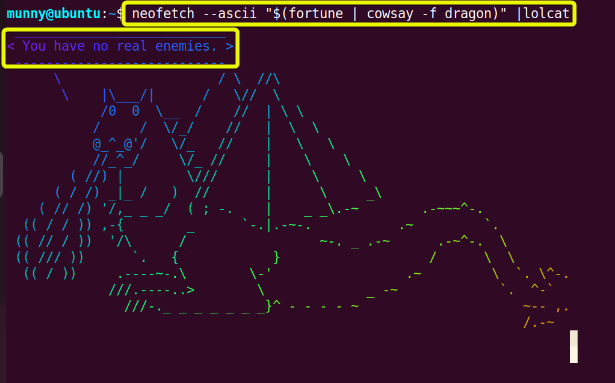 After that, you can see the sheep cow file showing another random message from the fortune program in the below picture as the output of the last command.
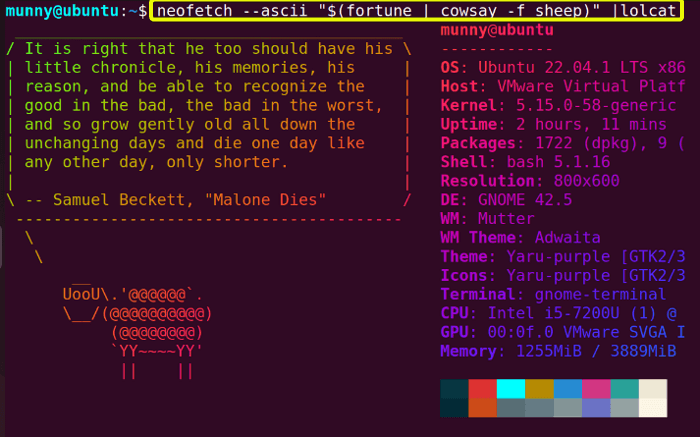
Example 11: Animate the Output Display of the “neofetch” Command in Linux
You can view the output of the neofetch command in a cool way by animating it. You can animate the output using the pv command. The pv ( Pipe Viewer) command is used to monitor the data sent through the pipe. It gives the user a visual display of time elapsed, and data transfer speed along with the remaining time. To animate the output of the neofetch command pipe it through the pv command. Use the option -L of the pv command to set the speed rate. The syntax is,
neofetch | pv [options] <speed _number>Check out the below example to animate the output of the neofetch command.
Steps to Follow >
➊ At first open the Ubuntu Terminal.
➋ Install the pv command using the following command.
sudo apt install pv➌ After completing the installation process type the following command in the command prompt.
neofetch | pv -qL 1000 | lolcat➍ Now, press the ENTER button.
Output >
When you write the command to install the pv command and run it, you will see the following display.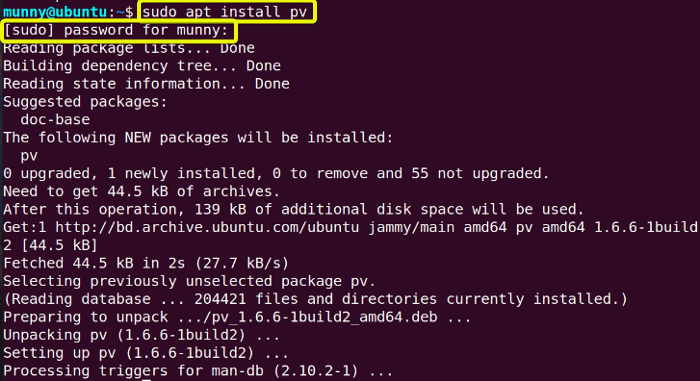 After the pv command is installed, run the second command and you will get the animated output of the neofetch command as you can see in the below gif. You can modify the speed of the animation by changing the number.
Example 12: Autostart the neofetch command
The most common use of the neofetch command is for setting up a screensaver. To set the screensaver using the neofetch command, write the command in the .bashrc file. It is a script that is executed whenever a new bash shell is started, for example, when you open a new terminal or window. After you write the neofetch command in the .bashrc file, every time you open the terminal the command will be executed and it will show you the system information and the logo or picture you set as a screensaver.
Go through the following steps to autostart the neofetch command with the new terminal.
Steps to Follow >
➊ Start by opening the Ubuntu Terminal.
➋ Type the following command in the command prompt to open the .bashrc file.
nano ~/ .bashrc➌ Then, press the ENTER button.
➍ Write the following line at the bottom of the .bashrc file.
neofetch | pv -qL 500 | lolcat➎ Save by CTRL+S and exit by CTRL+X
➏ After that, write the following command to make it effective in the current session,
source ~/ .bashrc➐ Finally, hit the ENTER button.
Output >
Open the .bashrc file in the nano editor, which will look like the below picture.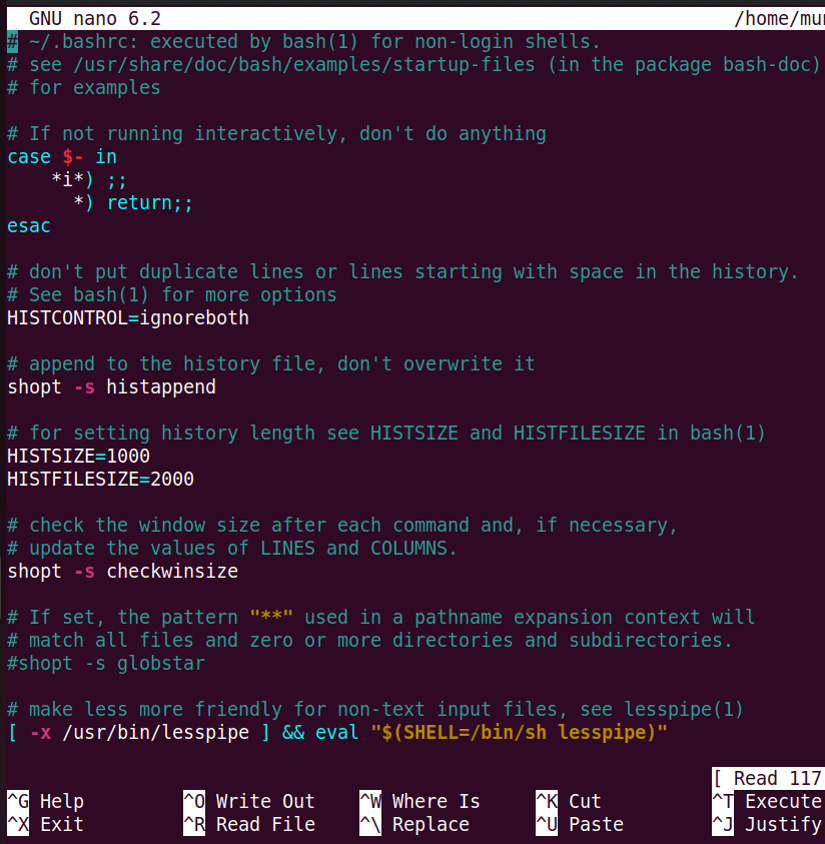 Add the command line at the bottom of the file just like the below picture. And save the .bashrc file.
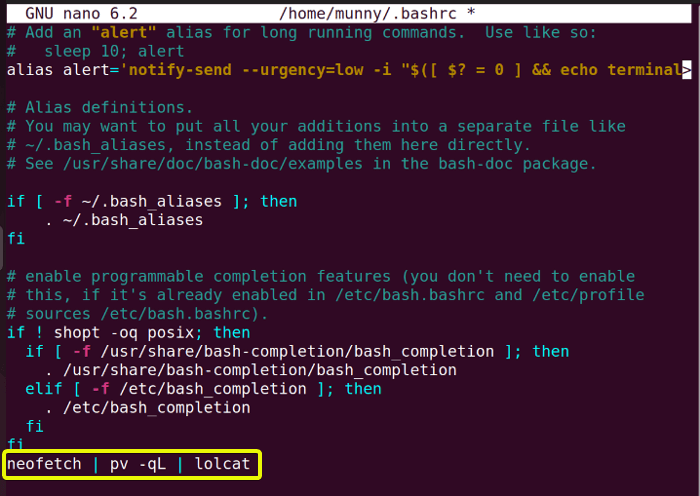 Next, run the next command to make the written command executable in that current session. Soon you will see the animated output of the neofetch command just like the below picture.
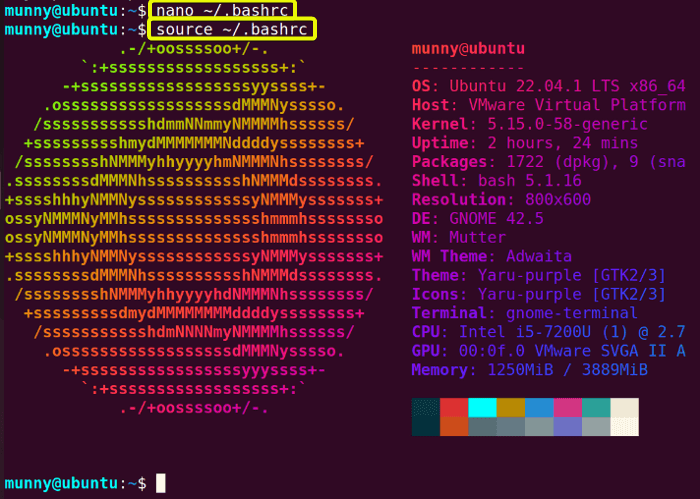 Or you can also close and reopen the terminal where you will see the output of the neofetch command as a screensaver.
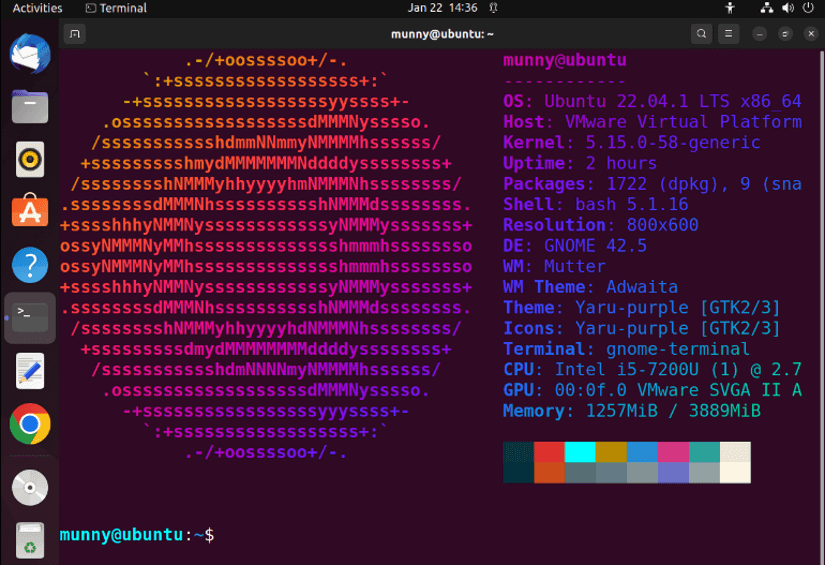
Conclusion
In this article, I discussed the neofetch command with some practical examples and now you know how cool it is! If you go through the examples one by one, hope you will learn most of the stuff related to the command tool. Wish you to be a fun learner of LINUX!
Similar Readings
- The “tree” Command in Linux [14 Practical Examples]
- The “whatis” Command in Linux [12 Practical Examples]
- The “whereis” Command in Linux [10 Practical Examples]
- The “which” Command in Linux [3 Practical Examples]
- The “at” Command in Linux [7 Practical Examples]
- The “tee” Command in Linux [4 Practical Examples]
FUNDAMENTALS A Complete Guide for Beginners


