The cron command in Linux is actually a daemon process. It performs scheduled tasks in the background at a predefined time. You can automatically run commands at regular time intervals using cron. It will perform your given task when a certain condition is met without your interference.
A. Description
The cron command is a software utility in Linux-like OS. It allows users to schedule commands to be repeated at a certain period of time. The cron command in Linux recurrently matches the assigned time to the current time field. When there is a match the system executes given commands. cron is automatically started from /etc/init.d on entering multi-user runlevels.
B. Syntax
The syntax for the cron command in Linux is as follows.
cron [-f] [-l] [-L loglevel]Note: In the above syntax the alphabets prefixed with “-” within the square brackets indicate OPTIONs for cron.
C. Options
The cron command in Linux comes with several options. You will find these options on the man page of cron to further modify your experience. Here, I am describing the offered OPTIONs for your convenience.
man cronUseful Options
- -f (Process stays in the foreground, does not daemonize)
- -l (Enables LSB compliant names for /etc/cron.d files)
- -n (Includes the FQDN in the subject when sending mails)
- -L log level
- 1 (Strats log of all cron jobs)
- 2 (Ends log of all cron jobs)
- 4 (Logs every failed job. Exit status is not equal to zero)
- 8 (Logs the process number of all cron jobs)
NB: The options in Linux CLI (Command Line Interface) are all case-sensitive, So be cautious while using them.
An Overview of The crontab
cron command in Linux checks the configuration file every minute to execute predetermined jobs. It reads the crontab (cron table), a table where you can schedule your desired repeated tasks. In Linux, each user has their own crontab for scheduling jobs.
crontab Syntax:
The syntax given below is a basic format for scheduling a job to crontab. The first five values indicate when and how often a job/command will execute. These values are separated by a space presenting each individual value.
a b c d e command
Practical Examples of the “cron” Command in Linux
cron requires you to add commands to the crontab. By default, every user has access to cron. But you can alter permissions by creating/using the /etc/cron.allow or /etc/cron.deny files. Here are some practical examples of the cron command in Linux for your frequent use.
Example 1: Permitting Users to Run cron Jobs in Linux
Using the cron command in Linux you can give a user permission to run cron jobs on your machine. To run cron jobs user must be enlisted to the /etc/cron.allow or /etc/cron.d/cron.allow file.
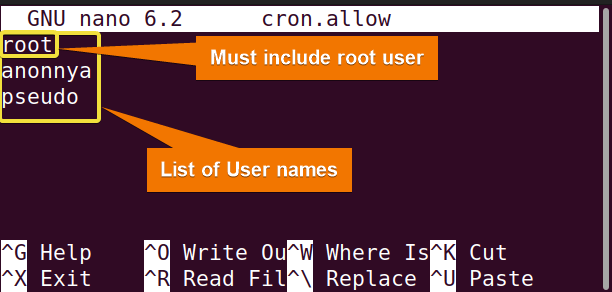
The image below shows the permitted users on my machine to run cron jobs. If there is no such file as /etc/cron.allow, you can check the /etc/cron.deny file. The user must not be enlisted in this /etc/cron.deny file. If neither of these files exists then only the superuser(system administrator) users are allowed to run cron jobs. In these cases, you as the superuser can always create or modify the /etc/cron.allow file to give permission to certain users. In this example, I will create the /etc/cron.allow file and permit users to run cron jobs. To do so you can follow the given process.
Steps to Follow >
➊ At first open the Ubuntu Terminal.
➋ Navigate to the /etc directory and type the following command in the command prompt:
sudo nano cron.allow➌ Press the ENTER button.
➍ Enter your password.
➎ Now type the desired user names including the root user in the text editor nano:
root
anonnya
pseudo
➏ Press the CTRL+S keys to save changes.
❼ Now, Press the CTRL+X exit the editor.
Output >
In the 1st image below, you can see that I have created the “cron.allow” file as a superuser using the sudo command. In the 2nd image, again using sudo I assigned the names of users who are permitted to run cron jobs using the cron command in Linux. You can see that one of the users “anonnya” can run the crontab command.![]()

Similar Readings
- The “man” Command in Linux [6 Practical Examples]
- The “history” Command in Linux [6 Practical Examples]
- The “cal” Command in Linux [7 Practical Examples]
- The “bc” Command in Linux [10+ Practical Examples]
Example 2: Denying Users From Running cron Jobs in Linux
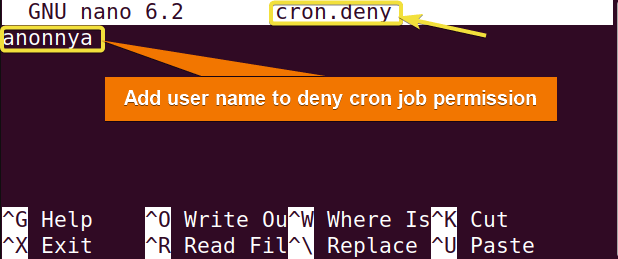
Using the cron command in Linux you can deny a user from running cron jobs on your machine. The use must be enlisted to the /etc/cron.deny or /etc/cron.d/cron.deny file. In this example, I will create the /etc/cron.deny file to stop users from running cron jobs. To do so you can follow the given process.
Steps to Follow >
➊ At first open the Ubuntu Terminal.
➋ Navigate to the /etc/ directory and type the following command in the command prompt:
sudo nano cron.deny➌ Press the ENTER button.
➍ Enter your password.
➎ Now add the desired user name to deny cron jobs permission in the text editor nano:
anonnya➏ Press the CTRL+S keys to save changes.
❼ Now, Press the CTRL+X exit the editor.
Output >
In the 1st image below, you can see that I have created the “cron.deny” file as a superuser using the sudo command. In the 2nd image, again using sudo I assigned the user name “anonnya” to remove its permission to run cron jobs using the cron command in Linux. As a result, you can see in the 3rd image that, the user “anonnya” does not have permission to run the crontab command.![]()

Similar Readings
- The “crontab” Command in Linux [10 Practical Examples]
- The “date” Command in Linux [8+ Practical Examples]
- The “ncal” Command in Linux [8 Practical Examples]
Example 3: Scheduling cron Jobs in Linux
You can schedule a task to execute at regular intervals using the cron command in Linux. Here, I am printing every minute passed to a log file named “time.log”. For this, I am using the echo command to return the date and time. I am redirecting the output to the desired file. do the same you can follow the below process.
Steps to Follow >
➊ At first open the Ubuntu Terminal
➋ Type the following command in the command prompt:
crontab -e➌ Press the ENTER button.
➍ Type the following command at the bottom of the crontab configuration file opened in your text editor:
* * * * * echo "1 Minute passed! Date & Time: $(date)" >> time.log➎ Press the CTRL+S keys to save changes.
➏ Now, Press the CTRL+X exit the editor.
Output >
In the image below, you can see that using the crontab command with the -e option I added the above-mentioned task to the crontab. This command will take you to a text editor. You will write your desired command/script along with the expected time period in that editor. In this 2nd image, you can see that I assigned an Asterisk(*) to all the fields. It indicates all possible values in that corresponding field. As the minute field ranges from [0 to 59] the task will execute every minute. After exiting the configuration file, the system will print out the message shown in 1st image.
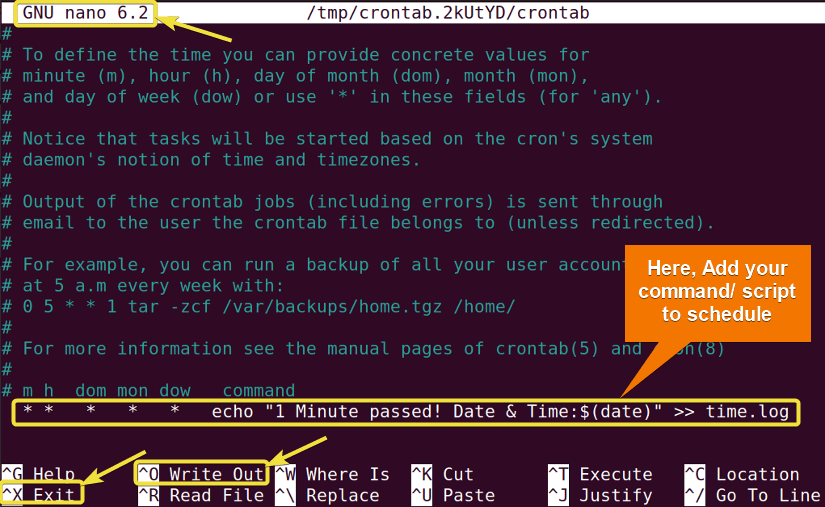 You can see the latest job output by running the tail command on your file.
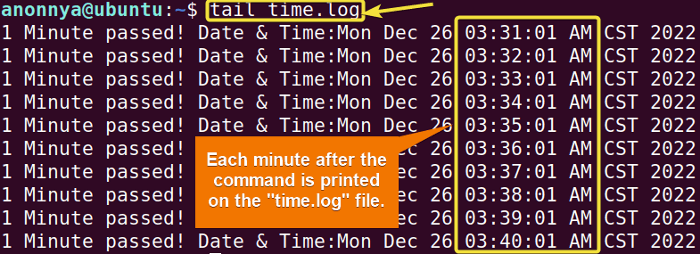
Conclusion
In this article, I have tried to show you some frequent uses of the cron command in Linux. You may go through the detailed applications of the crontab command to get a full experience. I hope these practical examples will help you through your journey with the command line and make you a power user of Linux.
Similar Readings
- The “neofetch” Command in Linux [12+ Practical Examples]
- The “tree” Command in Linux [14 Practical Examples]
- The “whatis” Command in Linux [12 Practical Examples]
- The “whereis” Command in Linux [10 Practical Examples]
- The “which” Command in Linux [3 Practical Examples]
- The “at” Command in Linux [7 Practical Examples]
- The “tee” Command in Linux [4 Practical Examples]
FUNDAMENTALS A Complete Guide for Beginners


