The at command in Linux is a command line utility tool used for scheduling one-time jobs. You can specify a time for executing certain tasks. Moreover, the command can also list or delete jobs that are saved for later execution. To use this command user must have the system permissions. The atq, atrm, and batch commands are also part of the at command that enables it to queue, examine, or remove scheduled jobs.
In this article, I will present you with the possible uses of the at command in Linux with practical examples.
Syntax of “at” Command
The syntax for the at command is:
at [OPTION]... runtimeOptions for “at” Command
You can find the details of at command’s option on the man page of the command.
man at| Option | Description |
|---|---|
| -b | Runs commands when system load levels permit, an alias for batch. |
| -c | Displays specified job context on the terminal. |
| -f | Reads jobs from a file. |
| -r or -d | Removes pending job specified by job ID, an alias for atrm. |
| -l | Lists current users’ pending jobs, an alias for atq. |
| -m | Mails user upon completion of the job. |
| -M | Does not mail the user upon completion of the job. |
Installing “at” Command in Linux
The at command may or may not be installed in your system. You can install the at package by following command:
sudo apt-get install at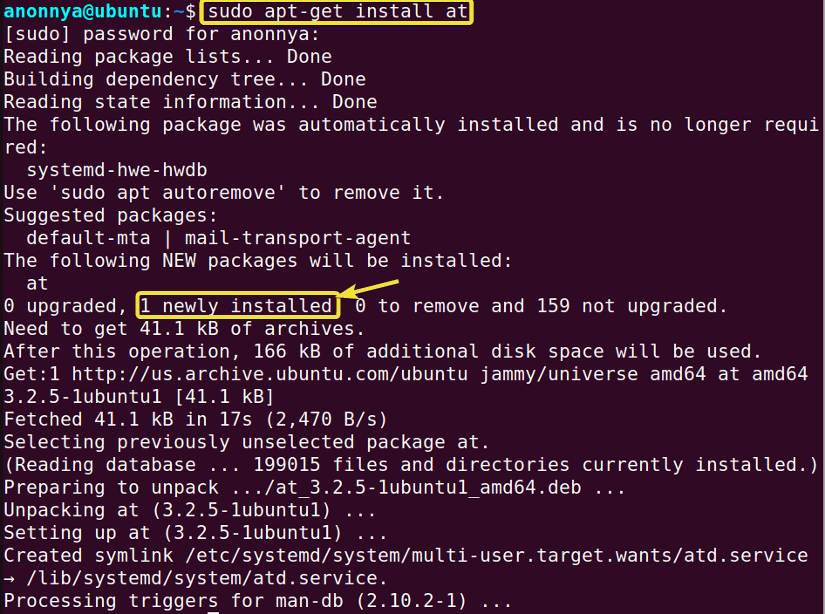 Now, to enable the atd service on your system, write the following command:
sudo systemctl enable --now atd
Practical Examples of the “at” Command in Linux
With the at command in Linux you will be able to schedule/remove commands for later execution. Moreover, You can use this command in many ways utilizing the associated options. Here are some of the most common uses of the at command in Linux:
1. Scheduling a Job to Run at a Certain Time Using the “at” Command
You can specify the time for executing a job using the at command in Linux. It will read your given commands from standard input. For example, to schedule the job “touch file1.txt” (Creating an empty file) to execute later on the same day at 5:00 AM, follow the steps:
- Open the terminal and run the below command:
at 05:00 - Now, write the following command as the job:
touch file1.txt - Finally, press CTRL+D keys to complete the scheduling.
In this given image, you can see that I have scheduled the desired job to execute at 5:00 AM.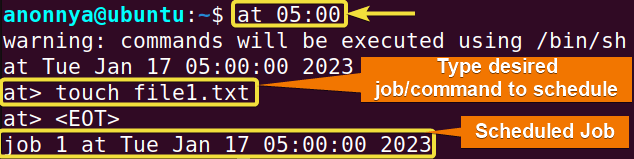
2. Piping a Job to the “at” Command to Run at a Certain Time
You can pipe a command for later execution to the at command in Linux. For example, to echo a text at a specific time, use the command below:
echo "This is a Scheduled echo" | at 05:00 amIn the following image, you can see that I have saved the command as a job for later execution using piping along with the at command.
Similar Readings
- The “man” Command in Linux [6 Practical Examples]
- The “history” Command in Linux [6 Practical Examples]
- The “cal” Command in Linux [7 Practical Examples]
- The “bc” Command in Linux [10+ Practical Examples]
3. Listing Pending Jobs Using the “at” Command
To list all the pending jobs, use either the atq command or the -l option along with the at command. For example, type any of the following commands in the command prompt:
atqOr,
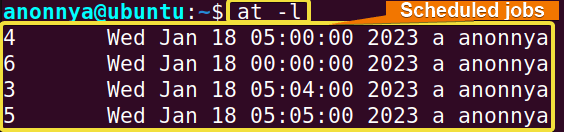
at -lYou can see that all the pending jobs are listed using the atq command.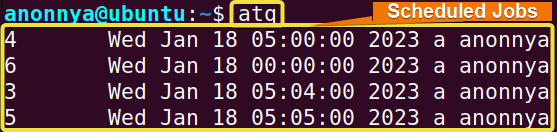 Here, all the pending jobs are listed using the
 at -l command:
4. Viewing a Specified Job Contents Using the “at” Command
To view a specific job content, use option -c and a specific job ID. For example, to show the contents of the job having ID 5, run the command:
at -c 5In the image, you can see that the contents of the job with ID 5.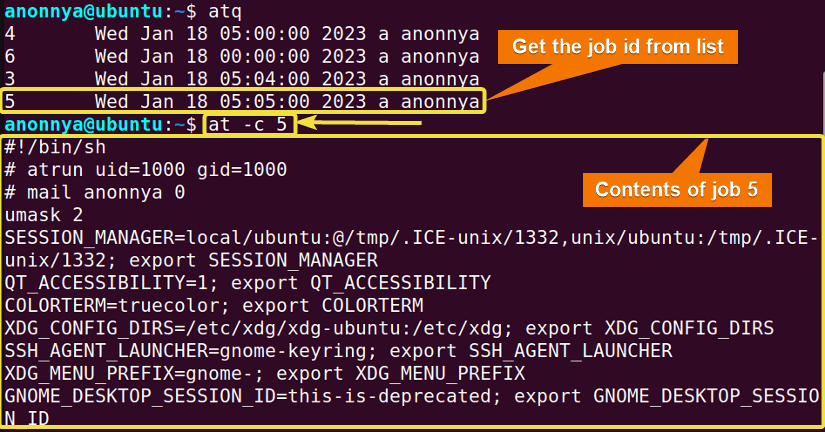
5. Reading a Job From a File Using the “at” Command
To read a job from a file, use the -f option with at command. For example, you have a file named “jobs.txt” to execute commands at this instant. To do the that use the below command:
at -f jobs.txt nowIn the image below, you can see that the “jobs.txt” file contains commands for creating folder1 and folder2. These commands are executed using the at command. You can use the ls command to see the newly created folders.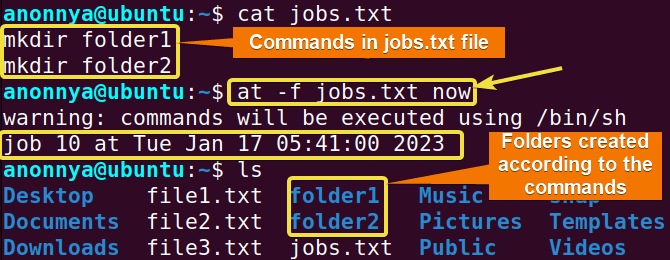
Similar Readings
- The “cron” Command in Linux [3 Practical Examples]
- The “crontab” Command in Linux [10 Practical Examples]
- The “date” Command in Linux [8+ Practical Examples]
- The “ncal” Command in Linux [8 Practical Examples]
6. Scheduling a Job to Execute When the System Load Levels Permit
By default, option -b permits the execution of commands when the average load is below 1.5. That is, one process is running while another one is waiting for 50% of the time. This option is an alias for the batch command. Now, let’s say, you want to schedule the job “touch file5” (Creating empty files) to execute when the average load is below 1.5. To do so, follow the steps below.
- Open the terminal and type any of the following commands:
at -bOr,
batch - Press the ENTER button.
- Now, write the following command as the job:
touch file5 - Finally, press CTRL+D keys to complete scheduling.
In the following image, you can see that the desired command is scheduled to execute when the system load level permits.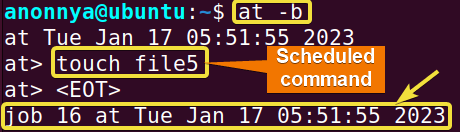
7. Removing a Specific Job Using the “at” Command
To remove a specific job from the scheduled list, use the job ID along with the options -r or -d. Moreover, using the command atrm with a specific job ID will also give you the same result. For example, to remove the job with ID 3 using the atrm command, use any of the following commands:
atrm 3Or,
at -r 3Or,
at -d 3In the image below, you can see Job 3 is removed.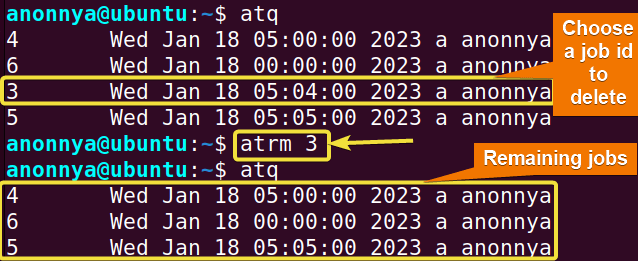
Time Specification of “at” Command
The time structure of at command is “Day Month Date hh:mm:ss Year”. The time specifications and their relative translation of at command are below:
| Time Specifications | Translated Time |
|---|---|
| now | Tue Jan 17 07:00:00 2023 |
| noon | Tue Jan 17 12:00:00 2023 |
| teatime | Tue Jan 17 16:00:00 2023 |
| midnight | Wed Jan 18 00:00:00 2023 |
| Tomorrow Or, now + 1 day | Wed Jan 18 07:00:00 2023 |
| Fri | Fri Jan 20 07:05:00 2023 |
| next week Or, now + 7days Or, next Tue | Tue Jan 24 07:00:00 2023 |
| next month Or, now + 1 month | Fri Feb 17 07:00:00 2023 |
| 08:00 Or, 08:00 AM Or, now + 1hour | Tue Jan 17 08:00:00 2023 |
| 08:00 PM | Tue Jan 17 20:00:00 2023 |
| 2:30 PM Feb 23 Or, 2:30 PM 23.02.23 | Thu Feb 23 14:30:00 2023 |
| now + 30 minutes | Tue Jan 17 07:30:00 2023 |
| now + 1 year | Wed Jan 17 07:00:00 2024 |
Conclusion
In this article, I have tried to show you some frequent uses of the at command in Linux. The options available under this at command work as alternatives to a few other commands. That is why the commands atq, atrm, and batch are considered as a part of the at command. I hope these practical examples of the at command described here, will help you with the command line and make you a power user of Linux.
People Also Ask
How to automate a process in Linux?
The at command in Linux is a useful tool that allows you to schedule commands to be executed at a specific time in the future. To create a new job with the at command, you need to enter the time and date when you want the command to run, followed by a space and then the command itself. You can also pipe the command from another program or file using echo or Here document. For example:
echo "date" | at 10:00This will create a job that will run the date command at 10:00 AM.
What is the difference between at and batch command?
The at command is great for scheduling one-time tasks that need to run at a particular time, while batch is suitable for running tasks when the system has free resources to ensure minimal impact on the system’s performance. Some key differences:
at Command:
- It schedules a command or a set of commands to run once at a specific time.
- You can specify the exact date and time for the execution of the task.
- The output of the command is mailed to the user after execution.
batch Command:
- It schedules tasks to be executed when the system load average drops below a certain level (usually 1.5).
- Unlike at, it does not run at a specific time but waits until the system is less busy.
- You can only use the batch command interactively, adding commands to the queue.
How do I know if at is installed in Linux?
To check if the at command is installed on your Debian/Ubuntu systems, use:
sudo apt list --installed | grep atFor CentOS/Fedora systems, use:
sudo yum list installed | grep atHow do I install the at utility in Linux?
To install the at utility package on your Debian/Ubuntu systems, use:
sudo apt update && sudo apt install -y atFor CentOS/Fedora systems, use:
sudo yum install atAfter installing, you should ensure that the atd service, which is the scheduling daemon for at, is running and enabled to start on boot by:
sudo systemctl enable --now atdSimilar Readings
- The “neofetch” Command in Linux [12+ Practical Examples]
- The “tree” Command in Linux [14 Practical Examples]
- The “whatis” Command in Linux [12 Practical Examples]
- The “whereis” Command in Linux [10 Practical Examples]
- The “which” Command in Linux [3 Practical Examples]
- The “tee” Command in Linux [4 Practical Examples]
FUNDAMENTALS A Complete Guide for Beginners


