Linux users are well-acquainted with the command line, and one of the frequent employment commands is sudo apt update. This command is pivotal in ensuring your system remains current by retrieving the latest package details from software repositories. Nonetheless, there can be instances when you face difficulties with the sudo apt update not working as anticipated. In this article, we will investigate the typical causes of this issue and offer remedies to restore your system’s proper functioning.
Key Takeaways
- Investigating different factors contributing to the malfunction of the sudo apt update command.
- Acquiring knowledge of the solutions to restore the proper functionality of the sudo apt update command.
Requirements
- To resolve the issues, you must have root privilege as you may need to change files or repositories related to ‘apt’.
Understanding the “sudo apt update” Command
The sudo apt update in Linux refreshes the software package list from online repositories to keep your system informed about software versions and dependencies, which is essential for installing, upgrading, and maintaining packages. It’s a crucial task for both system security and software management.
Causes of Errors With “sudo apt update” Command
The sudo apt update command may encounter various issues leading to failure, usually accompanied by error messages that provide insights into the root cause. Here, we’ll explore typical reasons for the malfunctions of ‘sudo apt update’.
- Internet Connection Issues
- Repository Configuration Errors
- Software Conflicts
- Proxy Settings
- Firewall or Security settings
- Outdated Package Manager
- Inconsistent Package Lists.
Solutions to 3 Types of “sudo apt update” Not Working Error in Ubuntu
While running the command sudo apt update, Linux users may sometimes fall into trouble for a couple of reasons. It normally generates error messages rather than updating the packages of the Linux system.
A. Fixing “sudo apt update” GPG Errors
When you execute the sudo apt update command and come across the ‘gpg error’, it usually signals a problem with the GPG (GNU Privacy Guard) key responsible for confirming the authenticity of software packages within your package manager’s repository. This issue can impede your ability to update your package lists and install or upgrade software packages.
While trying to update my packages, the GPG error hinders the operation as you can notice from the picture. The error message includes the repository and mentions that the public key is unavailable. This problem can occur for multiple reasons. To resolve the problem you can follow the steps below.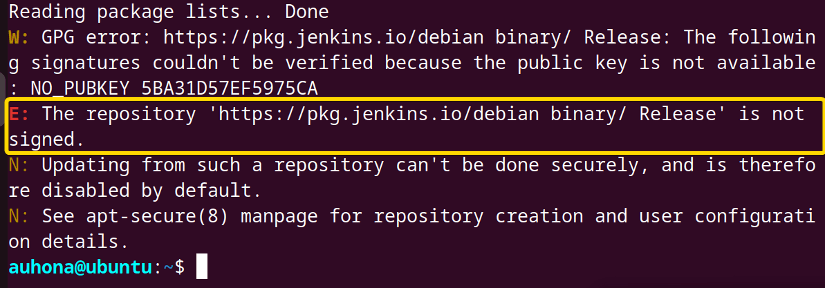 Steps to Follow >
➊ Open a terminal on Ubuntu.
➋ Run the following command to open the file /etc/apt/sources.list
sudo nano /etc/apt/sources.list- sudo: Provides the root privilege to perform the administrative command.
- nano: Opens files in CLI and allows you to edit the file like a text editor including multiple features.
- /etc/apt/sources.list: contains a list of software repositories or sources from which the apt package manager retrieves and installs software packages.
 ➌ Enter the user password and the file will be opened.
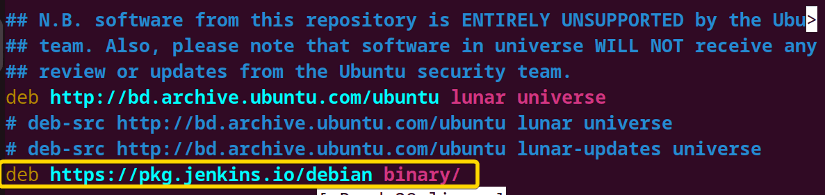 As the file opened, I searched for the line ‘deb https://pkg.jenkins.io/debian binary/,’ which configures an APT repository for Jenkins. Jenkins is a widely used automation server that plays a crucial role in building, deploying, and automating software projects.
➍ Remove the marked line or use a hash ‘#’ icon in front of the line to comment out the line.
➎ Now, run the command sudo apt update again and update your system packages.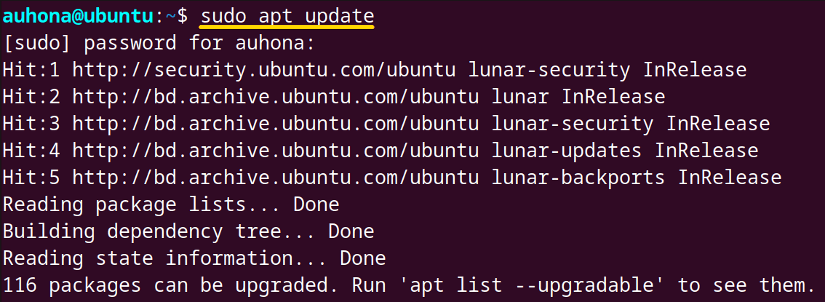 Now, here you can see the result of the sudo apt update command as you’ve anticipated.
B. The Repository Doesn’t Have Release File (404 Not Found (IP))
Linux users may face this error when apt is unable to find or access the release file for a repository. This file contains important metadata about the repository including information about the available packages, their versions, and more.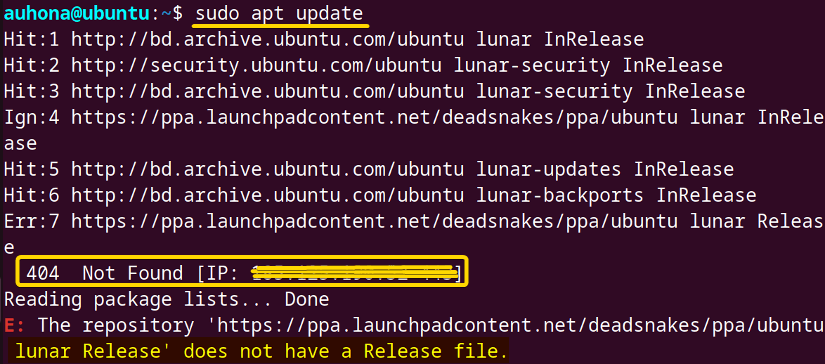 Here, you can see that the ‘https://ppa.launchpadcontent.net/deadsnakes/ppa/ubuntu lunar Release’ repository does not have any release file in my Ubuntu.
In case of a missing release file of any repository, you can resolve the erroneous situation from both GUI and CLI. Here’s how to address this issue described below.
Method 01: Using GUI to Fix 404 Not Found [IP…] Error in Ubuntu
It’s so simple to avoid this error just by using your GUI.
Steps to Follow >
➊ Open the Menu bar, and find the software and updates from the search bar.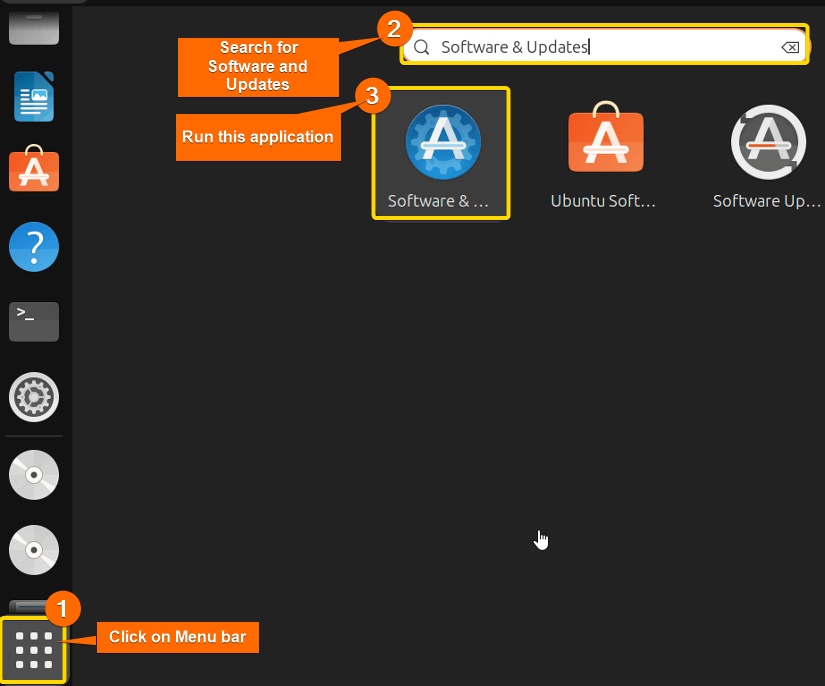 ➋ Finally run the ‘software & Updates’ application.
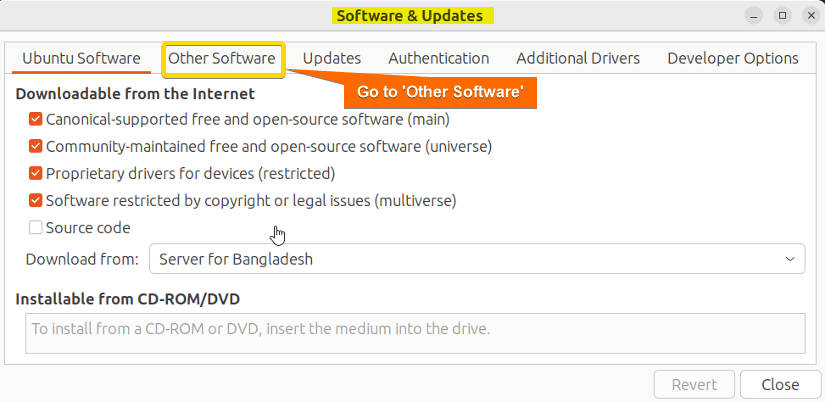 ➌ Now, click on the ‘other software’ option.
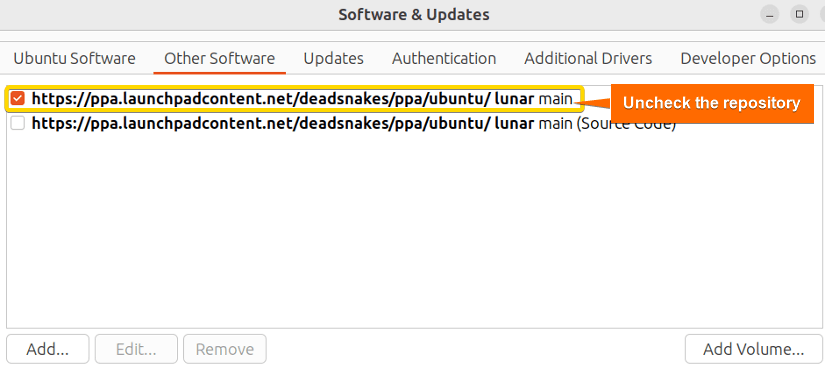 ➍ Uncheck the repository. Immediately a prompt will appear asking for the user password to authenticate.
➎ Provide the user password.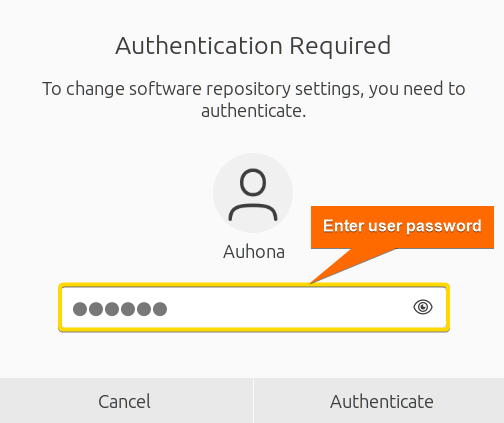 ➏ Lastly, close the ‘Software & Updates’ application and again run the sudo apt update command.
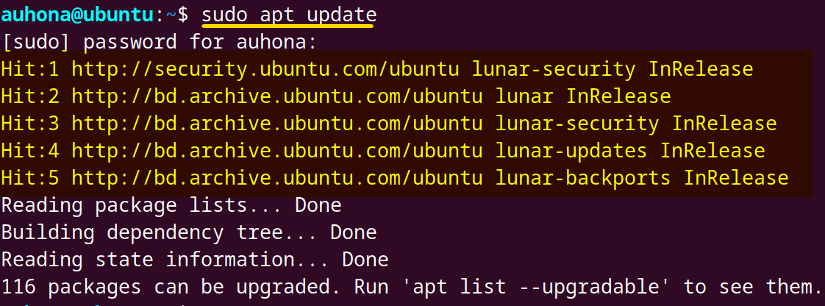 Here you can see that the sudo apt update is working properly.
Method 02: Using CLI to Fix 404 Not Found [IP…] Error in Ubuntu
You can also address the ‘404 not found’ issue by utilizing the command-line interface (CLI).
Steps to Follow >
➊ Open the Ubuntu terminal.
➋ Run the following command.
sudo add-apt-repository –remove ppa:deadsnakes/ppa- sudo: Gives the permission to execute commands with superuser (root) privilege.
- add-apt-repository: Used to manage APT repositories specifically to add new repositories.
- –remove: This option tells ‘add-apt-repository’ to remove the mentioned repository in the command rather than add it.
- ppa:deadsnakes/ppa: Refers to a PPA maintained by the deadsnakes team which provides updated Python packages and I want to remove it.
 ➌ Now, to recheck whether it’s working or not, run the sudo apt update command.
 The sudo apt update command is working accordingly after all the necessary modification is done.
C. The List of the Sources Could Not Be Reached
Another one of the simplest problems may occur while running the sudo apt update command that you can see below in the picture.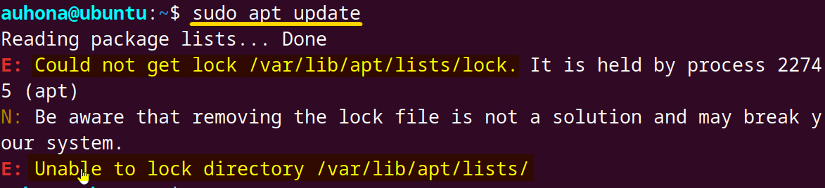 This issue tends to arise, particularly when ‘apt’ is engaged in another task, such as updating or installing software.
To get out of this issue, ensure that your apt package manager is completely available for the update process. For this, you can check whether any software is currently installing or updating or not. Whenever the process is finished, you can run the sudo apt update command.
Comparative Analysis of Methods to Solve 404 Not Found (IP) Error
I’ve presented two methods for troubleshooting when the repository release file doesn’t exist (404 not found error). It can be challenging to determine which one is the most suitable for your needs. To help you make an informed decision, here’s a comparison of the provided methods, outlining their pros and cons.
| Methods | Pros | Cons |
|---|---|---|
| Method 1 |
|
|
| Method 2 |
|
|
While choosing any one method, you can consider your situation and expertise. If you are an expert in using CLI commands and can maintain the specific format of Commands then go for Method 2 certainly. Otherwise, you can choose Method 01 as it is manual and less sensitive than CLI and does not require much attention.
Conclusion
In a nutshell, sudo apt update is an essential command to preserve the stability, security, and performance of your Linux system based on Debian. Consistently refreshing your package information guarantees that your system remains current with the most recent software and security updates. Then again, you may also face some unexpected results hindering your update operation. But, no worries there is a solution to fix that some of which I’ve tried to present in this article. Hope this has made your trouble quite easier to fix.
People Also Ask
Related Articles
- A Complete Overview of sudo apt update Command in Linux
- An Ultimate Guide of “sudo apt-get update” Command in Linux
- [Fixed] sudo apt-get update Not Working in Ubuntu
- [Fixed] APT-Get Update Failed to Fetch Error in Linux
- How to Update RPM Packages in RHEL? [6 Methods]
- How to Check Updates Using YUM on RHEL? [5 Practical Cases]
- How to Update All Packages in RHEL Using YUM? [3 Cases]
- How to Update a Specific Package in RHEL Using YUM? [2 Cases]
<< Go Back to Update Packages in Linux | Package Management in Linux | Learn Linux Basics
FUNDAMENTALS A Complete Guide for Beginners


SYNAPTIC AUTHENTICATION IS REQUIRED TO PERFORM THIS ACTION SO PLEASE HELP ME w FINDING TE RIGHT PASSWORD
IF YOU SPICK HUNGARY
TANK YOU.
Sandor
MY E-MAIL
[email protected]
[email protected]
Usually the synaptic requires the root password that you set while installation. So use that root password for authentication. I don’t speak Hungary. But if you share your problem using any translator I can help you .