Installing a software package in Linux may depend on some other packages as a prerequisite. These packages are called dependencies. Dependencies must be installed before to ensure the successful installation of the original package. That’s why, installing dependencies is the most crucial task in the daily life of a Linux user. In this tutorial, I’ll demonstrate different ways that you can use to install packages and their dependencies automatically in Ubuntu distributions.
To install dependencies automatically with apt, use the following command:
- Install dependency:
sudo apt install <package_name> - Fix broken dependency:
sudo apt install -f
Key Takeaways
- Installing DEB package in Ubuntu.
- Inspecting dependency issues regarding TeamViewer installation.
- Installing dependencies automatically during package installation.
Requirements
- System running on Ubuntu.
- Sudo privileges to use the core functionality of package managers.
- Installed GDebi tool in your Ubuntu.
- Synaptic Package Manager in your Ubuntu.
Process Flow Chart
[Distro Used Throughout the Tutorial: Ubuntu 22.04.1 LTS]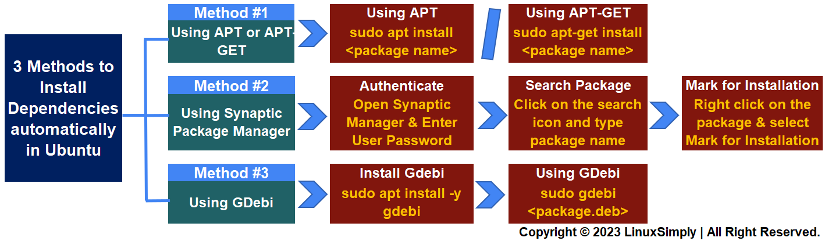
3 Methods to Install Dependencies Automatically in Ubuntu
In Linux, you can install a package in two basic ways. The first one is to download and install the package automatically using a package manager. Secondly, you can manually download the package with necessary files like dependencies and then install it in the system. In this guide, I’ll show you three different approaches that you can use in both cases to install dependencies automatically in your Ubuntu system.
Method 1: Using “apt” or “apt-get” to Install Dependencies Automatically
APT (Advanced Package Tool) is a powerful package management system used in Debian-based Linux distributions, including Ubuntu. It simplifies software installation by handling dependencies automatically. Installing a package APT has the following syntax:
sudo apt install <package name>Follow these steps to install TeamViewer with all dependencies using APT.
Steps to Follow >
➊ Open the Ubuntu terminal. You can press CTRL+ALT+T.
➋ Run the following command:
sudo apt install teamviewer➌ Enter user password if required.
➍ Type Y when the confirmation prompt appears.
➎ Press ENTER. By the above command, APT will install the latest version of TeamViewer with all necessary dependencies automatically. Moreover, you can use apt-get which is also a command-line tool for package management used in Debian-based Linux distributions. Use the below command to install dependencies automatically using the apt-get command.
sudo apt-get install <package name>Additionally, if you have tried to install a package that has unmet dependencies, you can use the below command:
sudo apt-get install –fix-brokenThis command will resolve all dependency issues automatically during the installation of the mentioned package.
Method 2: Using Synaptic Package Manager to Install Dependencies Automatically
Synaptic Package Manager, often denoted as “Synaptic“, is a GUI (Graphical User Interface) package management tool for Debian-based Linux distributions. interfaces that also handle dependencies and other package management tasks effectively. Follow these steps to install a package with all dependencies automatically using Synaptic in Ubuntu:
Steps to Follow >
➊ Open Synaptic Package Manager from the Show Applications section.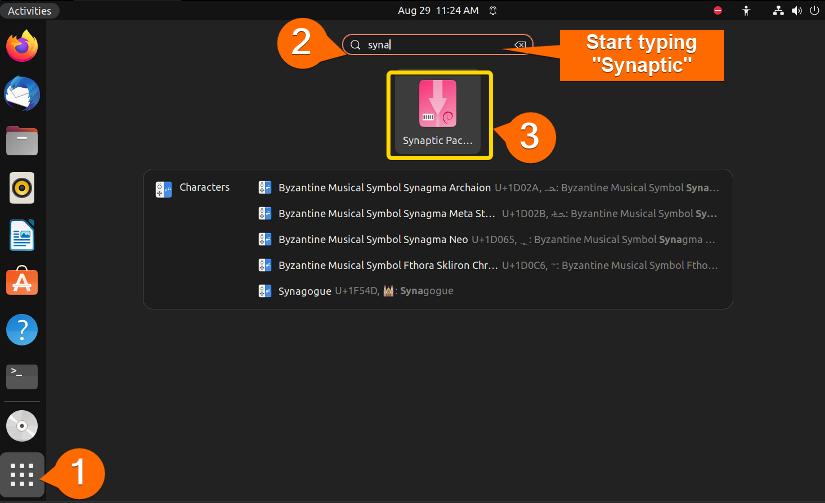 ➋ Type user password in the authentication window and click Authenticate.
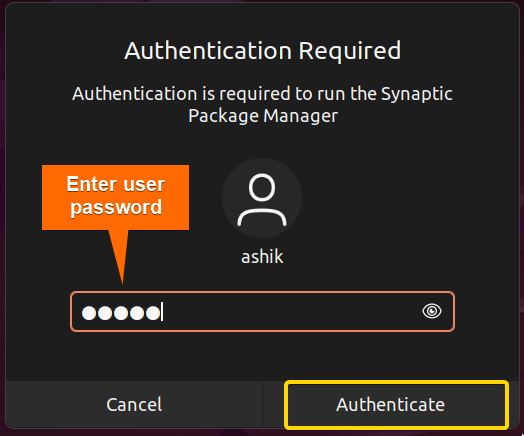 ➌ Click on the Search icon at the top right corner.
➍ Type “teamviewer” in the search box.
➎ Click on Search.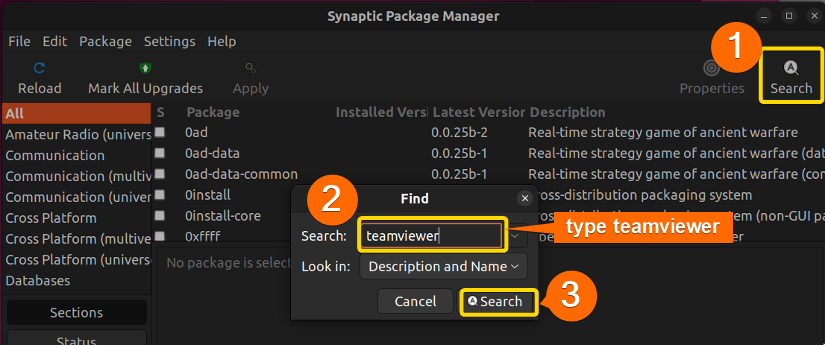 A list of packages that have “teamviewer” in their name will appear.
➏ Select the package you want to install.
➐ Right click and select Mark of Installation.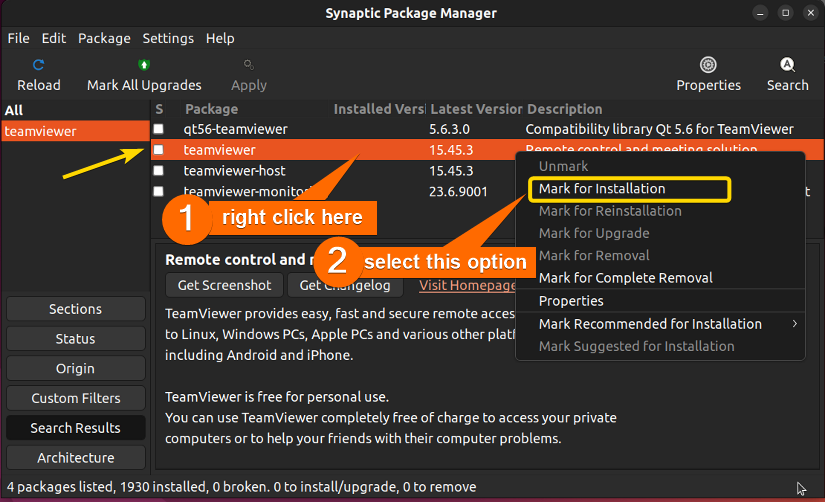 ➑ Click on Mark.
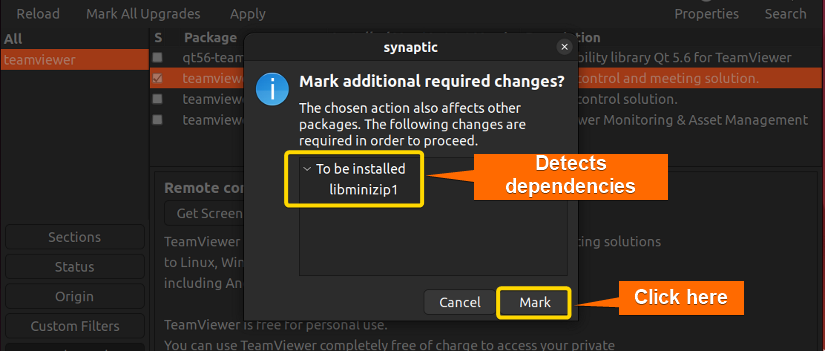 After that, Synaptic will install the package with detected dependencies automatically.
Method 3: Using GDebi to Install Dependencies Automatically
GDebi is mainly a GUI (Graphical User Interface) tool but it also supports CLI (Command Line Interface) to use for installing Debian (.deb) packages on Debian-based Linux distributions, including Ubuntu. It provides a user-friendly interface and handles dependencies automatically. But, you need the .deb file of the package to install it using GDebi. To install dependencies automatically using GDebi, follow the below steps:
Steps to Follow >
➊ Click here to get the .deb file of TeamViewer from the official repository.
➋ Open the Ubuntu terminal by pressing CTRL+ALT+T.
➌ Run the following command:
ls ~/Downloads/- ls: Lists all the files and folders in the mentioned directory.
- ~/Downloads/: Absolute path of the Downloads directory.
 The presence of the .deb file of TeamViewer in the Downloads folder ensures the successful downloading of the file.
➍ Now, execute the following command:
sudo gdebi ~/Downloads/teamviewer_15.43.7_amd64.deb- sudo: Grants administrative permissions.
- gdebi: Calls GDebi package management
- ~/Downloads/teamviewer_15.43.7_amd64.deb: Full name of the package with path.
➎ Enter user password if required.
➏ Type Y when the confirmation prompt appears.
➐ Press ENTER.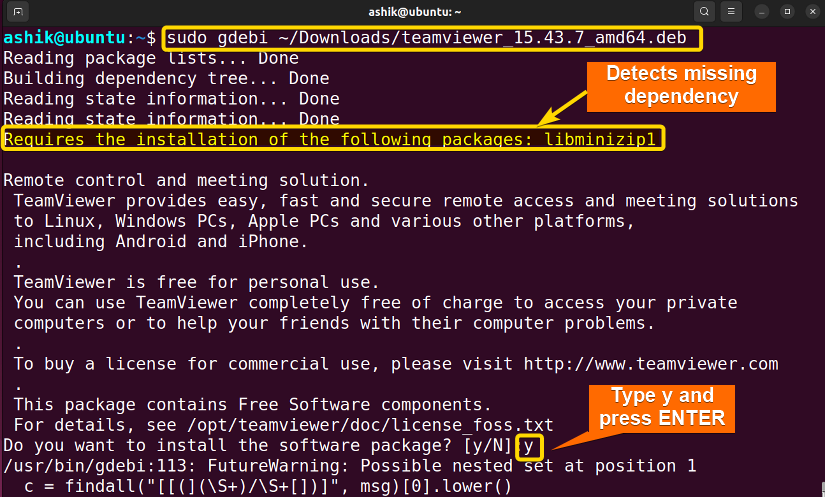 The above command automatically detects and installs the required dependencies.
Comparative Analysis of Methods
I’ve shown three ways to install missing dependencies in Ubuntu. You might be confused to decide which one suits you the best. Here’s a comparison between the methods provided to give you an overview of the pros and cons.
| Methods | Pros | Cons |
|---|---|---|
| Method 1 |
|
|
| Method 2 |
|
|
| Method 3 |
|
|
If you are comfortable with CLI and want to install all dependencies automatically during the installation of a package you can use Method 1. However, if you are not comfortable with CLI, you can use Method 2 in this situation. In case, you have a .deb file of a package and you want to install it with all required dependencies,, you should follow Method 3.
Common Challenges That May Arise
Although some of the package managers handle missing dependencies in Ubuntu automatically, challenges may arise sometimes. Some common challenges you might encounter and how to address them are listed below.
- Repository Problems: Repository servers may occasionally experience downtime or issues. Ensure that you’re using up-to-date and reliable repository sources in your /etc/apt/sources.list file.
- Dependency Version Conflicts: In some cases, a package may require a specific version of a dependency that conflicts with another package‘s requirements. Run sudo apt update and sudo apt upgrade to ensure your system is up to date and packages are compatible.
- Software from Untrusted Sources: Installing software from untrusted sources or manually downloading .deb files can lead to dependency problems. So, stick to official repositories.
- Disk Space Issues: If your system is low on disk space, it can prevent package installation. Check available disk space using df -h.
Conclusion
The automatic dependency resolution process discussed in this article simplifies the installation process and ensures complete functionality of the installed software. Also, automatic dependency installation lets you not worry about managing dependencies manually. However, you should stick to official repositories and trusted sources during package installation to ensure compatibility and security.
People Also Ask
Related Articles
- How To Check Package Dependencies in Linux [3 Easy Ways]
- How to Install Dependencies Using dpkg? [Easiest Solution]
- How to Install Missing Dependencies in Ubuntu? [4 Methods]
- 5 Methods to Remove Package and Dependencies in Ubuntu
- How to Install RPM Package With Dependencies? [3 Methods]
- 2 Ways to Install RPM Without Dependencies in Linux
- How to Check RPM Reverse Dependencies in Linux? [4 Methods]
- [Solved] RPM Failed Dependencies Error in RedHat
- 2 Methods to Install YUM Packages with Dependencies
- Remove Packages without Dependencies Using Yum [2 Methods]
- [Solved] The Following Packages Have Unmet Dependencies Error
- How to Check APT Dependency Tree in Linux? [4 Methods]
<< Go Back to Dependencies in Linux | Package Management in Linux | Learn Linux Basics
FUNDAMENTALS A Complete Guide for Beginners


