In Linux, there are different package managers to install a software package. DPKG is one of them. However, installation of your desired software package may depend on some other packages called dependencies. Typically, you must install the dependencies before installing any of your preferred software.
Install Dependencies Using dpkg in Ubuntu
DPKG (Debian Package) is a package management system used by Debian-based distributions such as Ubuntu. It is a package management tool that handles the installation, removal and management of individual software packages on the system. When you install a package with dpkg, any dependencies required by that package must be installed manually.
Illustrating to you practically, first I’ll try to install TeamViewer. Then I’ll show how to use dpkg to install dependencies that arise during the installation of TeamViewer.
1. Install TeamViewer Using dpkg
Firstly, download and extract TeamViewer 15.43.7 from the download button. A file named teamviewer_15.43.7_amd64.deb will be downloaded in your Ubuntu Download folder. You can view the file by following the steps:
- Open your Ubuntu terminal by pressing CTRL+ALT+T.
- Type the command:
ls Downloads/EXPLANATION- ls: List all files and folders in provided directory.
- Downloads/: Navigate to the Downloads folder.
 The output shows all the files and folders located inside the Downloads directory. Also, you can use GUI (Graphical User Interface) to check it.
 You may see some other files and folders also. But of course, you will see the newly downloaded deb file of TeamViewer located in your Downloads directory. It means the download was successful.
- Type the following command:
sudo dpkg -i Downloads/teamviewer_15.43.7_amd64.debEXPLANATION- sudo: Grants administrative privileges.
- dpkg: Calls package manager named dpkg to manage a package.
- -i: Tells dpkg to install a package.
- Downloads/teamviewer_15.43.7_amd64.deb: Location of the deb file with its name.
 The output shows that a package named libminizip1 is the dependency and it is not installed. Because it will try to install Teamviewer 15.43.7 package. But as dpkg can’t install dependencies automatically, it will show a dependency error like this.
 The output shows all the files and folders located inside the Downloads directory. Also, you can use
 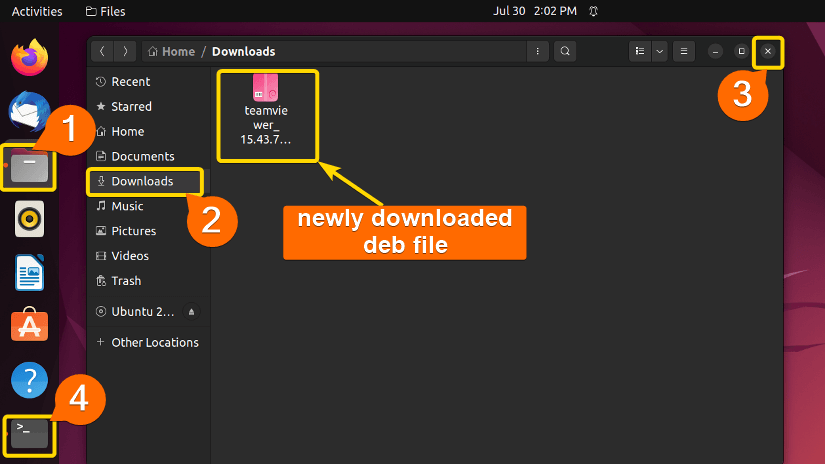 You may see some other files and folders also. But of course, you will see the newly downloaded deb file of TeamViewer located in your Downloads directory. It means the download was successful.
 The output shows that a package named libminizip1 is the dependency and it is not installed. Because it will try to install Teamviewer 15.43.7 package. But as dpkg can’t install dependencies automatically, it will show a dependency error like this.
2. Install the Dependency Using dpkg Package Manager
As you can use dpkg to install any .deb extension file, you have to download and install the libminizip1 deb file as the TeamViewer installation is stuck due to the dependency error of libminizip1. To do so, follow the steps below:
- Download the .deb file of libminizip1. You will find it after extracting the file provided in the download button of this article.
- Press CTRL+ALT+T to open Ubuntu terminal.
- Navigate to Download/ directory by executing the command:
ls DownloadsYou will see a file named libminizip1_1.1-8build_amd64.deb. It means libminizip1 is downloaded successfully.

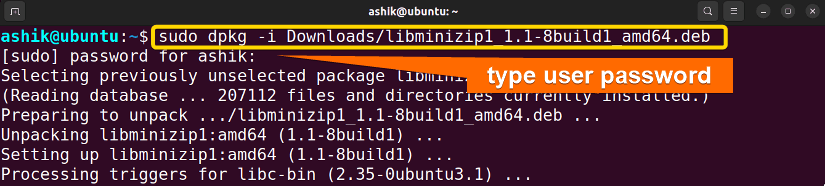
- Then type the following command:
sudo dpkg -i Downloads/libminizip1_1.1-8build_amd64.deb - Type your user password and Press ENTER.
 The output shows that libminizip1 is installed successfully.
Note: If you see multiple dependency errors at the beginning of installing software, download all the deb files and repeat the process for every file.After installing dependencies like this, try to install TeamViewer with dpkg now, it will show no dependency error because you have already installed its dependency manually by dpkg.
- Now, run the following command and it will not show any dependency error:
sudo dpkg -i Downloads/teamviewer_15.43.7_amd64.deb The output shows that TeamViewer is installed successfully.

 The output shows that libminizip1 is installed successfully.
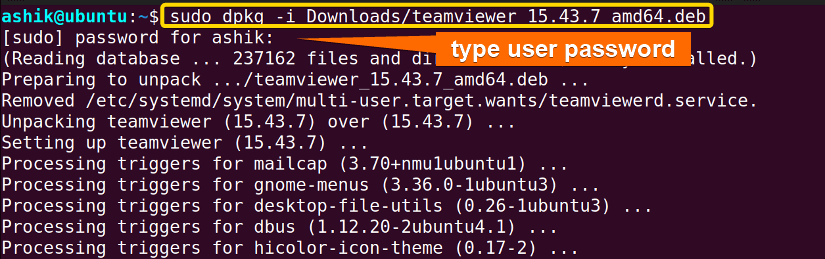 The output shows that TeamViewer is installed successfully.
Verify the Installation of Dependency in Ubuntu
Sometimes, more dependencies arise when installing a dependency. This is called recursive dependency. Then it becomes difficult to keep track of the dependency packages. Besides, you may want to check whether the dependency you installed was successful or not. Look at the below methods to verify the installation of dependencies.
A. Using dpkg to Verify Individual Dependency
dpkg shows different types of status flags that you can use to justify the dependency installation. They are:
| Status flag | Indication About Package |
|---|---|
| ii | Installed and configured. |
| rc | The package is marked for removal but its configuration files are still present. |
| un | Not installed. |
| ri | Installation is broken and its files have been partially installed, waiting for a reinstallation to fix the issue |
If you want to check multiple packages’ status, separate them by space. For example:
dpkg -l package1 package2 package3- dpkg -l: Calls the dpkg package manager to list installed packages that match a specific name or pattern which is provided after it.
- package1 package2 package3: Multiple package names separated by space.
I’ve met one dependency error (libminizip1) and want to check if it is successfully installed or not. So. I’ll run the following command:
dpkg -l libminizip1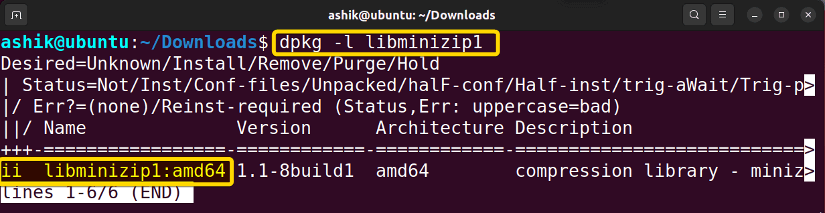 The output lists libminizip1:amd64 with the ii status flag. It means the libminizip1 dependency package is successfully installed and configured.
B. Using GUI to Verify Entire Software Package
You can find your installed software if the installation is successful and meets all dependencies. To check whether TeamViewer is successfully installed, follow the steps shown in the image:
- Click the Show Applications icon.
- Start typing teamviewer in the search bar.
 If you find TeamViewer in the application list like above, it means you’ve successfully installed the software and all its dependencies.
 If you find TeamViewer in the application list like above, it means you’ve successfully installed the software and all its dependencies.
Common Challenge: Package Architecture Doesn’t Match
You may download a .deb file of a dependency package that is not compatible with the version of your system. If you see an error message “package architecture does not match system” while installing, that means you are trying to install a file not suitable for your hardware. To check your hardware architecture, type the command below:
dpkg --print-architecture- dpkg: Package management tool for Debian-based architecture.
- –print-architecture: Shows system architecture.
 The output shows that my system architecture is amd64. So, I must download the deb packages that are suitable for amd64.
Note: If you see arm64 or other architecture, please be careful to choose .deb files that are suitable for your system architecture and download them from Ubuntu official website or any trusted source.
Conclusion
This article introduces you to the easiest way to install dependencies using dpkg. A complete method with a practical example is described here to resolve dependency errors that occurred during the installation of a package by dpkg. It is suitable for both advanced inspection and beginner installation purposes.
People Also Ask
Related Articles
- How To Check Package Dependencies in Linux [3 Easy Ways]
- How to Install Missing Dependencies in Ubuntu? [4 Methods]
- Install Dependencies Automatically in Ubuntu [3 Exclusive Methods]
- 5 Methods to Remove Package and Dependencies in Ubuntu
- How to Install RPM Package With Dependencies? [3 Methods]
- 2 Ways to Install RPM Without Dependencies in Linux
- How to Check RPM Reverse Dependencies in Linux? [4 Methods]
- [Solved] RPM Failed Dependencies Error in RedHat
- 2 Methods to Install YUM Packages with Dependencies
- Remove Packages without Dependencies Using Yum [2 Methods]
- [Solved] The Following Packages Have Unmet Dependencies Error
- How to Check APT Dependency Tree in Linux? [4 Methods]
<< Go Back to Dependencies in Linux | Package Management in Linux | Learn Linux Basics
FUNDAMENTALS A Complete Guide for Beginners


