WSL stands for Windows Subsystem for Linux and it is a feature that allows developers to install Linux distros in Windows where they can run Linux commands, applications, and utilities. WSL 2 is the newest version of WSL which is generally fast and more compatible. However, some might want to use WSL 1 as it is more compatible with older versions of Windows, it provides better performance across OS file systems and it runs with current versions of VMWare and VirtualBox. In this article, I will show you how to install Ubuntu in WSL 1. In addition, follow this article to know how to install Ubuntu in WSL 2. Furthermore, you can see this article to know how to install Ubuntu in WSL using GUI.
To install Ubuntu in WSL 1, follow the steps below:
1. Enabale WSL in Windows.
2. Install Ubuntu in WSL using: wsl --install -d Ubuntu-22.04
3. Change WSL Version using: wsl --set-version Ubuntu-22.04
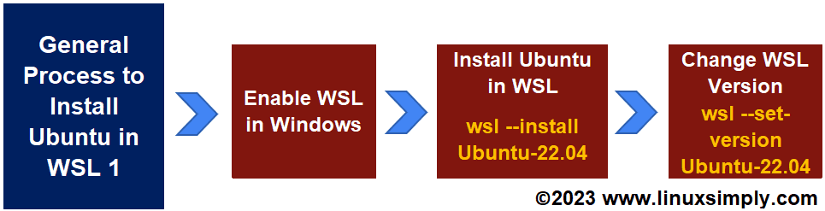
Process flow chart to install Ubuntu in WSL 1:
[OS Used Throughout the Tutorial: Windows 11]
3 Steps to Install Ubuntu in WSL 1
Here I will show how to install Ubuntu in WSL 1 in three steps:
Step 01: Enable WSL in Windows
In the beginning, I will enable the WSL feature in my Windows by the following steps:
- Search the Command Prompt, left-click on the mouse, and then select “Run as administrator” to open it as administrator.

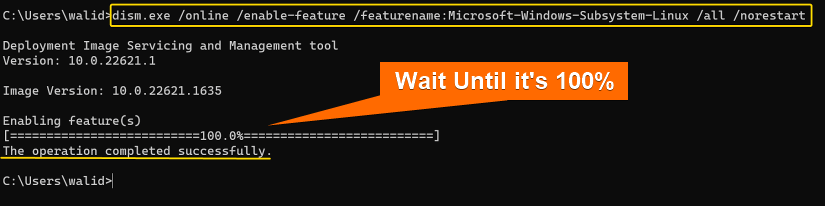
- To enable WSL, copy the following command and press ENTER:
dism.exe /online /enable-feature /featurename:Microsoft-Windows-Subsystem-Linux /all /norestartEXPLANATION- exe: Services Windows images, such as updating, adding or removing features.
- /online: Specifies that the command should be applied to the running operating system.
- /enable-feature: Enables a specific Windows feature.
- /featurename:Microsoft-Windows-Subsystem-Linux: Name of the feature being enabled.
- /all: Enables all the parent features of the specified feature.
- /norestart: Prevents the computer from automatically restarting after the feature is installed.
 You should see the “The operation completed successfully” message at the end of the process.
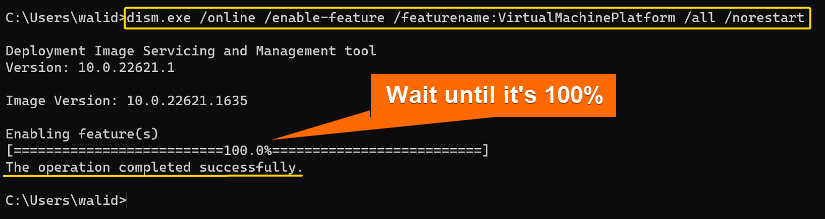
- Again, to enable Virtual Machine Platform, insert the following command and hit ENTER:
dism.exe /online /enable-feature /featurename:VirtualMachinePlatform /all /norestartEXPLANATION- exe: Services Windows images, such as updating, adding or removing features.
- /online: Specifies that the command should be applied to the running operating system.
- /enable-feature: Enables a specific Windows feature.
- /featurename:VirtualMachinePlatform: Name of the feature being enabled.
- /all: Enables all the parent features of the specified feature.
- /norestart: Prevents the computer from automatically restarting after the feature is installed.
 Wait until you see the “The operation completed successfully” message. This process will enable the Virtual Machine Platform feature which allows users to run virtual machines natively on Windows.
- Then restart the computer.

 You should see the “The operation completed successfully” message at the end of the process.
 Wait until you see the “The operation completed successfully” message. This process will enable the Virtual Machine Platform feature which allows users to run virtual machines natively on Windows.
Step 02: Install Ubuntu in WSL
Now I will install Ubuntu on WSL. However, you can install other distros as well. Follow the steps carefully:
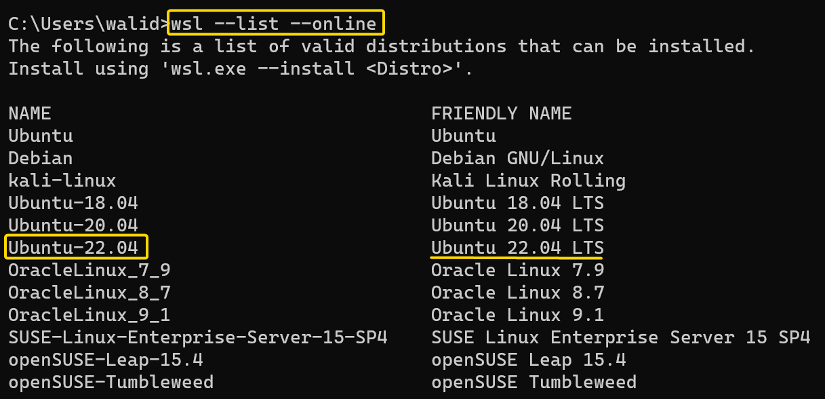
- At first, write the following command to list all the available distros and press ENTER:
wsl --list --onlineEXPLANATION- wsl: Manages WSL.
- – -list: Lists installed or available distros.
- – -online: Lists only those distros which can be downloaded online.
 Here, you can see the “Name” and “FRIENDLY NAME” of all the available distros. I will install “Ubuntu-22.04”.
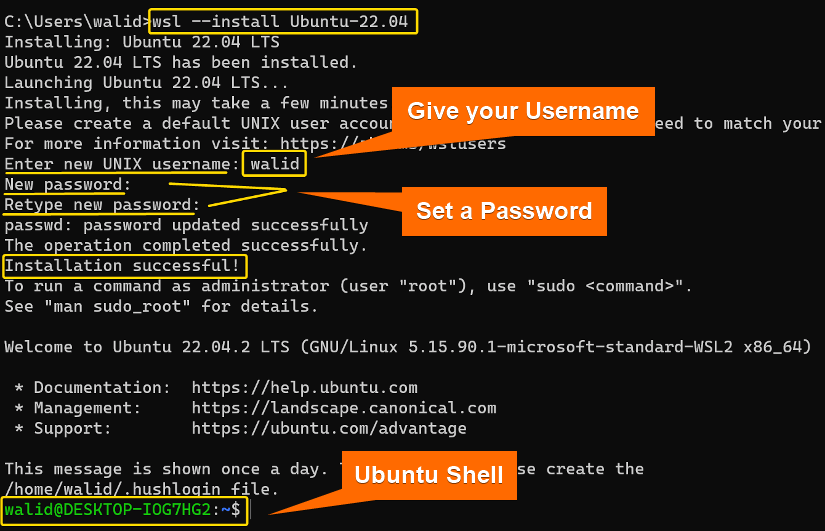
- Now copy the following command to install Ubuntu and hit ENTER:
wsl --install -d Ubuntu-22.04EXPLANATION- wsl: Manages WSL.
- – -install: Install a new Linux distro.
- -d: Specifying that you are installing a distribution.
- Ubuntu-22.04: Name of the distro which is being installed.
- Give your username.
- Finally, set a password.
 Remember, this whole process can take a while. You should see the “Installation successful!” message and at the end, you will see a Ubuntu shell where you can run Linux commands.
 Here, you can see the “Name” and “FRIENDLY NAME” of all the available distros. I will install “Ubuntu-22.04”.
 Remember, this whole process can take a while. You should see the “Installation successful!” message and at the end, you will see a Ubuntu shell where you can run Linux commands.
Step 03: Change WSL Version
As I am showing you how to install Ubuntu in WSL 1, I will now change the WSL version to 1, which is 2 by default mostly:
- First, open the Command Prompt as “Run as administrator”.
- Write the following command and hit ENTER:
wsl --set-version Ubuntu-22.04 1EXPLANATION- wsl: Manages WSL.
- – -set-version: Sets WSL version of a distro.
- Ubuntu-22.04: Name of the distro.
- 1: WSL version.
 This process may take some time. Wait for the “The operation completed successfully” message.
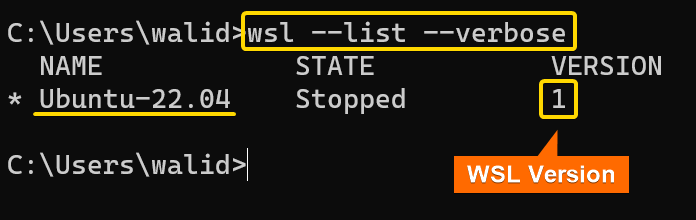
- (Optional) To list the installed distros and their corresponding WSL version, use the following command:
wsl --list --verboseOR,
wsl -l -vEXPLANATION- wsl: Manages WSL.
- -l,- -list: LIsts distros that are currently installed.
- -v,- -verbose: Shows additional information.
 As you can see, the WSL version for Ubuntu is 1 which was our goal.
 - Now you should find Ubuntu in your Windows like below:

 This process may take some time. Wait for the “The operation completed successfully” message.
 As you can see, the WSL version for Ubuntu is 1 which was our goal.
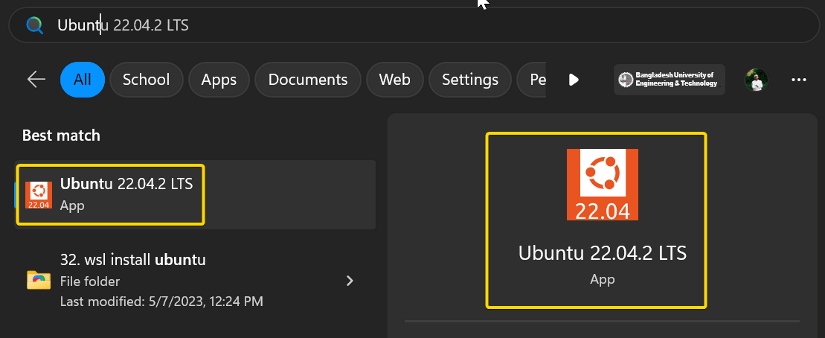
Conclusion
WSL is a useful feature as you don’t need to install an additional virtual machine to run Linux distros. In addition, it is lightweight and consumes less system resources. In this article, I have provided all the steps to install Ubuntu in WSL 1. Hopefully, you find this article helpful.
People Also Ask
What are the steps to install Ubuntu in WSL 1?
To install Ubuntu in WSL 1, follow these 3 steps:
- Enable WSL in Windows.
- Install Ubuntu in WSL.
- Change the WSL version to 1.
Where is Ubuntu WSL installed?
The Ubuntu WSL is installed on a virtual disk named ext4.vhdx and it can be found under %userprofile%\AppData\Local\Packages\Canonical…\LocalState\ext4.vhdx.
Is WSL installed?
To check if WSL is installed, you can use the command wsl -l -v in Powershell or Windows Command Prompt. This will show all the installed Linux distros and corresponding WSL versions.
Is WSL a virtual machine?
No, WSL is not a virtual machine. It allows a user to run a Linux distro in Windows. However, it uses a virtual machine platform.
Do I need to enable Hyper V for WSL?
No, you don’t need to enable Hyper-V for WSL, however, you need to enable the Virtual Machine Platform feature.
Related Articles
- 3 Methods to Uninstall Ubuntu from WSL
- How to Install Ubuntu in WSL2 in Just 3 Steps
- How to Install Ubuntu in WSL Using GUI [3 Steps]
<< Go Back to Windows Subsystem for Linux | Linux OS Single Installation | Learn Linux Basics
FUNDAMENTALS A Complete Guide for Beginners


you’re a mf god thx so much! i tried other guides and everytime something was not working but here it worked perfectly!!
Thankyou for your compliments.. Happy to hear that you found this article useful. Stay connected with us for more contents like this.