The WSL (Windows Subsystem for Linux) feature allows a user to install a Linux distro and execute Linux commands in Windows. WSL 2 is the current version of WSL which uses the latest and greatest virtualization technology. It has faster file system performance, is more compatible, and uses a real Linux kernel. In this article, I will show how to install Ubuntu in WSL2. Furthermore, follow this article if you want to know how to install Ubuntu in WSL 1.
To install Ubuntu in WSL2, follow the steps below:
- Enable WSL in Windows
- Make WSL 2 Default
- Install Ubuntu in WSL 2
Requirements to Install Ubuntu in WSL2
- Windows Operating System.
- Command Prompt.
- Stable Internet Connection.
Process Flow Chart to Install Ubuntu in WSL2: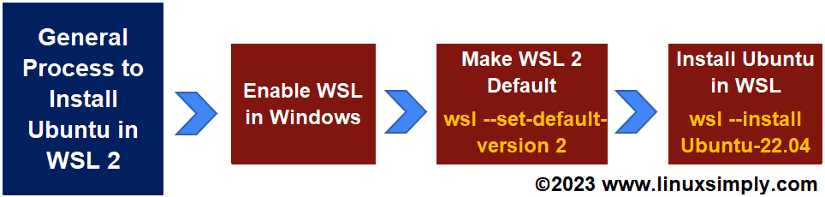 [OS Used Throughout the Tutorial: Windows 11]
3 Steps to Install Ubuntu in WSL 2
This is the core part of this article where I will show how to install Ubuntu in WSL2 in 3 simple steps.
Step 01: Enable WSL in Windows
In the beginning, I will enable the WSL feature in my Windows Operating system. You can do the same by following these steps:
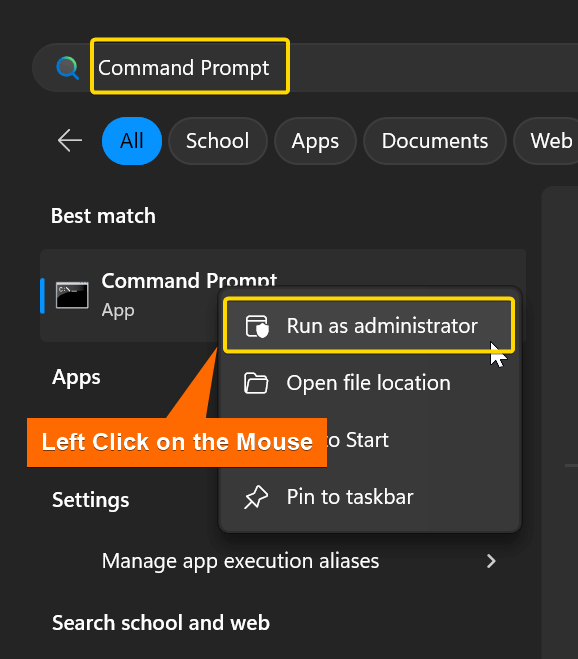
- Search Command Prompt, left-click on the mouse, and select “Run as administrator” to open it as administrator.

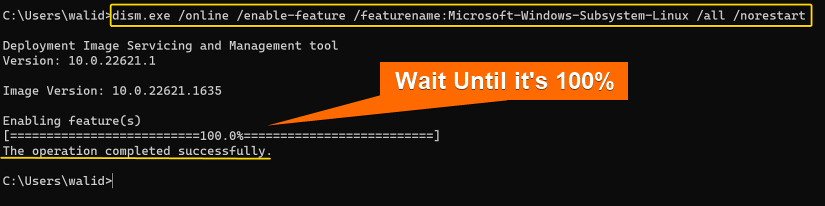
- To enable WSL, insert the following command and hit ENTER:
dism.exe /online /enable-feature /featurename:Microsoft-Windows-Subsystem-Linux /all /norestartEXPLANATION- exe: Services Windows images, such as updating, adding or removing features.
- /online: Specifies that the command should be applied to the running operating system.
- /enable-feature: Enables a specific Windows feature.
- /featurename:Microsoft-Windows-Subsystem-Linux: Name of the feature being enabled.
- /all: Enables all the parent features of the specified feature.
- /norestart: Prevents the computer from automatically restarting after the feature is installed.
 Wait for 100% and the “The operation completed successfully” message at the end.
 - Again, to enable Virtual Machine Platform, insert the following command and hit ENTER:
dism.exe /online /enable-feature /featurename:VirtualMachinePlatform /all /norestartEXPLANATION- exe: Services Windows images, such as updating, adding or removing features.
- /online: Specifies that the command should be applied to the running operating system.
- /enable-feature: Enables a specific Windows feature.
- /featurename:VirtualMachinePlatform: Name of the feature being enabled.
- /all: Enables all the parent features of the specified feature.
- /norestart: Prevents the computer from automatically restarting after the feature is installed.
 Like the previous, you will see 100% and the “The operation completed successfully” message. This process will enable the Virtual Machine Platform feature which allows users to run virtual machines natively on Windows.
 - Then restart the computer.
 Wait for 100% and the “The operation completed successfully” message at the end.
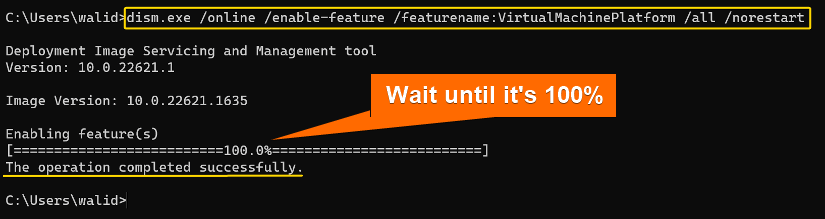 Like the previous, you will see 100% and the “The operation completed successfully” message. This process will enable the Virtual Machine Platform feature which allows users to run virtual machines natively on Windows.
Step 02: Make WSL 2 Default
Now I will make WSL 2 the default WSL version, which means Linux distros will be installed on WSL 2 by default:
- To make WSL 2 default, write the following command in the Command Prompt:
wsl --set-default-version 2EXPLANATION- wsl: Manages WSL.
- –set-default-version: Sets default WSL version.
- 2: The WSL version number.
- Press ENTER from the keyboard.
 You should see an output like the above.
 You should see an output like the above.
Step 03: Install Ubuntu in WSL 2
Finally, I will install Ubuntu in WSL. You can do the same by following the steps below:
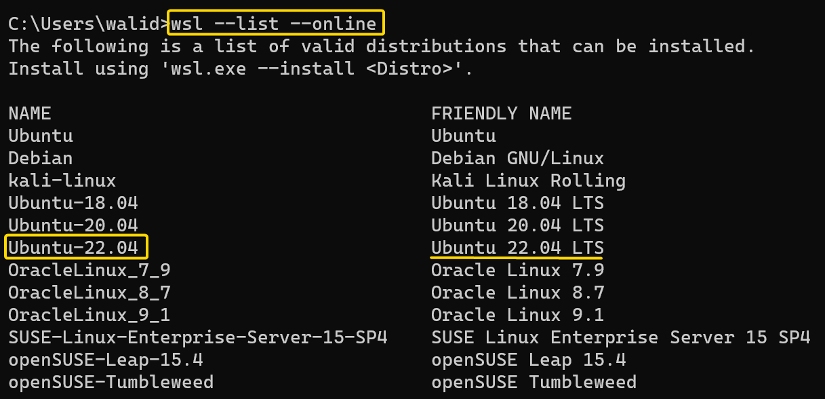
- At first, use the following command to list all the available Linux distros:
wsl --list --onlineEXPLANATION- wsl: Manages WSL.
- –list: Lists installed or available distros.
- –online: Lists only those distros which can be downloaded online.
 You will see two columns, the name of the Linux distro and its corresponding friendly name. I will install “Ubuntu-22.04” in the next step.
 - To install Ubuntu, copy the following command:
wsl --install -d Ubuntu-22.04EXPLANATION- wsl: Manages WSL.
- –install: Install a new Linux distro.
- -d: Specify that you are installing a distribution.
- Ubuntu-22.04: Name of the distro that is being installed.
- Give a username for the Ubuntu.
- Finally, set a password.
 You should remember that this whole process can take some time. In the end, you should see an Ubuntu shell where you can execute Linux commands.
Warning: If you face any issue while installing Linux distribution, check the WSL status using:wsl --statusIf, this happens due to the WSL kernel being missing then run:
wsl --updateThis should solve the issue.

- (Optional) Now execute the following command to print installed Linux distros and their corresponding version:
wsl --list --verboseOR
wsl -l -vEXPLANATION- wsl: Manages WSL.
- -l,–list: LIsts distros that are currently installed.
- -v,–verbose: Shows additional information.
 As you can see, the WSL version is 2. Therefore, Ubuntu is successfully installed in WSL 2.
 - Now you should find Ubuntu in your Windows like below:

 You will see two columns, the name of the Linux distro and its corresponding friendly name. I will install “Ubuntu-22.04” in the next step.
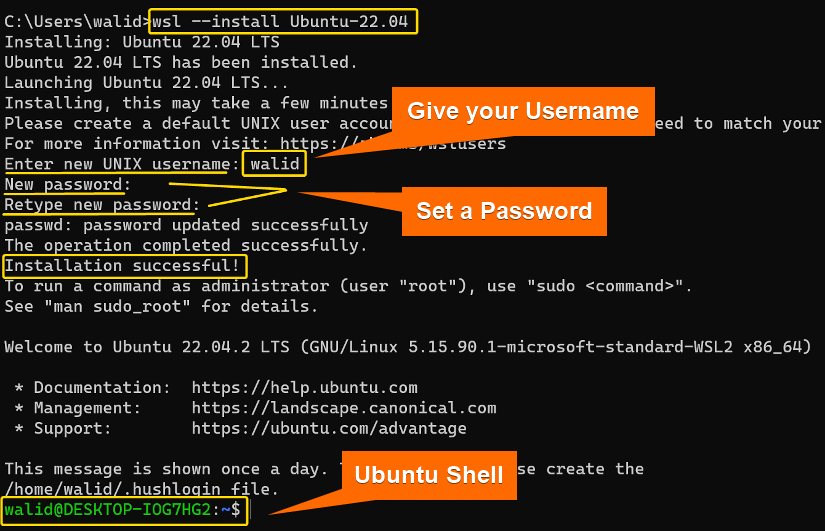 You should remember that this whole process can take some time. In the end, you should see an Ubuntu shell where you can execute Linux commands.
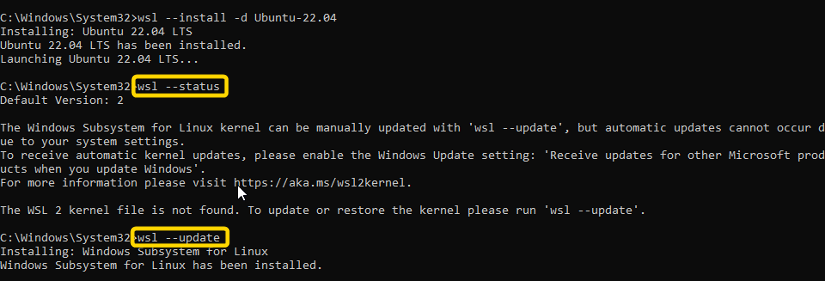
 As you can see, the WSL version is 2. Therefore, Ubuntu is successfully installed in WSL 2.
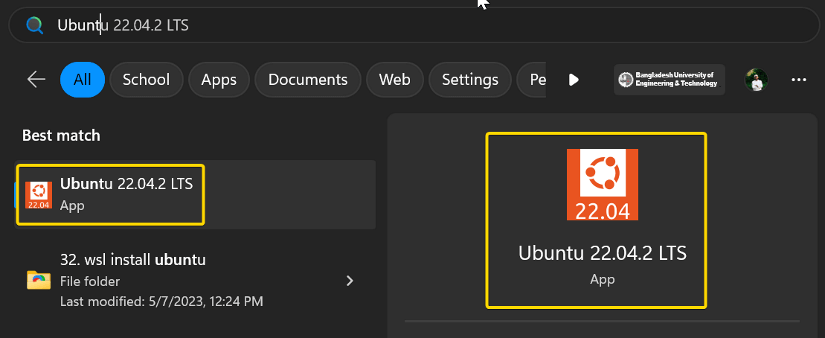
Conclusion
In this article, I have shown how to install Ubuntu in WSL2 in three steps. However, remember, step 2 might not be necessary as WSL 2 is the default WSL version in Windows mostly. Finally, I hope this article was helpful to you.
People Also Ask
How to access Ubuntu after installation using WSL2?
To access Ubuntu after installation via WSL2, go to the Start menu and open Ubuntu from there since Windows adds Ubuntu to its menu when installing. This is also applicable to access whichever Linux you choose during installation.
What is the best Linux distro for WSL2?
Ubuntu is the best Linux distro for WSL. It is a user-friendly and well-supported distro, with a large community and documentation. It comes with WSL2 by default and you can download it from the Microsoft Store and “wsl –install” command.
How to enable WSL2 and “Virtual machine Platform” using the Windows GUI (Graphical User Interface)?
To enable WSL2 and the “Virtual Machine Platform” using the GUI provided by your Windows OS, first, go to the Windows Start menu and type “turn on Windows features”. Secondly, select “Windows Subsystem for Linux” and “Virtual Machine Platform”. Finally, click OK and restart your PC.
Can I run VirtualBox in WSL2?
It is possible to run VirtualBox in WSL2. However, you must use Windows 10 (21H2) or higher, enable Hypervisor Platform, and use VirtualBox 6.1.4 or newer.
How to display the Ubuntu GUI desktop application via WSL?
To display the Ubuntu GUI desktop application via WSL:
- Install Ubuntu desktop using
sudo apt install ubuntu-desktop - Install an X server, for example, VcXsrv, from the official website.
- Configure the X server.
- Set a display environment variable.
- Start the Ubuntu desktop environment.
Can I convert Ubuntu on WSL1 to WSL2?
Yes, you can. To convert an existing WSL1 Ubuntu distro to WSL2, open the Windows PowerShell and run the command ws.exe --set-version Ubuntu 2 (replace the name Ubuntu with whichever Linux distro you choose). Additionally, you might restart your computer to ensure that the changes take effect.
Related Articles
- How to Install Ubuntu in WSL 1 in Just 3 Steps
- 3 Methods to Uninstall Ubuntu from WSL
- How to Install Ubuntu in WSL Using GUI [3 Steps]
<< Go Back to Windows Subsystem for Linux | Linux OS Single Installation | Learn Linux Basics
FUNDAMENTALS A Complete Guide for Beginners


Unfortunately it all broke down at step 3 . There was no user name or password input in the command lines . Could not proceed . A really nice explanation up to that point .
Hello! Thanks for letting us know. Actually, this article was written almost a year ago, and the commands to install wsl2 has been updated since then. We are updating the commands in the post. Again, thanks for your valuable feedback.
Couldnt go past here “`wsl –list –online“`
it gave me this error: “Error: 0x80072ee2”
Hello Jane, “Error: 0x80072ee2” can be caused for many reasons. First run
wsl --list --verboseandwsl --statusto get more information about the error you got. chances arewsl --updatewill solve those issues. Also make sure you have enabled wsl in your system.In case that do not solve your issue go through
https://developers.google.com/speed/public-dns/docs/using
and https://www.minitool.com/news/0x80072ee2.html
these articles. Let us know if you need further assistance.
I thought so too, until I realized that a different window popped up behind everything with the prompt as a new cmd window.
Great post! I found the steps incredibly easy to follow, and now I have Ubuntu running smoothly on WSL2. Thanks for breaking it down so simply!