Here are the top 10 Linux commands for newbies that will help every newcomer to Linux get started:
- ls: Lists all files & directories of the current directory.
- pwd: Prints working directory.
- cd: Navigates through directories.
- touch: Creates empty files.
- cat: Displays file contents on the terminal.
- cp: Copies files/folders in Linux.
- mv: Moves or renames files/folders in Linux.
- mkdir: Creates empty directories in Linux.
- rm: Removes files or directories.
- man: Displays manual page for specified Linux command.
Now, Let’s explore each of these commands more comprehensively to gain a deeper understanding. As there are already detailed articles available for each command, you can learn more about these commands with necessary examples & practical usages by visiting the corresponding attached link that is appended after each command.

1. ls
The ls command “Lists” the contents, both files and subdirectories of the current directory by default. It is one of the most used commands, as one can view the contents of a directory without exiting the terminal and perform their desired tasks on the specific contents.
Syntax
ls [OPTION]... [FILE]...
Useful Options
- -a → Doesn’t ignore the hidden files (files named with .(dot) at the beginning).
- -h → Prints sizes in human-readable forms.
- -l → Lists in a long form.
- -S → Sorts according to file size, largest first.
- -d → Only lists the current directory, not its contents.
Practical Example
To see how the ls command works simply type the ls command in your terminal as follows:
ls As shown in the image above, employing the command without any additional arguments displays all the files and directories within the current directory.
To learn more read, The “ls” Command in Linux [7+ Practical Examples]
2. pwd
The pwd command stands for print working directory. It displays the absolute path of the current directory, in a simple context, prints the name of the current/working directory all the way beginning from the root (/) directory. So it shows where the terminal currently is in detail and will help you when you are lost inside some unknown directory.
Syntax
pwd [OPTION]...Useful Options
- -L, –logical → Even as it carries symlinks, PWD utilizes from the environment.
- -P, –physical → Avoids the symlinks.
When no option is mentioned, it is assumed that option -P is being used.
Practical Example
To print the name of the working directory using the pwd command, simply type the command on your terminal:
pwd The image shows the directory I was working on which is /home/munny.
Typically, your terminal prompt already displays the entire directory. However, if it’s not visible, this command is a swift way to view your current directory. Additionally, when crafting scripts, this command proves valuable by helping identify the directory where the script is saved.
To learn more read, The “pwd” Command in Linux [4 Practical Examples]
3. cd
The word cd stands for change directory. This command is used for changing the current directory of the user. It will take the user from the current directory (current location) to a specified directory.
Syntax
cd [OPTION]... [DIRECTORY]
Useful Options
- cd ~[username] → Changes the directory to the specified user’s home directory.
- cd .. → Changes directory one directory up the current directory.
- cd – → Changes the directory to the previously changed directory.
Practical Example
To see practically how the cd command works, let’s change the current working directory to another directory. For that just type the command followed by the directory name:
cd test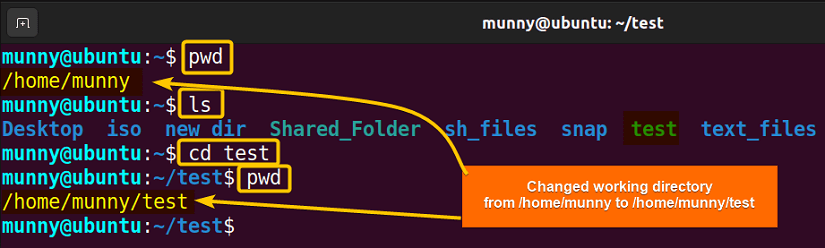 See from the image, first, I typed the pwd command to show my current working directory. After that, I displayed the files & directory lists of that directory, just to show you in which directory I will move (here I selected the test directory). Then I shifted to that directory & used the pwd command again to show you the changed directory name.
To learn more read, The “cd” Command in Linux [6 Practical Examples]
4. touch
The touch command allows us to update a file’s access or modification time. However, if the file doesn’t exist it will be created. This ability to create files makes the touch command one of the most useful commands.
Syntax
touch [OPTION]... FILE...
Useful Options
- -a → changes only the access time.
- -m → Changes only the modification time.
Practical Example
To create a new file use the touch command followed by the file name which will create a file in the current directory. Now to create a file named new_file, run the command:
touch new_file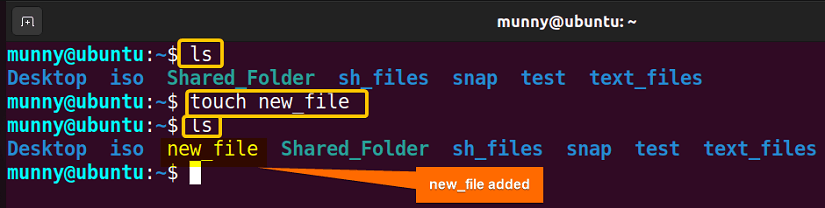 The output image shows how a new file named new_file is created and added to the list.
To learn more read, The “touch” Command in Linux [8 Practical Examples]
5. cat
The cat command prints the contents of the file specified. Generally, cat (concatenates) reads the contents of the files fed to its arguments and prints them serially on the terminal.
Syntax
cat [OPTION]... [FILE]...
Useful Options
- -E, –show-ends → Display $ at end of each line.
- -n, –number → Displays line numbers when utilized.
- -s, –squeeze-blank → suppress repeated empty output lines.
Practical Example
To print the contents of any file just type the cat command followed by the file name. For example, to see the contents of new_file:
cat new_file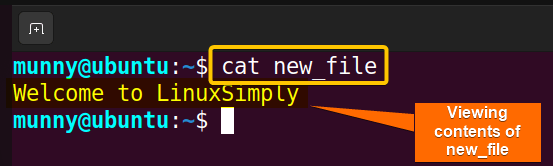 See from the above snapshot, the cat command is displaying the contents of the new_file.
To learn more read, The “cat” Command in Linux [10 Practical Examples]
6. cp
The cp command resembles the word ‘copy’. As the name suggests, it copies things from one place to another place. The command can copy one or multiple files to the specified destination directory. If the directory doesn’t exist it just renames the files. It can also be used to copy directories and their contents.
Syntax
For Copying Files
cp [OPTION]... [-T] SOURCE DESTINATION
To Copy Files to a Directory
cp [OPTION]... SOURCE… DIRECTORY
For Copying Directory
cp [OPTION]... SOURCE DIRECTORY DESTINATION DIRECTORY
Useful Options
- -i, –interactive → Displays interactive prompt before completing the modification.
- -R, -r, –recursive → Copies the directory as well as its contents recursively.
- -v, –verbose → Prints message of what is being performed.
Practical Example
Type the cp command with the source file name (in this case, new_file) & the destination directory name (here, test). Remember to add space between these two. See the command below:
cp new_file testNote: Make sure to add the absolute path for the source file and destination folder if they are not present in the current working directory.
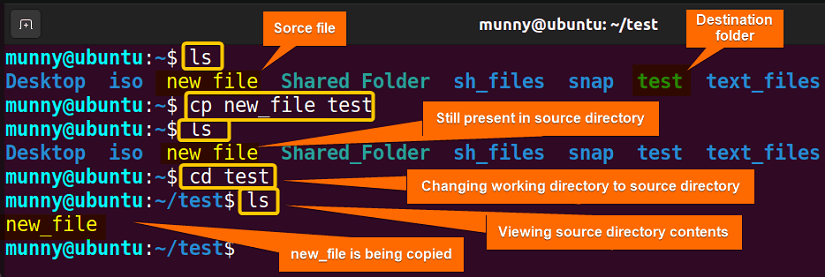
Here, the cp command copies the new_file from its source folder to the new destination directory. I executed the ls before after executing the cp command to show you the changes made by the command and used the cd command to enter the destination directory to display the copied file there.
To learn more read, The “cp” Command in Linux [6 Practical Examples]
7. mv
The mv command is a widely used file/folder management command that allows changing the location of a file or folder. Moreover, when changing the location you can rename the file as well just by changing the file name.
Syntax
mv [OPTION]... SOURCE... DESTINATION
Useful Options
- -n, –no-cobber → Does not overwrite an existing file.
- -i, –interactive → Prompts before overwriting.
- -f, –force → Does not prompt before overwriting.
- -v, –verbose → Explains what is being done.
- -u, –update → Moves only when the source file is newer than the Destination file.
Practical Example
This command works almost the same way as the cp command. Just that it moves the file/folder to a new place instead of copying it. Same as the cp command add the source file name and then the destination folder name. Such as:
mv new_file test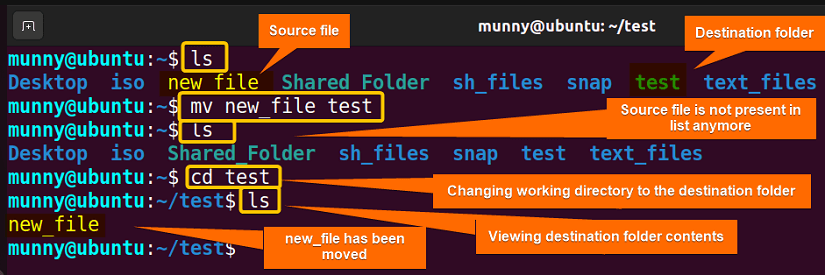 See from the image, the mv command moves the new_file from its source folder to the new destination directory. I executed the ls before and after executing the mv command to show you the changes made by the command. As you can see after running the mv command the source file is not present in its previous location anymore. Later used the cd command to enter the destination directory to display the moved file there.
To learn more read, The “mv” Command in Linux [8 Practical Examples]
8. mkdir
The command mkdir is the abbreviation for make directory. As the name suggests, the mkdir command is used to create one or more directories.
Syntax
mkdir [OPTION]... DIRECTORY...
Useful Options
- -p – -parents → Creates the necessary parent directories if required.
- -v, –verbose → Prints message of what is being performed.
Practical Example
It’s so straightforward to use the mkdir command, just type the desired directory name after the command. For example, to create a directory named new_dir type:
mkdir new_dir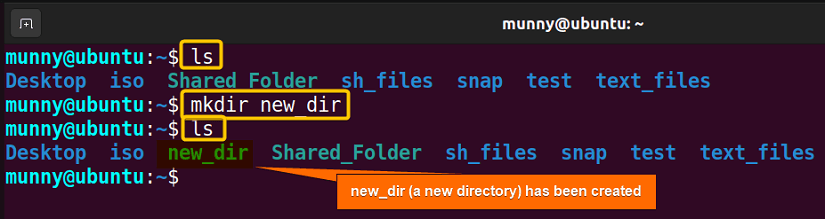 Upon execution, the command adds the new directory new_dir to the list, as you can see from the output of the ls command.
To learn more read, The “mkdir” Command in Linux [6+ Practical Examples]
9. rm
The rm command is the abbreviation for remove. As the name suggests, it removes files and the removal is permanent, so be cautious while using it. The command can also be used to remove directories and their contents permanently.
Syntax
rm [OPTION]... [FILE]...
Useful Options
- -i → Displays interactive prompt before completing the deletion each time.
- -I → Only shows prompt while deleting 3 or more files or deleting recursively.
- -d, –dir → Removes the empty directories.
- -R, -r, –recursive → Removes any directory as well as its contents recursively.
- -v, –verbose → Prints message of what is being performed.
Practical Example
By adding the file name simply after the rm command, it removes it from the system permanently. Let’s delete previously created new_file:
rm new_fileTo delete a directory, you have to add the --recursive or -r option to it. Without the -r argument, the rm command won’t delete directories. Now, to delete the new_dir directory, use the command:
rm -r new_dir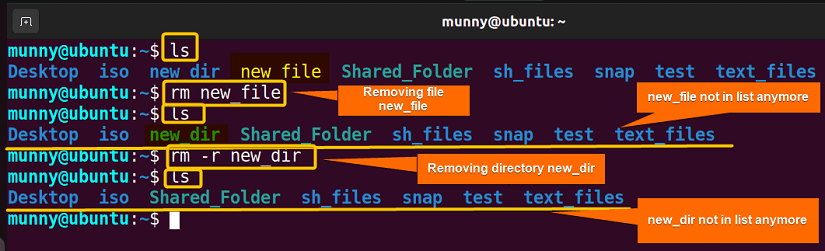 The rm command removes the file new_file, as well as this command with command option -r removes the directory new_dir, as you can see from the above image. I used the ls command after executing each of the commands so that you get a clearer overview of how the command works.
To learn more read, The “rm” Command in Linux [7 Practical Examples]
10. man
The man command in Linux stands for manual. Upon execution, it will display a manual page or documentation of a specified Linux command. It displays information like the synopsis, description, options, exit status, authors, copyright, etc.
Syntax
man [OPTION]... [Command_NAME]...
Useful Options
- SECTION COMMAND → Shows the specific SECTION of a COMMAND.
- -k KEYWORD → Search for the Keyword in the whole manual page and show all the matches.
- -f KEYWORD → Looks for a short description of any Keyword or Command.
- -d, –default → Resets the man command behavior to default.
- -i, –ignore-case → Ignore case sensitivity of the command.
- -I, –match-case → Looking inside the man page with case sensitivity.
- -a, –all → Shows all manual pages that match the specific keyword or command.
Practical Example
To see the manual page of the man command just type the following command:
man man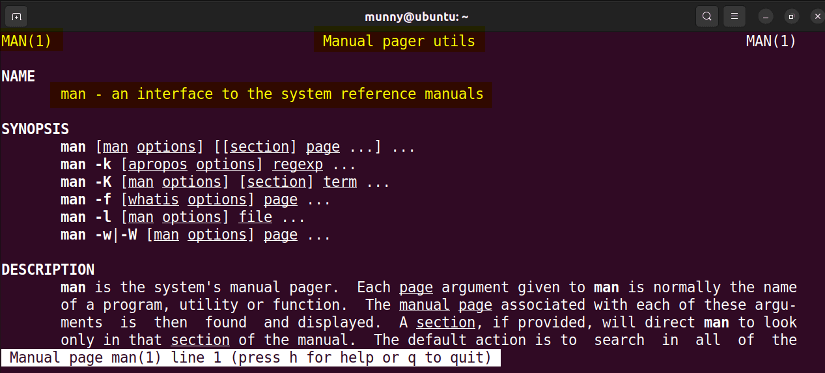 The command output displays the manual page for the man command, providing detailed information about its usage and options.
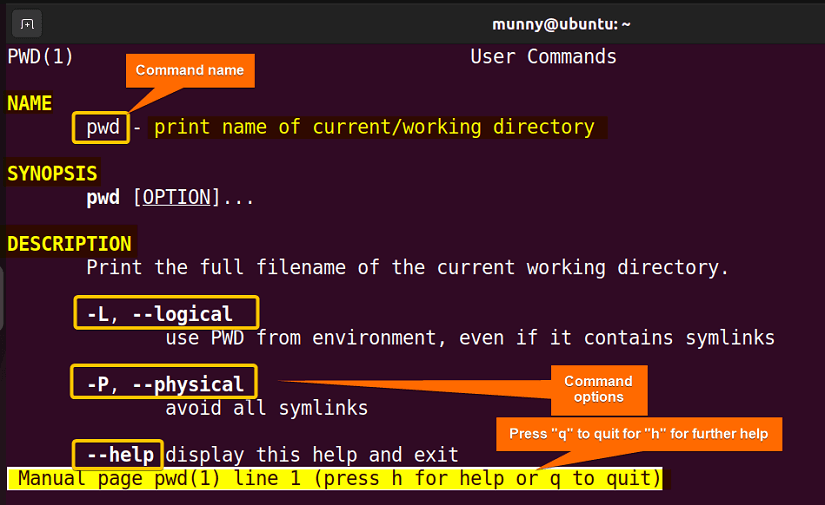 And, to view the manual page of any other command type the command name as an argument after the man command. For instance, to view the man page of the pwd command, type:
man pwdFrom the manpage of the pwd command, you can see the command name, description, and synopsis, along with all the flags or options of the command with their short description.
To learn more read, The “man” Command in Linux [6 Practical Examples]
Assignment Task
- Create and move a directory named “Winter” to a directory that is not situated in the current working directory.
- Rename a file name using one of the commands discussed in the article.
- Create multiple files at the same time using the touch command.
- List all the contents of a directory, along with the hidden files. (Hint: Use the command options).
- List out the contents of a directory as a comma-separated list. (Hint: You’ll need to dig into the man pages to find the correct option. Maybe you can search the ls man page for “comma”?)
- Remove a directory using the rm command but interactively!
Conclusion
Linux is a free and open-source operating system that has gained widespread acceptance over the years. It is extensively used in a variety of domains, including servers, embedded systems, and personal computers. Learning Linux can be intimidating for newbies, but it’s actually not that difficult. The usage of commands is one of the most important things to master in Linux. In this article, I discussed the top 10 must-learn Linux commands for newbies. Hope it helps new users to surf through the CLI world!
People Also Ask
How to learn Linux commands for beginners?
To learn Linux commands as beginners, first, understand the basics. Familiarize yourself with the basic concepts of Linux, such as the file system hierarchy, and command-line interface (CLI). Then begin by learning the most essential commands that are commonly used in everyday tasks, such as navigating directories (cd, ls, pwd), managing files (cp, mv, rm, mkdir, touch), and viewing file contents (cat, less, head, tail).
What is the most used Linux command?
One of the most used Linux commands is the ls command which is used to list directory contents. It allows users to view the files and directories present in a specified location or the current directory.
How do I Practice Linux commands?
To practice Linux commands:
- Set up Linux on your computer or use online tools.
- Follow tutorials and join online communities for guidance.
- Start with the basic and easy commands.
- Use cheat sheets and experiment with commands.
- Create your own exercises and projects.
How many commands are there in Linux?
There isn’t a fixed number of commands in Linux as it can vary depending on factors like the distribution and installed software. However, Linux typically comes with over 1000s of built-in commands for various tasks like file management, system administration, networking, and more. Additionally, users can install additional software packages, further increasing the number of available commands.
FUNDAMENTALS A Complete Guide for Beginners


