RPM(Red Hat Package Manager) serves as a prevalent package management system found in various Linux distributions, including Red Hat Enterprise Linux, CentOS, Fedora, and more. Maintaining your RPM package up-to-date is crucial to guarantee system security, reliability, and the availability of the latest functionalities To update RPM package of your system, you can use multiple package managers (like yum, dnf), GUI, CLI tool (pkcon). In this article, I will guide you through different methods to update RPM package on your Linux system.
To update rpm packages, check the following commands. The user must have root privilege.
- Using rpm:
sudo rpm -U [package_name].rpm - Using yum:
sudo yum update - Using dnf:
sudo dnf update - Using pkcon:
sudo pkcon update
Process Flow Chart
[Distro Used Throughout the Tutorial: RHEL 9.2]
Understanding the Basics of RPM
An RPM (Red Hat Package Manager) package is a file format for software packages predominantly employed in Linux distributions utilizing the Red Hat package management system, including Red Hat Enterprise Linux, CentOS, Fedora, and similar systems. These RPM packages encompass essential files and associated information essential for the installation, updating, or removal of software applications and libraries on a Linux operating system.
It’s also a command line utility that can perform installation, upgrade, and a few more operations in the CLI. The operations, rpm can perform are enlisted in the table below:
| Mode | Command |
|---|---|
| Installation | rpm -i <package.rpm> |
| Upgrade | rpm -U <package.rpm> |
| Remove | rpm -e <package_name> |
| Querry | rpm -q <package_name> |
| Verify | rpm -V <package_name> |
6 Methods to Update RPM Packages in RHEL
To update the RPM package on RHEL, you can use the ‘yum,’ ‘dnf,’ ‘pkcon,’ and ‘rpm’ package manager. These package managers can automatically handle dependencies and ensure a smooth update process. To update “rpm” packages, you check out the 6 methods mentioned here:
You can read the comparative analysis of Methods to distinguish between these six methods and find the convenient one for you.
1. Update RPM Packages Using “yum” in RHEL
Whenever you need to patch security vulnerabilities, access new features, or keep your system up-to-date, yum provides a reliable and efficient way to manage software updates on your Linux system. In this guide, I’ll walk you through the steps to update RPM packages using yum. You can follow them below accordingly.
- Open a terminal in RHEL.
- To ensure that you have the latest package information, you can check the updates in RHEL using the following command.
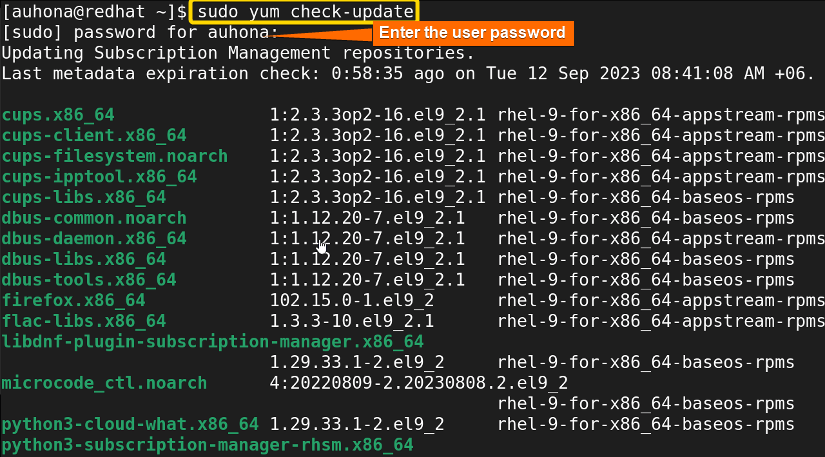
sudo yum check-updateEXPLANATION- sudo: Provides administrative privilege required to run the command.
- yum: This is the package manager used for installing, updating, and managing software packages.
- check-update: This is a specific subcommand for ‘yum’ that instructs ‘yum’ to check for any updates available in the configured repositories for the installed packages on the system.
-
Enter the user password as directed in the picture.
 This command enlists all the available updates for the installed packages in their corresponding repositories mentioning the versions also.
 - Now, run the following command to update the rpm packages.
sudo yum updateEXPLANATION- sudo: Gives users the privileges as the superusers.
- yum: It’s the package manager for installing, updating, and managing packages in RHEL.
- update: This subcommand tells yum to update the installed packages on the repositories.
 Here, you can see a list of packages that have updates available, including their current and new version numbers.
 - Press “Y” to continue the update process of the packages.
 After agreeing to continue the process, the update operation will be accomplished.
 This command enlists all the available updates for the installed packages in their corresponding repositories mentioning the versions also.
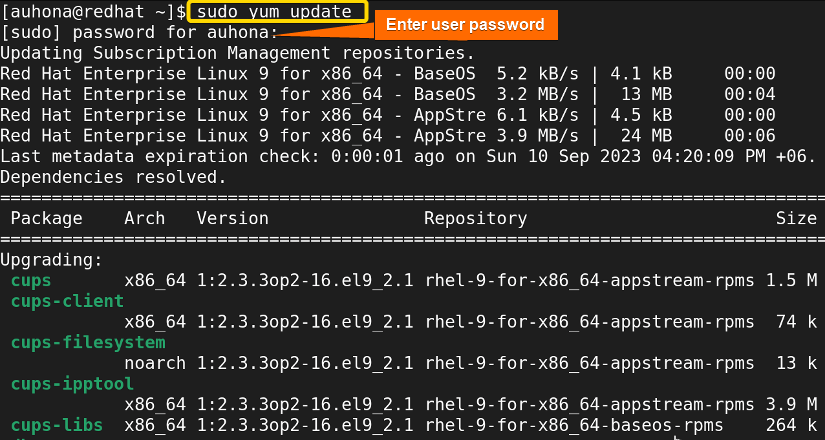 Here, you can see a list of packages that have updates available, including their current and new version numbers.
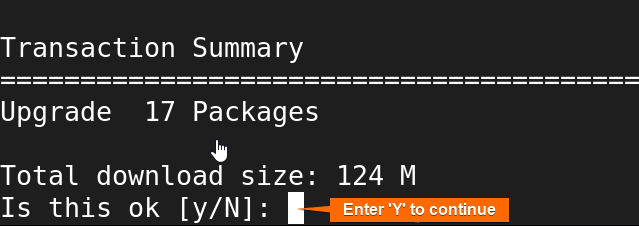 After agreeing to continue the process, the update operation will be accomplished.
2. Upgrading RPM Packages Using “dnf” in RHEL
DNF, which stands for ‘Dandified YUM,’ serves as a package manager tailored for Red Hat-based Linux distributions. Its primary function is to facilitate the installation, updating, and overall management of software packages. To update RPM packages using DNF, follow the steps mentioned below:
- Open the terminal in RHEL.
- To ensure your package repository metadata is up-to-date, run the following command.
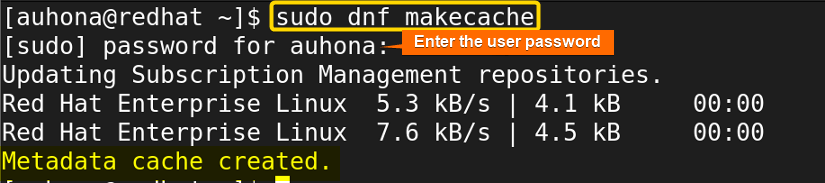
sudo dnf makeacheEXPLANATION- sudo: Provides the user the root privilege.
- dnf: It’s used for package management like installing, updating, and removing software packages in the Red Hat-based Linux distro.
- makeache: This subcommand instructs ‘dnf’ to update the local package metadata cache.
 You can see that metadata has been created here.
 - Once the metadata is updated, to check for the available updates, run the following command.
sudo dnf check-updateEXPLANATION- sudo: Gives the user sudo privilege while executing commands.
- dnf: It’s the package manager for managing packages in the RedHat-Based Linux distro.
- Check-update: This subcommand instructs ‘dnf’ to search the configured repository for available updates.
 The command shows an enlisted package list including the version specification whose new versions are available.
 - Finally, run the following command to update the ‘RPM’ packages
sudo dnf updateEXPLANATION- sudo: Provides user with administrative privilege.
- dnf: Used for managing packages in Red Hat-based Linux distro.
- update: Instructs ‘dnf’ to update all the installed packages on your system to their available versions.
 Here, you can see a package list who have updated versions with their version specification, system architecture, repository, and size of the updated version.
 Below the whole list, you’ll be asked for consent to continue the update process. So to get the update completed, Type ‘Y’ and continue the process.
 You can see that metadata has been created here.
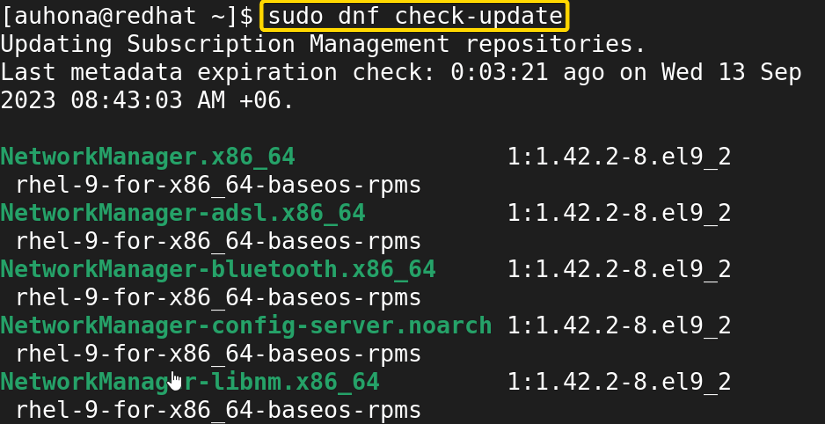 The command shows an enlisted package list including the version specification whose new versions are available.
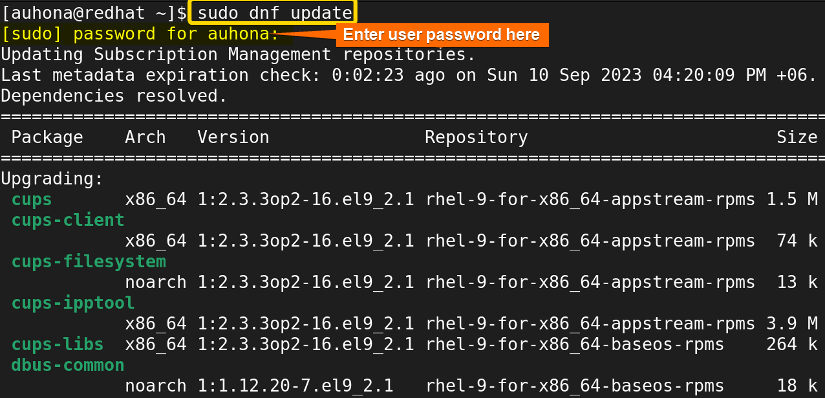 Here, you can see a package list who have updated versions with their version specification, system architecture, repository, and size of the updated version.
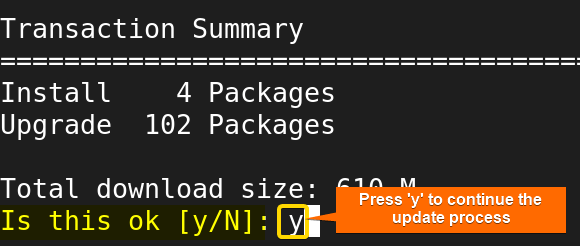 Below the whole list, you’ll be asked for consent to continue the update process. So to get the update completed, Type ‘Y’ and continue the process.
3. Use “rpm” to Upgrade RPM Packages in RHEL
This process allows you to replace the older version of the packages with the newer ones. Here’s a guide on how to update RPM packages using RPM:
- Open the terminal on RHEL.
- Run the following command.
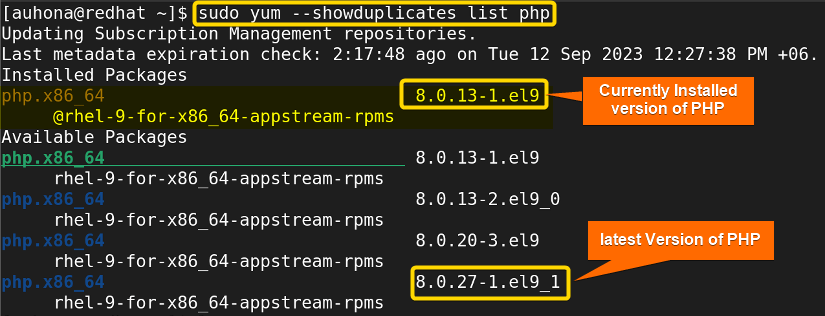
sudo yum --showduplicates list phpEXPLANATION- sudo: Allows you to run the command with superuser privilege.
- yum: This is a package manager used for managing software packages.
- –showduplicates: This option tells yum to display all the available versions of a package.
- list: This subcomand of ‘yum’ lists packages.
- php: This is the name of the package whose list I want to get.
 Here you can notice that the current installed version of php is 8.0.13-1.el9. The output also enlists all the available package versions of php including the latest version that is 8.0.27-1.el9_1.
Notes: You may need to provide the User password for authentication. In my case, I had already authenticated myself before running the command.
- Now run the following command to download the latest rpm package of php.
sudo dnf download phpEXPLANATION- sudo: Gives user sudo privilege as superuser.
- dnf: Stands for “Dandified YUM,” which is used for package management like installing, updating, and removing software packages in Red Hat-based distros.
- download: This option of ‘dnf’ indicates the download operation by the user.
- php: This is the name of the package I want to install.
 Here, you can see the downloaded php of the latest version to which I’ll update php using rpm.
 -
To see the downloaded ‘.rpm file’, simply run the ‘ls’ command in the directory you’ve downloaded the ‘PHP’ file.
lsEXPLANATION- ls: Used to display information about files and directories in a specific location.
 Here, the downloaded php file exists which is the latest version.
 - After downloading the ‘.rpm’ file, now you can run the following command to update PHP.
sudo rpm -Uvh php-8.0.27-1.el9_1x86-64.rpmEXPLANATION- sudo: Allows a user with superuser privilege to execute a command.
- rpm: A package manager stands for ‘Red Hat Package Manager’, used in Red Hat-based Linux distro for managing software packages.
- -U: This option for the ‘rpm’ tells the package manager to upgrade the package if it is already installed or install it if it’s not.
- -v: This option is used for displaying detailed information about the installation or upgrade process.
- -h: This option is used to display a hash mark (#) for each file being installed or upgraded
- php-8.0.27-1.el9_1x86-64.rpm: This represents the RPM package file name I wished to install. In this case, it seems to be the PHP version 8.0.27 package tailored for a 64-bit x86-64 architecture, designed for RHEL 9 or a similar compatible system.
 The ‘RPM file’ for the updated version of PHP is installed and in the meantime, the previous version of PHP is removed by rpm.
 - To verify whether the package PHP actually updated or not, run the following command.
rpm -q phpEXPLANATION- rpm: This is the package manager used for managing software packages in Red Hat-based distro.
- -q: This option instructs ‘rpm’ to query the package database for information about the specified package.
- php: The package name about which I wanted to get information about.
 It’s so vivid in the picture that the version of the rpm package is updated. You can check the version by comparing the available duplicates shown above.
 Here you can notice that the current installed version of php is 8.0.13-1.el9. The output also enlists all the available package versions of php including the latest version that is 8.0.27-1.el9_1.
 Here, you can see the downloaded php of the latest version to which I’ll update php using rpm.
 Here, the downloaded php file exists which is the latest version.
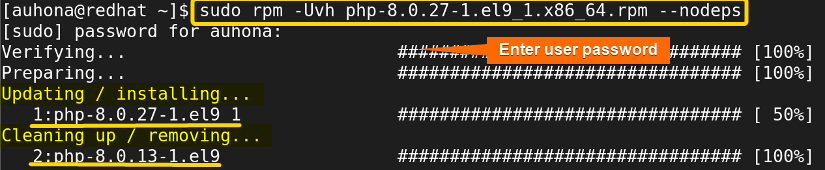 The ‘RPM file’ for the updated version of PHP is installed and in the meantime, the previous version of PHP is removed by rpm.
 It’s so vivid in the picture that the version of the rpm package is updated. You can check the version by comparing the available duplicates shown above.
4. Update RPM Packages Using “pkcon”
It’s important to keep in mind that ‘pkcon’ is commonly employed in Linux distributions that rely on the PackageKit package management framework. To update RPM packages using ‘pkcon’, you can follow these steps:
- Open a terminal in RHEL.
- Run the following command to update metadata.
sudo pkcon refreshEXPLANATION- sudo: Allows you to execute like
- pkcon: It’s the command line tool, which is a part of the PackageKit framework. It provides a simplified interface for package management
- refresh: This subcommand of ‘pkcon’ is used for refreshing package metadata.
 When you execute ‘sudo pkcon refresh’, it instructs PackageKit to fetch updated details regarding the available software packages from the software repositories that are set up on your system.
 - Finally, to update the RPM packages, run the following command.
sudo pkcon updateEXPLANATION- sudo: To get the superuser facility while executing the command.
- pkcon: Interacts with PackageKit, resolves package dependencies, ensuring that all packages are updated.
- update: This subcommand for ‘pkcon’ instructs to check for installed packages and install them if updates are available.
 Here is the enlisted package information for the available update package names. After listing the packages you’ll get a text for approving the process.
 Now, type ‘Y’ and continue the update process.
 When you execute ‘sudo pkcon refresh’, it instructs PackageKit to fetch updated details regarding the available software packages from the software repositories that are set up on your system.
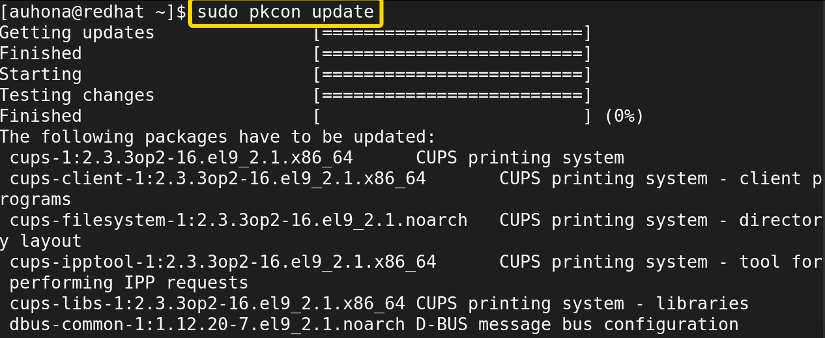 Here is the enlisted package information for the available update package names. After listing the packages you’ll get a text for approving the process.
 Now, type ‘Y’ and continue the update process.
Method 05: Update RPM Packages Using GUI
It’s so simple to update RPM packages using GUI(Graphical User Interface). To get that, follow the steps mentioned below accordingly:
- Open your RHEL system.
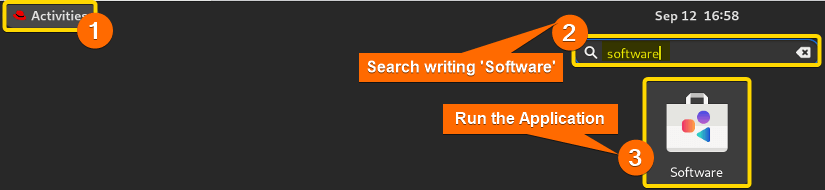
- Click on ‘Activities’, secondly search for ‘Software’.

- Then run the application.
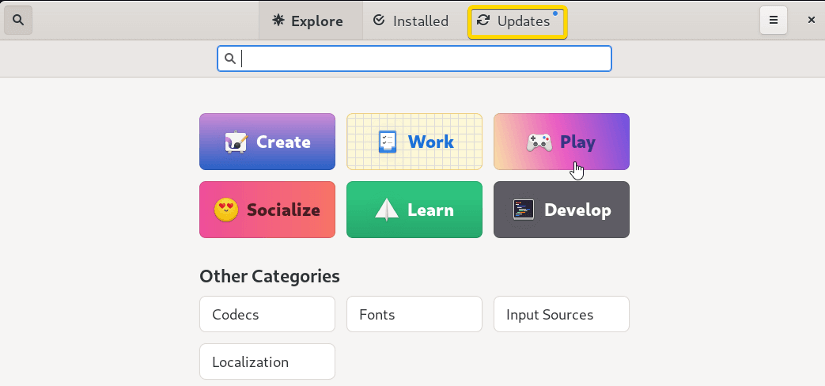
- At that moment, click on the ‘Updates’ option.

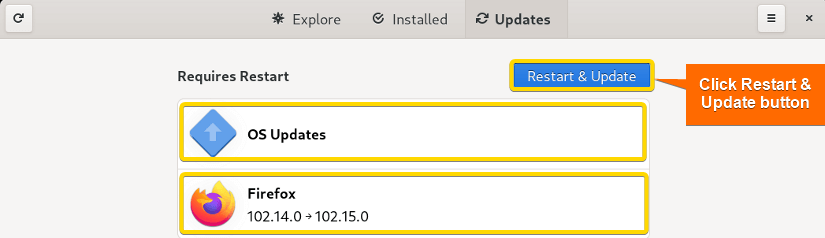
- A prompt will appear where the updated information will be enlisted. Now click on the ‘Restart & Updates’ to update the RPM packages.
 Your system will restart after downloading all the package updates.
 Your system will restart after downloading all the package updates.
6. Automatic Upgrade of RPM Packages in RHEL
The most exciting way to update your systems’ RPM packages is by creating a schedule for the update process. In this scenario, your system will update itself following the schedule accordingly:
- Open the terminal in RHEL.
- Run the following command to check whether your system has the dnf-automatic tool or not.
sudo dnf list installed dnf-automaticEXPLANATION- sudo: Provides administrative privilege.
- dnf: It’s the package manager for managing packages.
- list: Enlists all the packages regarding the keyword.
- installed: This option provided to the list will enlist the installed packages according to the keyword.
- dnf-automatic: This is a tool that has been provided as a keyword to search for.
 As the system didn’t have the tool, I had to install it first.
 - Run the command to install dnf-automatic.
sudo dnf install dnf-automaticEXPLANATION- sudo: It’s used to get sudo privilege.
- dnf: It’s the package manager for handling packages.
- install: This option tells ‘dnf’ to install.
- dnf-automatic: It’s the tool for automatic RPM update setup. Here, it’s the tool name that dnf needs to install.
 Here, you can see that dnf has been installed.
- Now, for automatic update setup, run the following command to turn on the timer.
sudo systemctl enable --now dnf-automatic.timerEXPLANATION- sudo: Gives the administrative privilege.
- systemctl: Controls and manages systemd services and units in Linux system.
- enable: This option of systemctl enables the unit to start automatically at boot time.
- –now: This option ensures ‘dnf-automatic.timer’ to enable and start immediately.
- dnf-automatic.timer: This is the name of the systemd automatic timer.
-
Enter the user password.
 Here, a symbolic link (symlink) has been created in the timer.target.wants directory. The link connects from ‘/etc/systemd/system/timers.target.wants/dnf-automatic.timer’ to the original timer unit file at ‘/etc/systemd/system/dnf-automatic.timer.
 - Run the following command to modify the timer settings.
sudo systemctl edit --full dnf-automatic.timerEXPLANATION- sudo: Allows root privileges.
- systemctl: This is a command used to control and manage systemd services.
- edit: This is an option for the ‘systemctl’ command that is used to open the configuration file of a specific systemd unit for editing.
- –full: This option is used to open the full configuration file for editing.
- dnf-automatic.timer: This is the name of the ‘systemd timer ‘unit whose configuration is to be modified.
 After pressing ‘enter’; the file will be opened. Now it’s ready to modify according to your preference. This configuration file is used to define how a specific timer operates.
 OUTPUT ANALYSISLet me break down the contents of the ‘Timer section’ to understand how to modify the time of the automatic update process:
- ‘OnClaender=*-*-* 6:00’: This line specifies the triggering time for the schedule. Here ‘*-*-* 6:00’ indicates that the timer will run every day at 6:00 AM. The asterisk(*) in each position serves as a wildcard. It implies that the timer is set to run at 6:00 a.m. every day of the week, every day of the month, and every month of the year.
- ‘RandomizedDelaySec=60m’: ‘RandomizedDelaySec’ configuration is adjusted to 60 minutes, implying that the timer will introduce a randomized delay of as much as 60 minutes before executing its associated task.
- ‘Persistent=true’: ‘Persistent’ is enabled as ‘true’, it ensures that if the timer fails to run at its scheduled time (e.g., due to sudden power of the system), it will execute the next time the system is started. This is how the timer’s task is eventually carried out anyway consistently.
- Now run the following command to customize other configurations of the automatic update schedule.
sudo vi /etc/dnf/automatic.confEXPLANATION- sudo: Used to get sudo privilege.
- vi: Terminal-based text editor allows to view and edit text files directly in the terminal.
- /etc/dnf/automatic.conf: This is the path of the configuration file you want to edit. In this case, the file is ‘automatic. conf’.

- Enter the user password and start editing the configuration file.
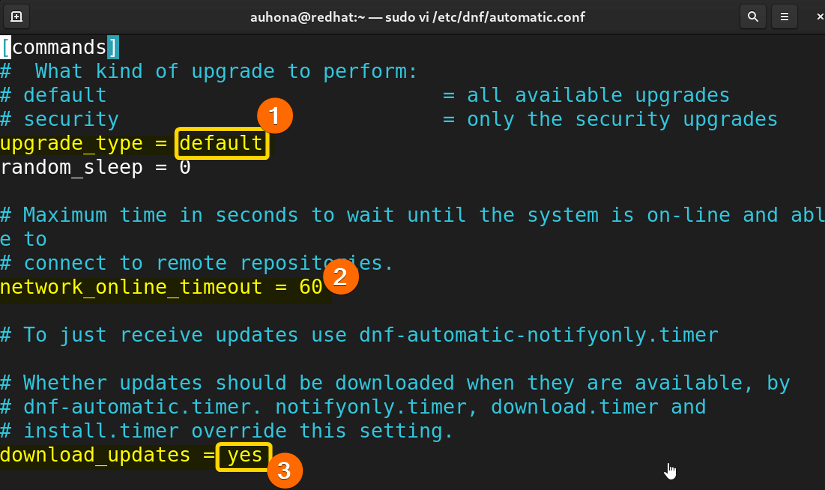
 Let me explain how to edit the configuration file:
- upgrade_type: you can choose the upgrade type as you require.
- network-online-timeout: To modify the network online timeout, you can replace 60 with your preferred time in seconds.
- download_updates: You must set ‘yes’ in the download-update section so that your system automatically downloads the updates for the packages.

- apply _updates: Controls whether downloaded updates should be applied or not ( set yes to apply updates).
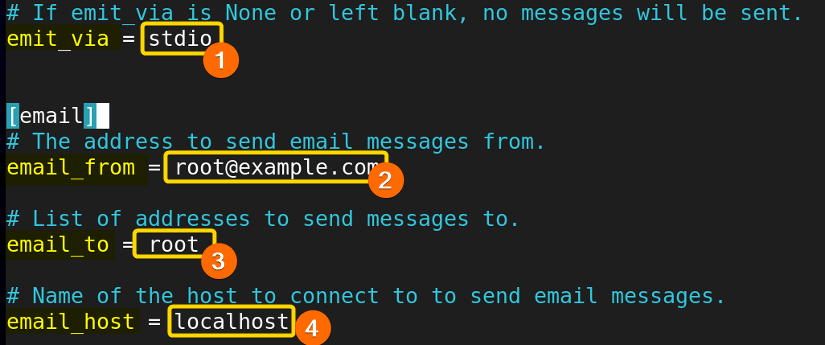
- Emit_via: specifies how to notify users about updates (e.g. stdio, email).
- Email_from: the sender’s email address for update notification.
- Emit_to: The email address where update notifications are sent.
 After all the modification is done, press CTRL+O to save the file and then press CTRL+X to exit.
 -
At last, to apply all the changes, you may need to restart the DNF automatic service or timer for the changes to take effect. For that run the following command:
sudo systemctl restart dnf-automatic.timerEXPLANATION- restart: Thai option for the systemctl command instructs systemd to stop the unit and then immediately start it again.
- dnf-automatic.timer: This is the name of the systemd timer unit that you want I want to restart.
 After restarting, your system is configured with the automatic update schedule. Now you will get your system up-to-date on a regular basis at a specific time.Note: If somehow you need to stop the automatic update process for your convenience of work just run the following command to disable the timer.
Sudo systemctl disable dnf-automatic.timer
 As the system didn’t have the tool, I had to install it first.
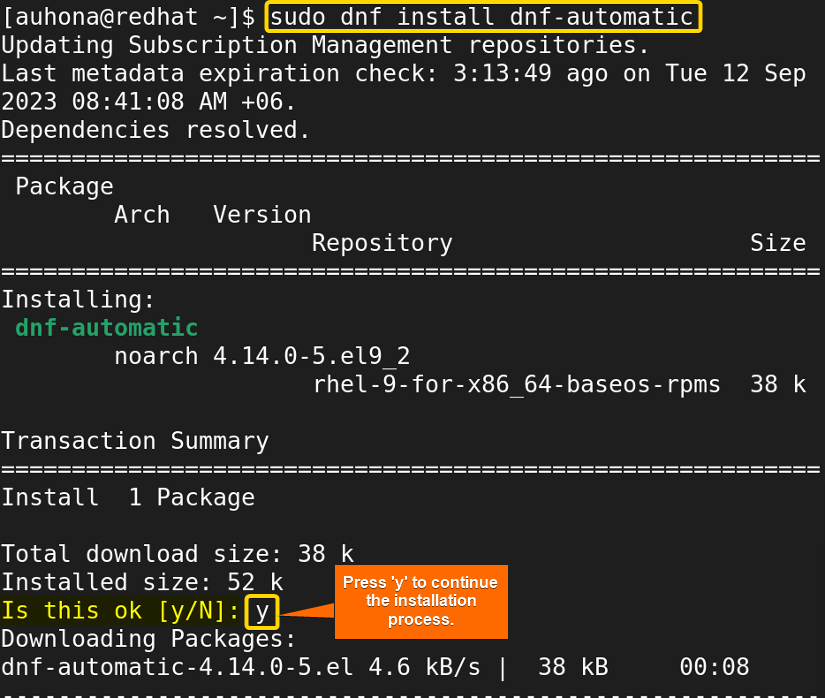 Here, you can see that dnf has been installed.
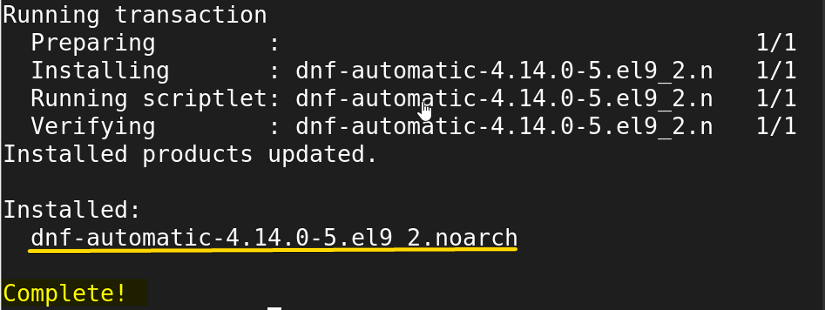
 Here, a symbolic link (symlink) has been created in the timer.target.wants directory. The link connects from ‘/etc/systemd/system/timers.target.wants/dnf-automatic.timer’ to the original timer unit file at ‘/etc/systemd/system/dnf-automatic.timer.
 After pressing ‘enter’; the file will be opened. Now it’s ready to modify according to your preference. This configuration file is used to define how a specific timer operates.
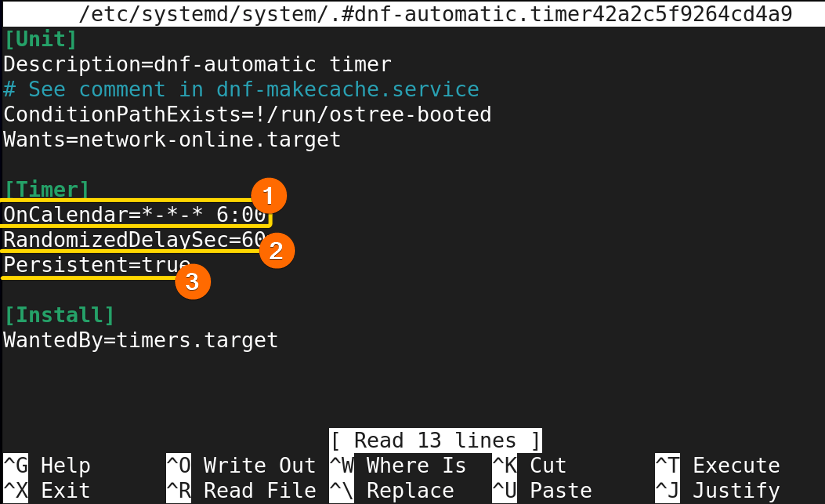

 Let me explain how to edit the configuration file:

 After all the modification is done, press CTRL+O to save the file and then press CTRL+X to exit.
 After restarting, your system is configured with the automatic update schedule. Now you will get your system up-to-date on a regular basis at a specific time.
Comparative Analysis of the Methods
In this guide, I have shown six methods to update RPM packages which include yum, dnf, pkcon, rpm, GUI, and dnf-automatic. Each method owns its individuality including advantages and limitations.
| Method | Pros | Cons |
|---|---|---|
| Method 1 |
|
|
|
Method 2 |
|
|
| Method 3 |
|
|
| Method 4 |
|
|
| Method 5 |
|
|
| Method 6 |
|
|
If you want to update all the RPM packages of your system at a time, you can simply go for Method 1 or Method 2. To get any manual intervention like updating to a specific version, you can choose the third method. To get the simplest way to update, you can choose Methode 5 which is using GUI. Finally, If you have a scenario where you need to update your RPM packages on a regular basis at a specific time, You can choose Method 6.
Conclusion
In a nutshell, Updating RPM packages is a fundamental aspect of maintaining a secure and stable Linux system. To update RPM packages, you can adopt any method of those mentioned above according to your convenience. Hopefully, this guide will show you the paths effectively to get your system updates.
People Also Ask
How to update RPM packages?
To update RPM packages, you can simply use a package manager like rpm with -U option or yum and dnf with the update command. If you use the rpm package manager then use rpm -U [package _name]. While using yum and dnf package manager, use the yum update and dnf update command respectively.
Why Update RPM Package?
Updating RPM packages is essential for various reasons for the health and security of your system. By updating your RPM packages regularly, you eventually ensure your system environment with the latest features, security patches, and bug fixes. This proactive approach helps to protect your system from potential threats and vulnerabilities.
Furthermore, maintaining an up-to-date status with these updates guarantees that your software aligns seamlessly with the dynamic Linux environment, ensuring a user experience that remains smooth and trouble-free. Therefore, updating RPM packages is not merely a recommended practice, it’s a fundamental step in maintaining a secure, efficient, and reliable Linux environment.
Where is RPM installed in Linux?
All the package database files of RPM are typically located in the ‘/var/lib/rpm’ directory. The configuration files remain in the ‘/etc/rpm/’ directory.
How do I list all installed RPM packages?
To list all installed RPM packages on a Linux system, you can run the rpm -qa in the terminal.
How to find RPM install date?
To find the installation date of all the installed packages on your system, use ‘rpm -qa –last’. And to search a specific package’s date just run the command ‘rpm -qa –last | package_name’. Obviously, replace the package_name with the real package_name you want to check for the install date.
Where is RPM repo file?
RPM repository configuration files are commonly created and saved in the ‘/etc/yum.repos.d/’ folder within Linux systems, allowing package management utilities such as YUM and DNF to access and utilize these files.
Related Articles
- A Complete Overview of sudo apt update Command in Linux
- An Ultimate Guide of “sudo apt-get update” Command in Linux
- [Fixed] sudo apt update Not Working Error in Ubuntu
- [Fixed] sudo apt-get update Not Working in Ubuntu
- [Fixed] APT-Get Update Failed to Fetch Error in Linux
- How to Check Updates Using YUM on RHEL? [5 Practical Cases]
- How to Update All Packages in RHEL Using YUM? [3 Cases]
- How to Update a Specific Package in RHEL Using YUM? [2 Cases]
<< Go Back to Update Packages in Linux | Package Management in Linux | Learn Linux Basics
FUNDAMENTALS A Complete Guide for Beginners


