Cron Job in Linux helps us run an Operation at a user-defined time. The word Cron comes from the word Cronos. Cronos is a Greek word that has the meaning “TIME”. So from Cronos came Cron. This is why time-based operations, commands that run by themselves after a defined time are called Cron Job in Linux.
What is Cron Job Used for?
Cron Jobs are used for operations that need to run repeatedly within a timeframe. Let’s say you want your machine to remind you of the time every 2 minutes. In that case, you will have to give the machine a command to run the date command after every 2 minutes. You will write the Command below
*/2 * * * * echo "$(date)"But you have to redirect this command output to some file otherwise it won’t work. I have shown some examples later take a look at those.
Difference Between Cron Job and Crontab
The difference is very simple. You write Cron Jobs inside Crontab that’s all. For a simpler understanding, you can say Crontabs are like directories and cron Jobs are like files within the directory.
Cron Job Syntax
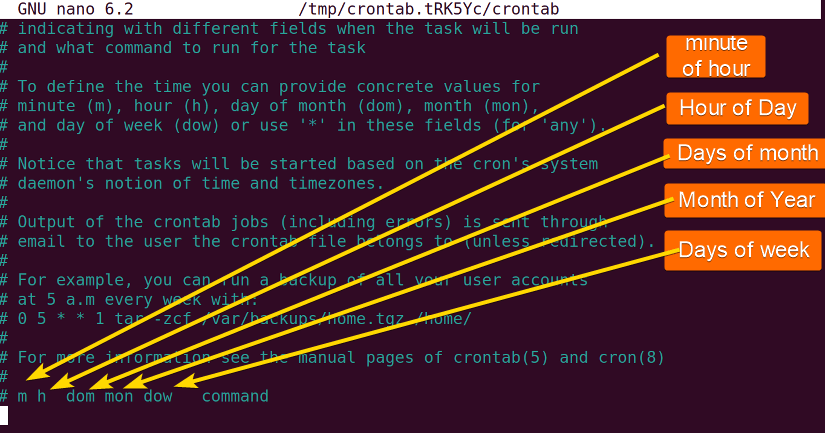
Cron Job syntax may look scary to you at first glance. But with time you will get a hang of it. A basic cron job syntax looks like this.
Now here a,b,c,d,e doesn’t mean alphabets. These different letters mean different schedules that you will use to define your own cron job. Now take a look at which character is for what.
First space(a) = for minute of an hour(1-59)
Second space(b) = for hour of a day(0-23)
Third space(c) = for day of a month(1-30)
Fourth space(d) = for month of a year(1-12)
Fifth space(e) = for days of a week(1-7)
Types of Cron Jobs in Linux
In the previous section, you saw that there are 5 characters that denote Five different timeframes. Depending on these timeframes Cron Jobs can also be classified into five types. Those are given below.
- Minute (0-59)
- Hourly (0-23)
- Daily (1-30)
- Monthly (1-12)
- Days of Week (1-7)
Cron Characters
As you saw in the previous section there are 5 spaces to specify how the cron job should happen. In these spaces, we put different types of characters. Depending on these characters we get different types of outputs. Here I have given a table of some characters that I will later explain to you in this article.
| Character |
Explanations |
|---|---|
| ASTERISK(*) | Takes every value |
| COMMA(,) | List of values |
| DASH(-) | Range of values |
| */ | Step values |
Let me show you a couple of examples so you can understand better what I mean by the table above.
Example 1: Run a Command Every minute
* * * * * echo helloThis syntax of command will print hello at every minute of every hour of every day of every month of the year indefinitely.
Example 2: Run a Command When the Minute Hand on 5
5 * * * * echo helloThis syntax of command will print hello at every fifth minute of every hour of every day of every month of the year indefinitely.
Example 3: Run a Command When the Minute Hand on 1-5
1-5 * * * * echo helloThis syntax of command will print hello at every 1 to 5 minutes of every hour of every day of every month of the year indefinitely.
I hope now you understand how the Cron Job syntax works. Now you must remember that the examples that I have shown below must be used with redirection. As for how to do that I have discussed that in the later part of this article. So stay with me till then.
How to Create a User Defined Cron Job in Linux
A. Creating a Crontab
If you want to create your own cron Job you have to first create your crontab. Unless of course if you haven’t created one yet. Now if you don’t know how to create a crontab just follow the steps given below.
Steps to Follow >
➊ Open your Ubuntu terminal.
➋ Write the below command to open a new crontab.
crontab -e➌ Now press ENTER.
➍ Terminal will ask you to select an editor. Press 1 and press ENTER to select nano.
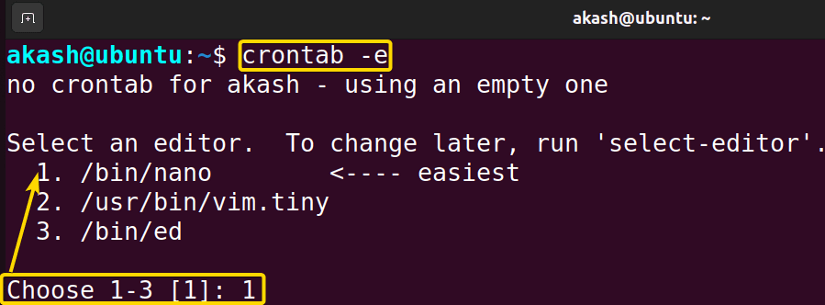
I have chosen nano as my text editor but you could choose any if you want.
➎ After selecting nano, the nano text editor will open.
After opening crontab you will learn how to edit a crontab. Go to the next section to learn about editing crontab.
B. Editing a Crontab
After creating the crontab, you must edit your newly created crontab. When I say edit I mean you have to assign the cron Job. Next, I will show you how to write your cron Job inside your crontab.
Steps to Follow >
➊ Open your Ubuntu terminal.
➋ Write the command
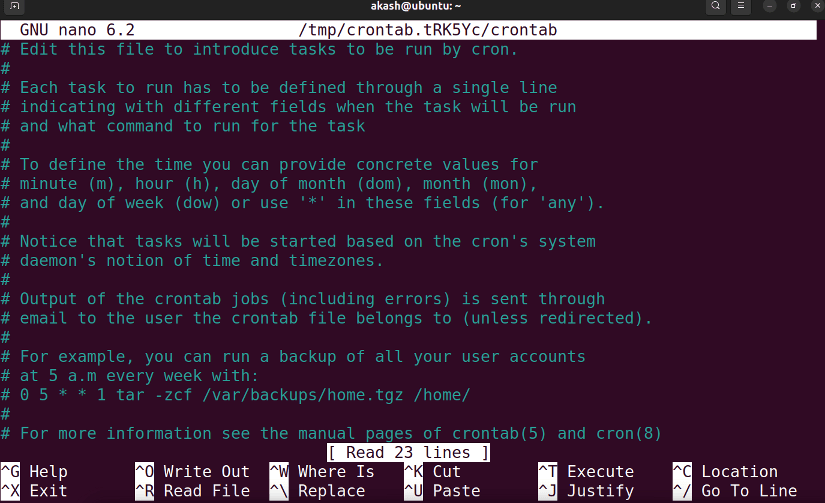
crontab -e➌ This will Open your existing crontab inside nano.
Output >
➍ Then start writing your cron job in the marked place in the picture.
Remember spacing between characters doesn’t matter.
➎ Now write the command below
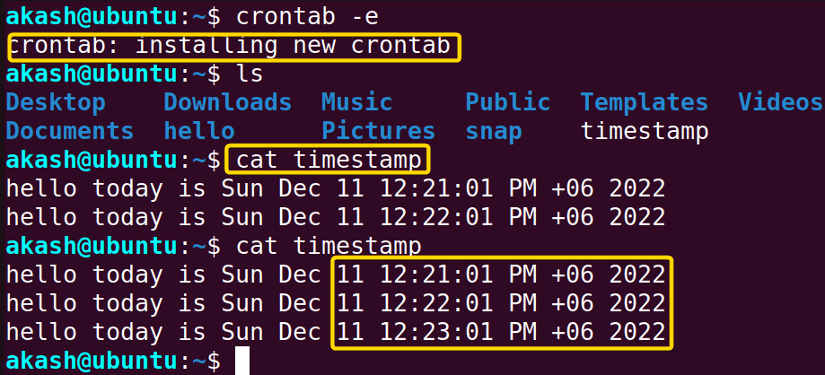
* * * * * echo "hello today is $(date)" >> ~/timestamp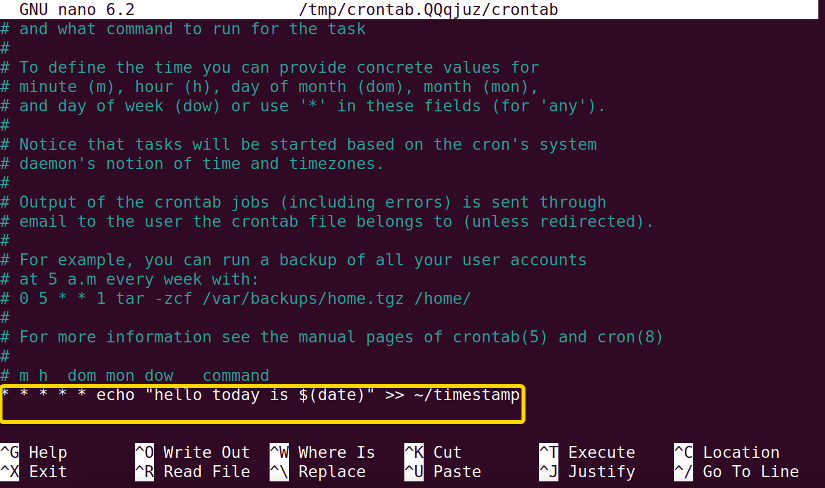
Now let me explain this command. As you know asterisk (*) character means that the cron job will happen for all values (minutes, days, months). This command means that the echo command will run at every minute of every day of every month of the year.
➏ Press CTRL+S to save and then Press CTRL+X to exit nano. A new crontab will be installed.
➐ Now go to your terminal and run the command
cat timestamp➑ Press ENTER
Output >
C. Errors in Cron Job
Cron Job in Linux has a unique way of working with errors. You must redirect the error while editing the Crontab. Now I will show you an example of how to handle errors in a cron job. Now, look at the picture below.
Steps to Follow >
➊ Open your Ubuntu terminal.
➋ Write the command
crontab -e➌ This will Open your existing crontab inside nano.
➍ Write the incorrect command as I have shown in the picture

Here I have written the echo command incorrectly. So it will print an error every minute of every day inside the timestamp.
➎ So let’s take a look at the timestamp. Hit CTRL+S to save and then Press CTRL+X to exit nano. Go to the terminal and write the command below and hit ENTER
cat timestampOutput >
Strangely enough, we don’t see the Error printed out. The reason behind this is what I said previously. Here I didn’t redirect the error. Let’s redirect the error and see what happens.
➏ Write the command and hit ENTER
crontab -e➐ This will Open your existing crontab inside nano.
➑ Write the command below
* * * * * echfo hello >> ~/timestamp 2>&1Now this command will print an error every minute of every day of the year indefinitely inside the timestamp. Because now the error is redirected to the timestamp.

Now the error should be there inside the timestamp according to the cron job. Now the final output.
➒ Press CTRL+S to save and then Press CTRL+X to exit nano. Go to the terminal and write the command below and hit ENTER
cat timestampOutput >
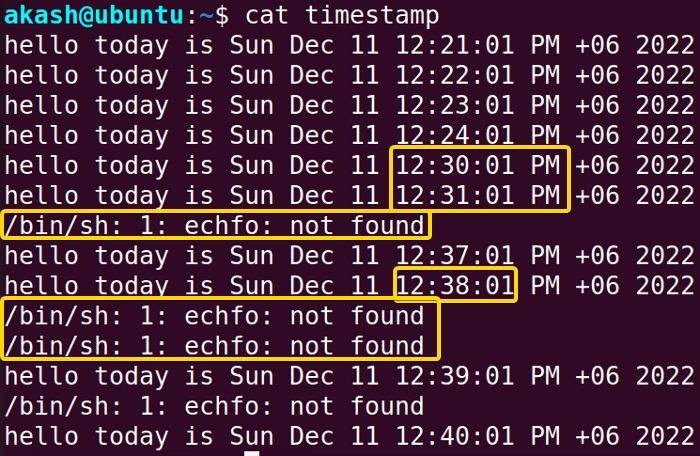
Error is there inside the timestamp in accordance with the cron job. So this is how you handle errors in a cron job.
3 Practical Examples of Cron Job in Linux
Now that you know how to create a crontab, edit a crontab, and handle errors in a cron job it is time to show you how to schedule a cron job in Linux. Now follow me step by step to learn some commands.
Example 1: Schedule a Job for Every Minute
Steps to Follow >
➊ Open your Ubuntu terminal.
➋ Write the Command below
crontab -e➌ Press ENTER
This will open a new crontab or open the existing crontab.
➍ Now write the below command in the space shown in the picture
* * * * * echo "hello today is $(date)" >> ~/timestampThis command will print hello today is “todays date” inside the timestamp file every minute, every day, every month indefinitely.
➎ Press CTRL+S to save and CTRL+X to exit nano editor.
➏ Now go to your terminal and print the timestamp with the below command and hit ENTER
cat timestampOutput >
Example 2: Schedule a Job for Every Five Minute
Steps to Follow >
➊ Open your Ubuntu terminal.
➋ Write the Command below
crontab -e➌ Press ENTER
This will open a new crontab or open the existing crontab.
➍ Now write the below command in the space shown in the picture
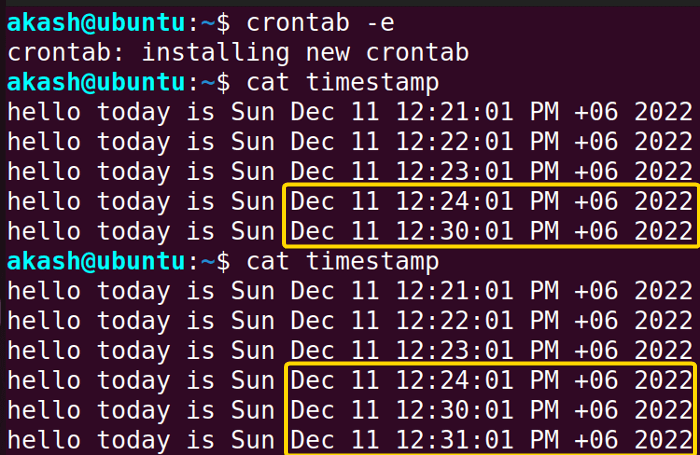
*/5 * * * * echo "hello today is $(date)" >> ~/timestamp*/5 this character stands for step value. So the above command will print hello today is “todays date” inside the timestamp file every five minutes, every day, every month indefinitely.

➎ Press CTRL+S to save and CTRL+X to exit nano editor.
➏ Now go to your terminal and print the timestamp with the command below
cat timestamp➐ Press ENTER.
Output >

Here you can see that the command ran after every Five minutes. So the cron job operation was successful.
Example 3: Scheduling a Job to Perform in a Given Time Range
Steps to Follow >
➊ Open your Ubuntu terminal.
➋ Write the Command below
crontab -e➌ Press ENTER
This will open a new crontab or open the existing crontab.
➍ Now write the below command in the space shown in the picture
1-5 * * * * echo "hello today is $(date)" >> ~/logfileAs I have mentioned before (-) character is used for giving a range. So this command will print hello today is “todays date” inside the logfile every from 1-5 minutes of every hour of every day, every month indefinitely.

➎ Press CTRL+S to save and CTRL+X to exit nano editor.
➏ Now go to your terminal and print the timestamp with the command below
cat logfile➐ Press ENTER.
Output >
Now this command is for doing a cron job in a given time range this could be days, months, minutes any time range. So the output should look like the below.

Conclusion
In this article, I have tried to explain how Cron Jobs works and what is their relation with Crontab. After completing this article You should be able to create Crontab, edit Crontab, and perform basic cron jobs on your machine.
Similar Readings
FUNDAMENTALS A Complete Guide for Beginners


