ZIP is a universally used archive file format that provides lossless data compression. The zip command line tool in Linux allows you to create a ZIP archive. In this article, I’ll discuss how you can use the zip command in Linux and how many aspects.
A. Description
The zip command is a simple command that helps compress the file size to save disk space. Compressed files are easier to transfer and less time-consuming.
B. Syntax
The syntax for the zip command is quite plain. You just have to type the command zip then the archive file along with the file name you want to ZIP. You can use zip as an extension for the archive file. Otherwise, it is added automatically if the name does not end with a dot (.).
zip [OPTIONS] File.zip File_ListC. Options
There are several options for the zip command. I will list some of the most useful ones with examples here. You can check the man page to read more about them.
man zipUseful Options
- -r ( to zip a directory)
- -d ( to remove specified files without unzipping)
- -m (to delete the original file after zipping)
- -x (to exclude specified files from zipping)
- -e ( to create a password-protected zip archive)
- -s (to split a large zip file into parts)
Note: The options in Linux CLI (Command Line Interface) are all case-sensitive, So be cautious while using them.
Installing the zip Command in Linux
Most of the versions of Linux have the zip command already installed. You can find out whether you have it on your machine or not by typing the command zip itself.
It will print out the following message if you have it installed already,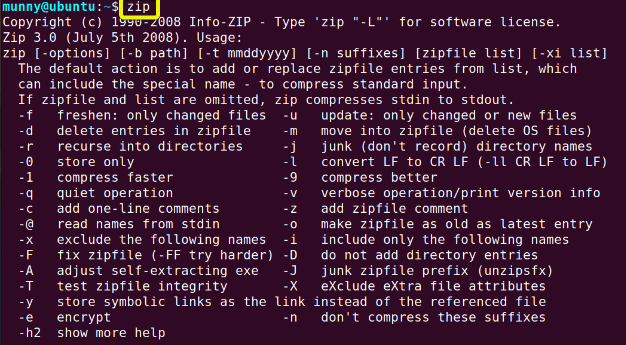 Otherwise, you will get the following text:
 In this case, don’t worry. You can install the zip package within a minute by following the instructions below:
Steps to Follow >
➊ At first, open the Ubuntu Terminal.
➋ Type the following in your command prompt:
sudo apt-get install zip➌ Type your password.
➍ Now, press ENTER.
Output >
After completing these four steps, the zip command will be installed on your system.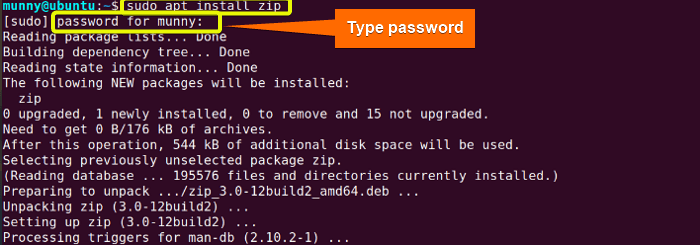
Practical Examples of the “zip ” Command in Linux
zip command is a very useful and easy command to use. Whenever you need to shrink your data & free space in your storage you can use it. Below I am giving a list of practical examples where you can see how to use the command in different aspects.
Example 1: ZIP a File Using the “zip” Command in Linux
To zip any file you just type the zip command & then give the archive file name you want to keep your zipped data in. Then add the file list name you want to zip. In this example, I will zip myfile.txt file. To do so you can follow the below process:
Steps to Follow >
➊ At first, open the Ubuntu Terminal.
➋ Type the following command in the command prompt:
zip myfile.zip file.txt➌ Now, press the ENTER button.
Output >
The below image shows that the command has created my ZIP archive. Using the ls command I can see the list of my files and myfile.zip.
Example 2: ZIP a Directory Using the “zip” Command in Linux
You can zip a directory including all the files recursively. To ZIP a directory & every file that exists inside use the zip command with the -r option. In this example, I will zip the directory. To do so you can follow the below process:
Steps to Follow >
➊ At first, open the Ubuntu Terminal.
➋ Type the following command in the command prompt:
zip -r dir.zip directory➌ Now, press the ENTER button.
Output >
The output shows that the command has created my ZIP archive. This is quite interesting to see how the zip command with option -r is zipping all the files inside my directory one by one recursively and then destining them to my zip archive dir.zip. Using the ls command I can see the list of my files and the newly made dir.zip.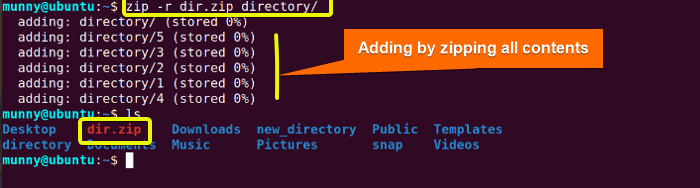
Example 3: Remove Any File from a ZIP Archive Using the “zip” Command in Linux
Suppose, you have zipped a directory including many zip files. Now you want to remove a particular file from that archive without unzipping it. In that case, you can use the option -d with the zip command. Write the zip command with option -d and then the archive.zip file name you want to remove the file from followed by the file name you want to remove. The syntax for this is given below:
zip -d filename.zip file.txtIn this example, I will remove file A from the zip archive file.zip. To do so you can follow the below process:
Steps to Follow >
➊ At first, open the Ubuntu Terminal.
➋ Type the following command in the command prompt:
Zip files.zip A B C D E➌ Press the ENTER button.
This will create a ZIP archive containing zip files A, B, C, D, and E.
➍ Now, Type the following command in the command prompt to remove A from the zip archive:
zip -d files.zip A➎ Finally, press the ENTER button.
Output >
In the below picture, you can see I created a ZIP archive containing zip files A, B, C, D, and E. Then I used the -d option to remove a certain file named A from the ZIP archive without even unzipping it.
Example 4: Delete the Original File After Zipping
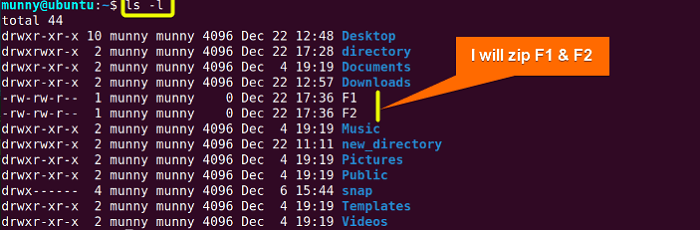
You can ZIP a file and delete the original file after that. The original file will be deleted after zipping has been completed successfully without any error. When you are zipping files inside a directory and after the removal it becomes empty, also gets removed. To perform you have to use the -m option with the zip command.
zip -m filename.zip file.txtIn this example, I will zip F1 and F2 files using -m as an option with the zip command. You can follow these steps.
Steps to Follow >
➊ At first, open the Ubuntu Terminal.
➋ Now, select the files you want to remove by zipping. Here I am showing you files I will zip by using the below command.
ls-l➌ Now, type the following command in the command prompt:
 ➌ Now, type the following command in the command prompt:
zip -m files.zip F1 F2➍ Finally, press the ENTER button.
Output >
After the command has been run, we can now see a zip file named files.zip. And files named F1 & F2 have been removed. Using the ls -l command we can check.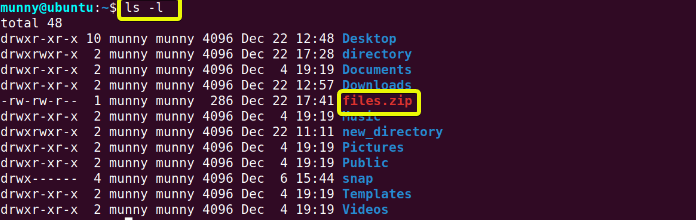
Example 5: Update the File Inside a ZIP Archive Using the “zip” Command in Linux
You can update the file in the ZIP archive. Use option -u with the zip command. This option can be used both to update or to add new files to the zip archive. It will update an existing file in the archive only if it has been modified recently. I will discuss an example where you can see a new file F3 has been added. The syntax is
zip -u filename.zip file.txtSteps to Follow >
➊ At first open the Ubuntu Terminal.
➋ Now type the following command in the command prompt:
zip -u files.zip files.zip F3➌ Now, press the ENTER button.
Output >
From the output, you will see your machine is adding the F3 file to the existing file.zip archive.![]()
Example 6: ZIP Excluding Specified File
In any case, when you want to zip some files from a directory & leave some of them unzipped. Use the -x option with the zip command. The syntax is:
zip -x file.zip file_to_be_excludedTo check with an example, follow the below steps.
Steps to Follow >
➊ At first, open the Ubuntu Terminal.
➋ Now, select the directory you want to zip files from. Here, using the ls command I am showing you a list of files inside my selected directory.![]() ➌ Then, type the following command in the command prompt:
➌ Then, type the following command in the command prompt:
zip -r NEW.ZIP new directory/ -x new directory/5Here, the zip -r NEW.ZIP new directory part will zip my new directory to NEW.ZIP archive, and then -x new directory/5 will exclude file 5 of the new directory from zipping.
➍ Now, press the ENTER button.
Output >
From the output image, we can see zip is compressing and adding all files (1,2, 3, 4) except file 5 to the NEW.ZIP archive.
Example 7: Creating a Password-Protected ZIP File
You can zip a file by making it password-protected. Let’s assume, you have a private file that you want to zip and transfer. But you don’t want the wrong person to open it. You can add a password to open using the -e option with the zip command. The syntax is:
zip -e file.zip file_nameI will show you an example, where I will zip my Pictures folder by adding a password.
Steps to Follow >
➊ At first, open the Ubuntu Terminal.
➋ Then, type the following command in the command prompt:
zip -e Pictures.zip Pictures➌ Now, press the ENTER button.
➍ Enter password.
➎ Verify your password.
➏ Finally, press the ENTER button again.
Output >
Now, the password-protected zip file has been created. Whenever anyone wants to open this file they have to provide the password to view it.
Example 8: Setting the Level of Compression Using the “zip” Command in Linux
The zip command uses a compression value. By default, it is 6 from the range of 0-9. Where ‘0’ is used for uncompressed and ‘9’ for the maximum allowable compression level. We can simply add a number as an argument with the zip command to change the level of compression. The syntax is:
zip -n file.zip file_nameWhere n is the compression range (0-9).
I will show you how to do it using an example.
Steps to Follow >
➊ At first, open the Ubuntu Terminal.
➋ Choose a file and view its size using the below command.
ls -lAfter zipping using compression levels 9 & 0, keep the zip files in two different archives. That way you can compare the size of those two files after zipping. I will use a file named new_story on my desktop.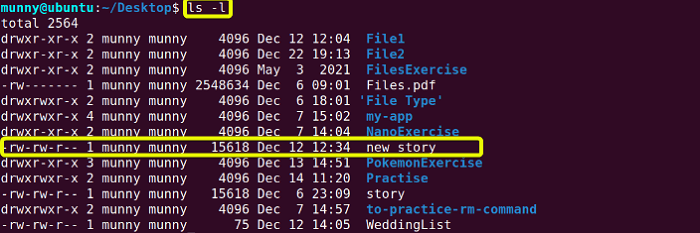 ➌ Now, enter the following command in the command prompt: (for max compression level)
zip -9 max_zip new_story❹ Now, press the ENTER button.
❺ Then, enter another command in the command prompt: (for the least compression level).
zip -0 min_zip new_story❻ Now again, press the ENTER button.
Output >
You will see the below image in the output prompt. For max compression, the zip command is deflating the file. And for the least compression level, it only stores the data in the zip archive without zipping. Using the ls -l command you can compare the sizes of these two files. You can see the min_zip file is larger than the max_zip file. As max_zip file is compressed in maximum compression level.
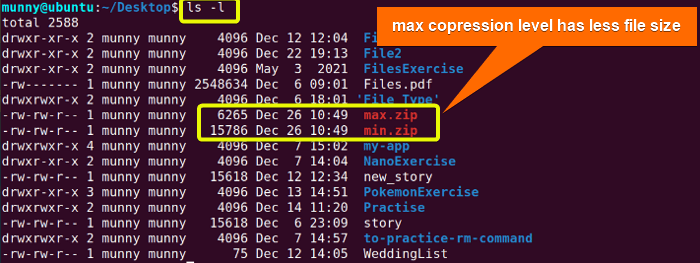
Example 9: Split the Large ZIP File Using the “zip” Command in Linux
Sometimes you have a too-large file to send or upload as an attachment due to size restrictions. In that case, you can split your zip file into smaller files using the -s option with the zip command. This way it gets easier to transfer files. You can specify the size you want to split your zip files into. The syntax will be:
zip -s <size> file.zip file_nameIn this example, I will split my google.deb file. To do so you can follow the below processes:
Steps to Follow >
➊ At first, open the Ubuntu Terminal.
➋ Type ls -l command to list all your files by size. From the picture, you can see I sorted my file size in ascending order using the sort command with the ls -l command. You don’t need to sort when you already know your desired file to split. I will split my biggest size file google.deb.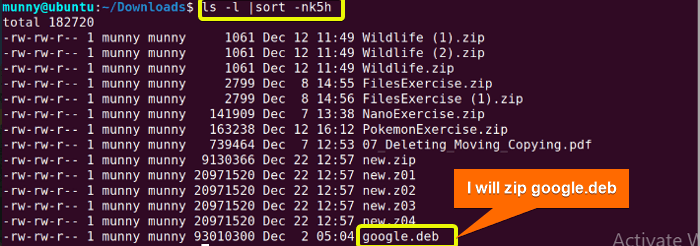 ➌ Now, type the following command in the command prompt:
zip -s 20m new.zip google.debYou can see I used 20m as size cause I want to split my file into 20 megabyte-sized parts. You can use k (kilobytes), m (megabytes), g (gigabytes), or t (terabytes).
➍ Finally, press the ENTER button.![]() Output >
Output >
Using the ls -l command I can see the list of my files. From where we can see that the command has created 4 new split files. Also, we have our zip file as a whole named new.zip.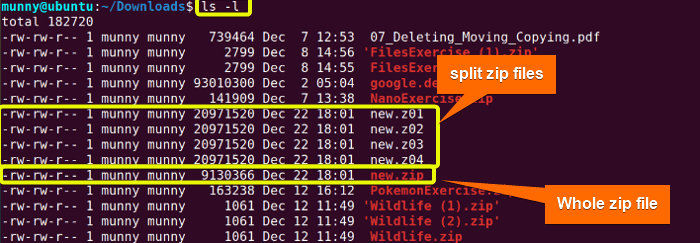
Conclusion
In this article, I described the zip command & how you can use it with different options to make it more functional. If you go through all the examples I have discussed here, you will surely learn and be a power user.
- The “unzip” Command in Linux [7 Practical Examples]
- The “bzip2” Command in Linux [7 Practical Examples]
- The “gzip” Command in Linux [9 Practical Examples]
- The “gunzip” Command in Linux [9 Practical Examples]
FUNDAMENTALS A Complete Guide for Beginners


I used the following command:
zip -FS9r example.zip example
According to “du -sh,” the example folder is 23 gigs, and the zip file is 22 gigs…
Is there no way to achieve higher compression by using another zip flag?