gzip is one of the most useful compression functions in Linux. It uses the Lempel-Ziv coding (LZ77) algorithm to reduce file sizes. gzip command compresses uncompressed files & decompresses compressed files. In this article, you will learn the ins and outs of the gzip command in Linux.
A. Description
gzip command in Linux is used to compress & decompress files. The file size is decreased without losing data using this command in Linux. This command can also be used to test the integrity of the compressed files. Like some other compression commands, it replaces the original file while compression.
B. Syntax
The gzip command in Linux has a pretty simple syntax. The syntax is as shown:
gzip [OPTION]... [FILE]...C. Options
A large number of options are available for the gzip command. I have shown a rundown of some most useful options of the command here. Nevertheless, you can look for the man page for the gzip command to know more about its options.
man gzipUseful Options >
- -f, Forces compression of the file & removes the original file.
- -k, Compresses file but does not remove the original file.
- -r, Compresses all files of a specified directory.
- -v, Displays the name & percentage of reduction of file.
- -d, Decompresses file that is compressed.
- -L or -V, Displays the license & the version.
Practical Examples of the “gzip” Command in Linux
The gzip command in Linux is a very easy-to-use command that will compress or decompress a file based on which options are used in the command line. Here are several useful examples of the gzip command. In this article, I have worked with the files below.
Example 1: Force Compression of File Using the “gzip” Command in Linux
To compress a file you can use the gzip command along with option -f. Option -f forces the compression of the file and gets rid of the original file. Here I have compressed a file named file1.txt. You can also do the same by following the below instructions:
Steps to Follow >
➊ At first, launch the Ubuntu Terminal.
➋ Type the following command in the command prompt:
lsThis will show the uncompressed files.
➌ Now, hit the ENTER button.
❹ Type the following command in the command prompt:
gzip -f file1.txt➎ Now, press the ENTER key.
❻ Type the following command in the command prompt:
lsThis will display the compressed file here.
❼ Finally, press the ENTER button.
Output >
In this image, you can see the file is compressed but the original file no longer exists.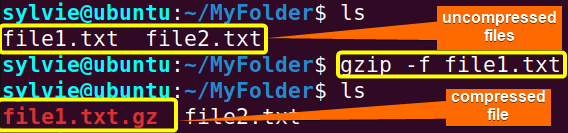
Example 2: Compress Multiple Files Using the “gzip” Command in Linux
I am using the gzip command in Linux along with option -f to compress multiple files named file1.txt, and file2.txt. Option -f forces the compression of the file and replaces the original file. To do the same you can follow the steps below:
Steps to Follow
➊ First, open the Terminal in Ubuntu.
➋ Type the following command in the command prompt:
lsThis will show all the uncompressed files.
➌ Then, hit the ENTER button.
❹ Type the following command in the command prompt:
gzip -f file1.txt file2.txt➎ Now, press the ENTER key.
❻ Type the following command in the command prompt:
lsThis will display all the compressed files here.
❼ Finally, press the ENTER button.
Output >
In the following image, you can see multiple files are compressed but the original files no longer exist.
Example 3: Compress Files Keeping the Original Files
To compress files without replacing the original files you can use the gzip command with option -k.
Steps to Follow >
➊ At first, open the Ubuntu Terminal.
➋ Type the following command in the command prompt:
lsThis will show all the uncompressed files.
➌ Now, press the ENTER button.
❹ Type the following command in the command prompt:
gzip -k file1.txt file2.txt➎ Now, press the ENTER button.
❻ Type the following command in the command prompt:
lsThis will display all the compressed files here along with the original files.
❼ Finally, press the ENTER button.
Output >
In the image below, the files are compressed and the original files are not replaced by them.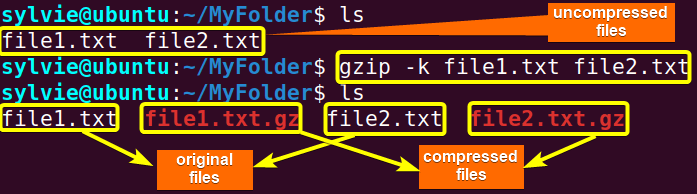
Example 4: Decompress Files Using the “gzip” Command in Linux
To decompress files named file1.txt.gz & file2.txt.gz, I am using the gzip command in Linux along with option -d. Option -d decompresses the files replacing the original files. To do the same you can follow the procedure below:
Steps to Follow >
➊ At first, open the Ubuntu Terminal.
➋ Type the following command in the command prompt:
lsThis will show all the compressed files.
➌ Now, press the ENTER button.
❹ Type the following command in the command prompt:
gzip -d file1.txt.gz file2.txt.gz➎ Now, press the ENTER button.
❻ Type the following command in the command prompt:
lsThis will display all the compressed files here.
❼ Finally, press the ENTER button.
Output >
As you can see in the output, the files are decompressed and the compressed files are removed.
Example 5: Compress All Files of a Specified Directory Using the “gzip” Command in Linux
To compress the files named file1.txt & file2.txt of the directory named MyFolder, I am using the gzip command along with option -r. To do this you can follow the steps below:
Steps to Follow >
➊ At first launch the Terminal in Ubuntu.
➋ To view the uncompressed files, type the following command in the command prompt:
ls➌ Now, hit the ENTER button.
❹ Type the following command in the command prompt:
cd ..➎ Then, press the ENTER key.
❻ After that type the following command in the command prompt:
gzip -r MyFolder❼ Then, strike the ENTER key.
❽ To display the compressed files, type the following command in the command prompt:
ls❾ Finally, press the ENTER button.
Output >
As you can see in the image below, all the files in the MyFolder directory are compressed and the original files are removed.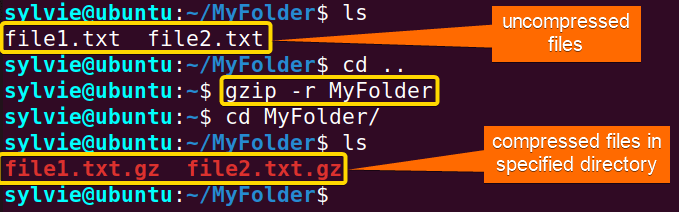
Example 6: Decompress All Files of a Specified Directory
To decompress the files named file1.txt & file2.txt of the directory named MyFolder, you can use the gzip command along with option -d & option -r.
Steps to Follow >
➊ At first, launch the Ubuntu Terminal.
➋ To display the compressed files, type the following command in the command prompt:
ls➌ Now, hit the ENTER key.
❹ Type the following command in the command prompt:
cd ..➎ Then, press the ENTER button.
❻ After that, type the following command in the command prompt:
gzip -dr MyFolder❼ Then, hit the ENTER button.
❽ To display the decompressed files, type the following command in the command prompt:
ls❾ Finally, strike the ENTER key.
Output >
As you can see in the image, all the files in the MyFolder directory are decompressed and the compressed files are removed.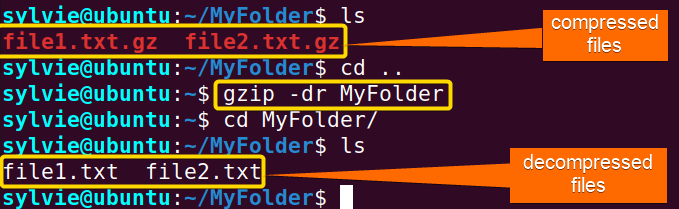
Example 7: Test Integrity of Compressed File
To test the integrity of the compressed files you can use the gzip command as well as option -t in Linux.
Steps to Follow >
➊ At first open the Ubuntu Terminal.
➋ To show all the compressed files in the current directory, type the following command in the command prompt:
ls➌ Then, hit the ENTER button.
❹ Type the following command in the command prompt:
gzip -t file1.txt.gz➎ To create a file named newzip.txt.gz, type the following command in the command prompt:
touch newzip.txt.gz❻ Now, press the ENTER key.
❼ To check if the file is created or not, type the following command in the command prompt:
ls❽ Then, hit the ENTER key.
❾ To check the integrity of the newzip.txt.gz file, type the following command in the command prompt:
gzip -t newzip.txt.gz❿ Finally, strike the ENTER button.
Output >
In the following image, the newzip.txt.gz file is corrupted as the output displays an error whereas the file1.txt.gz file is genuine and there’s no error.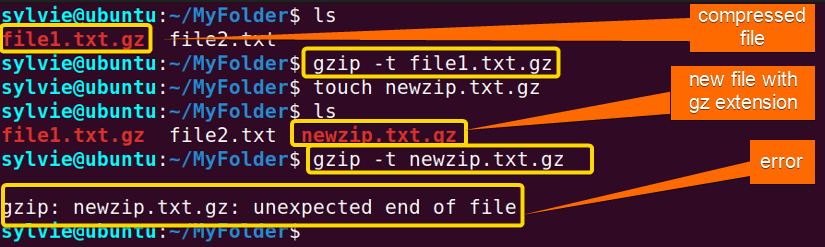
Example 8: Display the Compression Ratio & the Statistics of the Specified File
To display the file’s compression ratio & statistics, you can use the gzip command with option -l. You can find a lot of information that can be used for diagnostic purposes.
Steps to Follow >
➊ At first open the Ubuntu Terminal.
➋ To display the compression ratio & statistics of the file, type the following command in the command prompt:
gzip -l file1.txt.gz❸ Now, press the ENTER button.
Output >
As you can see here, the output displays the compression ratio & the statistics of the compressed file.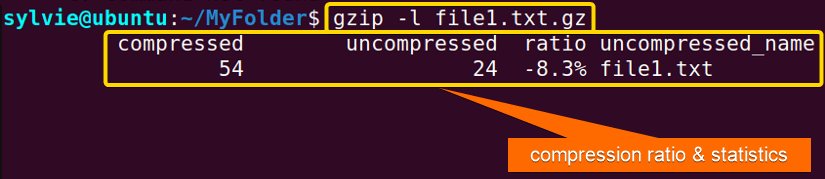
Example 9: Display the License & the Version Using the “gzip” Command in Linux
You can use the gzip command in Linux with option -V or -L to display the license & version.
Steps to Follow >
➊ At first, open the Ubuntu Terminal.
➋ To display the license & version of the file, type the following command in the command prompt:
gzip -VOR,
gzip -L❸ Then, press the ENTER button.
Output >
In the following images, the outputs display the license & the version.
OR,
Conclusion
As described in this section, the gzip command has various uses in Linux. You’ve also got to know the syntax, some functional options, and the practical applications of this command. To become an expert in Linux, have a glance at the command and its practical applications thoroughly.
Similar Readings
- The “zip ” Command in Linux [9 Practical Examples]
- The “unzip” Command in Linux [7 Practical Examples]
- The “bzip2” Command in Linux [7 Practical Examples]
- The “gunzip” Command in Linux [9 Practical Examples]
FUNDAMENTALS A Complete Guide for Beginners


