The gunzip is one of the most useful decompression methods in Linux. Using this command, the compressed files can be restored to their original state in Linux. In this section, you will learn the syntax, options and practical applications of the gunzip command in Linux.
A. Description
The gunzip command in Linux is used to decompress the compressed files. It is used to check the integrity of the compressed files as well as the percentage reduction of the files in Linux. This command can also be used to display the contents of the compressed files. Like some other decompression commands, it replaces the original file while decompression.
B. Syntax
The gunzip command in Linux has an easy syntax. The syntax is as shown:
gunzip [OPTION]... [FILE]...C. Options
A large number of options are available for the gunzip command. I have mentioned here some of the most useful options of this command. Nevertheless, you can look for the man page for the gunzip command to know more about its options.
man gunzipUseful Options
- -k, Compresses file but does not remove the original file.
- -v, Displays the name & percentage of reduction of file.
- -l, Displays information about the compressed files.
- -c, Displays contents of the compressed files.
- -L or -V, Displays the license & the version.
Practical Examples of the “gunzip” Command in Linux
The gunzip command in Linux is a very easy-to-use command that decompresses compressed files. Here are several useful examples of the gunzip command. In this section, I have worked with the files below.
Example 1: Extract a Single .gz File Using the “gunzip” Command in Linux
The gunzip command can extract a single compressed file in Linux. To extract a single file named file1.txt.gz, I am using the gunzip command. To do the same you can follow the procedure below:
Steps to Follow >
➊ At first, launch the Ubuntu Terminal.
➋ To view the compressed files, type the following command in the command prompt:
ls➌ Now, press the ENTER button.
❹Copy the following command in the command prompt:
gunzip file1.txt.gz➎ Then, tap the ENTER button.
❻ To view the uncompressed files, write the following command in the command prompt:
ls❼ Finally, hit the ENTER key.
Output >
As you can see in the output, the file1.txt.gz file is extracted and the compressed file is removed.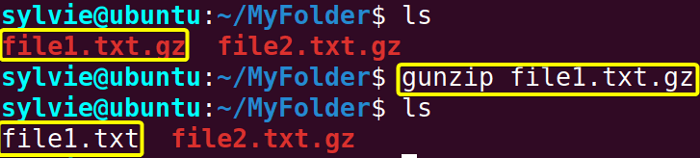
Example 2: Extract Multiple .gz File Using the “gunzip” Command in Linux
Multiple files can also be extracted using the gunzip command Linux. To extract multiple files together you can use the gunzip command. Here I want to extract the compressed files named file1.txt.gz and file2.txt.gz. To do the same you can follow the steps below:
Steps to Follow >
➊ Initially open the Ubuntu Terminal.
➋ To display the compressed files, write the following command in the command prompt:
ls➌ Now, tap the ENTER button.
❹ Type the following command in the command prompt:
gunzip file1.txt.gz file2.txt.gz➎ Then, hit the ENTER key.
❻ To display the uncompressed files, copy the following command in the command prompt:
ls❼ Finally, press the ENTER button.
Output >
As you can see in the image, the file1.txt.gz & file2.txt.gz files are extracted and the compressed files are removed.
Example 3: Extract All .gz File in the Current Directory Using the “gunzip” Command in Linux
The gunzip command is allowed to extract all the files in the current directory together. To extract all files in the current directory, you can use the gunzip command in Linux. You can do this by following the process below:
Steps to Follow >
➊ First, open the Terminal in Ubuntu.
➋ To view the compressed files, write the following command in the command prompt:
ls➌ Now, strike the ENTER key.
❹ Type the following command in the command prompt:
gunzip *.txt.gz➎ Then, hit the ENTER button.
❻ To display the uncompressed files, copy the following command in the command prompt:
ls❼ Finally, tap the ENTER button.
Output >
In the following image, all the files in the current directory are extracted and the original files no longer exist.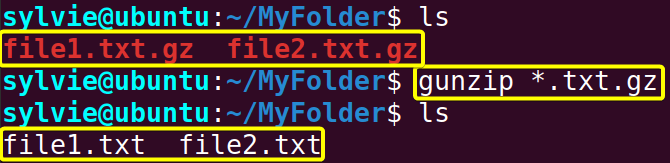
Example 4: Extract .gz File Keeping the Original File
An option with the gunzip command helps to keep the original file while extracting the compressed files. To extract the compressed files named file1.txt.gz & file2.txt.gz without removing the original file, I am using the gunzip command along with option -k in Linux. You can also do the same by following the steps below:
Steps to Follow >
➊ To initiate open the Terminal in Ubuntu.
➋ To view the compressed files, run the following command in the command prompt:
ls➌ Now, tap the ENTER key.
❹ Type the following command in the command prompt:
gunzip -k file1.txt.gz file2.txt.gz➎ After that, press the ENTER button.
❻ To display the uncompressed files, write the following command in the command prompt:
ls❼ Finally, strike the ENTER key.
Output >
In the following image, the compressed files are extracted and the original files are not removed.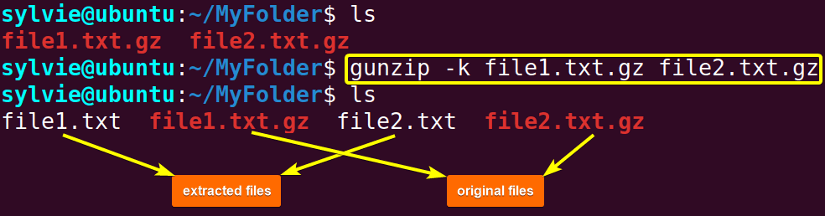
Example 5: Test Integrity of .gz File Using the “gunzip” Command in Linux
Using the gunzip command in Linux, you can also test the integrity of the compressed files. To test the integrity of the compressed files named file1.txt.gz & file3.txt.gz I am using the gunzip command as well as option -t in Linux. To do the same follow the process underneath:
Steps to Follow >
➊ To start open the Ubuntu Terminal.
➋ To show all the compressed files in the current directory, type the following command in the command prompt:
ls➌ Then, hit the ENTER button.
❹ Type the following command in the command prompt:
gunzip -t file1.txt.gz❺ To check the integrity of the file3.txt.gz file, type the following command in the command prompt:
gunzip -t file3.txt.gz❻ Finally, strike the ENTER button.
Output >
In the following image, the file3.txt.gz file is corrupted as the output displays an error whereas the file1.txt.gz file is genuine and there’s no error.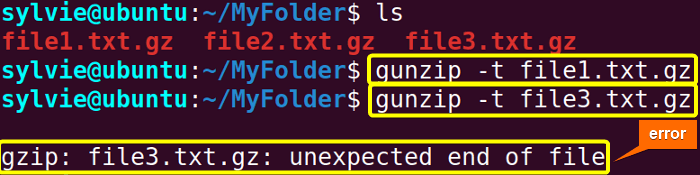
Example 6: Display Percentage Reduction of File Using the “gunzip” Command in Linux
The percentage reduction of a file can be displayed using the gunzip command in Linux. To display the percentage reduction of a file named file1.txt.gz, I am using the gunzip command along with option -v in Linux. To do the same follow the instructions below:
Steps to Follow >
➊ Firstly, open the Terminal in Ubuntu.
➋ Run the following command in the command prompt:
gunzip -v file1.txt.gz➌ Now, tap the ENTER key.
Output >
In the following image, the output shows the percentage reduction of the compressed file.
Example 7: Display Information About Compressed Files
You can display the information about the compressed files using the gunzip command in Linux. To display the information about a compressed file named file1.txt.gz, I am using the gunzip command along with option -l in Linux. To do the same follow the instructions underneath:
Steps to Follow >
➊ Firstly, open the Terminal in Ubuntu.
➋ Type the following command in the command prompt:
gunzip -v file1.txt.gz➌ After that, press the ENTER key.
Output >
In the image below, the display shows the information about the compressed file named file1.txt.gz.
Example 8: Display the Contents of the Compressed File Using the “gunzip” Command in Linux
The contents of the compressed files can also be displayed using the gunzip command in Linux. To display the contents of a compressed file named file2.txt.gz, you can use the gunzip command along with option -c in Linux. You can also do the same by following the process below:
Steps to Follow >
➊ At first launch the Terminal in Ubuntu.
➋ Type the following command in the command prompt:
gunzip -l file2.txt.gz➌ Finally, hit the ENTER key.
Output >
In the image below, the display shows the contents of the compressed file named file2.txt.gz.
Example 9: View Version & License Information
Using the gunzip command, you can display the version & the license information. You can use the gunzip command with option -L or -V to display the version & license in Linux. To do this follow the procedure below:
Steps to Follow >
➊ To start, launch the Ubuntu Terminal.
➋ To display the version & license, copy the following command in the command prompt:
gunzip -LOR,
gunzip -V❸ Then, press the ENTER button.
Output >
In the following images, the outputs display the license & the version.

Conclusion
As described in this section, the gunzip command has various uses in Linux. You’ve also got to know the syntax, some functional options, and the practical applications of this command. To become an expert user of Linux, go through the materials and their practical applications thoroughly.
Similar Readings
- The “zip ” Command in Linux [9 Practical Examples]
- The “unzip” Command in Linux [7 Practical Examples]
- The “bzip2” Command in Linux [7 Practical Examples]
- The “gzip” Command in Linux [9 Practical Examples]
FUNDAMENTALS A Complete Guide for Beginners


