RPM is the low-level back-end package manager mainly used for RedHat-based Linux distributions. It allows users to install, remove, query, and verify packages. RPM package manager wraps up the files in .rpm format. In this article, I will illustrate the rpm package manager in detail with the basic command examples and information.
What is RPM Package Manager in Linux?
RPM is the package manager that is used on the RedHat-based distributions to install, update, or remove software packages in the Linux system. YUM and DNF are the front-end package managers of RPM. If you have a downloaded package then you can easily install, remove, upgrade, and query about the package using the RPM package manager.
The Key Components of RPM
The users who use the package manager for the first time should know about the key components of rpm. Here I have shown the modules:
- Format: Used by Red Hat-based distributions like RHEL, CentOS, and Fedora.
- Tool: Manage rpm packages, two significant components compressed source code, and metadata.
- Key Features: Automatic dependency evaluation, cryptographic verification, pre and post-installation action.
- Dependency Handling: External tools like yum and dnf are necessary for handling dependencies.
Why Use the RPM Package Manager?
Some key features make RPM the most usable package manager in RedHat-based distribution. Below I have shown some of them:
- Unified Environment: The RPM package manager manages and distributes the package on the Redhat-based Linux distribution in a unified way. One can use the RPM file in the RPM distribution with the tools very easily.
- Highly Compatible: As rpm is very compatible with the Linux distribution for that reason packages are installed and managed effortlessly on the compatible distribution.
- Support & Great Documentation: RPM package manager provides distribution support and documentation that will make it useful for the developers.
Package Management With RPM
There are 5 basic modes of rpm commands that install, remove, query, upgrade, and verify a package. So, Below I will illustrate the management of packages with rpm:
Check the RPM Signature Package
Before installing a package on your system you have to check the package’s integrity is ok and it must have the PGP signature. If you want to see if a package is signed or not then you can use the following command:
sudo rpm --checksig google-chrome-stable-116.0.5845.179-1.x86_64.rpm- sudo: Permits administrative privileges.
- rpm: Red-hat package manager to install, uninstall, and manage software packages.
- checksig: Check the signature of the following package.
- google-chrome-stable-116.0.5845.179-1.x86_64: The package that I want to check the signature.
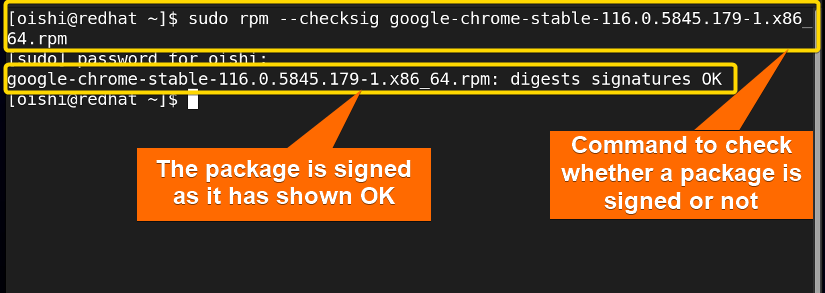
From the image, you can see the package’s origin is OK. It is important to install a signed package for the security issue. But it does not mean that if it is not signed then you can not install it. If you want to install the package ignoring the security issue then you can do that also.
Install RPM Packages
The common function of any package manager is to install a package rpm shows variety in installation. With rpm, you can install single packages, multiple packages, and deb files. Here you can see some of the installation commands with hands-on examples below:
1. How to Install an RPM Package With Dependencies
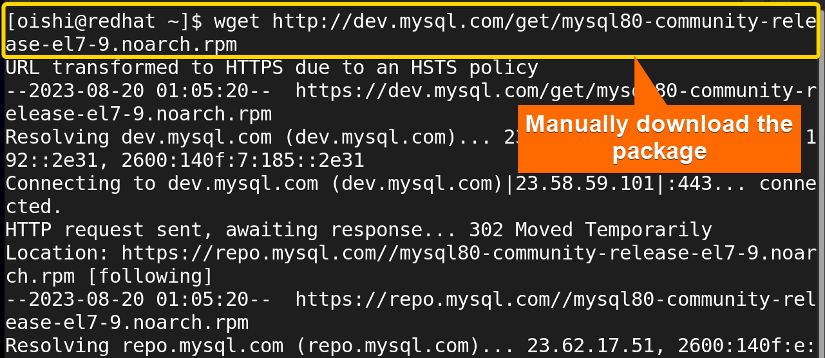
Installation is the basic mode of management of the rpm package manager. When one wants to install a package with rpm then he has to download the package manually. So below I have shown how to download a package with RPM manually through the command:
wget http://dev.mysql.com/get/mysql80-community-release-el7-9.noarch.rpm- wget: Command line utility that provides non-interactive and recursive downloading facilities.
- http://dev.mysql.com/get/mysql80-community-release-el7-9.noarch.rpm: The URL from which I want to download a package.
After downloading the package you can install the package with the -i option. With rpm, one can install the manually downloaded packages. To download the package you can copy the following command:
sudo rpm -ivh mysql80-community-release-el7-9.noarch.rpm- -i: Option to install a package.
- -v: Option to show the verbose output.
- -h: Option to show the hash marks.
- mysql80-community-release-el7-9.noarch.rpm: The package I want to install.
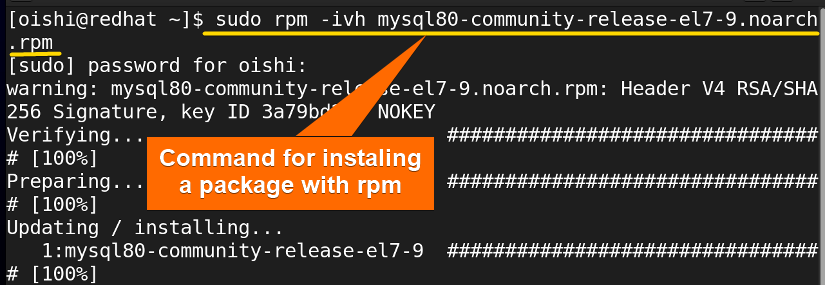
As you can see I have installed the previously downloaded package with rpm. With rpm, the user can not install a package without downloading it on the system also while installing he must put the full name of the package is not user-friendly.
2. Install the RPM Package Without Checking Dependencies
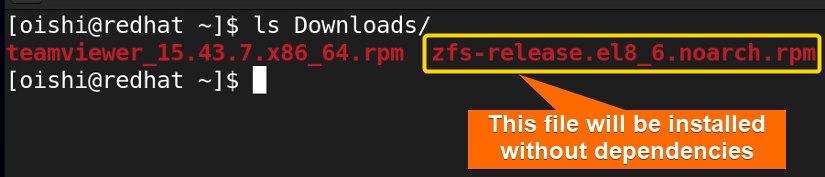
Firstly from the image you can see the package that I want to install without checking the dependencies:
If the user wants to install a package without the dependencies then you can copy the following command:
sudo rpm -ivh --nodeps Downloads/zfs-release.el8_6.noarch.rpm- –nodeps: Without checking dependencies.
- zfs-release.el8_6.noarch.rpm: The package that I want to install.
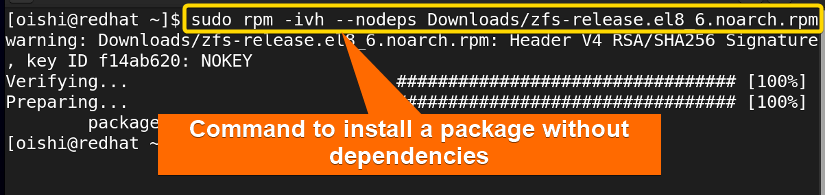
You can use the -i option to install but sometimes it shows an error for that reason you can install without checking the dependencies but it is not encouraged to do so.
Query of RPM Packages On RedHat
Rpm provides a powerful search or query of the packages. You can know about a package from the query option. Below I have shown how to manage a package with the query option.
A. Check the RPM Package Dependency Before Installing
If you want to see the package dependencies before installing then you can use the following command:
sudo rpm -qpR google-chrome-stable-116.0.5845.179-1.x86_64.rpm- -q: Query of a package.
- -p: List the functions that the following package provides.
- -R: List the functions on which the package depends.
- Google-chrome-stable-116.0.5845.179-1.x86_64.rpm: The package which dependencies I want to see.
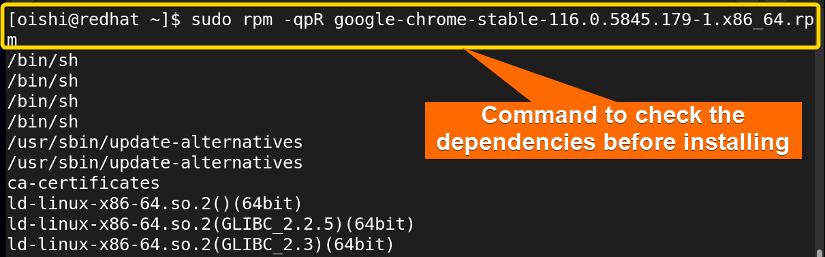
After using this command it displays all the dependencies of the following package. I have chosen a package according to my needs you can use any package according to your liking.
B. Check an Installed RPM Package
If you want to see whether a package is installed or not then you can use the following command:
sudo rpm -q google-chrome-stable- -q: Query of a package.
- google-chrome-stable: Package which I want to check.
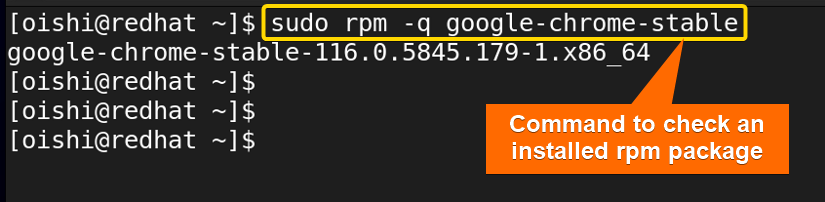
Here from the image, you can see the package has been installed.
C. List All the Installed RPM Packages
To list all the installed packages you can use the following command:
rpm -qa- -qa: Query for the list of all installed packages.
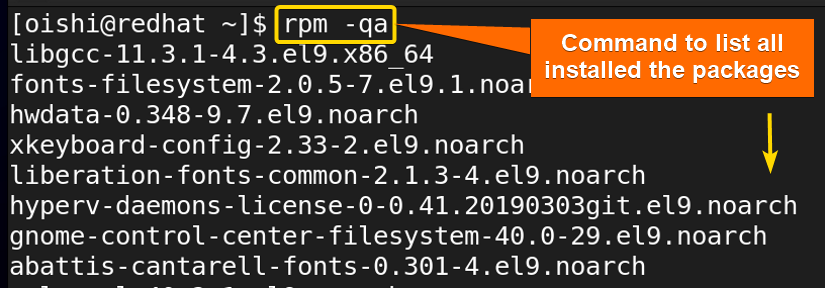
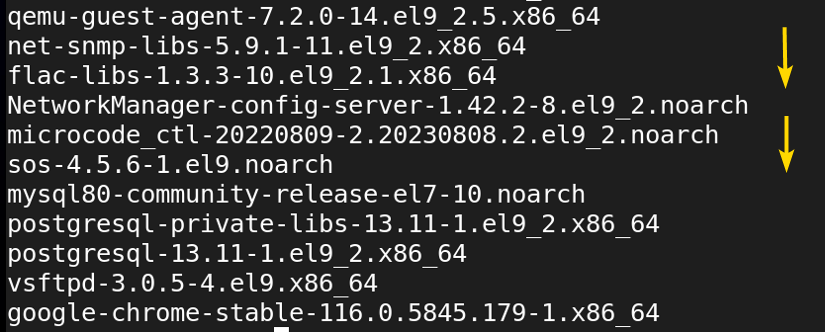
From the image, you can see all the packages that is installed on the system.
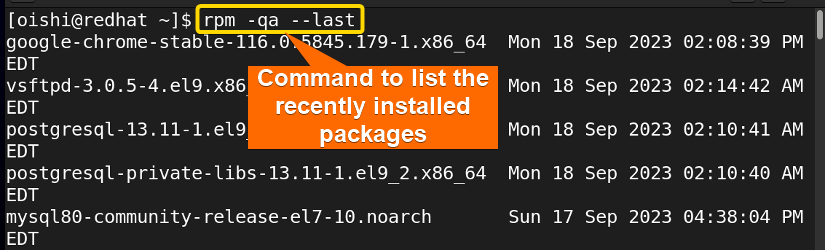
D. List the Recently Installed RPM Packages
If you want to see the list of the recent packages, then you have to use the last installed option to see this. So to see the recently installed packages you can copy the following command:
rpm -qa --last- – -last: Displays the list of recently installed packages.
E. List Each File of an Installed RPM Package
When you need to know what files a package contains then you can copy the following command:
rpm -ql mysql80-community-release- -ql: List the files of the following package.
- mysql80-community-release: The package I want to see which file it contains.

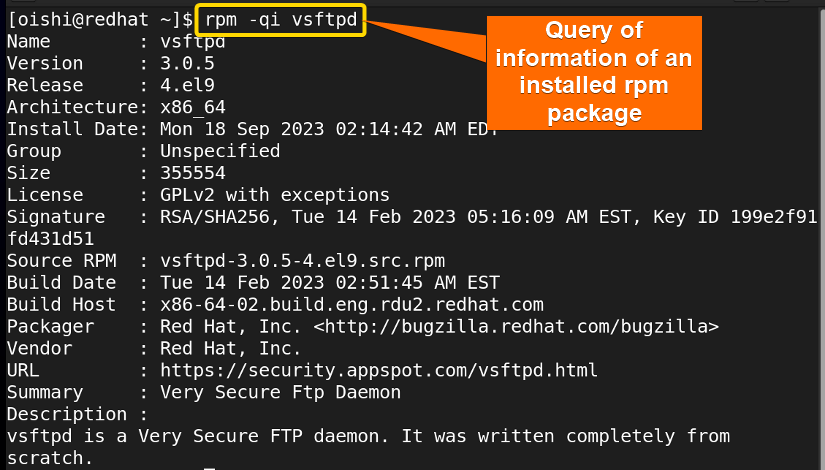
F. Query Package Information After Installing
You can query an installed package information with the following command:
rpm -qi vsftpd- -qi: Query for the information of an installed package.
- vsftpd: The package I want to see the information.
G. Query RPM Package Information Before Installing
To get the information about the package that is not installed you can copy the following command:
rpm -qip zfs-release.el8_6.noarch.rpm- qip: Query of a package information.
- zfs-release.el8_6.noarch.rpm: The package that I want to know about the information.
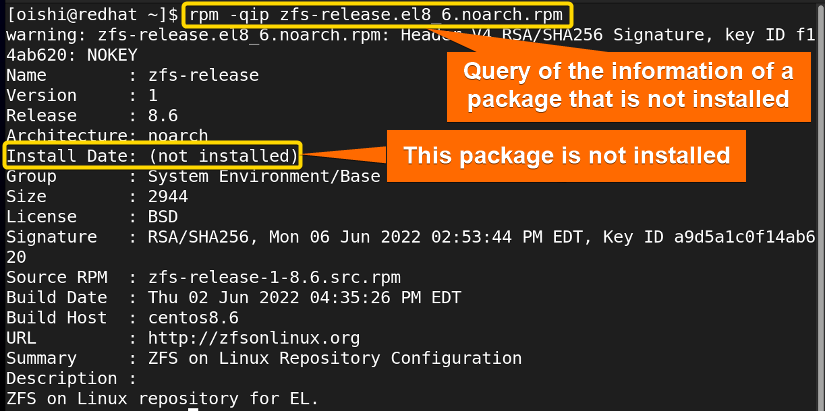
Here from the information you can see the install package is installed.
H. List Documentation of Installed RPM Package
If you want to see the documentation with the query option then you can copy the following command:
sudo rpm -qdf /usr/bin/vmstat- -qdf: Query of the documentation of a specific file.
- /usr/bin/vmstat: The path of the file from which I want to know the package documentation.
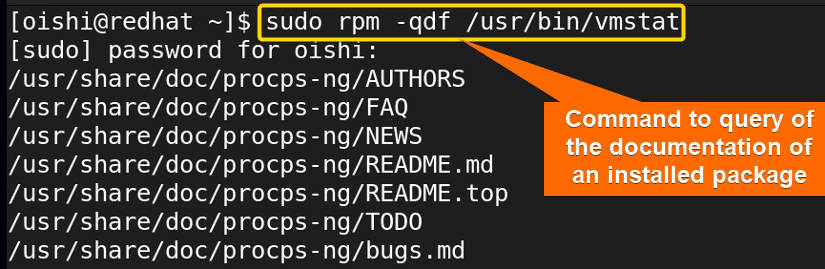
With the query option if you use other options like i, a, l then it will show different query results.
Upgrade RPM Package
I’ll use rpm to upgrade a package here. You can copy this command or use another package based on your requirements:
sudo rpm -U mysql80-community-release-el7-4.noarch.rpm- -U: Update a desired package.

You can see from the image with rpm that one package has been upgraded.
Remove RPM Packages
Sometimes you install a package but you do not need the file later. So you can uninstall or remove it with the remove option. In this section, I have shown how to remove a single package and unnecessary packages.
1. How to Remove an RPM Package
To remove a package first I have queried whether the package is installed or not which I want to remove. To do that you can copy the command on Redhat:
sudo rpm -q mysql80-community-release-el7-9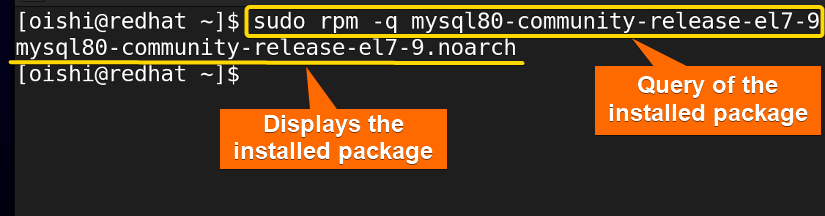
If you want to remove a package you have to use the -e option which means erase the installed package from the database. You can easily copy the following command to remove mysql:
sudo rpm -e mysql80-community-release-el7-9- -e: Command option to erase software package.
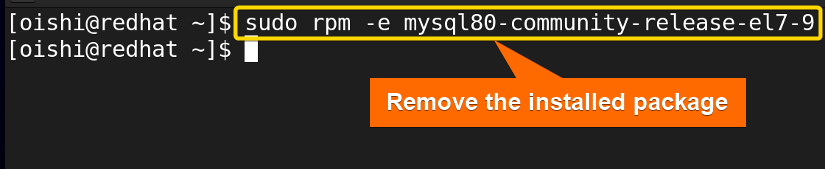
After removing the package, you can use the rpm query to see whether the package is installed or not.
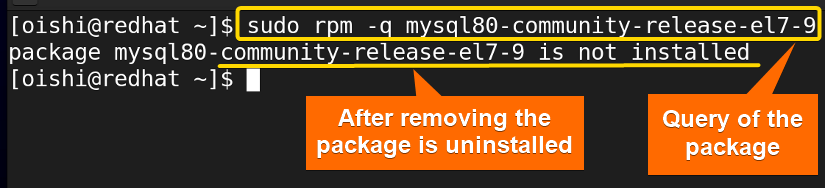
As you can see from the image, the package is not installed.
2. How to Remove an RPM Package Without Checking Dependencies
If you want to remove a package without dependencies then you can use the following command:
sudo rpm -ev --nodeps zfs-release-1-8.6.noarch- -ev: Remove the following package.
- –nodeps: Without checking dependencies.
- zfs-release-1-8.6.noarch: The package that I want to remove.
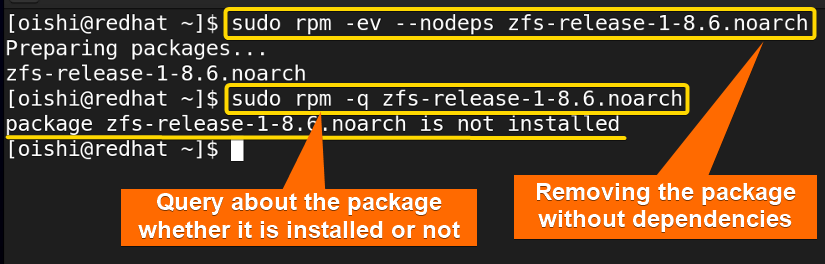
From the image, you can see the package is not installed after removing the package. It is not appreciated to use the –nodeps option always. You can only use the option when it is important to remove a package but it shows its dependencies have been already removed. In this case, you can use the options.
Verify RPM Packages
Sometimes one needs to verify the installed packages then you can see the following examples:
A. Verify All RPM Packages
If you want to verify all the packages then you can copy the following command:
sudo rpm -Va- -Va: Verify all the packages.
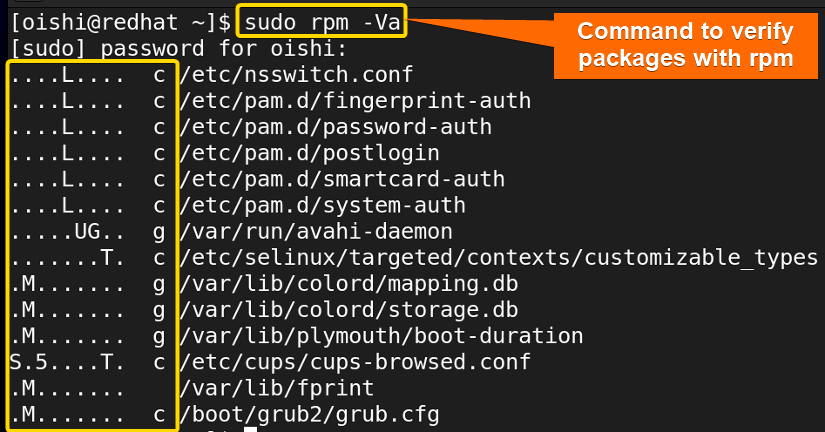
From the image, you can see the list of the problems when it checks the installed packages with the RPM database. Here the UG means User and group ownership differs, S means file size differs, Others show unexpected timestamps differ with T, and unexpected checksum and permissions with 5 and M respectively. And L means the mismatch in the path of readlink.
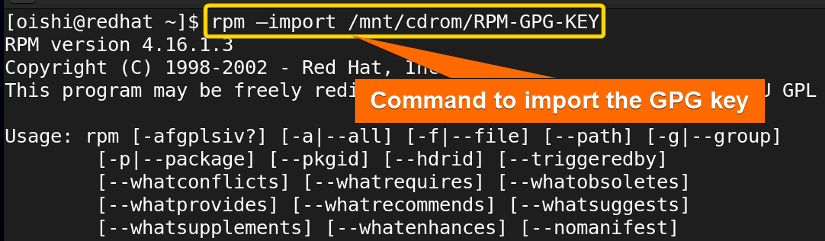
B. How to Import a GPG Key of RPM
If your system does not have the gpg keys then you have to install the keys on the secure keyring. By using the following command you can do that:
rpm –import /mnt/cdrom/RPM-GPG-KEY- –import: Import a GPG key.
- /mnt/cdrom/RPM-GPG-KEY: Path in which the gpg key I want to import.
C. How to List All the Imported GPG Keys
To display all the verified keys you can copy the following command:
rpm -qa gpg-pubkey*- -qa: Query of the list of all gpg keys.
- gpg-pubkey*: Pattern to match with all the gpg keys that are available on the system.

From the image, you can see that there are two gpg keys by which the user can verify the signed packages. It is important to ensure the security of the system by using verified packages.
Conclusion
In this article, I have tried to show the basic information and mode of rpm package manager. From the article, the beginner will get to know about the commands and be able to know how to use RPM tools. Hope after reading the article one will be able to manage the rpm package manager easily.
People Also Ask
What does the RPM package manager do in Linux?
The RPM (Red Hat Package Manager) is a software package management system that primarily handles software packaging, installation, updation, removal, and querying of installed packages in Red Hat-based Linux distros such as RHEL. It also upgrades the packages and handles dependency that ensures package integrity.
How to remove a software package using RPM?
To remove software using the RPM package manager in Linux, use the rpm command with the -e option. Open the terminal and run the command sudo rpm -e and the package_name afterward to remove the package from the system. For instance, running the command sudo rpm -e Firefox removes the package Firefox.
what option can be added to the rpm command to query package information?
The -q option is added to the rpm command to query information about the installed packages. The full command is rpm -q followed by the <package_name> you want to query.
rpm -q package_nameHow can one understand whether a package is intact or corrupted?
By using the -qs option or using the command rpm -qs package_name then you can understand whether a package is intact or corrupted.
How to rebuild the RPM database?
If the RPM database is corrupted and cannot function properly then you can use the following command to restore the RPM database. First, you have to run the cd /var/lib command then use rm _db*. After that you have to use rpm –rebuilddb and at last use the following command rpmdb_verify Packages.
Why the ‘?’ has been shown while verifying the packages?
It means that that package is not checked. If you are not the root user but verifying the packages then you are notified with the ‘?’ mark but if you are a root user then you can not see the mark.
Related Articles
- Apt Package Manager [A Complete Guide on How to Use it]
- The Synaptic Package Manager [A Complete Guide]
- Pacman Package Manager in Linux [How to Use It]
<< Go Back to Package Manager Examples | Package Management in Linux | Learn Linux Basics
FUNDAMENTALS A Complete Guide for Beginners


