The export command in Linux is an uncomplicated command. Using the export command, environment variables can be defined and set for the current shell session in Linux. The export command makes the environment variables available to the child processes. In this article, I will explain to you the syntax, options & practical examples of the export command in Linux.
A. Description
The main purpose of the export command is to make the environment variables available to the child processes for the current shell session. Using this command you can show the exported environment variable. The export command can also be used to export the declared variables and functions. This command can remove the specified variables and functions as well.
B. Syntax
The export command has a simple syntax in Linux. It includes the export command, options, names & values. And the syntax is given below
export [OPTION]... [[NAME]=[VALUE]]...C. Options
A few options are available for the export command in Linux. I have listed all of them here. However, if you want to know more about the options for the export command you can always check the help page for the export command.
help exportUseful Options
- -f, Refers to functions.
- -p, Displays all exported environment variables.
- -n, Removes specified variables/functions.
Practical Examples of the “export” Command in Linux
The export command in Linux is an easy-to-use command which is basically used to export environment variables or functions. This is where you’ll find valuable examples of the export command in Linux.
Example 1: View All Exported Environment Variables
You can view all the exported environment variables using the export command in Linux. The export command with option -p also displays the same output in Linux. To do this you can follow the steps below:
Steps to Follow >
➊ Firstly, open the Terminal in Ubuntu.
➋ Copy the following command in the command prompt:
exportOR,
export -p➌ Now, press the ENTER button.
Output >
In the images below, you can see that the output is showing all the exported environment variables.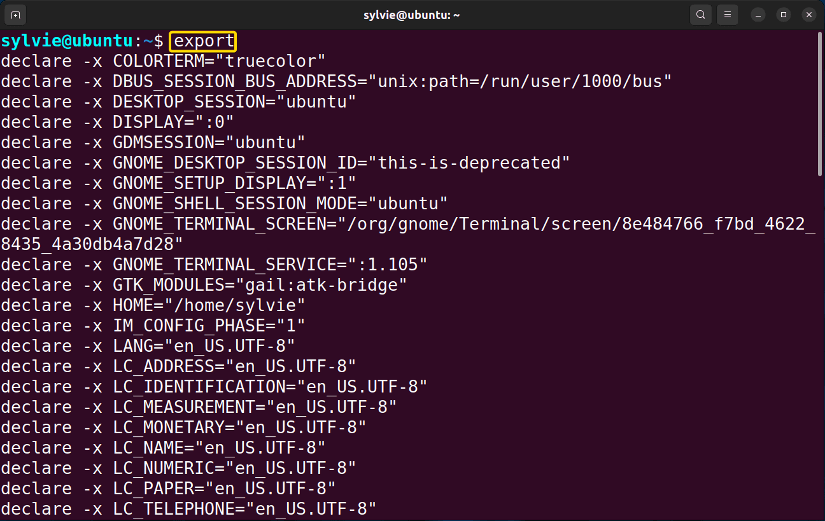 OR,
OR,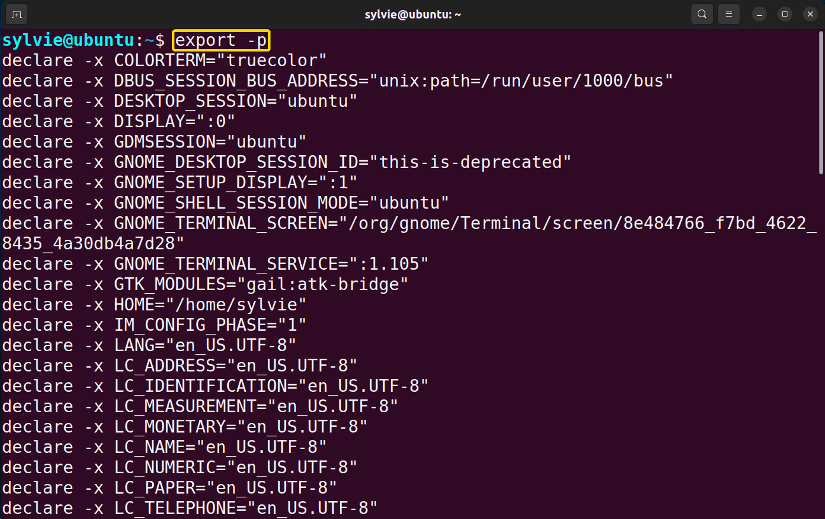
Example 2: Export Declared Function Using the “export” Command in Linux
Using the export command with option -f, you can export a function that is declared in Linux. By calling the function you can view whether the function is exported or not. Here I am using a function named myFunction. You can do this by following the process below:
Steps to Follow >
➊ At first, launch the Ubuntu Terminal.
➋ To declare a function, run the following command in the command prompt:
myFunction() { echo "LinuxSimply";}➌ Then, hit the ENTER key.
❹ Type the following command in the command prompt:
export -f myFunction❺ Now, strike the ENTER button.
❻ Write the following command in the command prompt:
myFunction❼ After that, tap the ENTER button.
Output >
In the following image, you can see in the output that I have exported the declared function.
Example 3: Export Declared Variable Using the “export” Command in Linux
You can use the export command to export a declared variable in Linux. To view whether the variable is exported or not you can print the variable. You can do this by following the instructions below:
Steps to Follow >
➊ Initially open the Ubuntu Terminal.
➋ To declare a variable, copy the following command in the command prompt:
myVariable=10➌ Then, tap the ENTER key.
❹ Write the following command in the command prompt:
export myVariable❺ After that, press the ENTER button.
❻ Write the following command in the command prompt:
echo $myFunction❼ Finally, strike the ENTER key.
Output >
As you can see in the following image, the output is showing the exported environment variable.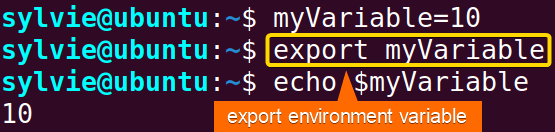
Example 4: Remove the Specified Variable/Function from the Environment
You can also remove a specified variable or function from the environment using the export in Linux. For removing a variable named EDITOR I am using the export command option -n in Linux. You can choose any variable of your choice. You can do this by following the steps below:
Steps to Follow >
➊ To start, open the Terminal in Ubuntu.
➋ Copy the following command in the command prompt:
export -n EDITOR➌ Then, hit the ENTER button.
❹ Run the following command in the command prompt:
export | grep EDITOR❺ Finally, press the ENTER key.
Output >
As you can see in the image below, there is no output as the variable has been removed from the environment.
- The “alias” Command in Linux [3 Practical Examples]
- The “unalias” Command in Linux [3 Practical Examples]
- The “exit” Command in Linux [5 Practical Examples]
Example 5: Export Java Installation Path Variable Using the “export” Command in Linux
For exporting the Java installation path variable, the export command can be used in Linux. You can view if the path variable is exported or not by printing the JAVA_HOME variable in the terminal. To do this you can follow the following process:
Steps to Follow >
➊ To initiate, launch the Ubuntu Terminal.
➋ Write the following command in the command prompt:
export JAVA_HOME=/usr/lib/jvm/java-8-openjdk-amd64➌ Now, press the ENTER key.
❹ Copy the following command in the command prompt:
bash❺ After that, strike the ENTER button.
❻ Type the following command in the command prompt:
echo $JAVA_HOME❼ Finally, hit the ENTER key.
Output >
In the image below, you can see that I have exported the java installation path variable using the export command in Linux.
Example 6: Change the Default Language For the System
The export command is used to change the default language for the system. To check whether the default language for the system is changed or not, you can print the $LANG variable in the terminal. You can do this by following the steps below:
Steps to Follow >
➊ At first open the Ubuntu Terminal.
➋ Run the following command in the command prompt:
export LANG=fr_FR.UTF-8➌ Now hit the ENTER key.
❹ Copy the following command in the command prompt:
bash❺ Then, tap the ENTER key.
❻ Execute the following command in the command prompt:
echo $LANG❼ Finally, press the ENTER button.
Output >
In the image below, you can see that I have changed the default language for the system using the export command.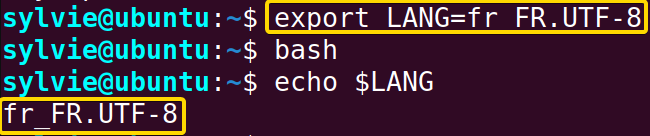
Example 7: Export Multiple Variables Using the “export” Command in Linux
I am exporting multiple variables named x, y and z using the export command. For checking if the variables are exported or not, you can print the variables like $x, $y and $z in the terminal. To do this you can follow the following procedure:
Steps to Follow >
➊ To initiate, launch the Terminal in Ubuntu.
➋ Copy each command below in the command prompt and press the ENTER button every time:
x=1y=2z=3➌ Execute the following command in the command prompt:
export x y z❹ Now, hit the ENTER button.
❺ Type the following command in the command prompt:
Printenv x y z❻ Finally, press the ENTER button.
Output >
In the following image, the output displays that I have exported multiple variables using the export command in Linux.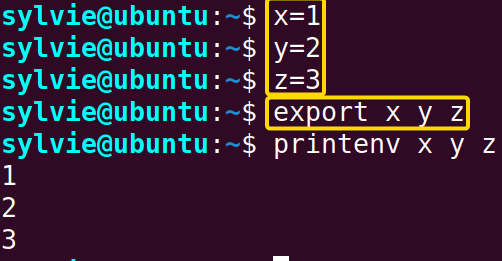
Example 8: Set an Email Address to Receive Mail Notifications
You can use the export command to set an email address to receive mail notifications in Linux. To check if the email address is set or not, you can print the $MAIL variable in the terminal. You can follow the instructions below to do this:
Steps to Follow >
➊ Open the Ubuntu Terminal.
➋ Execute the following command in the command prompt:
export [email protected]➌ Now, press the ENTER button.
❹ Copy the following command in the command prompt:
bash❺ Then, hit the ENTER key.
❻ Write the following command in the command prompt:
echo $MAIL❼ After that, tap the ENTER button.
Output >
In the image below, the output is showing the email address that I have set to receive mail notifications using the export command.
Conclusion
As explained in this article, the export command has some practical uses in Linux. You’ve also got to know the syntax, some functional options, and the practical applications of this command. Learn the command and its practical applications to become a master in Linux.
Related Articles
- The “bash” Command in Linux [5 Practical Examples]
- The “clear” Command in Linux [3 Practical Examples]
- The “declare” Command in Linux [7 Practical Examples]
- The “echo” Command in Linux [7 Practical Examples]
- The “source” Command in Linux [3 Practical Examples]
- The “hash” Command in Linux [6 Practical Examples]
- The “read” Command in Linux [8 Practical Examples]
- The “set” Command in Linux [6 Practical Examples]
- The “unset” Command in Linux [2 Practical Examples]
- The “eval” Command in Linux [4 Practical Examples]
FUNDAMENTALS A Complete Guide for Beginners


