The set command in bash is one of the most powerful tools in bash. It has many functionalities such as enabling debugging to manipulate the positional parameters. However, in this article, I am going to talk about the role set command plays in bash debugging with some examples. So let’s get started!
What is “set” Command in Bash?
In Bash, the ‘set’ command is a built-in command that alters the shell’s behaviour and attributes. With various options, it enables or disables settings, modifies shell attributes, sets positional parameters, and adjusts the internal field separator. Moreover, it provides control over script execution, error handling, debugging, and more.
The basic syntax of the set command in Bash is as follows:
set [options]Here, [options] represents various command-line options that modify the behaviour of the shell.
Check the list of options down below that can be used with the set command in bash:
The set command in bash debugging is an essential tool for developers. With specific options, this command can print each line of a script before its execution. This allows the developer to identify any errors that may exist and correct them accordingly. One of the most popular features of the set command in bash debugging is the “set -x” command, which helps to understand the flow of script execution and detect errors. Additionally, “set -u” treats unset variables as an error, so you don’t have to worry about uninitialized variable issues. However, It is important to disable the debugging options before deploying your scripts to production to avoid verbosity and security risks. As mentioned, the set command is a handful and effective tool for Bash Debugging. Here, there are three examples are going to be discussed in the following section of the article. To activate the debug mode in Bash using the set -x command, you simply include the following line at the beginning of your Bash script: You can also use an alternative approach like using When The provided Bash script begins with
Option
Functionality
-e
Exit immediately if any command exits with a non-zero status, signaling an error.
-u
Treat unset variables as an error, preventing the use of undefined variables.
-x
Print each command and its arguments to the standard error output before executing, aiding in script debugging.
-o
Enable or disable a specific shell option, providing fine-grained control over script behavior.
-E
Preserve the environment when executing shell functions, ensuring access to variables and settings.
-n
Read commands but do not execute them, useful for syntax checking and debugging without actual execution.
-v
Print shell input lines as they are read, assisting in understanding script execution and identifying errors.
-C
Turn off case–insensitive filename completion, affecting how file and directory names are handled in the shell.
-h
Display a summary of available options for the “set” command, providing a quick reference for users.
Role of Set Command in Bash Debugging
3 Practical Cases of “set” Command in Bash Debugging
1. Activate Debug Mode Using “set -x” Command in Bash
#!/bin/bash
set -x  # Activate debug mode

# Rest of your scriptset -o xtrace command to active the debug mode as follows:#!/bin/bash
set -o xtrace # Activate debug mode
# Rest of your scriptset -x is used, each command and its arguments will be printed to the standard error output before execution. See the following example code to understand its functionality:#!/bin/bash
set -x # Enable debugging output
function greet {
local name=$1
echo "Hello, $name!"
}
echo "Script starting..."
name="John"
greet "$name"
for number in {1..3}; do
result=$((number * 2))
echo "Result: $result"
done
set +x # Disable debugging output
echo "Script ending..."
#!/bin/bash, indicating that it is a Bash script. Next, set -x turns on debugging output, so that each command and all of its arguments will be printed to standard error before execution. Then, the greet function is called to display a customized greeting using the given name. After that, the script will echo "script starting..." and set the variable name “John”. Then, the for loop will iterate three times, counting and repeating a doubled result each time. Finally, the set +x line is used to turn off debugging output. The script finally displays “Script ending” with the help of echo command.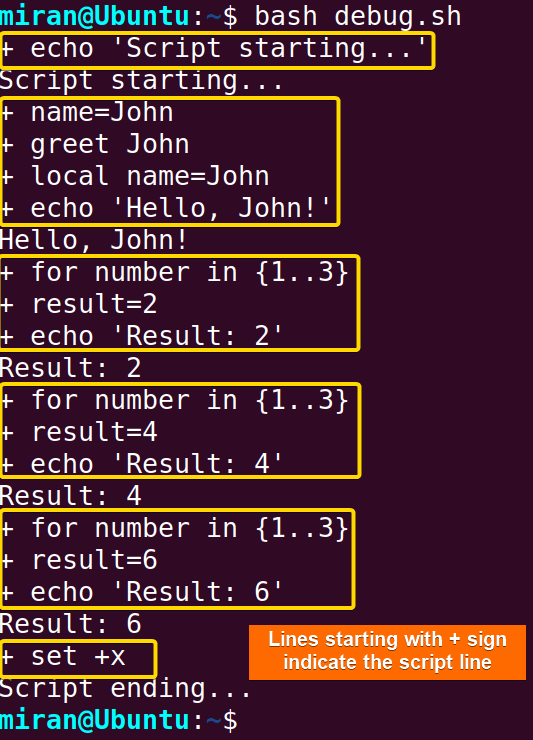 As you can see from the image, the “set -x” command enables the display of the script line before its execution, and “set +x” disables the facility at the end of the code.
2. Enable Verbose Mode Using “set -v” Command in Bash
To enable verbose mode in Bash using the set -v command, include the following line at the beginning of your Bash script:
#!/bin/bash
set -v  # Enable verbose mode

# Rest of your script

You can also go for an alternative approach to debug your bash script with verbose mode as follows:
#!/bin/bash
set -o verbose  # Enable verbose mode

# Rest of your script
Let’s see an example relevant to this:
#!/bin/bash

set -v  # Enable verbose mode

function greet {
    local name=$1
    echo "Hello, $name!"
}

echo "Script starting..."

name="John"
greet "$name"

for number in {1..3}; do
    result=$((number * 2))
    echo "Result: $result"
done

set +v  # Disable verbose mode

echo "Script ending..."
In this given bash code, set -v is used to enable verbose mode, printing each command to the standard error output before execution. The script defines a greet function and echoes "Script starting..." before setting the variable name to “John” and calling the greet function. A for loop calculates and echoes doubled results for three iterations. set +v is then used to disable verbose mode, and the script concludes with “Script ending…” echoing to signify the end of execution.
 As you can see from the image given above, the set -v command in the bash script displays the script line before their execution.
3. Check Unset Variable Using “set -u” Command in Bash
When you use set -u in a Bash script, you are enabling a setting that treats unset variables as errors. This is a safety measure to ensure that your script doesn’t inadvertently use variables that have not been defined.
Here’s an example script demonstrating the use of set -u:
#!/bin/bash

set -u  # Enable treating unset variables as errors

echo "Script starting..."

# Using the defined variable
defined_variable="I am defined."
echo "Value of defined_variable: $defined_variable"

# Using an unset variable
echo "Value of unset_variable: $unset_variable"

echo "Script ending..."
In this Bash script, the command set -u is used to enable the treatment of unset variables as errors. A variable named defined_variable is declared and assigned a value, and its value is echoed to the console. Subsequently, an attempt is made to echo the value of an unset variable, unset_variable. Due to the set -u option, referencing an unset variable is treated as an error, which can help catch potential issues related to uninitialized variables.
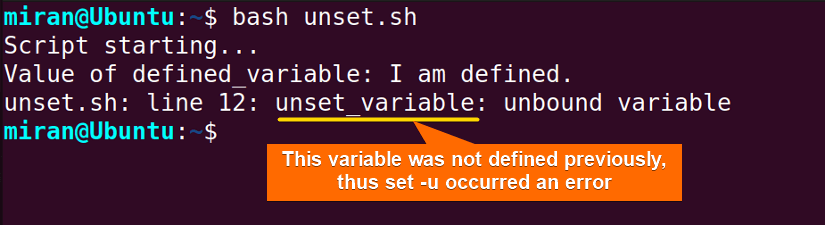
As the ‘unset_variable’ was not set previously, the ‘set -u’ command triggers an error when the variable is called, as shown above.
Conclusion
Bash debugging is one of the most important tools for shell script development and maintenance. It improves the reliability and productivity of shell scripts. Proper utilization of set commands in bash debugging can play an effective role in your code development. This article has tried to discuss multiple examples of set commands in bash debugging. Hope you like it. However, If you have any questions or queries related to this article, feel free to comment below. Thank you!
People Also Ask
How to set debug in bash script?
In Bash scripting, you can set debug mode by using the set -x option, which enables debugging output. Here’s an example of how to set debug mode in a Bash script:
#!/bin/bash
set -x  # Enable debugging output

# Your script code goes here

set +x  # Disable debugging output
In this script, set -x is used to activate debugging mode. Once enabled, each command and its arguments will be printed to the standard error output before execution.
How do I set debug mode in Linux?
Debugging in Linux, particularly in a Bash script, often involves using the set command with the -x option to enable debugging output. Here’s how you can set debug mode in Linux:
- Command Line Debugging: If you are running a Bash script from the command line and want to enable debug mode for that specific execution, you can do it like this:
bash -x your_script.sh - Debugging Inside the Script: Alternatively, you can include the
set -xcommand directly in your Bash script to enable debugging for the entire script:#!/bin/bash set -x # Enable debugging output # Your script code goes here set +x # Disable debugging outputThis way when you execute the script, it will automatically print each command and its arguments before execution.
What is the use of set +E in Bash?
In Bash, set +E is used to disable the ERR trap. The ERR trap is a feature that allows you to execute a command or a series of commands whenever a simple command has a non-zero exit status (returns an error). By default, the ERR trap is enabled.
When you use set +E, you are turning off the ERR trap, meaning that the shell will not execute the commands specified in the ERR trap when a command returns a non-zero exit status.
Here’s an example to illustrate the usage:
#!/bin/bash

# Enable ERR trap
set -e

# ERR trap will be triggered for the following command
echo "This command will trigger the ERR trap" && false

# Disable ERR trap
set +E

# ERR trap will not be triggered for the following command
echo "This command will NOT trigger the ERR trap" && false
In the example above, the set -e enables the ERR trap. The first echo command followed by false triggers the ERR trap, causing the script to terminate. After set +E, the second echo command followed by false does not trigger the ERR trap, and the script continues to execute despite the non-zero exit status of the command.
Related Articles
- How to Activate Debug Mode in Bash Script? [3 Methods]
- How to Debug Bash Script with “ShellCheck” Command?
<< Go Back to Bash Debugging | Bash Error Handling and Debugging | Bash Scripting Tutorial
FUNDAMENTALS A Complete Guide for Beginners


