When exploring the world of bash scripting, it can feel like going on a mission with a variety of commands and logic to achieve your desired outcome. However, all scripters, regardless of their experience, will inevitably encounter the challenging task of debugging. Fortunately, there are various methods available for debugging purposes when it comes to Bash scripting.
If you need to debug your bash script, you can use any of the methods provided below:
- Using set -v aka Verbose Mode: allows inspecting the code line in the terminal.
- Using noexec Mode: finds the syntax error in the bash script
- Using set -x aka xtrace Mode: debugs the code with the “+” sign at the beginning.
- Using set -u command: identifies the unset variable.
- Using “trap” command with DEBUG argument: creates a customized function to debug the code.
- Employing “shellcheck” command: displays the error line and provides the reference to solve as well.
This article will guide you to use each method with detailed explanations. So without any due, let’s dive further.
The Importance of Debugging Bash Scripts
In Bash scripting, errors can arise from various sources such as syntax, logic, or runtime issues. The debugging process helps to identify the causes of the problems, correct them, and make sure to execute the script without any further errors.
Consider a Bash script designed to process a set of files in a directory. If an unexpected error occurs during execution, such as a syntax error in one of the commands or a logical flaw in the script’s design, the script may fail to function as intended. Through effective debugging, you could systematically analyze the script, identify the specific issue, and rectify it.
6 Different Methods for Bash Debugging
Bash debugging can be approached through various methods to efficiently identify and address issues in scripts. Among them, using set -v is the most widely used approach to debug the bash code. Some other methods such as using set -u, xtrace mode, set -x, using shellcheck are also effective depending on the problem context. The following section will discuss those methods and give you a good understanding of bash debugging.
1. Enabling Verbose Mode Using “set -v” Command
You can use the -v switch to enable verbose mode, which displays each command before execution.
To enable the verbose mode in the bash script, you can call the -v option along with your script name which you intend to debug. Let’s say you have a bash file named script_name.sh. Now you can enable the debug mode either by calling the -v option along with the script name while executing the file as like bash -v script_name.sh or you can do so by adopting the following manner.
If you want to avoid writing -v option along with your script name, you can debug your script by adding the -v option in the shebang line:
!/bin/bash -vOr, you can enable the bash debug mode using the set command along with -v option in your script file:
!/bin/bash
set -v
You can also switch off the verbose mode using the set +v command. To illustrate this point, let’s prepare a sample bash script:
#!/bin/bash

# setting verobose mode
set -v

echo "Loop with Verbose mode:"
for i in {1..3}
do
    echo "Iteration $i"
done

# Disable verbose mode
set +v
echo "Loop without Verbose mode:"

for i in {1..3}
do
    echo "Iteration $i"
doneThe script begins with set -v to activate the verbose mode, displaying commands during a loop that iterates three times. Later, set +v turns off verbose mode, and the script repeats the loop without displaying commands. This demonstrates the dynamic use of verbose mode in Bash scripting for debugging or monitoring execution details.
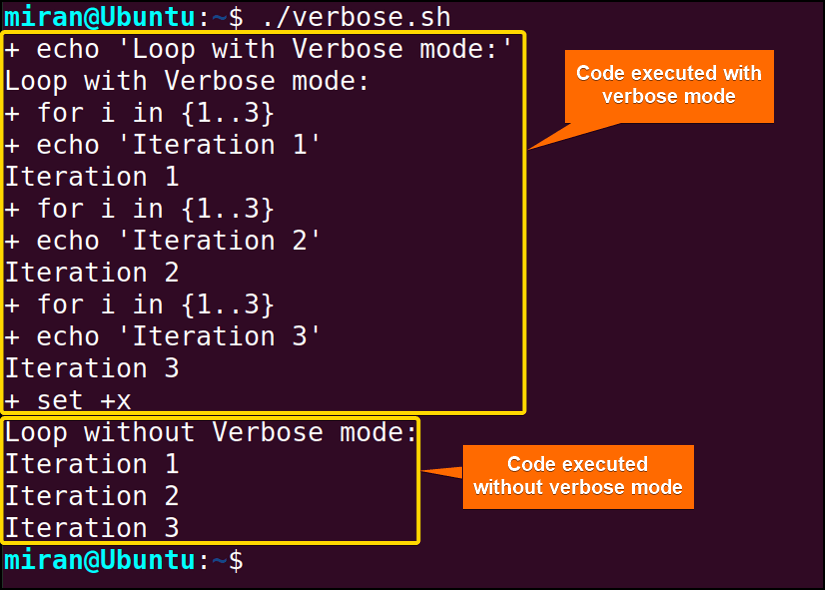 As you can see from the image attached above, set -v enables the verbose mode, thus debugging each line of the script. However, once the set +v line is executed, the terminal does not show any subsequent script lines except their output.
2. Syntax Checking Using “noexec” Mode
In certain scenarios, it might be necessary to check the script’s syntax before running it. In such cases, you can employ the noexec mode by using the -n option. This way, Bash noexec mode allows you to check the syntax error without performing any kind of execution in your script.
Let’s see the following bash code to understand its functionality fully. Here I have developed a sample code with a syntax error in a for loop statement:
#!/bin/bash

#loop with noexec mode
echo "Loop with noexec mode:"

for i in {1..5}
    echo "Iteration $i"
done
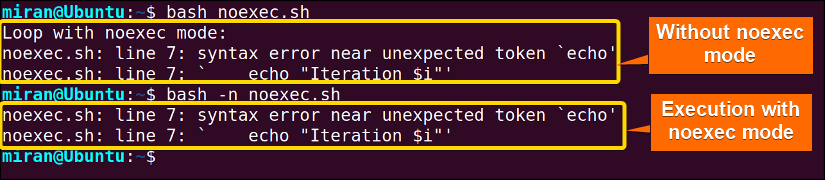
The provided Bash script aims to create a loop with noexec mode, where the commands within the loop are read but not executed. However, there is a syntax error in the script. The ‘for’ loop is missing ‘do’ to indicate the beginning of the loop block.
 When I run the code using
 bash noexec.sh command, the file is executed and an error in line 7 appears. However, upon executing the bash file noexec.sh with the -n option to enable noexec mode, it only provides the error line without executing the scripting.
3. Debugging in “xtrace” Mode Using “set -x” Command
Debugging using xtrace mode in Bash involves activating the xtrace option (set -x) to enable the printing of each command along with its arguments before execution. This mode is particularly useful for tracing the script’s flow and identifying issues in command execution.
To debug the script with xtrace mode, you can write set -x in your bash script as given below:
#!/bin/bash

# setting xtrace mode
set -x

echo "Loop with xtrace mode:"
for i in {1..3}
do
    echo "Iteration $i"
done

# Disable xtrace mode
set +x

echo "Loop without xtrace mode:"

for i in {1..3}
do
    echo "Iteration $i"
done
The Bash script initiates with set -x to enable xtrace mode, which prints each command and its arguments before execution. The script then enters a loop, echoing the iteration number within the loop and providing a detailed trace of each command due to xtrace mode. Subsequently, set +x is used to disable xtrace mode.
The script proceeds to another loop, this time without xtrace mode. It echoes the iteration number within the loop, but the commands are not displayed during execution as xtrace mode has been turned off.
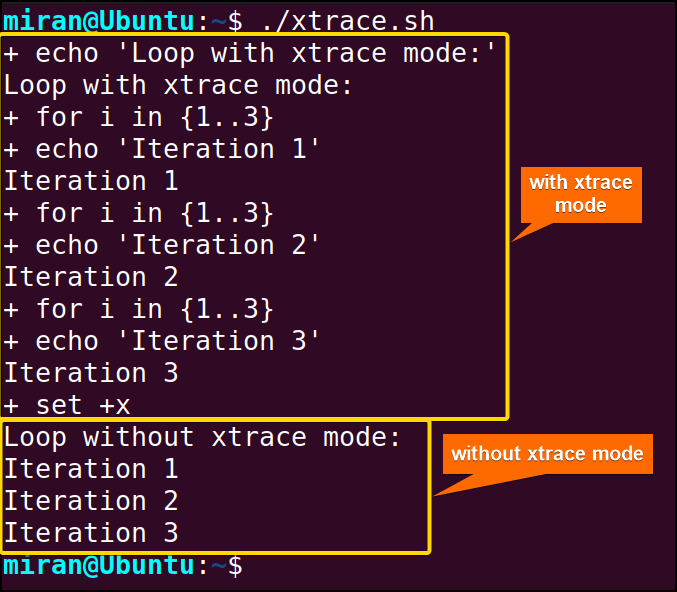 As the image shows the code line is displayed as soon as the interpreter executes the set -x line. The second part of the code does not show the code line as set -x command disables the xtrace debug mode. It’s important to note that the lines preceded by a plus sign are generated by the xtrace mode.
4. Identifying Unset Variables Using “-u Option”
The -u option is used to treat unset variables and parameters as an error while performing parameter expansion. Incorporating the -u option along with the script name allows to debug the code and find if there is any unset variable in the bash script.
To understand how the -u option works in a bash script, see the code given below:
#!/bin/bash

#assigning variable value
num1=5
num2=3

sum=$((num1+nu2))

echo "The sum of the given $num1 and $num2 is $sum"
In this Bash script, two variables, num1 and num2, are assigned values of 5 and 3, respectively. The sum of these two numbers is calculated using the parameter expression sum=$((num1+nu2)). However, there is a syntax error in the calculation of the sum variable. Here, nu2 is called instead of num2 variable. For this reason, the code will generate a syntax error, leading to a false sum of the given two variables, num1 and num2. To identify this error, incorporating the -u option along with the script name is crucial.
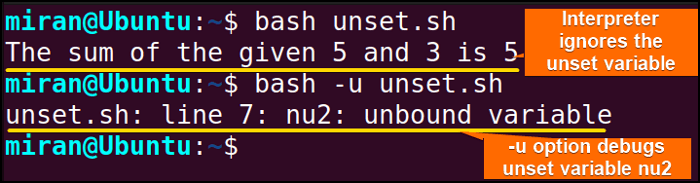 Here, if the variable nu2 is not set, the code returns the sum of num1 and num2 as 5. However, if you use the -u flag along with the script, it will successfully identify the presence of the unset variable, nu2, and return the following error message to the command line: “nu2: unbound variable”. This error message will help you understand that there is an unset variable present, which may mislead you in your calculations.
5. Debugging Scripts Using “trap” Command
Bash trap command helps you to set up actions to be taken when certain signals are received. When debugging scripts, the trap command can be employed to catch errors, perform cleanup tasks, or handle specific signals. For example, you can use the trap command to catch the ERR signal, which is triggered when a command returns a non-zero exit status.
To use the trap command in your script, you follow the script construction given below:
#!/bin/bash

# Function to be executed before each command in the script
debug_trap() {
    echo "DEBUG: Now executing command: $BASH_COMMAND"
}

# Set up trap to invoke debug_trap before each command
trap debug_trap DEBUG

# Your script code here
echo "Hello, this is a sample script."

# Performing some calculations
result=$((5 + 7))
echo "Result: $result"

# Another command
echo "End of the script."
In this Bash script, a trap is used to set up a debug_trap function that will be executed before each command in the script. The debug_trap function simply echoes the currently executing command using the $BASH_COMMAND variable. Here, $BASH_COMMAND is a special variable in Bash that holds the command currently being executed. Finally, with the help of the DEBUG argument, the trap debug_trap DEBUG line sets up the trap, ensuring that the debug_trap function is executed before each command.
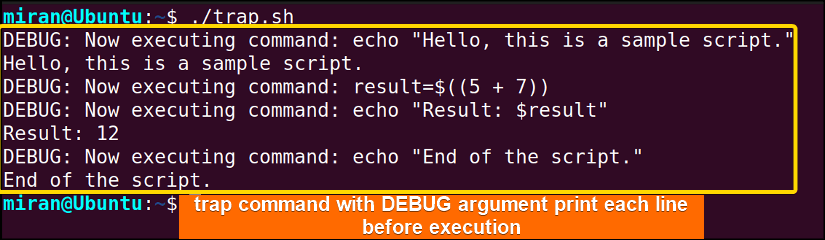 As you can see, the trap command with the DEBUG argument returns each bash line, an opportunity to trace the possible line of error easily.
6. Using “ShellCheck” Command for Bash Debugging
ShellCheck is a tool that analyzes shell scripts for common errors and provides suggestions for improvements. To use ShellCheck to debug your Bash script, first, you need to install the ShellCheck on your system. To download ShellCheck in Ubuntu, follow this article.
Now, here is an example of how the ShellCheck works to debug the script:
#!/bin/bash

echo "Loop with Verbose mode:"
for i in {1..3
do
    echo "Iteration $i"
done
In this Bash script, a simple loop is implemented to iterate three times. The loop uses the for construct to iterate over the range of numbers from 1 to 3 (inclusive) and prints a message for each iteration. There is a syntax error in for i in {1..3 line. The curly bracket is not closed, which will cause an error when the script is run.
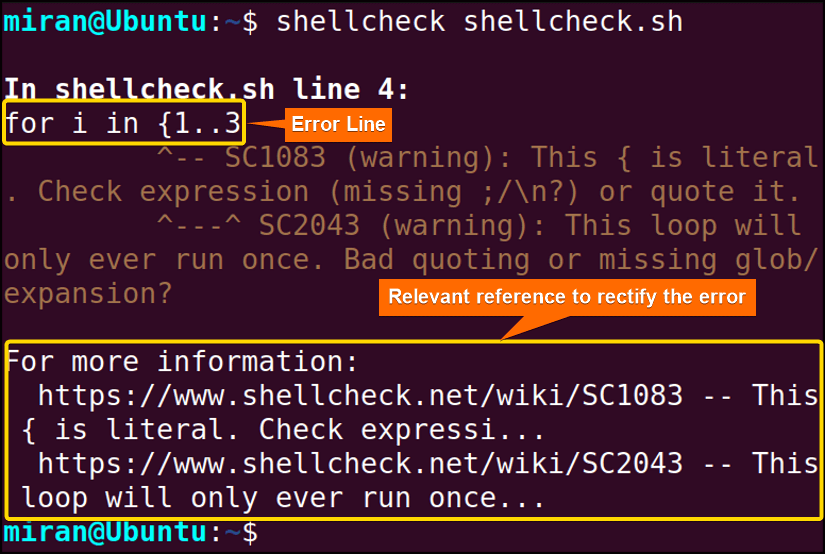 As you can see in the image given above, the ShellCheck command before the script name helps to identify the error line and subsequently provides the relevant information to fix it.
2 Different Use Cases of Debugging in Bash Scripts
So far, I have discussed various methods of bash debugging. Now, you will have some use cases of bash debugging which may help you to understand and utilize the method better.
1. Combining Debugging Options
To debug your script more effectively, you can combine various options while running your script. For instance, you can use both -u and -x options to enable the debug mode and to find the unset variable. Here is an example script and result displayed below:
#!/bin/bash

#assigning variable value
num1=5
num2=3

sum=$((num1+nu2))

echo "The sum of the given $num1 and $num2 is $sum"
The Bash script starts by assigning values to variables num1 and num2 (5 and 3, respectively). It then calculates their sum and prints the result using an echo statement. The shebang line at the beginning (#!/bin/bash) specifies Bash as the interpreter. However, there is an unbound variable nu2 exists instead of num2 in sum=$((num1+nu2)) line.
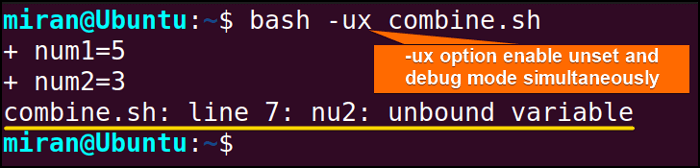 As you can see in the image given above, the -x option enables the debug mode but the code stops its execution once it finds an unbound variable with the -u option.
2. Redirecting the Debug Output to a Separate File
In the previous section, you learned how to combine multiple debug options in your bash script. In this part of the discussion, you will learn how to direct your debug output in a separate file. This way, you can keep your error track and work on it at your convenient time later.
To learn how to redirect the debug output in a file, you can follow the script given below:
#!/bin/bash

# Redirect debug output to a log file
exec 5> debug.log

# Set up debug options
PS4='$LINENO: '
BASH_XTRACEFD="5"

# Read user input
read -p "Enter the input: " user_input

# Rename variables for clarity
zero_value=0

# Check if the input is a positive number
if [ "$user_input" -gt "$zero_value" ]; then
  echo "Positive number entered."
else
  echo "The input value is not positive."
fi
This Bash script begins with the shebang line (#!/bin/bash) indicating the use of the Bash shell. It redirects the debug output to a log file (debug.log) using the exec command (e.g., exec 5> debug.log). The script configures debug options with PS4='$LINENO: ' and BASH_XTRACEFD="5", enhancing line-by-line debugging.
User input is obtained with the read command, prompting the user to enter a value. The script then renames the variable zero_value to enhance code clarity.
The main logic checks whether the user input is a positive number. If the condition [ "$user_input" -gt "$zero_value" ] is true, it echoes “Positive number entered”; otherwise, it indicates that the input is not positive.
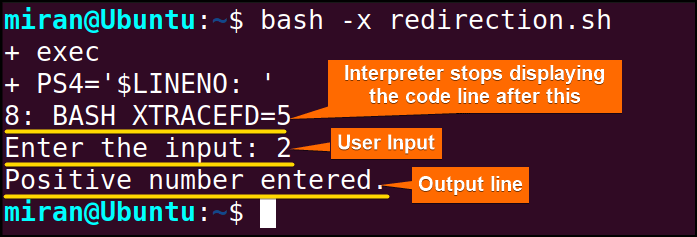
As you see, the -x option used in the command line helps to enable the debug mode and the exec command successfully redirects the debug output to a separate file. The debug output in debug.log will be like for this script as given below:

Conclusion
In conclusion, learning Bash debugging is an indispensable skill for scriptwriters and system administrators alike. The ability to efficiently identify and rectify errors, optimize performance, and gain insights into script execution flow can significantly enhance the reliability and effectiveness of Bash scripts. This article has provided you with some common methods to debug the script effectively. However, if you have any questions or queries related to this article, feel free to comment below.
People Also Ask
What is debugging in bash?
Debugging in Bash refers to the process of identifying, isolating, and fixing issues or errors in Bash scripts. It involves various techniques and tools to understand the script’s execution flow, inspect variables such as using echo statements to print variable values, enabling debug mode with set –x or set -o xtrace to trace command execution, utilizing error-handling options like set -e or set -o errexit, and employing tools like ShellCheck for static analysis.
How to debug a shell script?
To enable debugging mode, use either set -x at the beginning of your script or call the -x option along with the script name. This prints each command and its arguments to the standard error output before executing them. For instance:
#!/bin/bash
set -x
# Your script code goes here
As an alternate solution,
bash -x script_name.shHere bash script script_name.sh is executed with the -x option to enable the debug mode. In this case, you do not need to write the set -x command in your script.
How to debug specific parts of a script?
To debug specific parts of a script, you can use the set -x command, which enables debugging and set +x, which disables debugging. Place the set -x before the section you want to debug and set +x after that section. This will print each command and its arguments to the standard error output as they are executed.
What is a trap in bash?
In Bash, a trap is a built-in command that allows you to specify actions to be taken when signals are received by the script or shell. Signals are notifications sent to a process, often triggered by external events or by other processes. The trap command enables you to define custom actions, such as handling errors or performing cleanup tasks, in response to specific signals. Commonly used signals include SIGTERM (termination), SIGINT (interrupt), and SIGHUP (hang-up). For example, you can use trap ‘cleanup_function’ EXIT to ensure that a specific function (cleanup_function) is executed when the script exits. This helps in maintaining script integrity and handling unexpected scenarios gracefully.
What is a Bash error?
In Bash, an error refers to an unexpected or undesired behaviour that occurs during the execution of a script or command. Bash errors can manifest in various forms, such as syntax errors, runtime errors, or logical errors. Syntax errors occur when the script violates the rules of the Bash language, preventing successful parsing and execution. Runtime errors occur during script execution and can result from issues like undefined variables, incorrect command usage, or unexpected conditions. Logical errors are more subtle and involve mistakes in the script’s logic, leading to unintended outcomes.
Related Articles
- How to Activate Debug Mode in Bash Script? [3 Methods]
- How to Debug Bash Script with “set” Command? [3 Cases]
- How to Debug Bash Script with “ShellCheck” Command?
<< Go Back to Bash Error Handling and Debugging | Bash Scripting Tutorial
FUNDAMENTALS A Complete Guide for Beginners


