The ‘read’ command in Linux is a built-in tool often used in Bash scripts to read user input. It takes in user input from the terminal and passes it on to the variables in the script. In the process, the command makes your Bash scripts more interactive and dynamic.
In this article, you will learn the characteristics and applications of the read command in Linux with 8 practical examples.
Syntax of “read” Command
The basic syntax of the read command is as follows:
read [-options] [name...]The [options] modify how the read command works. Common ones are ‘-p’ for prompts, ‘-t’ for timeouts, and ‘-a’ for arrays. Whereas, name is the variable where user input is saved. If there are multiple names, each word in the input line goes to a variable.
Options of “read” Command
The read command in Linux offers various options that provide greater flexibility and control when handling input. You can read all about them from the manual page using:
man readHere is a list of the top read options:
| Option | Description |
|---|---|
| -p (prompt) | Shows the specified prompts before input reading. |
| -r | Stops backslashes from behaving like escape characters. |
| -a (array) | Reads input as an array. |
| -e | Enables line editing using the readline library. |
| -n (count) | Reads the provided number of characters only. |
| -s | Makes the password prompts silent. |
| -t (timeout) | Sets timeout for user input. |
How to Use “read” Command in Linux
To apply and test the read command, follow the below steps:
-
- Open the terminal.
- Type this command and press ENTER:
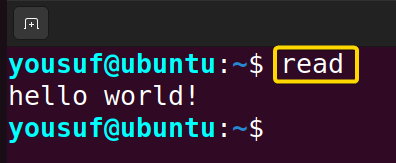
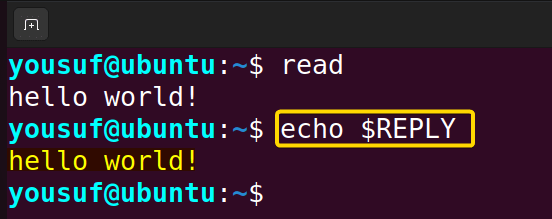
readThe prompt lets the user enter input. - Write a sentence and press ENTER again.

- Use the echo command to display your message:
echo $REPLY Here, the REPLY variable stored the user input of the read command.
 Here, the REPLY variable stored the user input of the read command.
8 Examples on Applying “read” Command in Linux
Let’s apply the read command to some real-life examples:
1. Reading User Input
To read user input from the prompt, use the read command followed by a variable name. However, you can use -p option to display a prompt message while reading user input.
You can store the user input in a single or multiple variables depending on the size of your input.
Here are two examples:
A. Storing User Input in a Single Variable
To store the user input into a single variable, use only a single variable within the read command. For example, read name will store the user input into the name variable.
Run the below command on the terminal to read user input and store it in a single variable:
read -p 'Enter your name: ' nameNow, check the value stored in the name variable by echo command:
echo $name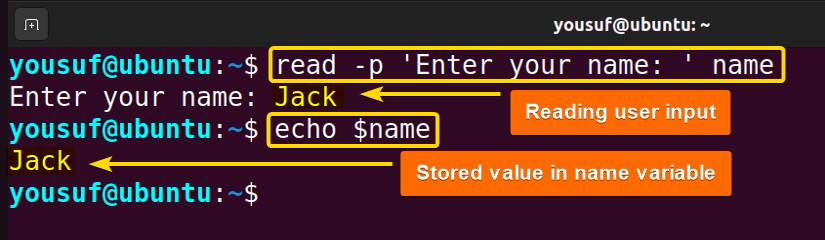
Here, the command asks the user to enter the user’s name and stores the input in the specified ‘name’ variable.
B. Storing User Input in Multiple Variables
To store the user input in multiple variables, use the read command followed by variable names separated by space. For example, read fName lName will store the user’s first and last name in the fName and lName variables respectively.
Run the command below on the terminal to read user inputs and store them in multiple variables:
read -p 'Enter first & last name:' fName lNameThen, use the echo command to check the value stored in the variables:
echo $fName $lName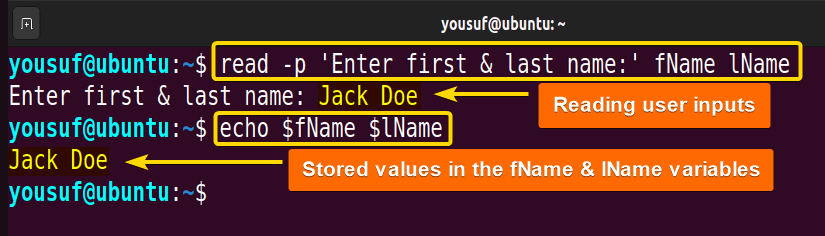 Now, the user can store the first and last names in fName and lName variables.
2. Reading into Array
To read user input as an array, use the read -a command with an array name. Instead of using multiple individual variables for a string, the read command with the -a option saves the inputs in an array based on whitespace. This is particularly useful for reading multiple inputs and storing them separately.
Here is the command to read input into an array:
read -a colorsNow, retrieve the stored values using the below commands:
echo ${colors[0]}
echo ${colors[1]}
echo ${colors[2]}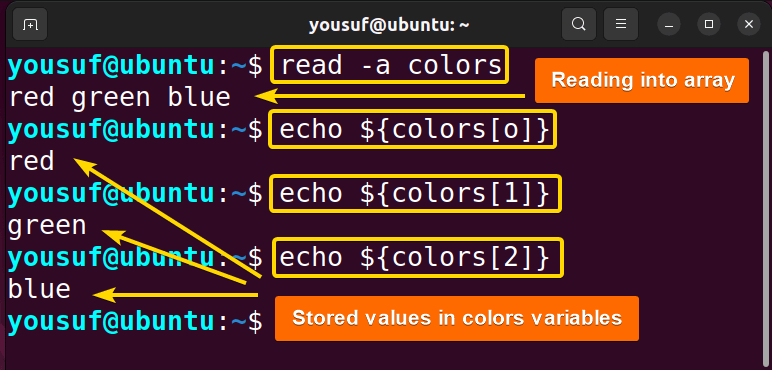 As a result, the command reads the elements red green & blue into an array named colors.
3. Reading Password
To read sensitive texts like passwords from prompts, you can use the read command with the --silent or -s option. While entering sensitive information, the read -s command accepts the user input without displaying it on the screen.
Run the below command on the terminal to secure your sensitive data while reading:
read -s password After that, use the echo command to check if the hidden password is correct:
echo $password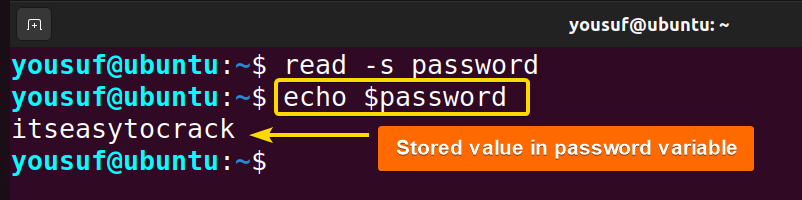 Hence, the read command with the
 -s option makes the user input silent and invisible while reading it.
4. Reading from File
To read data from a file, you can use the read command along with the while loop. For example, to extract the data from a file named states.txt, run the below command:
While IFS= read -r line; do echo "\$$line"; done < states.txt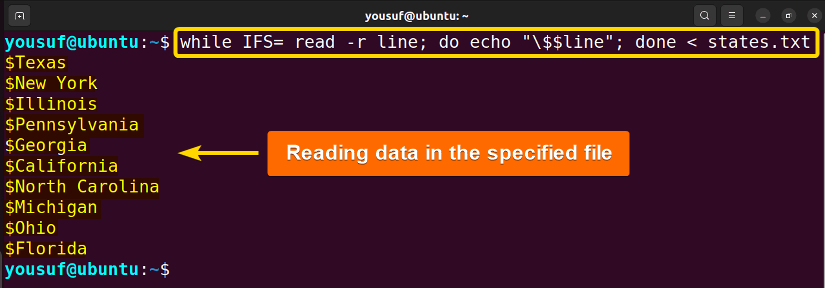
This command checks the contents of the states.txt file one line at a time and prints out each line. The -r option stops backslashes from appearing as escape characters.
5. Reading Limited Number of Characters
To read only the provided number of characters from a specified user input, the read command provides -n and -N options.
A. Using -n Option
The read command with the -n option specifies the maximum number of characters to read. It is used to limit the input to a specific length. For example:
read -n 5 foodsThis command will read up to 5 characters into the variable named “foods”.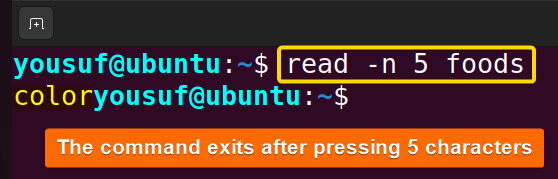 Press ENTER after one character to end the command before reaching the character limit. Otherwise, the command stops taking input automatically after the specified number of characters.
B. Using -N Option
The read command with the -N option specifies the maximum number of bytes to read. Generally, –N returns exactly N characters unless there is a timeout or EOF. In this case, the line separator is no longer necessary. For example:
read -N 11 variable_nameThis command will read up to 11 bytes into the variable named “variable_name”.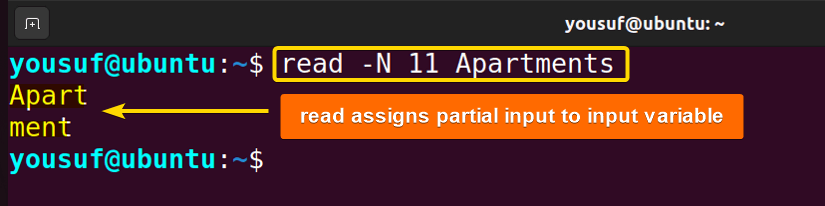
As you can see, it doesn’t break the input down into words anymore because you want to assign exactly 11 characters to the variable named Apartments. If there’s a timeout, the read command assigns a partial input to the variable.
6. Setting a Timeout for Input
To set a timeout for input, use the read command with -t option that sets a time limit. Here is an example to set a timeout for input:
read -t 2 response As a result, the read command receives any input within 2 seconds.
Note: If no input is received during this period, the command exits automatically.
7. Reading Until the Specified Delimiter Found
To read until a specified delimiter is encountered, use the read -d command followed by the delimiter enclosed within "". In the below code, the -d option lets the read command continue reading input until it finds a colon byte (:).
read -d ":" input In this case, the command reads till a colon (:) appears.
8. Providing an Initial Value for Input
To assign the input an editable initial value, use the read command with -i option. Run the below command to set an initial value to name:
read -i "default" -p "Enter your name: " nameNow, use the echo command to display the initial value:
echo "Hello ${name: -default}"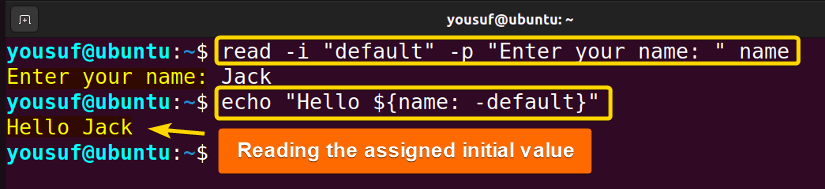
The command prompts the user to input their name, with “default” as the default value. After input, it greets the user with “Hello” followed by their name or “default” if you provide no name.
Advanced Uses of “read” Command
The read command is versatile and highly customizable. Consequently, you can use the read command for your advanced functionalities. Here are some advanced uses:
1. Piping Information to “read” Command
To pipe information to the read command, use a combination of commands or methods that generate output and pipe it into read. To immediately process your data, use echo to output data and then use read to receive and parse it. For example:
echo "hello there!" | (read a b; echo $a; echo $b)
The command echoes the input and pipes it into a subshell. In the subshell, it reads the input into the specified variables a and b, then echoes a and b.
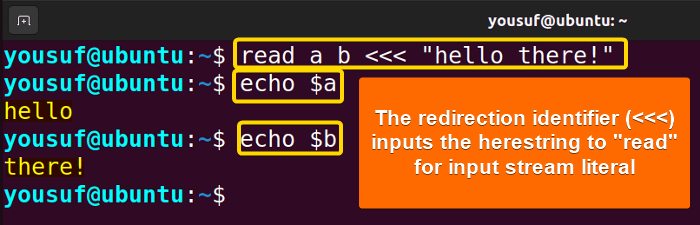
2. Using Heredoc Notation to Input Text into “read”
Heredoc notation allows you to provide multiple lines of input without needing to store them in a file, making your scripts more concise and readable.
To use Heredoc notation to input into read, follow the below steps:
- Write this command and press ENTER:
read a b <<< "hello there!" - Now, use the
echocommand to these specified variables:echo $a echo $b
The read command reads two variables (a and b) from a given string using a here-string (<<<). Then, echo commands print the values of a and b variables to the console.
3. Escaping Characters and Backslashes
To escape characters and backlashes in the input, use the read command. Typically, the read command allows you to split large inputs into multiple lines using backlashes. For example:
read
hello \
> there \
> !
As you can see, the read command stores the input in the $REPLY variable & pressing ENTER after the backlashes do not end the command.
Now, print the output using the echo command:
echo $REPLY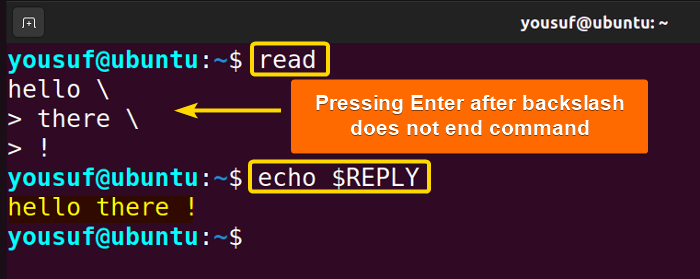
Thus, the echo command prints its content without preserving the line breaks entered during input.
However, you can escape the backlash using -r option of the read command. The -r option prevents backlashes from acting as escape characters. It is useful for reading file paths and where your backslash has a meaning.
Run the below command:
read -r <<< "hello\there!"; echo $REPLY
The command reads the input string into the variable $REPLY, ignoring any backslashes as escape characters. Then, it echoes the content of the variable $REPLY.
Conclusion
In conclusion, you have covered the definition, characteristics, and practical examples of the read command in Linux. The read command is essential for managing user input and reading file content effectively. With its various options, it can do more than just basic input; it can set timeouts, show prompts, and even read into arrays. This versatility makes the read command important for shell scripting.
People Also Ask
How to read a file in Linux command?
To read a file in Linux command, you can use commands like cat, less, or more. For example, you can use cat followed by the file name to display the entire content of a file in the terminal.
What is read-only command in Linux?
A read-only command in Linux is a command that prevents any modifications to files or directories specified as arguments. It allows users to view the contents of files or directories without the risk of accidentally changing them.
What is the difference between read and read-only commands?
The read command in Linux is used to read from standard input or take user input. Alternatively, the read-only command allows you to switch between the active file’s read-only and write-only states. There won’t be any way for you to alter the file if the read-only status is set. The syntax of the read command is: read [-options] [name...]. And, the syntax of the read-only command is: chmod a=r file_name
What does ‘read -p’ do in a Linux shell script?
The “read -p” command in a Linux shell script prompts the user with a message specified after the “-p” option. It then waits for the user to input data from the keyboard.
How to use the read command in Bash?
To use the read command in Bash, you typically specify the command followed by the name of the variable where you want to store the input. For example: read variable_name command will prompt the user to input data, which will then be stored in the variable named ‘variable_name’.
What if the number of arguments provided is more than the number of variable in read command?
If the number of arguments provided is more than the number of variables in the read command, the remaining inputs get automatically assigned to the last or final arguments. For example, run the read -p “Enter your name:” fname lname command to read multiple user inputs. Here, 2 variables are specified. Now, enter 3 user inputs: Jack B. Doe. After that, again run this command to view the input assigned in the last variable name: echo $lname. The output will be B. Doe which indicates the last variable had the extra inputs.
FUNDAMENTALS A Complete Guide for Beginners