Neovim is a useful, extensible text editor in Linux that continues the legacy of the text editor Vim. It offers handy features while maintaining compatibility with the Vim editor. This article briefly demonstrates the essentials you need to know about Neovim: its background, installation process, most common plugins, and so on. So let’s explore everything about the Neovim!
What is Neovim in Linux?
Neovim, a fork of Vim (Vi improved), is designed to enhance the capabilities of the original Vim editor. By default, it is a text editor, however, upon specific configuration, it can also behave like an IDE.
Use of Neovim
Neovim is normally used as a text editor. Apart from this, you can use Neovim for writing and editing code efficiently. For this reason, Neovim accepts multiple useful plugins for customizing the editing environment according to your preferences. Also, you can browse and choose files within the built-in terminal emulator without exiting the text editor.
Neovim helps you with code completion and error checking for languages like CSS, JavaScript etc. It also integrates with version control systems like git, allowing you to manage your code directly within Neovim.
Key Features of Neovim
Neovim offers a wide range of features to give you a smooth user experience. These include:
- Extensible API: Neovim’s API allows extensions in any language. Developers can tailor this API to their specific needs.
- Remote Plugins: Neovim’s remote plugins allow you to use any programming language to extend Neovim without making changes to Neovim itself. These plugins run as co-processes.
- Job-Control: Job control enables multitasking in Neovim. Scripts can start and manage several processes while you continue using Neovim.
Apart from these features, Neovim also offers a great parsing engine, LSP framework, terminal emulator, XDG base directories, etc. to ease your tasks.
Modes in Neovim
Neovim has 7 basic modes. These modes are designed for different functionalities. Let’s take a look at the modes of Neovim:
- Normal Mode: This is the default mode when you open Neovim. In this mode, you can easily navigate within a file and execute commands. To return to Normal mode from any other mode, you need to press the
ESCkey. - Insert Mode: This is the mode where you can insert, delete, or modify the contents of a text file. To enable the insert mode, simply press
i. When you switch Insert Mode, the cursor turns to a line from a square. - Command-line Mode: In this mode, you can use commands to edit the file. To get into the command mode from the Normal mode, simply press :. After that, you can enter the command you want to execute. Finally, leave a space and hit the
ENTERkey to execute the command. - Visual Mode: This is the mode for selecting your text. To switch from Normal mode to Visual mode, you can press
v. This enables character-wise selection. The visual mode also offers other types of selections. For example, pressingVenables line-wise selection, and pressingCTRL+Venables block-wise selection. - Select Mode: The Select mode is similar to the Visual mode, however, it differs in the acceptance of some commands. It has close similarity with the selection mode in Microsoft Word too. When you start typing a printable character, it deletes the selection and starts the Insert mode. To enter into the Select mode from the Normal mode, you can press
gh. - Ex Mode: The Ex mode is similar to the Command-line mode. The difference between them is after entering a command, you remain still in the Ex mode. This is especially useful when you’re executing more complex and less interactive commands. To enter into the Ex mode from the Normal mode, you need to press
gQ. - Terminal Mode: To use a terminal emulator within the Neovim environment, you can switch to the Terminal mode. To switch to Terminal mode from the Normal mode, you can type
:terminal. And to start sending input to the terminal, you can usei.
Apart from these seven basic modes, Neovim has 6 additional modes. They are Operator-pending mode, Replace mode, Virtual Replace mode, Insert Normal mode, Insert Visual mode and Insert Select mode.
Installation of Neovim in Linux
You can install Neovim in several ways, like through a download, a package, or from the source. Let’s explore the installation process with the packages.
You’ll find Neovim in the repositories of a wide range of Linux distributions. To Install Neovim, in Debian-based Linux distributions like Ubuntu, type the following command in the terminal and hit ENTER:
sudo apt-get install neovim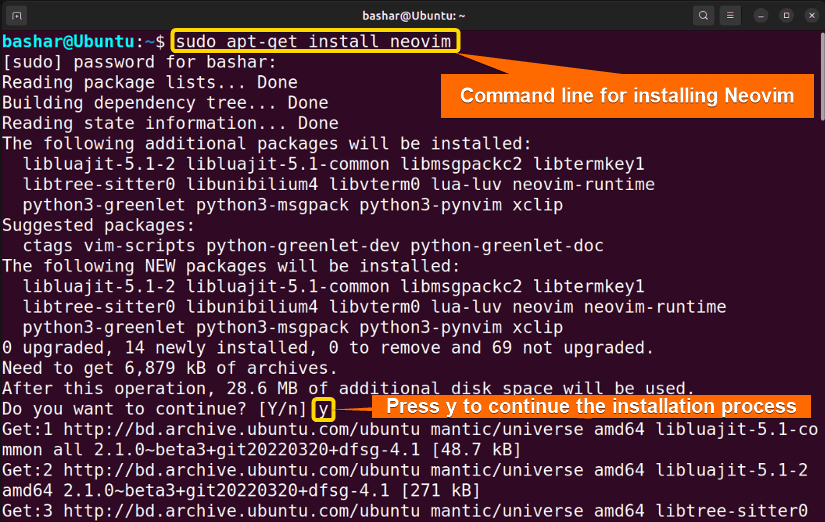
The above image shows the installation process of Neovim.
sudo yum install neovimNeovim User Guide
Neovim offers great flexibility to create or edit text files. Here are the essentials you should know while using Neovim:
How to Create / Open a Text File in Neovim
To open or write a file using Neovim, type nvim followed by the file name. For example, type the following command to write a file named Sample.txt:
nvim Sample.txt00 creating a file using neovim
From the above image, you can see that the Sample.txt file has been created.
How to Write in a Text File
Now to write anything in this file, press the i button to enable insert mode and start typing the text. For instance, let’s write the following text in Neovim:
Welcome to the Neovim user guide.
This is a sample text.
Follow along for more!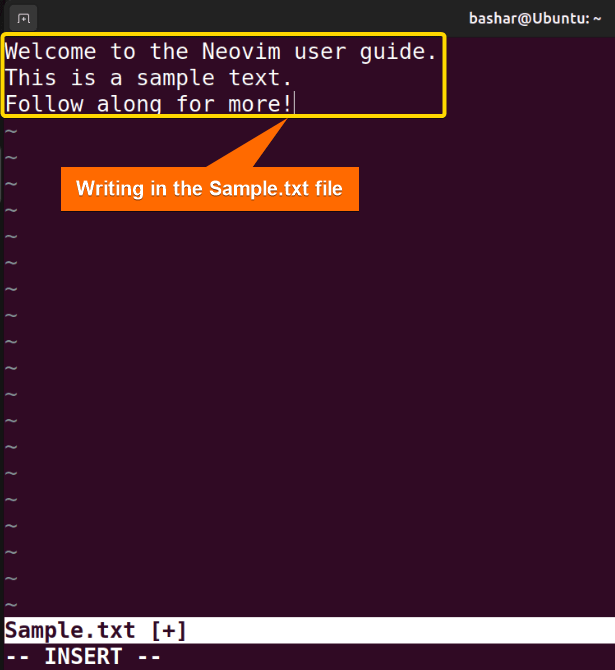
The above image shows the writing process in the Sample.txt file.
Saving a Text File in Neovim
After typing the text, hit the ESC key to return to Normal mode. To enable the command line mode, hit the : button. To save the “Sample.txt” file, type the following command and hit ENTER:
:w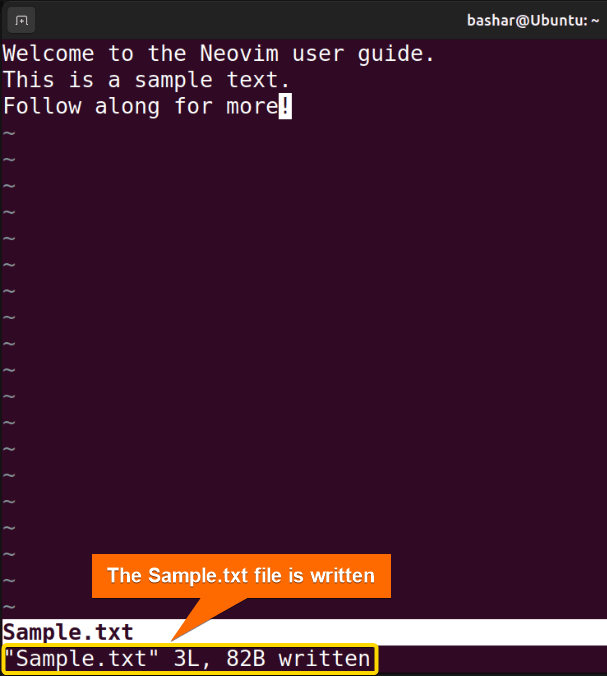
From the above image, you can see the message about saving the file. If you want to change the file name, you can do that too. For example, to change the filename to “EditedSample.txt”, type the following command and hit ENTER:
:w EditedSample.txtThis changes the file name to EditedSample.txt.
Navigating a Text File in Neovim
You can navigate through a text file in Neovim using only the keyboard. For example, to set the line number at the start of each new line, type the following command:
:set number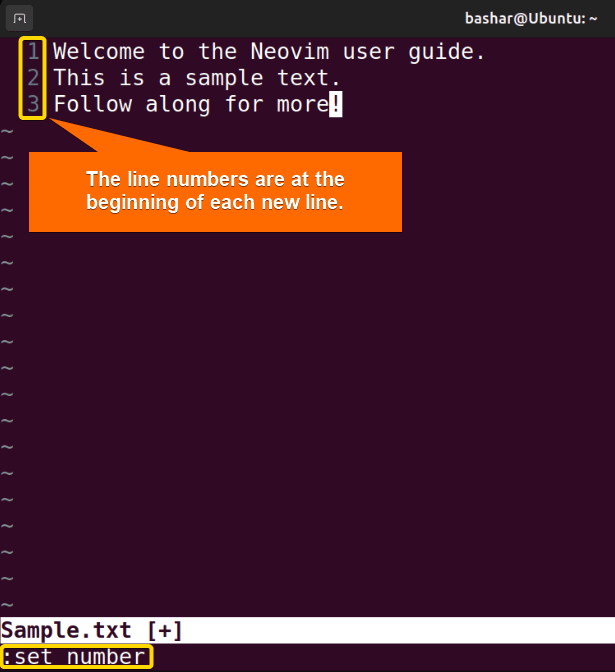
The above image shows the line numbers at the beginning of each new line.
Now you can type the command to navigate to a specific line. For instance, to navigate to line 2, type the following command:
:2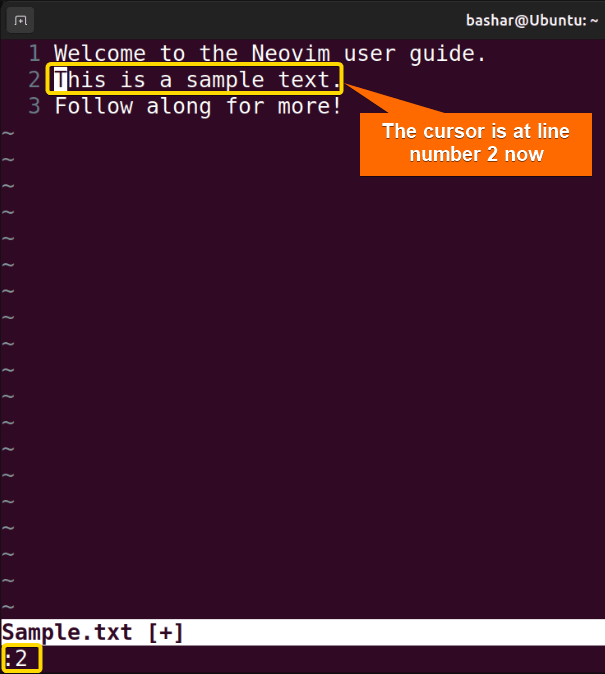
The above image shows that the cursor is now at line 2.
NOTE: To navigate to the last line of a file, use the following command:
:$How to Copy & Paste in a Neovim Text File
To copy a portion of the text file in Neovim, select that portion first in Normal mode. Then press the y button to copy the selected text to the clipboard. After that, navigate to the line where you want to paste the text you have just copied. Finally, press p to paste the copied text.

From the above image, you can see, the text in line 2 is copied and pasted in line 4.
NOTE: To cut and paste a text, you need to first select the text, press the dd key combination to cut the text, go to the location where you want to paste it and finally press p to paste the text.
Deleting Contents from a Text File
To delete a specific line from a text in Neovim, go to that specific line in Normal mode. Then type the following command to delete that line:
:dAlternatively, using the key combination dd will delete the current line.
Let’s delete line 4 which was just copied and pasted.
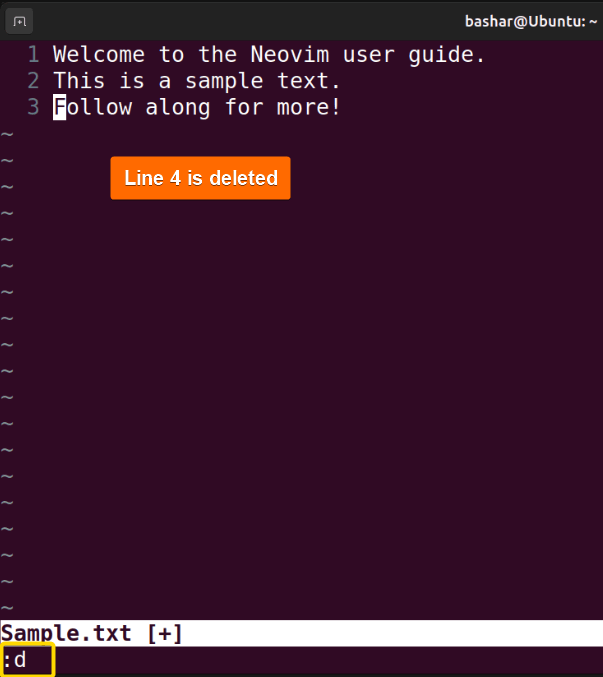
The above image shows that line 4 is deleted.
NOTE: To delete a specific number of lines after the current line, you can mention the number of lines you want to delete. For example, if you’re currently in a certain line of a text, and want to delete the next 3 lines by using a single command, you can use the 3dd combination to do that.
Undo a Change
To undo a change you’ve made to the text, simply press the key u. For example, to undo the deletion action that we’ve performed on line 4, press the key u.

u key repeatedly to do so.
Highlighting the Text
To highlight a text in Neovim, first press the v button. This will enable the visual mode. Then you can select the text you want to highlight by using the arrow keys.
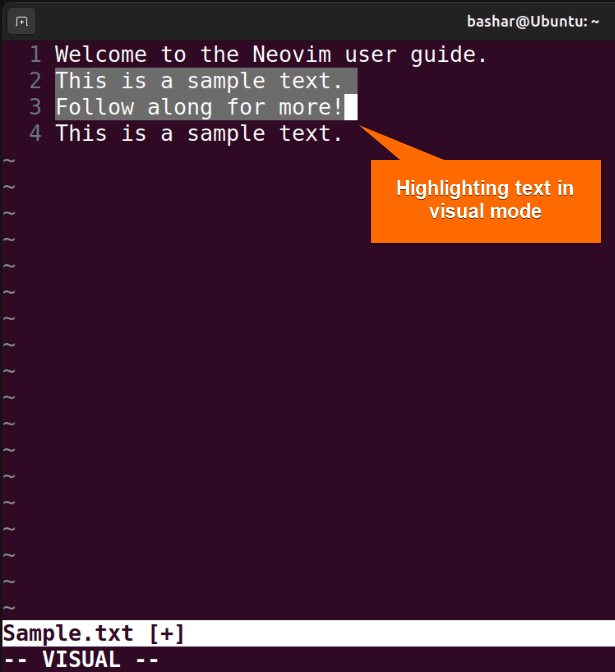
The image above shows that lines 2 and 3 are highlighted in the text.
Searching a Text File in Neovim
To search for a string in a text file using Neovim, you can use / (Backslash) followed by the string you’re looking for in Normal mode. For example, to search for the string “sample” in our Sample.txt file, you can use the following syntax:
/sample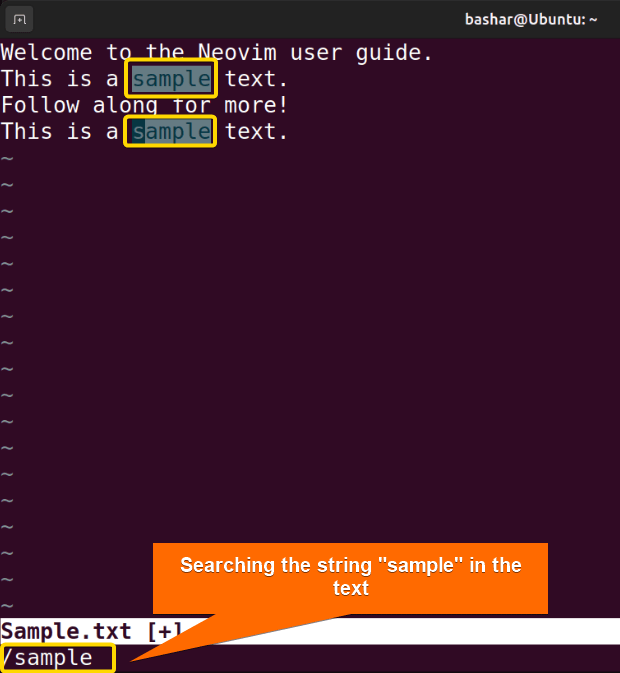
In the above image, you can see the text that matches our search results are highlighted.
NOTE: While /string searches for occurrences of string from the current cursor position to the end of the file, ?string searches to the beginning of the file. Also, if multiple matches are found in the text, you can use n and SHIFT+n to move to the next match and the previous one, respectively.
How to Save & Exit a Neovim Text File
To save the changes to the text file or even to exit the Neovim interface without saving, first of all, you need to be in Normal mode. Press the ESC button to switch to Normal mode.
Now you have several options for exiting the Neovim interface. To save the changes without exiting the Neovim interface, type the :w key pattern and hit ENTER.
To save the file and exit the Neovim interface simultaneously, type the :wq keybindings and hit ENTER.
To exit the file without saving and exit the Neovim interface as well, use the :q! key combination and press the ENTER key.
Useful Neovim Plugins
One of the significant aspects of Neovim is that it supports a wide range of useful plugins. Let’s learn about some frequently used plugins:
A. Plugin Manager: Packer
Packer is a useful plugin manager for Neovim. This allows you to install and manage your required plugins easily. You can define which plugins you need to install and Packer will take care of the dependencies. Also, it is extensible, so you can add custom functionalities according to your requirements. In addition, Packer uses native packages and supports Luarockes dependencies.
NOTE: You can also use the lazy or poker package manager for managing packages. Especially the lazy package manager is one of the most stable package managers.
B. Telescope
To search and navigate files, buffers, etc you can use the Telescope plugin. Telescope is an efficient fuzzy finder and file picker for Neovim. It’s a handy tool especially if you’re working with a large project and need to navigate your code efficiently.
C. LazyVim
To customize and extend your configuration, you can use the lazyVim plugin. LazyVim is a Neovim setup that offers both the flexibility to create your config or to use a pre-configured setup right away. You can use the LazyVim to transform your Neovim interface into a customized IDE.
D. Tree-sitter
Tree-sitter is a parser-generator tool. It also serves as an incremental parsing library. It can generate a working syntax tree for a source file and update it when the file is updated.
Keyboard Shortcuts for Neovim
Here’s an overview of some keyboard shortcuts from the Neovim website that you should know:
1. In Normal mode
| Key | Task |
|---|---|
| h | Moves the cursor to the left |
| l | Moves the cursor to the right |
| k | Moves the cursor to the up |
| j | Moves the cursor to the down |
| 0 | Moves to the start of a line |
| $ | Moves to the end of a line |
| w | Moves forward by word |
| b | Moves backwards by word |
| gg | Goes to the top of the file |
| G | Goes to the bottom of the file |
| dd | Deletes a line |
| yy | Copies a line |
| p | Pastes a line |
2. Insert Mode
| Key | Task |
|---|---|
| i | Enters insert mode |
| CTRL-E | Inserts the character from below the cursor |
| CTRL-H or BS | Deletes the character before the cursor |
| CTRL-W | Deletes word before the cursor |
| CTRL-O | Executes one command in Normal mode and returns to insert mode |
3. Visual Mode
| Key | Task |
|---|---|
| v | Starts highlighting characters |
| V | Starts highlighting linewise |
| CTRL-V | Starts highlighting blockwise |
| aw | Selects a word |
| as | Selects a sentence |
4. Command-line Mode
| Key | Task |
|---|---|
| :w | Writes to the current file |
| :wq | Writes the current file and exits |
| :xit | Like “:wq” but writes only when changes have been made |
| / | Searches forward |
| ? | Searches backwards |
| u | Undo |
| CTRL-r | Redo |
Neovim Limitations
Neovim is a wonderful text editor. However, there exist some issues which you may consider while using Neovim. For example, configuring Neovim gives you customization freedom, but it poses a distraction too. Also, sometimes managing the dependencies of the plugins may lead to dependency issues. In addition, with a large number of plugins, you may experience slow performance issues as well.
Conclusion
Overall aspects of Neovim are demonstrated in this article. Which includes the basic use of Neovim, its different modes, and some useful plugins. Follow the article and try the features side by side to get a first-hand experience of Neovim. Hopefully, this article will help you easily understand the basics of Neovim.
People Also Ask
What is Neovim in Linux?
Neovim is a text editor that is used in Linux distributions. This is a hyperextensible Vim-based text editor that offers better extensibility.
What is Neovim used for?
Neovim is designed to be used for creating or editing text. However, with specific configurations and plugins, this is also useful for extensive coding.
Is Neovim slower than Vim?
Neovim is faster than Vim because it’s tailored to include only essential features, resulting in around 30% less code than Vim. This lightweight design contributes to its speed. However, you can still enhance Neovim by installing plugins for further customization.
Can I use my existing Vim plugins with Neovim?
Yes, you can use your existing vim plugins with Neovim Most Vim plugins work smoothly in Neovim too. However, in some cases, you may need to update or even find alternatives to some plugins. So checking the plugin’s documentation is recommended.
FUNDAMENTALS A Complete Guide for Beginners


